


cambridge
-
Posts
298 -
Joined
-
Last visited
Content Type
Events
Profiles
Forums
Media Demo
Posts posted by cambridge
-
-
-
So, this is how it actually looks:

all the parts are made out of rubber, and when unpainted are of a plain creamy color. The snaps are not that good and you need to sand them in order to fit properly but being made of rubber sanding them is not a really clean job. Ribs are all bent, and i'm probably going to cut them and redo them using milliput and metal wire.
i'll start with the skull. Removing all seam lines with a dremel. The teeth are out of proportion and since sending them down would not produce a good result i'll just cut them off and use green stuff to replace them.
-
 12
12
-
-
this is an odd one, but i'm willing to give it a try. I've found this on the chinese ebay and considering how cheap it was ( around 10 € ) i wanted to give it a try. It's kinda more a toy than a model but i figured it out it could become a nice frame to work with and with a little bit of love and some milliput something interesting might came out of it. This is how it looks when assembled:
this is how it looks when it's disassembled
-
4
-
-
the weathering is superb
-
1
-
 1
1
-
-
how many of them they sell? i mean that thing is huge.
-
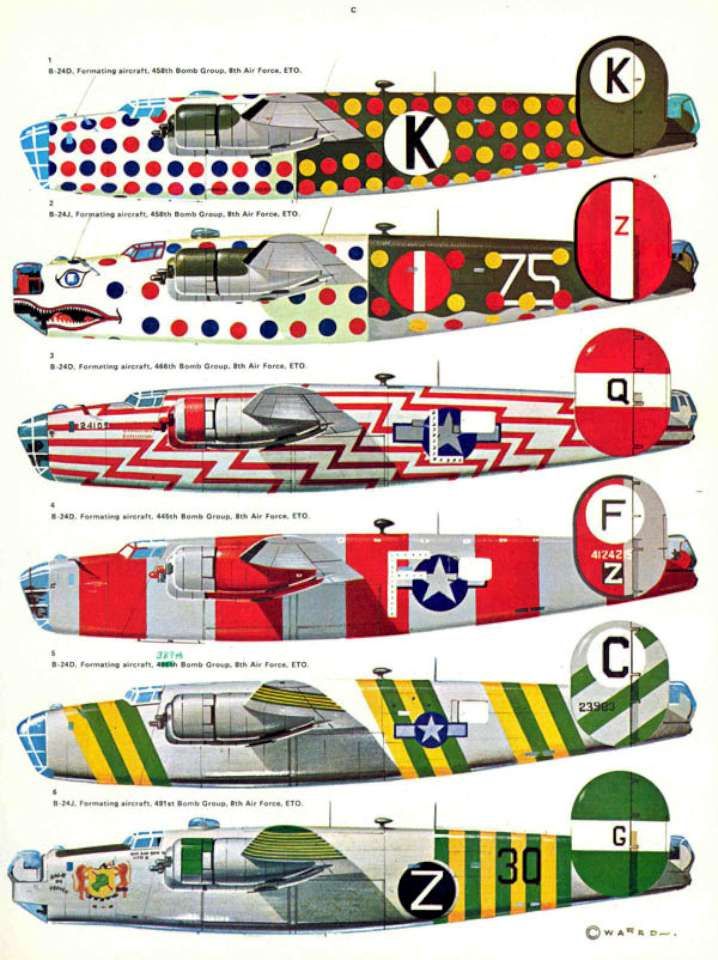
what about a B-24 assembly ships? they're definitely the most interesting and challenging camouflages to make. They were used to help bomber squadrons form up, therefore painted with very bright and visible color schemes.
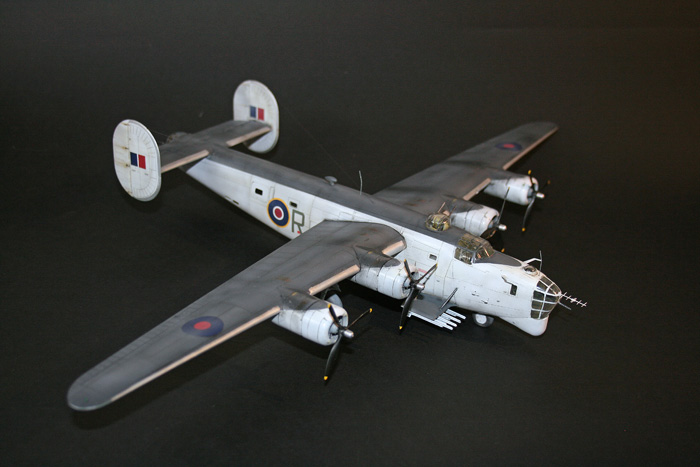
or b-24 coastal command used to patrol british coasts, they had very elegans camos and look very good on a model
-
2
-
1
-
-
don't really know if this was better posted here or in diorama section.
Introduction
Tank is Panther Ausf D 521 that fought in the battle of Kursk.
I wanted to make a battle damaged tank, but i also did want to make a properly built panther, but i didn't want to build two of them.
so the solution i came up with was to build this vignette, with the tank seen as pristine from one side and as disabled from the other, and two russian tankers posing for a picture with the tank they've killed to provide some contest.
the damage is based on pictures of damaged panther i've found online.
the kit
the kit came togheter pretty well apart from the driver and codriver hatches plate that i had to cut and shorten cause it wasn't fitting by 3 good millimeters, that's kinda weird.
all in all the kit provide nice detail. it has plastic single link tracks. No transparent parts and no photoetched part, is a basic kit. Decals are good quality. It's one of the cheapest panthers around, should be available around 20€
modifications
no extra part used apart from the figurines ( Miniart 35027 ). Custom built the camera held by one of the figurines. Custom built the engine that is not part of the kit. Drilled the holes for penetrations, custom made some minor details like smoke grenade wires, hatches springs, skirts and mudguards. Redone Towing cable using electric wire. Custom made engine deck grills using a mosquito net. The base is just a painted piece of polistirene.

-
10
-
-
12 hours ago, Winenut said:
I was going to ask the same question.....was this the condition of the aircraft at the time of the attack on pearl harbour?
Or was this the aircraft at some time later in its career?
hell if i know. as i said those are the only two known pictures of fuchida's plane ( and it seems like they come from a video if u ask me ). they're usually presented as picture from the pearl harbor attack, but as far as i know the thing is still disputed. that's kinda crazy the amount of information already lost on an historical moment that happened so relatively recently. no other picture taken than these two, no people able to confirm or deny, no reliable accounts
-
12 hours ago, Uncle Pete said:
Looks like the Japanese didn't have much in the way of a maintenance budget. A lick of paint on Lt. Fuchida's plane might have brightened it up a bit! Cracking job.
yeah they have kind of a problem with priming and sea weathering, makes it quite fun for modelling actually.
Also i'm not totally sure those picture i've shown are right from the pearl harbor attack or later pictures from the same plane flown by the same man.
They're always presented as such but i've opened a discussion before starting the kit and there are different opinions on that.
-
1
-
-
12 hours ago, Nachtwulf said:
Excellent! Well done! Were the flaps a kit option?
thank you. Yes the flaps are part of the kit. They've got plastic pins you can remove so you can place them both in extended or retracted position, thought extended looks better. Ailerons and tail surfaces are fixed on the other hand.
-
1
-
-
Nakajima B5N2 Flown By Lt Mitsuo Fuchida during Pearl Harbor attack.
The Kit is Hasegawa 09076
used the following pictures as reference
-
23
-
-
1 hour ago, Troy Smith said:
A suggestion.
Field applied Green applied over factory grey, which was not properly prepared or cleaned, possible if applied on-board or in a rush?
So the "bare metal patches" maybe just underlying grey showing though work off green?
applying green over gray would make sense, but usually a paint sticks well over another paint, so green peeling exposing gray i dont really see that happening.
but it can be that green peeled off also the gray layer exposing metal.
or maybe the upper side is more exposed to sun and rain therefore it weather quite more heavily than the underside.
i've found this video, it kinda gives an idea of a weathered b5n2, i'm still convinced it's metal showing under there.
also i've discovered a new interesting thing, apparently there was some weathering also on the half wings that were folded as you can see at the start of the video. It's like the wings had 2 different colors, what could that bee? just fading paint? gray? spare half wings from a different plane not being repainted? that's kinda weird and i kinda wanna show that in my model
-
Well i think i will use the pictures as reference, both because i like to make something with an historical verified background and cause i'd like to do some peling on this model that would certain make it more interesting that a flat freshly painted green one
so overall you think the most correct interpretation would be underside gray ( let's say tamiya XF-12 ) and overside green ( let's say tamiya xf-11 ) with the peeling revealing a bare metal skin, with no traces of primer.
how come the green would peel that much and the gray not?
-
so, in short, i'm waiting for a hasegawa 1/48 kit to arrive, and i was planning to make it in Mitsuo Fuchida Pearl Harbor color scheme.
so, couple of questions:
1 - the underside. according to hasegawa instruction sheet is silver. I've read somewhere that fuchida's plane was all silver during training ( that's why you sometime see the all silver livery depicted ) and overpainted with green for the attack. But i've seen it depicted everywhere with the underside in the usual IJN gray like you have in the zero, plus i've read somewhere akagi planes were all in gray/green camo. So wich one is correct? In the picture ( few and grainy ) it looks like underside is a different more dull color compared to the peeled part, but also the peeled part is in direct light so it could be the result of the shadows. In the pictures also the underside has no peeling at all, so it could be bare silver, but for what i know it could also be that gray paint was less subject to peeling.
2 - the weathering. there are a couple of picture supposedly showing fuchida's plane on the carrier's deck the day of the attack. What's going on there? Its paint is extremely worn. I've heard japanese planes at the end of the war suffered from peeling cause they went short of primer but here we are in 1941. So what's happening there? is that a proof that the plane was bare silver with overpainted green, therefore with no primer it just peeled quickly?
i may have some other questions as the discussion comes along but for now i'll focus on these two.
-
so it's the flat flesh paint, the one used for the skin. My problem is, i can't find a way to use it. it's like it has a thick consistency but a thin pigmentation, so even when applied undiluted it won't stick properly. and when diluted it would just flow away. i try to do coat after coat after coat but i can't ever have a proper uniform finish, both using airbrush or a brush.
expecially considering you would like to have best possible control painting tiny details with this paint, it seems impossible to me.
should i move to other brands for skin paint ( any suggestion? ) or there's some trick i don't know on how to use this particular paint?
-
 1
1
-
-
decided i didn't like the rocks, i'm in the middle of replacing the with polystyrene ones that i'm making myself. It's so odd that fake rocks may end up looking more real than actual real rocks
-
3
-
-
are they the same thing, minus the propellent?
i mean, i've used so far Tamiya spray cans, they work good but i don't have control on them and i waste so much paint.
i have an old airbrush i can use for priming, i would like to try to airbrush that. I've heard you can decant it and spray it.
So the question is, is Decanted tamiya primer the same thing as Tamiya liquid surface primer, or are these two different animals?
Do they both need lacquer thinner to be airbrushed with a 0.5 nozzle?
-
i'm starting to blend in the plane adding details like tail and wing panels and debris and adding sand over its wing, now is darker cause its wet, soaked in water and glue, but it will dry over time.
this following is just an experiment fun adding some background to a picture of the model in its current state just to see how it looks
-
6
-
-
now that you make me think about it i should give a look at the net of the flour strainer
-
i'm starting to add some detail gluing them to the base end blending them with more sand while i wait to finish the plane itself. once the sand layer is done i've retraced the sand dunes. in the end this is the effect shown in a lowlight
i've added some debris, expecially under the nose. I've added soem gears, the parachute and some panels around and started to blend them in with the sand.
i feel the sand grain is a bit too big but that's the smallest i've been able to find. I could have used pigments for that but it would have cost a fortune. i'm thinking if i should try to use a mortar to crush it and than filter it and see if i can produce thinner sand and then add another layer over this one. overall this doesn't look that bad in the wide view, but if i shoot some closeup the grains pop up completely out of scale
in the end i've got a bag of 5 kg of that sand, i think i've enough to make experiments, i just don't know what can i use to filter it, maybe some old collant or something.
-
3
-
-
a beautiful kit in some expert hands, can't wait to see the final result
-
so, i've made an even layer of sand, painted the rocks more bright and put the plane. this is still far from being complete but should just give a hint of the final result:
-
5
-
-
I'm back to work. I've redone the base, this time using Extruded polystyrene. i've used a metal ball to obtain a sand texture and glued rocks over it. Now i need to apply different layers of sands. For the sand i've used "gecko desert sand" that i've found in a pet shop and that looks very good for the project, very fine grain and a good color.
-
7
-
-
in this picture i see three 1/144 kits by BANDAI:
the guy in the middle should be HGUC RX-78-2 Revive.
is there any expert in gunpla who can tell me what kits are the guy on the left and the guy on the right?


T-Rex fossil skeleton
in Figure Work In Progress
Posted
i've been a bit busy lately, so the project has been on hold. hopefully i'll be able to pick it up again in the near future.