


Ferrata
-
Posts
115 -
Joined
-
Last visited
Recent Profile Visitors
1,102 profile views


Ferrata's Achievements
")
New Member (2/9)
908
Reputation
-
Nothing special, just done lightly with a fine brush.
-
I thought I would share with everyone my latest build, Italieri's 1/48 scale Ju 87D-5. This kit is not without its problems, and to fix all of them is probably beyond my skill level, so I chose fix some and as long as it looked like a Stuka I would not worry about the rest. It was also an excuse to add a few extras that I had been wanting to do such as exposing the engine, gun bays and undercarriage using some of the aftermarket bits I had been hording for a while. The engine turned out to be a bit more effort than I expected, this was a modified Aries unit with the kit oil cooler shortened to suit. Firewall and engine bearers were from another set and were modified and detailed to get the engine to sit level and closer to the firewall. With every build there is always one cock-up and this was no exception. After taking care to paint the internal and external frames on the canopy properly I managed to miss this on the front sliding section and paint them all as external. Oh well, it's an excuse to build another and try to get it right next time! The model was finished with Vallejo paints and weathered with a clay wash and oils. This is something I need mode practice with as I don't think the oils came out too well but, every model is a learning experience! The cluster bomb on the centre line came with the kit but the wing mounted gun pods were from the Italieri weapons set. I'm not sure how accurate this load-out would be but I have been wanting to use the gun pods on a Stuka for ages and this was the time. Enough waffle, here are the pictures. I hope you enjoy and feel free to comment/criticise.
-
Welcome to my Italieri HS 126B finished as a machine from 3. (H) 13 involved in the Balkans Campaign in 1941. The kit , I believe, is the ICM moulding and is not without a few faults. These being some vague location issues, brittle plastic (could be my ham fistedness as I snapped a couple of the struts) and the appalling fit of the top deck behind the engine. On the plus side the detail is more than enough, with plenty of build options. The only details I felt the need to add was a set of seatbelts, gunsight and altering the angle of the tail wheel. Paints were my usual Vallejo ModelAir, weathered with a combination of clay wash, oils and a final overspray of Tamiya XF-57 Buff to blend everything in and make it look a bit faded and dusty. I was surprised at the size of the thing as I was building it, bigger than a Ju-87, but quite good looking in it's own way. As ever, tips and criticism are welcome, how else do we improve? Thanks for looking.
-

Revell Phantom FGR.2 111 Squadron
Ferrata replied to Ferrata's topic in Ready for Inspection - Aircraft
Thanks Pete, it's 1/48. -
Revell Phantom FGR.2 111 Squadron
Ferrata replied to Ferrata's topic in Ready for Inspection - Aircraft
Thanks. I never thought about the crew being the US version, considering the kit's origins I should have thought of that. Schoolboy error! Hopefully it's not too obvious.🤦♂️ -
Revell Phantom FGR.2 111 Squadron
Ferrata replied to Ferrata's topic in Ready for Inspection - Aircraft
Thanks. I was basing it off this. Think I got reasonably close... -
Revell Phantom FGR.2 111 Squadron
Ferrata replied to Ferrata's topic in Ready for Inspection - Aircraft
Thanks Dr. Quack, since you've seen it up close that means a lot. I feel the same about them in the Leuchars days. -
Revell Phantom FGR.2 111 Squadron
Ferrata replied to Ferrata's topic in Ready for Inspection - Aircraft
Thanks. As stevr219 said, they come with the kit. Even so, they still need a little surgery to fit 🙂 -
Finally got round to taking a few pictures of this one after finishing it back in April! Modern jets and RAF are not my normal thing but this was an itch that needed to be scratched. I also wanted to build a machine from either 43 or 111 Squadrons, these being the ones I remember being wowed by at so many Leuchars' airshows. The kit is Revell's boxing of the 1/48 scale Hasegawa moulding which, despite its age, is still a good build. The model was built straight from the box, the only addition being a set of Sidewinders. Just for a change I also decided to add the two crew figures to give a little "life". XV416 did not have a long service life, being lost in May 1975 shortly before the Squadron moved to Leuchers. Fortunately the crew ejected safely. Despite this there are quite a few photo's of the aircraft available on the internet and I was able to use these to help with the painting and weathering, especially the underside which was particularly stained. Enough waffle here are the pictures and I hope you like. As I said, this is not my normal subject so any tips and hints are welcome and thanks for looking!
- 22 replies
-
- 67
-

-
Thanks for the kind comments gents.
-
Summer is not normally an active model building time for me but the recent damp weather has allowed me to actually finish something! In this case the Airfix 1/48 scale Spitfire Mk1. Having previously built the Hurricane and Me109 from the same stable I thought it would be nice to complete the BoB set of rivals. The kit itself was quite nicely detailed and went together easily with virtually no fit issues or filler. The only addition being a set of PE seatbelts. Paint was predominantly Vallejo Modelair with a little Tamiya acrylic here and there. For the first time I tried out the flexible masking putty when spraying the camo' and it went reasonably well with only a little touch up required - lessons learnt for next time. I decided to go with one of the kit options of a 222 Squadron machine from late August 1940 just because I liked it and I kept the weathering on the subtle side of things (I think/hope) but in keeping with how the machine would have been used. Anyway, here are the pictures and I hope you like it. Feel free to give tips and hints to improve the next one.
-
A tarmac rally version perhaps? I think they do that with the Escort RS 1800 kit.
-
Thanks for all the kind comments Gent's. And yes, those were the kit wheels/tyres. Quite a hard rubber but no seams and nice tread.
-
I have been wanting to build a Stuka in the early/pre-war markings for some time, the problem was always finding crosses of the correct size and style. I think I have managed to do that, or at least as close as I am going to get, so I can finally tick this one off the list. This is also the first time I have built the current tooling of the Airfix Stuka, my last B-1 was converted from the 1977 tooling, so I was looking forward to an easier build. The kit goes together very nicely, the only issues I found were with the number of ejection pin marks and sink marks to be filled but the fit was good. There were a few surprising omissions such as the instrument panel cover and gunsight which were easy to replace and the main bomb rack is exposed when it should be faired over but these are easy to fix. The access steps also look poor but I left alone this time. I decided to model a machine from III/StG1 as I thought it would appear on 31 August 1939, fully armed but only lightly weathered. Decals were a mix from various sources with the Hans Huckbein from Peddinghaus Decals. These were nicely printed but very thick carrier film made them difficult to apply. Anyway, enough waffle. Here are the photo's and I hope you like it.
-
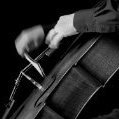
Evening All, Allow me to present my Fiat 131 Abarth in the Alitalia scheme and built from the Italieri kit. I normally build aircraft but like to indulge in the occasional race or rally car although I have to admit the last one I built must have been over 10 years ago so I think the change has done me some good. This one represents the 1979 1000 Lakes winner and had been in my stash so long the decals had cracked. The drive to dig this one out and actually build it came from a 70s theme Club group build ending in the December meeting. An email to Italieri and a few weeks later I had a fresh decal sheet and we were game on. Despite its age, the kit went together relatively easily. The only issues being the fit of the rear suspension with the exhaust and the engine to chassis being a bit vague. I added some wiring to the engine bay and seat belts from painted masking tape with buckles from the spares box. Other than that it was a straight from box build. Enough waffle from me, here are the photos and I hope you like it.
