


Ceithearn
-
Posts
104 -
Joined
-
Last visited
Content Type
Events
Profiles
Forums
Media Demo
Everything posted by Ceithearn
-
LDRG Chev Truck, SAS Jeep and vignette
Ceithearn replied to Ceithearn's topic in Work in Progress - Armour
Thanks Darby. Certainly can use those nuggets of information and experience, appreciate your input. All the best, R. -
LDRG Chev Truck, SAS Jeep and vignette
Ceithearn replied to Ceithearn's topic in Work in Progress - Armour
Thanks for the specifics on the rope Badder, will give that a try. The existing rope at first looked like it would work...wet it was a thinner diameter and not all fuzzy. Then, as it dried, it became a completely new beast all large and fuzzy like a cute caterpillar. The dios are fun to let the imagination run. All the best, R. -
LDRG Chev Truck, SAS Jeep and vignette
Ceithearn replied to Ceithearn's topic in Work in Progress - Armour
Hi Badder, Thanks for the comments. Love the SAS and desert campaign as subject matter The rope....doesn't look as bad irl but yes could use a better scale and hopefully finishing technique. Working on a new driver for the truck now. Jeep....driver is testing play in steering box after driving through that gully....perhaps a change later. Project has taken on a life's of it's own. Started as the truck build, then, while reading SAS history, thought a jeep would be good idea....the chaps needed an environment.... Dio section good idea. Would be nice to add some desert flora and fauna for colour and contrast. All the best, R. -
LDRG Chev Truck, SAS Jeep and vignette
Ceithearn replied to Ceithearn's topic in Work in Progress - Armour
Your dio is various nice Darby! Particularly like your dust covering and additions along the side of the truck. Couple questions, which product or what did u use for the dust? One of the Mig or Vallejo dust products I would imagine? Application technique? The gravel and rock, is that a purchased product or I see your garden is nearby.... Thanks, will continue to add accessories and features to mine. R. -
LDRG Chev Truck, SAS Jeep and vignette
Ceithearn replied to Ceithearn's topic in Work in Progress - Armour
Appreciate the encouragement Clive, thank you. Keeps me going R. -
LDRG Chev Truck, SAS Jeep and vignette
Ceithearn replied to Ceithearn's topic in Work in Progress - Armour
Thank you Carius. This is going to be an ongoing evolution adding, fixing pieces while carrying along with other projects. . As you know your fabulous build(s) of these has been a template for my project R. -
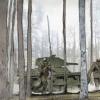
Hi Everyone, It's been a busy summer and fall. Have to mention, if you have a chance to visit, the Canada Space and Aviation Museum in Ottawa is absolutely first class. Posting these pics more as a test after moving off PB. Village Photos does seem to work quite well at the moment. Ongoing vignette/environment for the LDRG truck and SAS Jeep. Many firsts again on this project including varying degrees of filters, washes and weathering. Scratch build on the rope is cotton string with paint, wash and mud. Scale doesn't look great in the photo, not quite as bad in real life, size certainly could be better. Work is ongoing with accessories, figures and the diorama base. This project is not on par with many of the amazing builds displayed on Britmodeller but I'm enjoying the hobby and improving (hopefully) with each project. Also on the go is an AFV Wiesel, my first shot a modern vehicle. If anyone has simple ideas/projects to add to the diorama such as grasses, gravel, or other please let me know. Thanks to everyone who posts their how-to tips and helps with advice; this is a great community. Regards, Robert
- 17 replies
-
- 12
-

-
Another amazing build Carius; thx for all the pics. Question: what product(s) and tools are using to attach those tiny photo etch parts? Not a cement smear or smudge to be seen anywhere! Regards, Robert
-
Absolutely fabulous craftsmanship Cesar! R.
-
Love your project and all the photos Lloyd. As an engine guy would really enjoy putting together a hundred plus parts....almost could build the real deal....hollow out the block...pistons and rings..., Shoveling snow....fine the first couple times for a work out, after that, bring on the liquid precipitation. Cracking job, please keep posting updates. All the best, Robert
-
Hope the ventures proves rewarding for you in all ways Submariner! We are down to one local shop which I cherish. So enjoyable to go to a physical location peruse all the goodies and converse with fellow hobbyists. Good luck and please keep us updated! Regards, Robert
-
Monogram 1/8 65 corvette stingray
Ceithearn replied to kpnuts's topic in Work In Progress - Vehicles
Fabulous project K! Looking really good so far. Definitely one of the nicest body shapes ever for an auto (Imho). A small point, not sure if it matters to you (artistic flair!), but the four speed transmission that came in these cars was either a M20 Muncie or M22 "Rockcrusher" Muncie. These transmissions were/are in aluminum casing and never painted. So, if you haven't bolted it in yet, perhaps an aluminum colour? The bell housing is aluminum too, usually painted Chev orange as you have done. Exception to this would be an after market steel bell housing from Lakewood; these tended to be red or yellow. Steel "scattershields" stopped the pieces of exploding clutch material from coming up through the floorboards and slicing some pieces off of you. When launching at high rpm for a drag race this did happen from time to time. Great subject, great build! Looking forward to seeing more. Robert -
Thank you John! If the weathering turns out half decent will post a couple more pics. The jets you've built are amazing, especially the Prowler, wow. Appreciate the support. Robert
-
Thank you for the input Badder. Your point on the tracks is well taken and fully agree. Really didn't even think of it as was more concerned about the actual construction portion of the project and having the soil stay in place. The soil isn't thick at all so to make a track impression would have had to be done when the filler was still moist. This brings to light the issue of pushing the tracks into a moist substance. Are people making the track impressions before finishing touches, cleaning them off (possibly removing from model), then completing build and weathering? Soil has been sitting around in an open container drying for a long time. Now covered with quite a gloop (technical term) of glue/water mix. Be interesting to see how it lasts over time, has been about twelve weeks now. Be keeping my eye out for the materials you mentioned. Currently on the bench is a LDRG Chevy truck and SAS jeep. Reading a couple SAS books has inspired me. Regards, R.
-
Thank you Dennis. The bar is set quite high with so many of the great builds on Britmodeller, it is somewhat intimidating to post picks of a modest project. I'm enjoying the construction and art aspect of the hobby. As a young boy didn't even have an airbrush, so much available now. Is that help you have sitting on the desk or supervisor? Regards, R.
-
Not pleased with photo quality/exposure. Will attempt again with Lumix and different lighting. Progress stalled just before Christmas when I butchered some important (to me) decals. Ordered more, the wrong ones arrived, awaiting correct ones. After decades off, really enjoying building again. Trying to add more technique and skill to each build. Frankly not being very artistic don't believe I will ever achieve the grandeur as many of the projects posted on Britmodeller, yet, for me the artistic outlet is a real joy. Many firsts for me on this project and relatively happy with the outcome so far. Once the decals arrive will apply them, clear coat, attach the e-z line and begin the weathering process. Apprehensive about weathering as this is still new to me and have only applied to a couple armour builds. Relatively happy with the camo. Used the putty under paper mask technique to soften the camo lines. Masked canopy, windshield and painted inside and out, slow painstaking task first time. Photo doesn't show it very well, but the result wasn't too bad. Lots of other firsts for me on this build, old school to many of you no doubt. Another shot of the camo. Decals....lots of them. Hard to work with, thinking because of the age or perhaps Hasegawa in general? Not enough experience to know. Poor exposure really doesn't do the colours justice. Next one would like to have more a green/yellow scheme. Supercharger intake weld seam built up with putty and filed thinner. Out of focus.....in real life seam doesn't look too off scale for thickness but I do believe it should be thinner. Next time... On this side the putty/sanding job isn't nearly as good as on the other. Really wasn't that noticeable until painted and under better lighting. Another detail to improve on for future builds. With so many things to improve with each build, will I ever finish the kits accumulated?? Thanks for looking. All the best, R.
-
First, not happy with photo quality at all. Will try again with the Lumix and different lighting. Decades ago did not have the resources to evolve the hobby. Now, hopefully, making steps to toward the beautiful projects posted here on Britmodeller. Posting this very basic base for others beginning to build vignettes. The base is a 5/8" piece of plywood, corners adjusted with laminate trimmer, interior primer paint on the plywood, layer of drywall filler for texture. Decided to let the filler completely dry before adding the soil, as was not sure how the drying process would be affected by adding the soil. Brushed on a layer of white glue to the dry base, then sprinkled on the soil. Once the soil covered the base completely, let dry, then sprayed on a 50/50 mix of white glue and water to hold the soil in place. After some trial error on the portion of water to glue, found 50/50 worked best for the glue consistency. You can now stand the vignette on it's side and lose very little soil if any. Once the top coat of glue dried the finishing touch was a spray of black around the edges from a rattle can. Soil from backyard. Exposure....lighting..... The pieces of vertical branch are supporting a rectangle of glass which is helping avoid dust accumulation. Big Block Chevy in the background, Cdn loonie foreground. Quick, simple, inexpensive vignette. All the best, R.
-
Nice subject! Keep going, looking forward to the next build. R.
-
Desert patrol vignette - SAS jeep
Ceithearn replied to Carius's topic in Ready for Inspection - Armour
Thank you for the pictures and information Carius. Do not believe my build will be as nice but looking forward to it after reading a couple good books regarding the SAS activities in North Africa. All the best, R. -
Desert patrol vignette - SAS jeep
Ceithearn replied to Carius's topic in Ready for Inspection - Armour
Absolutely fantastic Carius, thank you for posting. Is there a WIP thread? Wondering what you used for sand and grass? LDRG truck and SAS jeep to be built next. Robert -
Yes, like those LED strips. Challenge is across the pond here in Canada, not quite the variety. Started checking local suppliers but nothing yet. Looking at the specs, something in the 4-6,000 Kelvin would give nice shadow free lighting. May even mount a couple small ones on the sides. If you happen to know a retailer on the West Coast here, I'm all ears! R.
-
Thanks guys. Two for two on picking LEDs over the other choices. Will check the local building supply stores and see what is available. R.
-
Wondering if there is a lighting expert in house? Converting this to a spray booth and would like to mount a light(s) on the top portion. Lots of options, LED, Halogen, fluorescent.......input appreciated. Robert
-
Mirage Hobby Weld Lines – Copper Strip (various scales)
Ceithearn replied to Mike's topic in Aftermarket
Concur on scale Mike. Great product to review and thank you for posting. Lots of tips on how to make your own with sprue, putty, or styrene on various posts. However, for consistency and/or using your time elsewhere this would be terrific product. R. -
Mirage Hobby Weld Lines – Copper Strip (various scales)
Ceithearn replied to Mike's topic in Aftermarket
Just went through the exact putty process you mentioned Mike, on the outside of the bf 109 supercharger intake. A short strip of this would have been perfect. 1/32 not shown, undoubtedly something could be used from one of the other scales. Robert