


monsterpartyhat
-
Posts
249 -
Joined
-
Last visited
Content Type
Events
Profiles
Forums
Media Demo
Posts posted by monsterpartyhat
-
-
On 1/27/2022 at 12:58 PM, Andy Moore said:
In other news, I've just finished clipping together the little Bandai RC. It's pretty nice, although somehow not quite as good as I was expecting. It doesn't have quite the crispness of detail that we saw on the Tantive and SSD, although some of that impression may be due to the swirly twirly silver plastic.I can confirm that the impression of a lack of crispness is in fact due to the swirly silver plastic -- I made silicone molds of the Bandai Razor Crest engine to use for scratch builds, and the castings are as sharp as you'd expect from Bandai (aside from my casting errors of course 😄). When you put a casting next to the original kit part you can see that it's due to how that particular plastic reflects the light (or due to its slight translucency at the edges, maybe?). There's a few photos in here: https://flic.kr/s/aHBqjzAgmc
-
 2
2
-
 1
1
-
-
Wow, this is fantastic work — really inspiring!
-
It’s pretty much my favorite non-canon SW ship. Dark Forces was revolutionary in its time

-
Hi all,
I know it's been aaaaages since I posted here, but I haven't been idle; just busy enough that I've mostly only posted to Instagram for the last two years because it's just the lowest friction avenue. But as the year ends I've been taking proper photos of a lot of models. I'll probably make a single thread for most of them, but this one might interest folks on its own. It's the JPG Productions 1:144 scale Moldy Crow resin kit, mastered by Nicholas Sagan (aka Cosmos Models). It's currently out of production, but JPG has said he may bring it back in the future.
I actually picked it up years ago, and made a start out of it 3 years ago, and then it sat unfinished for 3 years because I couldn't find a good base color. Well -- that all changed when I bought an airbrush and the entire line of Archive-X acrylics. Which, by the way, are *AMAZING*. The slightly paraphrase the immortal words of Ferris Bueller -- they are so choice. If you have the means, I highly recommend picking them up.
The three year break turned out to be a good thing, because this is the first resin kit I've completed; it took a lot of work to build it, from lots of filing and filling to get parts to fit, to completely rebuilding the wing-attachment, using brass and my Proxxon micro-mill setup. I took a lot of inspiration from game artist Jason Lewis's digital Moldy Crow model he built for his personal project remaking the first level of Dark Forces. It is, without doubt, the most detailed digital model of the Crow ever made, and a fantastic extrapolation of the ship from its distinctly low-polygon origins. Check it out at https://www.artstation.com/artwork/A929GX
Jason included a mechanism for adjusting the wings, which I adapted as an added detail on my build, made from steel music wire, brass tubing, and cast resin greeblies. I added a lot of additional detail to the built with cast resin greeblies which I molded from various Bandai kits, and I also completely scratch-built replacements for the sensor arrays on the front of the wings, which were extremely fragile as included with the kit. The replacements are also a lot sharper. I also replaced the kit-supplied barrels on the belly cannon with machined brass Hurricane Mk IIC - Hispano Mk I cannons from master-model.pl Finally, I replaced some of the piping with 1.5mm braided silver hose, a motorcycle kit up-detailing part.Painting Details
I primed it with Mr Surfacer 1500 Black, then applied Vallejo Model Air White for pre-shading under the base color coat.
- The base color is a mix of AX-020 Rust and AX-041 Roof Brown, with accented panels misted over with AX-016 Earth or pure Roof Brown.
- The red accents are a 1:1 mix of AX-025 Caboose Red and AX-026 D&H Caboose Red.
- The contrasting rear side panels are AX-008 SP Dark Lark Grey, and the sensor antennas and belly cannon barrels are AX-013 Grimy Black.
- The sensor fins in front of the engine pods are AX-007 SP Lettering Grey (which is one of my favorite colors in the whole Archive-X lineup).
- I used the Vallejo Metal Colors line for the grills and actuator rods, as well as dry-brushed metallic highlights on top of the Grimy Black. Mostly bits of Gun Metal, Magnesium, and Duraluminum.
Without further ado, the Moldy Crow.

-
9
-
Hi everyone,
I know it's been almost 11 months since the last update on the T16 skyhopper, but if you want want of your own, read on.....
I initially intended to produce a small number of kits myself, but then life got in the way, so I've gotten all the files cleaned up and wrote step-by-step assembly instructions, along with a bill of materials for everything you need to build one of your own if you're interested in having a teeny-tiny mostly-accurate Skyhopper of your own. Everything is posted on my personal website -- https://monster.partyhat.co/article/1-144th-scale-t-16-skyhopper-kit/
There you'll find the SVG file for use in a cutting machine to cut the flat styrene, an STL file for the 3D printed greeblies (which are also available from Shapeways), a list of the remaining assorted materials needed, and step-by-step instructions for how to put it together.
-
5
-
-
11 hours ago, DalekCheese said:
Any pictures of the fully-weathered ship?
Wow, I've really been slacking -- yes, there are!
I *think* these cover the current state, but I have a feeling I've added more streaking since, and I might need to take some more photos.
-
1
-
-
Looks fantastic!
-
1
-
-
That's some pretty amazing masking. Beautifully done!
-
1
-
-
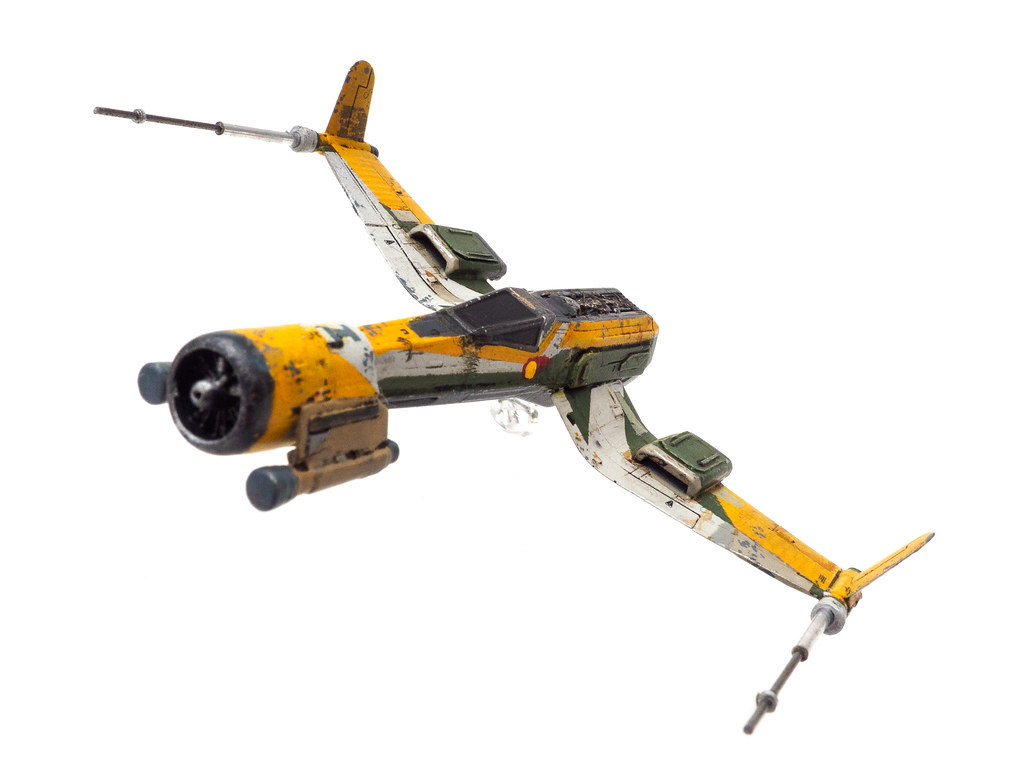
I finished this model ages ago, but it took a long time to get around to taking studio photos of it. The new animated show "Star Wars: Resistance" is a mixed bag, IMO. I love the animation style (I grew up watching Robotech, the US-import version of the Macross Saga, so I love the anime style applied to Star Wars) and some of the ship designs are quite cool, while some of the characters are.....anyway.
I fell in love with the main hero ship, the constantly-in-need-of-repair Fireball, which came about from one of Lucasfilm's showrunners wondering what an X-wing designed around the F4U Corsair would look like. While the actual ship doesn't directly share any parts with the T-65 X-wing or the F4U Corsair, you can get pretty close my mashing the two together, which is what I did with a Bandai Vehicle Model T-65 X-Wing, and an AFV Club 1:144 scale F4U.
The AFV club model was very nice to work with, with plastic that's compatible with Tamiya extra fine cement. I had to do a lot of chopping, filing, and repositioning of various parts, as well as replacing the X-wing wing cannons with music wire and aluminum tubing, since they predictably broke off in all the handling.
The paint job took ages - SO much masking. There are 4 base colors, and quite a few odd panels. I'm very pleased with how it turned out.

I didn't really keep a build log outside of Instagram, but there are a bunch of WIP and primered photos in a flickr album.
-
13
-
-
Of course
-
1
-
 1
1
-
-
I wish I had room to build models at that scale. There's a reason I stick to 1/144
-
1
-
-
3 minutes ago, Pete in Lincs said:
Love those engines!
More please!
That's all there is so far!
There's a few more pictures on flickr, but I still need to come up with a pod. That got sidetracked by the arrival of my T-16 parts :).
-
1
-
-
4 hours ago, Photon said:
Awesome!
Did that start as a Sketch-up model as well?
Yup. I'm really enjoying the CAD-to-hand-assembled-styrene approach.
-
Yeah, for scratching with styrene it really is. I could never cut those typical Star Wars-y plating notches cleanly by hand. The Cricut Maker with its knife blade attachment cuts them precisely down to 0.5mm, and the cut out bits can then be added back onto the plating for more precise raised detail. Check out these podracer engines I built entirely with machine-cut styrene (and cast greeblies):
-
5
-
-
Yup, that's the short version
The plugin that extracts the designated faces automatically is really what makes it possible.
-
11 minutes ago, Photon said:
How do you get the Sketch-up files into a form your cutting machine can deal with?
It's a slightly involved process.
* It starts with the Milling Tools extension. That lets you set a "ground plane" for each part that you want to export for cutting.
* The extension can then generate new two dimensional faces of every 3D part that you've set a ground plane for it on.
* Then I arrange those faces in a minimal arrangement to minimize material waste. I do this in SketchUp, with the camera in parallel projection mode in a top-down view. With the ability to snap vertices to each other, this is pretty easy in SketchUp.
* Then I group the faces, adding additional lines to fully enclose them in a rectangular face, merge them all down to a single object (i.e. a bunch of co-planar faces)
* Then I export that to SVG using sketchup-svg-outline-plugin
* Then I open the SVG in a vector editor (I'm currently using TouchDraw, which has its quirks, but it does what I need) and make sure the whole thing is a single compound path, and re-save as SVG
* Then it's ready to import into the Cricut software (which imports SVG and DXF)
It's not as complicated as it sounds written up like that, but it is a bit involved and took a bit of experimentation. One thing to note -- SketchUp doesn't do curves. Circles and arcs are just a lot of straight segments, which will take a LOOOONG time to cut. So I replace those with bezier curves manually.
-
1
-
-
It's done! Painted, decaled, and detailed.
I'm going to make a silicone mold of the second set of 3D printed parts, in case I need to make any additional alterations to accomodate molding before ordering the final masters. I've already modified the parts to have a couple of the mounting holes for the steel wire pre-"drilled". After making the mold, II'll be building up a second T-16 with the Shapeways parts, which will be heavily weathered, instead of the clean studio model type finish.
Highlighting the value of a decal stash - the black-bordered-yellow-bar came from the decal sheet for a 1:72 scale Hasegawa F/A 18.
-
1
-
-
Aight, this is turning out better than I imagined - the physical model basically matches what I modeled in SketchUp almost perfectly. I've assemble all the 3D printed pieces onto the styrene frame. I used music wire to connect the gun to the lower chassis, with .047" music wire running through both the gun body and the lower chassis, with a small length of 3/32" styrene slipped over it for the chassis -> gun connector. The single piece of music wire that holds those together also extends through the bottom of the gun to form the model support, just like the original studio scale model.
The barrel of the gun is a piece of .032" music wire with aluminum (err, aluminium) tubing slipped over it. Drilling the holes in the various tiny parts with an 0.8mm and 1.2mm drill bit in a pin vise was a bit fraught, since they're so small, but the Shapeways fine detail plastic both sands and drills very nicely. I've updated the 3D models so that a couple of the holes I had to drill will just be part of the 3D printed masters.
I put a couple of quick coats of white primer on it, and tomorrow I'll paint the rest.
Here's a mix of photos, with the raw parts and primed.
-
4
-
-
Well, look what arrived sooner than expected! I wasn't expecting these until Monday.
Two sets of the preliminary greeblie prints from Shapeways. I've already got most of one set mounted to the most recent prototype build - I'll have shots of that up soon. There will be some minor revisions and another round of prints before I cast them (well, I may make a V1 mold of this round anyway, since it's so small).
-
3
-
-
Just realized I never linked to the finished gallery from here -- just in case anyone comes across this thread later and wonders where the glamour shots are --
-
1
-
1
-
-
On 1/2/2019 at 4:25 AM, Gav G said:
Having said that, there are some other scales used in the series that are a bit weird - who had the idea for 1/93 scale (Kylo Ren's Shuttle) ?!?
The be fair -- that's a completely different manufacturer. Bandai doesn't make a Kylo Ren shuttle kit, and Revell has never produced kits in consistent scales.
-
1
-
-
9 hours ago, The Chief Smeg said:
Ooh cheers - I’ll have a look for the 2017 version! I’ve used 3D modelling software in the past (Catia v4) but I’d never heard of sketchup until I saw you using it. I’ll find a link today!
quick question though; sketchup Make or Pro?
Sketchup Make - Pro is the $$$ version. About the only thing Make is missing is CSG operations.
https://www.sketchup.com/download/sketchup-make/mac/thank-you or https://www.sketchup.com/download/sketchup-make/windows/thank-you (bypasses the registration page)
-
1
-
-
You can still download SketchUp 2017 - it's the last desktop version that can be used free for unlimited time. SketchUp 2018 is now limited to 30 days before you have to buy a $500 license
(they introduced a free web version - ugh). It takes some work to make things printable, but it's a really intuitive 3D editor. I actually set out to learn Blender over the holidays, and went back to SketchUp after 4 hours :).
-
1
-
-
As soon as I got home, I ran off a test of the updated pattern.
The Cricut machine doesn't currently have enough control to actually get the panel lines engraved along with the cuts, so instead I use one of the pens to have the machine draw them, and then I scribe them by hand with a ruler laid over the lines drawn by the machine.
Wiping the ink off results in impromptu panel lining.
The pile of tiny parts:
Some of the smallest slots and tabs aren't working - they'll need some tweaking so the tabs fit into the slots - cutting them exactly the same size doesn't work when you're talking about 1/2mm styrene, as it's just not strong enough to force in for a tight friction fit. The most critical part works, however - the slots for angling the wings.
Now the biggest challenge is patience while I wait two weeks for Shapeways - there probably won't be an update until the greeble prints arrive. In the meantime, I'm starting to model some other parts I've wanted for a while for additional concept-drawing inspired models.
-
4
-


Mandalorian Razor Crest
in Work In Progress - SF & RealSpace
Posted
I don't want to de-rail Andy's beautiful Razor Crest build thread here, but...probably not. They're not printable, and the 3D plans I make are more like....guidelines. Takes a lot of manual tweaking to put them together.