


tomfomes
-
Posts
31 -
Joined
-
Last visited
Recent Profile Visitors


tomfomes's Achievements
")
Newbie (1/9)
170
Reputation
-
1/48 Tamiya F-14D Super Tomcat VF-2
tomfomes replied to tomfomes's topic in Ready for Inspection - Aircraft
Thank you all for very nice feedback and comments! Cheers, Tomas -
1/48 Tamiya F-14D Super Tomcat VF-2
tomfomes replied to tomfomes's topic in Ready for Inspection - Aircraft
Thanks a lot. I have done the wiring/hydraulic lines on the gear & wells myself. I am not sure if there are aftermarket ones available for Tamiya, at least there was nothing at the time. Here are some other photos of the landing gear & bays: Cheers, Tomas -
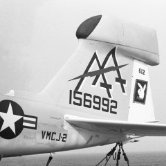
Hi all, So here is my 1/48 Tamiya F-14D Super Tomcat VF-2. At the end I have decided not to add any additional weapons, but maybe I will upgrade it in the future. This is what I used for the build: Tamiya 1/48 Grumman F-14D Tomcat Eduard Brassin 1/48 F-14D Cockpit Eduard Brassin 1/48 F-14D Wheels Kasl 1/48 F-14D Exhausts Master 1/48 F-14 Pitot & AOA SAC 1/48 Grumman F-14 Tomcat Landing Gear Fightertown Decals Grumman Tomcat F-14A/F-14B/F-14D Data and Weapons ANYZ models decals Here are few photos from every angle: Thanks! Tomas
- 28 replies
-
- 68
-

-

-
1/48 Tamiya F-14D Super Tomcat VF-213
tomfomes replied to tomfomes's topic in Work in Progress - Aircraft
Thanks Thom! Here is some further progress, the nose landing gear is done - not great / not terrible. Still need more experience airbrushing these Tamiya gloss acrylics - pain. I am always struggling to get nice smooth finish with these. Anyway, I can live with this and finally I can start the fuselage assembly! In addition I have also painted the rear wheels. For the tyres I have used some Mig pigments and I think it worked out quite well - see for yourself. Cheers, Tomas -
1/48 Tamiya F-14D Super Tomcat VF-213
tomfomes replied to tomfomes's topic in Work in Progress - Aircraft
I agree with you. This was the first time I have used this and was also surprised that it was just a copy of the original part and also how much soft this metal is. Some parts of the landing gear were already bent when it arrived! I was expecting solid metal part with extra details, but should have done some research before purchase, obviously... Anyways, for this build I decided to use it (most probably only for the nose gear), just because the metal effect on the landing gear piston. We will see if it was worth the headaches, once the landing gear is painted. Not a big progress done over the last few weeks, but at least something. I have added some details to the intakes bypass area (correct me if I'm wrong naming this): Started to work on the intakes and engines, but this still needs some corrections, so I will post more photos later: Also detailing of the nose gear is finished and ready for painting: Cheers, Tomas -
1/48 Tamiya F-14D Super Tomcat VF-213
tomfomes replied to tomfomes's topic in Work in Progress - Aircraft
Hi Nasos, beatufil work with alclad on those landing gears! If I would know that I can acheive such a good result with alclad, I would buy alclad instead of metal landing gears. Also when I decided to buy these, I didn't know that they are a copy of tamiya's original part. I was hoping they might have more details. I wouldn't be worried about the original parts at all. I am sure Tamiya made sure these can take the models weight and also most of the people who did this model already have used original parts and I haven't read about any issues. -
1/48 Tamiya F-14D Super Tomcat VF-213
tomfomes replied to tomfomes's topic in Work in Progress - Aircraft
SAC metal landing gear arrived this week. The details are nice overall, basically a copy of Tamiya's original part. Some areas require additional work, but the top of the nose landing gear was just so bad (holes were filled with the metal) that I decided to do a small operation between the two. Also it is a very soft metal and some parts came bended, so you have to be careful manipulating it. The metal effect on the landing gear piston (after some polishing) is definitely worth the headaches. -
1/48 Tamiya F-14D Super Tomcat VF-213
tomfomes replied to tomfomes's topic in Work in Progress - Aircraft
Thanks man! I don't think you have any reason to be sad, tho.. just looked at your F-14 and it looks awesome. Beautiful paintjob and finish imo 👌 -
1/48 Tamiya F-14D Super Tomcat VF-213
tomfomes replied to tomfomes's topic in Work in Progress - Aircraft
Thanks gents! If you can't see the photos, try this link: https://photos.app.goo.gl/mXzyJZwzW3vgmgXy8 -
1/48 Tamiya F-14D Super Tomcat VF-213
tomfomes replied to tomfomes's topic in Work in Progress - Aircraft
After a productive weekend, the nose gear bay detailing & painting was finished. Didn't like how I painted it the first time, so I have to repaint the whole thing.. Note to myself: be more patient next time 🙄 And here's few photos from the final paintjob: I have also corrected the ejection seats straps as the original photoetch parts color seemed too bright green compared to the real thing. I like it better this way: -
1/48 Tamiya F-14D Super Tomcat VF-213
tomfomes replied to tomfomes's topic in Work in Progress - Aircraft
Hi Tony, thanks for useful information. I have revised my planned loadout for this model and this is what I'll go for: 1x AIM-9L, 1x AN/AAQ-25 LANTIRN, 1x GBU-12, 1x GBU-38, ROVER antenna Yeah, I found out about that LANTIRN pod. Tomcats were carrying AN/AAQ-25 LANTIRN pod. Hopefully EDUARD will release one before I finish the model, if not then I will just use the one in box. -
1/48 Tamiya F-14D Super Tomcat VF-213
tomfomes replied to tomfomes's topic in Work in Progress - Aircraft
Hi all, started to work on detailing the nose gear bay. It's a bit slow process, but the results are worth it. Here are some photos from progress.. Cheers, Tomas -
1/48 Tamiya F-14D Super Tomcat VF-213
tomfomes replied to tomfomes's topic in Work in Progress - Aircraft
And few more photos from cockpit assembly and dry fitting stage... Thanks, Tomas- 28 replies
-
- 10
-
-
1/48 Tamiya F-14D Super Tomcat VF-213
tomfomes replied to tomfomes's topic in Work in Progress - Aircraft
I would definitely reccomend it. It's a lot of work (it's a model kit on its own - some people probably build whole models faster than it took me to finish this cockpit 😅), but the result is worth it. The most tricky part is to get the cockpit instruments decals right - this is where I realized my eye sight is not as good as it used to be! FYI the instruments decals are much better detail in the "Fightertown Decals Grumman Tomcat F-14A/F-14B/F-14D Data and Weapons" than the ones in Eduard cockpit set. Also the Fightertown decals set has some other useful decals for cockpit, which are missing in the Eduard cockpit set. I have previously built a 1/32 F-14D resin cockpit (Aires) and was very surprised how much smaller the 1/48 cockpit is - see below comparison. So for the size of 1/48 cockpit the level of detail is impressive. Some parts on the Eduard cockpit are done even better or more detailed than the bigger Aires one! Also, here's a good review & photos of the Eduard cockpit: http://www.hyperscale.com/2020/reviews/accessories/eduard648457reviewbg_1.htm Cheers, Tomas -
Thank you all for nice comments!