


skiny
-
Posts
94 -
Joined
-
Last visited
Content Type
Events
Profiles
Forums
Media Demo
Posts posted by skiny
-
-
Started the airfix 1/72 mustang on Tuesday. Bloody good model to build ,dead easy, so i tried some different things as i went alone.I tried (about ten times) making my own spinning prop for this ,using clear plastic,on about number 8 i thought i had cracked it,went to put it on and the paint came off in my hands (dry).tried again but this time i used enamels.but these didnt dry after two days.Oh dear ,what a shame ,never mind.This model should have been done in the British grey green camo scheme.But i used my new revell aqua metal paint on this one .Turned out great,not the aluminum effect but plain metallic ,so left it on.Played with a few paint scheme but settled on a red arrows red.Looked ok on the 1st few coats but took a lot of paint to cover the steel look so lost a bit detail on the front and rudder. Didnt notice the space on on one side of the canopy till it was completely solid so it stays where it is because if i tried to take it off the inevitable would happen. Thinking of giving it a pin wash but still looking at videos on how its done,but for now im calling it complete. Still learning so onwards and upwards.
 mustang 1 (1) by skellitor59, on Flickr
mustang 1 (2) by skellitor59, on Flickr
mustang 1 (3) by skellitor59, on Flickr
mustang 1 (4) by skellitor59, on Flickr
mustang 1 (6) by skellitor59, on Flickr
mustang 1 (8) by skellitor59, on Flickr
mustang 1 (9) by skellitor59, on Flickr
mustang 1 (11) by skellitor59, on Flickr
mustang 1 (1) by skellitor59, on Flickr
mustang 1 (2) by skellitor59, on Flickr
mustang 1 (3) by skellitor59, on Flickr
mustang 1 (4) by skellitor59, on Flickr
mustang 1 (6) by skellitor59, on Flickr
mustang 1 (8) by skellitor59, on Flickr
mustang 1 (9) by skellitor59, on Flickr
mustang 1 (11) by skellitor59, on Flickr
-
 15
15
-
-
Hi folks,well got the hunter all glued with only minimal filling needed and some sanding.put some paint on sunday night and left to dry.Gray and green looks great but not sure i like the silver underside.
a b by skellitor59, on Flickr
a sunday 1st coat of paint 1 by skellitor59, on Flickr
a1a sunday 1st coat of paint 1 (1) by skellitor59, on Flickr
a1a sunday 1st coat of paint 1 (2) by skellitor59, on Flickr
-
1
-
-
As its a bigger build i feel a WIP is called for.Started last night for an hour looking at the instructions ,threw them down n started with the cockpit (as ya do),so many fiddly bits for my podgy hands to hold.Left out the seat cause im bound to knock it loose before i start painting anyway and it gets in the way of the masking tape.Clamped it in the front bodywork and called it a night.Far to hot in the kitchen so i left it till the sun went over and got the fan out .Checked the cockpit was ok and continued with the other bigger body parts.Rear body assembly no bother,wings, no bother,come to the exhaust and things started to go a bit strange.Pulled the drawings out of the bin but they were as much help as a chocolate fireguard.took a while to work out where the exhaust funnel sat in the exhaust cowling.All together a good bit work done on the hunter.Im leaving it overnight to dry off properly and will assemble the main body parts together in the morning .Thanks for looking ,onwards and upwards.
IMG_2087 by skellitor59, on Flickr
-
1
-
-
1 hour ago, NealParkes said:
That is a nice looking hawk you have built there.
Thanks
-
Airfix 1/72 benevolent fund hawk,nice little kit.Every thing went were it should do except for the canopy which still needs a little more paint and two tiny probes /antenna Which has found a loving home in the outside bin.No real problems that couldnt be fixed ,except for the white decal.The minute you leave the transfer paper they disintegrate.Not all of them just the longer ones so ended up painting most of them on.Thats about the only problems i had with this build apart from that its a nice little hawk.Dont know why i was fretting about this one. Onwards n upwards.
1 by skellitor59, on Flickr
2 by skellitor59, on Flickr
4 by skellitor59, on Flickr
5 by skellitor59, on Flickr
6 by skellitor59, on Flickr
7 by skellitor59, on Flickr
8 by skellitor59, on Flickr
9 by skellitor59, on Flickr
10 by skellitor59, on Flickr
11 by skellitor59, on Flickr
12 by skellitor59, on Flickr
13 by skellitor59, on Flickr
14 by skellitor59, on Flickr
15 by skellitor59, on Flickr
16 by skellitor59, on Flickr
IMG_2066 by skellitor59, on Flickr
-
5
-
-
Hobby boss RAF lynx 1/72 ,thats what the box said.So i ordered it ,arrived in two days. Champion.Got all the way to the end of building,so far so good no real fit issues,only a small bit of filler,Glass went in no problem,paint looked good ,yeah pretty good build, and get set for putting the decals on.Q trouble .Only two sets of decals and neither was for the RAF lynx.Instead they were decals for the royal Neitherland air force or the German marines.Bol lix!!!What to do>????I know paint it in green n grey camo and managed to find some decals from other builds.I dont know if our RAF does a lynx helicopter in this camo but i dont really care.Its finish,it goes well on my shelf,although it now looks like it has 10 coats of paint on it and a big Royal Airforce sticker on it.Oh well you live and learn.Onwards n upwards.
IMG_1987 by skellitor59, on Flickr
IMG_1990 by skellitor59, on Flickr
IMG_1993 by skellitor59, on Flickr
IMG_1995 by skellitor59, on Flickr
IMG_1998 by skellitor59, on Flickr
IMG_1999 by skellitor59, on Flickr
IMG_2002 by skellitor59, on Flickr
IMG_2006 by skellitor59, on Flickr
IMG_2008 by skellitor59, on Flickr
IMG_2010 by skellitor59, on Flickr
-
8
-
-
12 minutes ago, jean said:
Hi,
this kit is supposed to be rather good, like the whole H-34 series. So I hope you had a good time building it!
It is an impressive chopper and you have managed to portray this! Well done!
On your next helicopter model, try and glue the wheels vertical and parallel to each other.
Other than that, I really like it,
JR
Thats just me being heavy handed .the wheels started buckling while i was taking photos,so im still not finished i suppose..i need to strengthen the legs /wheels with pins (again)
-
1
-
-
Straight out of the box ,not to much to say about it .It went together pretty well.very little filling and sanding.Smaller parts are becoming a real pain because of the meds and shoval fingers.Once iv complaeted my stash of 1/72 i wont be buying anymore.Colour went on great ,only took 3 coats with no runs,but i think its to dark compaired to the photos of it.Once again the more i handled it the more that fell off.(does glue go off????),and lost a few of the antennas.Clear plastics didnt frost over and fitted pretty good with the exception of a small gap under the windscreen(used pvc glue to fill and you cant notice it)One wheel started to buckle as i was taking photos dont know if it was my heavy hand or weak joint.All in all a canny build for me, onwards n upwards.Thanks for looking.
IMG_1975 by skellitor59, on Flickr
IMG_1974 by skellitor59, on Flickr
IMG_1972 by skellitor59, on Flickr
IMG_1968 by skellitor59, on Flickr
IMG_1967 by skellitor59, on Flickr
IMG_1965 by skellitor59, on Flickr
IMG_1964 by skellitor59, on Flickr
IMG_1956 by skellitor59, on Flickr
IMG_1947 by skellitor59, on Flickr
-
15
-
-
12 hours ago, whiskey said:
Might I suggest trying to take photos with as much lighting as you can provide and a solid color background?
Suggestion noted,im disabled not a photographer, and the kitchen is the best room for light.
1 hour ago, mcdonnell said:Hello and welcome to the Forum,Skiny.
She may have fought you all the way and given you a few headaches but that happens to us all.
I reckon you've won the battle with this Tornado.I think this special scheme really looks good and so does her in-flight pose.She's armed to teeth and going to make someone's day.Well done,that man.
😉👍 All the best,Paul.
Thanks mate.
-
1
-
-
The one aircraft iv been wanting to do is finished,and so is my affair with italeri models.Nothing fitted,missing parts,masses of filler,decals fell to bits,parts fell to bits.Everything that could go wrong with a model this is it.If you like to loose your temper ,be frustrated,swear ,cuss.Even couldnt take a decent photo of it during the build ,Oh i could go on but never mind whats done is done ,onwards and upwards.
IMG_1807 by skellitor59, on Flickr
IMG_1832 by skellitor59, on Flickr
IMG_1838 by skellitor59, on Flickr
IMG_1844 by skellitor59, on Flickr
IMG_1850 by skellitor59, on Flickr
IMG_1868 by skellitor59, on Flickr
IMG_1876 by skellitor59, on Flickr
IMG_1880 by skellitor59, on Flickr
IMG_1884 by skellitor59, on Flickr
IMG_1887 by skellitor59, on Flickr
IMG_1905 by skellitor59, on Flickr
IMG_1906 by skellitor59, on Flickr
IMG_1907 by skellitor59, on Flickr
-
9
-
-
On 14/04/2017 at 1:57 PM, Des said:
My starboard side view is missing from its place in the album but this port side in the full glare of the early morning sun at RAF Leuchars in September 1991 shows that the original satin finish had started to lose its lustre , looks like the aircraft is in a three tank fit with a Desert Sand Sky Shadow ECM Pod , presume there was a BOZ Pod on the opposite outer pylon but cannot recall what colour.
Deffinatly has a green tinge to it in the photo.thanks for the info,Looks like its going to be black.
-
1
-
-
Would anyone be able to help with a colour scheme.In the middle of building an italire 1/48 tornado and im confused over what colour 16 squadrons The Saint is.
Instuctons say black but photos im useing for some reference is green.Which is correct??????
-
Dont have a clue where the photos went so here they are again.
light 1 (19) by skellitor59, on Flickr
light 1 (18) by skellitor59, on Flickr
light 1 (17) by skellitor59, on Flickr
light 1 (11) by skellitor59, on Flickr
light 1 (7) by skellitor59, on Flickr
light 1 (5) by skellitor59, on Flickr
light 1 (4) by skellitor59, on Flickr
6 by skellitor59, on Flickr
4 by skellitor59, on Flickr
-
1
-
-
Wow ,That turned out nice.
-
Well heres my take on the Airfix 1/72 English Electric Lightning with the dark past.Hope you like as its taken me 3 days to put everything back on that "fell" off.For a bigger model it was so delicate but enjoyed the build.
1 by skellitor59, on Flickr
2 by skellitor59, on Flickr
3 by skellitor59, on Flickr
4 by skellitor59, on Flickr
5 by skellitor59, on Flickr
6 by skellitor59, on Flickr
light 1 (3) by skellitor59, on Flickr
light 1 (7) by skellitor59, on Flickr
light 1 (11) by skellitor59, on Flickr
-
5
-
-
Having second thoughts about the two tone ,i looks "bland"Thinking of going all black,What do you think???
nelsomeXS933 an E.E. Lightning F.53 ZF594 barley grey light grey - Copy by skellitor59, on Flickr
-
Hi all. im looking to replicate one of my local museums english electric lightnings, it was a saudi arabia aircraft then was sold to NELSAM at sunderland.Shes coloured in two tone grey ,dark on top,and lighter on the bottom.Would anyone know of the colours id need to paint it in humbrol paints.Any hhelp would be greatfully received.
nelsomeXS933 an E.E. Lightning F.53 ZF594 by skellitor59, on Flickr
-
1
-
-
16 hours ago, Paul Bradley said:
100 feet of models and all you came home with was a single kit?
Amateur.......
I didnt even get a kit, this is one of the stash.
-
1
-
-
Well looks like my shopping days are over.Went to the metro centre with the wife for a look for a mirror and thought have a look in the crafts department.Didnt get mirror or any paints or such so called in to Hobbycraft on the way home .Parked right outside the door ,into shop,seen the models on the back wall that was a hundred feet along.50 paces in, all stop .Chest started to go into respiratory failure,After 15 minutes screaming in the aisle we managed to get back to the car and came home. So its model shopping at Amazon from now on.Up next Airfix English Elecrtic lightning f2.Im thinking of doing this in all black,(opinions please)Any problems i should made aware of.
f2a by skellitor59, on Flickr
-
Finally ,after what seems like forever iv finally got the follands Red Arrows Gnat finished.Been far to ill to do much on it and every time i used glue n paints i had to leave it for a couple of days until my chest felt better.After seeing the size of the model the elaborate paint scheme went out of the window,it was way beyond my capabilities so i just finished it in a more modern colour scheme.Its taken almost a week to get the base for the gnat made and polished and a day and a half to get the smoke looking OK.Some may or may not see the final mistake i made but if you can well done,a little to much pressure and well you can see the result.Unless your looking at my shelf you wont know its there so its staying put.
RED AROWS GNAT by skellitor59, on Flickr
RED AROWS GNAT by skellitor59, on Flickr
RED AROWS GNAT by skellitor59, on Flickr
RED AROWS GNAT by skellitor59, on Flickr
RED AROWS GNAT by skellitor59, on Flickr
RED AROWS GNAT by skellitor59, on Flickr
RED AROWS GNAT by skellitor59, on Flickr
RED AROWS GNAT by skellitor59, on Flickr
RED AROWS GNAT by skellitor59, on Flickr
RED AROWS GNAT by skellitor59, on Flickr
RED AROWS GNAT by skellitor59, on Flickr
Hope you like .Onwards n upwards.
-
8
-
-
On 27/02/2017 at 5:51 PM, theplasticsurgeon said:
That would be me then! Off the top of my head there's:
B-57 Canberra,
C-119 Flying Packet,
B-24 Liberator,
T-6 Texan,
EE Lightning
and loads of partial bits of models.
Some amazing models there fella.Wishing i could find more videos of the techniques used to aplying the foil around bends / into scribes/rivets and such.
-
On 27/02/2017 at 10:41 PM, Old Man said:
I do quite a bit of foiling, Sir. It is laborious, but not really so difficult.
It is best to make your own foil, from ordinary kitchen foil, with MicroScale adhesive. This can be aged to get a more weathered/scale appearance.
Here is how I do the eggshell aging now, after some years of employing the method.
In a medium saucepan (not aluminum) boil the shells of eight to twelve eggs in a couple of cups of water (when I am going to make a batch, we save the shells over a few days, or, if some meal involves many eggs, I will just go ahead and do some foil). Let this boil for a good while, about fifteen minutes. Keep it topped up with fresh water so you have about as much liquid when you take it off the heat as when you started. Pour the liquid into a jar through a strainer, removing the shells. Scrub the pan, there will probably be a bit of tough grey-ish scum above the water line, and it is best got off while fresh. I used simply boil water and shells a while, then add the foil, but it works well with the shells removed. One thing to look out for is a bit of scum on the foil, and this has proved less likely when shells and foil do not commingle in the boil.
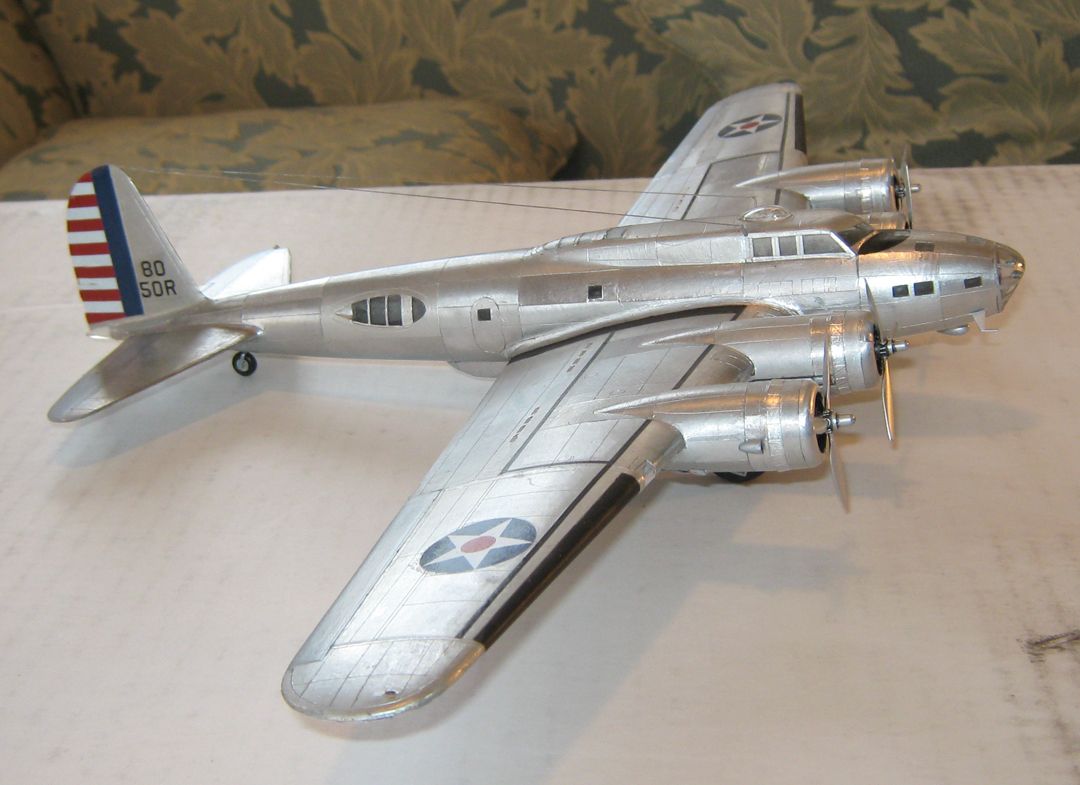
To prepare foil for boiling, you will want some steel wool, a scissors you don't care about, and a smooth hard surface (I have a piece of tempered glass about a foot square). Cut foil into pieces about six inches square. Two such will be more than ample to cover entirely a single engined model in 1/72; a 1/72 B-17 I did a while back took about two square feet.
It is good to make up excess sheets, to have it on hand, and because some might get spoiled. Place the piece on on the hard surface, dull side down, and go over the shiny side with steel wool. Use long, straight strokes. Avoid wrinkles. A hard wrinkle cannot be smoothed out.
Pour the liquid from the jar into a frying pan (again, not aluminum). Bring it to a boil. Place a sheet of foil in it, dull (smooth) side down, scratched (once shiny) side up. For just a little discoloration, leave in for about two minutes or so. If left in for six or seven minutes, the foil will get much darker.
Take the foil out with tongs, rinse well under cold water, and wash the smooth side then rinse again. Sometimes a scum may form on the sheet (this happened more often when the eggshells were left in), and this will get it off. If it forms, and remains, the scummed foil is useless. Pat dry. Store the sheets so they stay flat (I put them between pages of a large book). The liquid will prove good for about a dozen such squares. The discoloration has a brownish tinge when pronounced.
I use MicroScale adhesive. I have read adhesive for gold leaf can be used as well, but have not tried it. Place the foil on your hard, smooth surface, dull (smooth) side down. Tape in place, stretching it as you do (a bit of tape on opposite side, then opposite corners, like stretching artists canvas). Sometimes I repeat the steel wool here --- if you do, dust to be sure all fragments of steel wool are gone. I apply the adhesive with a cotton bud. Cover evenly but not too thick. It shows cloudy, and dries clear.
Once clear, you can cut and apply.
Since you can't see the surface that will be showing, variations in the discoloration can ambush you. One thing I mean to try, and will next time I make up a batch, will be to see if, once the adhesive is dry, the sticky side can be placed on wax paper and so stored with backing. I suspect this can be done, and if so, it will be possible to cut pieces with scissors, looking at the surface that will be showing.
I will mention another method of aging foil, that I have used only once. I have seen others get good results with it. You put copper. lead, and foil in a large jar, cover with laundry bleach (chlorine bleach(, and close. After a while you open it and take out the foil. What happens is some lead plates onto the aluminum surface, and some aluminum is leached off into the bleach. The discoloration has a bluish tinge. I do not know how long is right, I do know that too long puts pinholes in the foil.
Cut out pieces, put them on, press down with Q-tip and round tooth-pick, always trim at panel lines. You will want a new blade, the sharper the better.
Past this, it is just practice.
Get cheap foil if you can; thinner is better, more flexible.
CA accelerator does a good job of cleaning the adhesive, so if you do find you need to take a piece up, that stuff on a bit of paper towel will get any remaining glue up, and won't harm adhesion of adjacent pieces.
Sometimes you have to cut pieces to rough shape (where nacelles fitting to the airfoil of wings being a prime example) before putting them on.
Start in the center of a piece and work out, or at one side and work across, when burnishing down, helps avoid wrinkles. You can usually get a wrinkle flat by moving a tooth-pick along the crest, so to speak.
The good thing about making your own foil is that it is cheap, and you don't have to worry about being caught short --- there's always more where that came from.Here are few pictures of the results, all in 1/72....
Wow, i thought for a moment i was getting a cookery lesson.Sounds messy but the results you have speak for themselves. very good and i hope when im better and get round to it i will endevour to try and be good as yourself.Question ,do you have to "age" the foil before hand or can it be done by brush afterwards as normal modeling ???
-
Thanks very much lads,looks like im gona be busy (hair tearin, slapping wife,kicking dog,punching walls.
)Not as easy as it looks but im determined to give it a go when im feeling better.
-
HI all. Bare metal foiling.Has anyone ever done it to a whole airplane .Theres loads of videos for BMF on cars and then its only used for small items(bumpers/window sills.)Would anyone know where to find a link for a video for covering large areas .Im thinking of having a go at it on a P51 mustang i have in my stash,and if BMF dosnt look good then i shall just have to resort to a hairy stick.


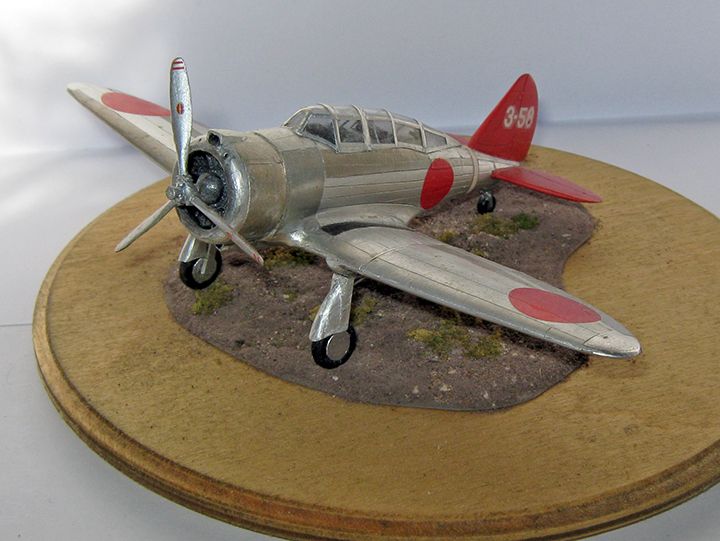
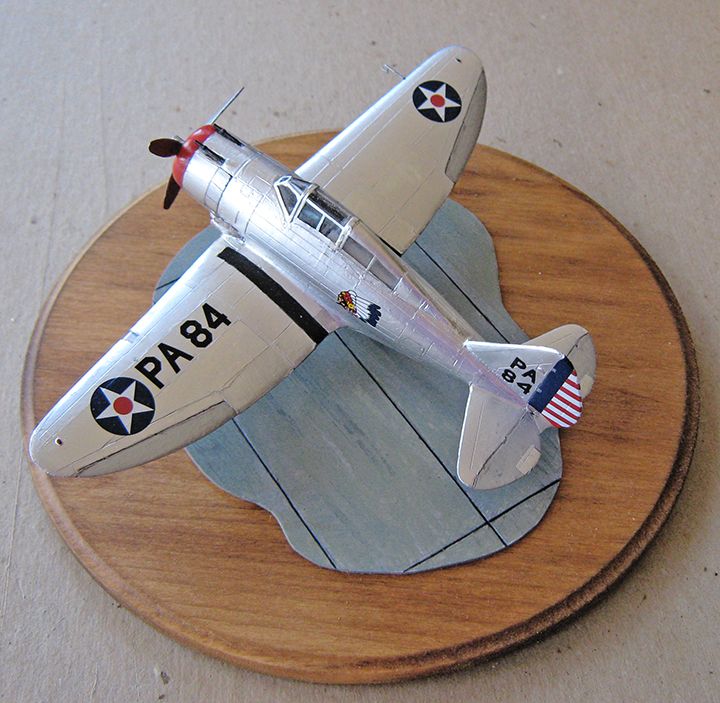

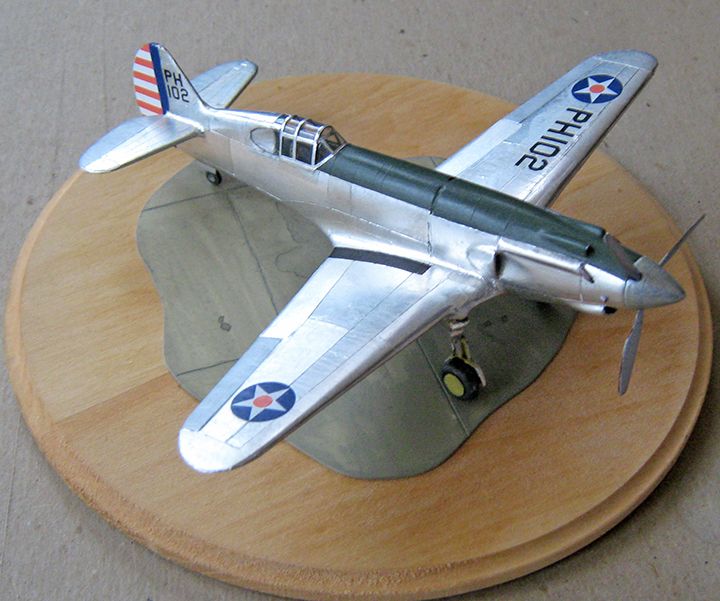
Airfix 1/72 p51 mustang
in Ready for Inspection - Aircraft
Posted
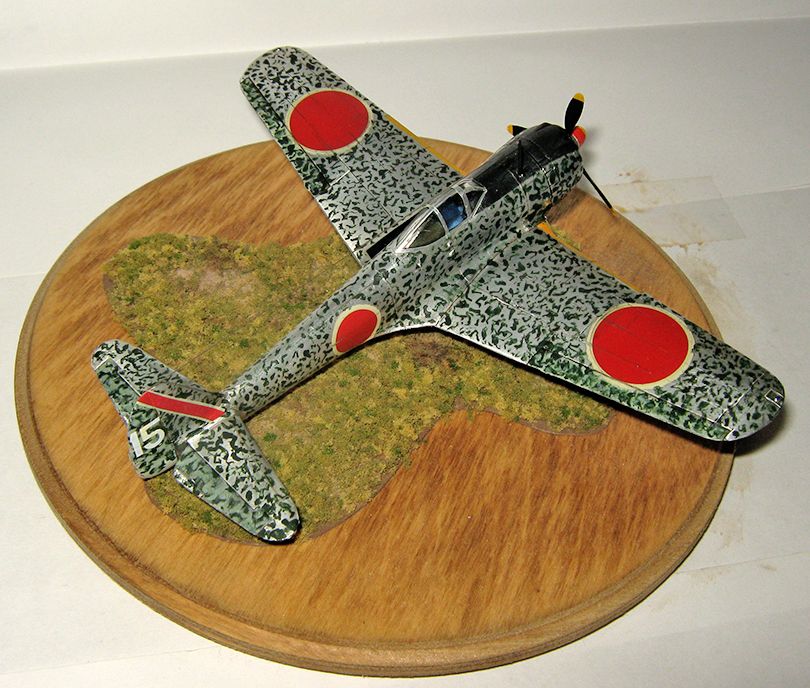
Hairy stick my friend,to much faf on with the airbrush for my temprement,do more smashing than painting.Next could be the 1/72 warhawk in British livery.