


OwenEldridge
-
Posts
26 -
Joined
-
Last visited
OwenEldridge's Achievements
")
Newbie (1/9)
88
Reputation
-
Could you describe the method you used to paint the tracks? Also, where did you source the chain from?
-
M1A1 Abrams Tusk - Dragon 1/35
OwenEldridge replied to OwenEldridge's topic in Work in Progress - Armour
Bronco Workable tracks now assembled -
Challenger 2 - Operation Telic 2003 (Tamiya 1/35)
OwenEldridge replied to OwenEldridge's topic in Work in Progress - Armour
Used out of the bottle at 40 psi. Here's an article explaining the technique: http://www.armorama.com/modules.php?op=modload&name=Sections&file=index&req=viewarticle&artid=382 -
Challenger 2 - Operation Telic 2003 (Tamiya 1/35)
OwenEldridge replied to OwenEldridge's topic in Work in Progress - Armour
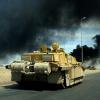
I've finally got some paint on 11B. The model was basecoated/preshaded/modulated with Tamiya Nato Green, Black Green, and Dark Green. While I let this dry for a few days I mixed up my own British desert yellow sand color using about six different Tamiya paints until I got it just about right (to my eyes). The model looks more green in these photos than it does in person, but my lighting wasn't cooperating today so I think that's the best I'll get for now. I gave the model a coat of hairspray in the areas I would be depicting the scratches present in the photos of the real 11B. I've viewed several hundred wartime photos of the Challenger 2 in Iraq over the course of this build and I've found that 11B appears to have the least amount of chipping and fading of any of the Challengers that served in Operation Telic 1. This makes for somewhat of a boring model if weathering is everything to you, but I'm going for historical accuracy on this one rather than an attempt to use every weathering product in my modeling arsenal. Not surprisingly, something that was intended to be a quick project using a kit that essentially falls together has turned into a drawn out rivet counting fest. I'm currently trying to decide if I should attempt to depict a few extra details such as: 1. A rectangular box mounted to the top of the right armor skirt (The Eduard PE set supplies this) 2. The large camouflage tarp draped on the front and sides of the tank 3. An orange and white (air identification?) square draped on the rear of the turret 4. A canvas cover on the roll of wire near the jerry cans So unless I decide to add these extra details, my Challenger 2 is now painted and ready for the final weathering phases. -
This is where I got bogged down on my build of the same tank (See the link below). The Voyager set doesn't include the commander's shield and I didn't feel like shelling out another hundred dollars for the ET M1A1 TUSK set. Then the RFM kit what released and I thought about purchasing it just for the shield. Seeing the shield up close I'm not sure I will now.
-
Challenger 2 - Operation Telic 2003 (Tamiya 1/35)
OwenEldridge replied to OwenEldridge's topic in Work in Progress - Armour
I just received "Shot and Captured" in the mail. Incredible photos. Several great photos of 11B as well. Thanks for the recommendation John_W. -
Challenger 2 - Operation Telic 2003 (Tamiya 1/35)
OwenEldridge replied to OwenEldridge's topic in Work in Progress - Armour
I've now completed most of the etch work and I've done some test fitting for photos. I'll start the painting process as soon as "Shot And Captured" arrives in the mail. The side skirts and CIP panels will be removed for painting. Any tips or suggestions are welcome. -
Challenger 2 - Operation Telic 2003 (Tamiya 1/35)
OwenEldridge replied to OwenEldridge's topic in Work in Progress - Armour
I've made more progress on the Challenger 2. I've decided to finish this model as "11B" of HQ Squadron Command Troop of the Royal Scots Dragoon Guards. Using several photos of 11B for reference, I've attempted to replicate the folds in the canvas of the dust mitigation side skirts and the heavily dented fuel drum. The Bronco workable track links went together without any issues and are a huge improvement over the rubber bands provided by Tamiya. -
Challenger 2 - Operation Telic 2003 (Tamiya 1/35)
OwenEldridge replied to OwenEldridge's topic in Work in Progress - Armour
I used Mr Surfacer 500. -
Challenger 2 - Operation Telic 2003 (Tamiya 1/35)
OwenEldridge replied to OwenEldridge's topic in Work in Progress - Armour
Here is the first build update. The no-slip texture was recreated by spraying Mr. Surfacer through an airbrush at 40 PSI. -
M1A1 Abrams Tusk - Dragon 1/35
OwenEldridge replied to OwenEldridge's topic in Work in Progress - Armour
I finished the side skirts and the loader's armored gun shield. Next I'll start with the TUSK ERA. -
M1A1 Abrams Tusk - Dragon 1/35
OwenEldridge replied to OwenEldridge's topic in Work in Progress - Armour
I use some needle nose pliers, tweezers, a hobby knife, my fingernails, and my 20/15 vision. -
M1A1 Abrams Tusk - Dragon 1/35
OwenEldridge replied to OwenEldridge's topic in Work in Progress - Armour
I use Scotch brush on super glue for the photo etch and Testors cement for the plastic parts. I prefer the Testors cement over Tamiya extra thin because it gives me more time to align parts. -
Challenger 2 - Operation Telic 2003 (Tamiya 1/35)
OwenEldridge replied to OwenEldridge's topic in Work in Progress - Armour
My aftermarket sets arrived from HobbyEasy. -
M1A1 Abrams Tusk - Dragon 1/35
OwenEldridge replied to OwenEldridge's topic in Work in Progress - Armour
I received the side skirts from HobbyEasy and I was very impressed with their prices and handling time. You can see use of the other products I ordered here Anyways, on with the photos...
