


Serkan Sen
-
Posts
2,245 -
Joined
-
Last visited
-
Days Won
50
Content Type
Events
Profiles
Forums
Media Demo
Posts posted by Serkan Sen
-
-
On 1/31/2024 at 9:19 PM, PeteH1969 said:
When will the 32nd version be ready?
It's design art MMMM
Pete
I bought Saturn 3 Ultra to be able to print the parts in 1/32 scale ☺️ (Mars series doesn't have enough volume to print such big fuselage parts)
I will do some test prints hopefully in May.
Serkan
-
 1
1
-
-
On 3/14/2024 at 11:30 AM, Alan P said:
How is this build going, @Serkan Sen? Hope all is well with you.
Thanks for asking @Alan P. I am well but due to many reasons (private, health and professional) I had to make a little break. Now I am back to make progress in my builds. During this break I have bought two new 3d Elegoo printers; Mars 4 Ultra and Saturn 3 Ultra. Unfortunately they are still unboxed and waiting for home heating system replacement which is planned for next week. After then I will rearrange this area and deploy the printers.
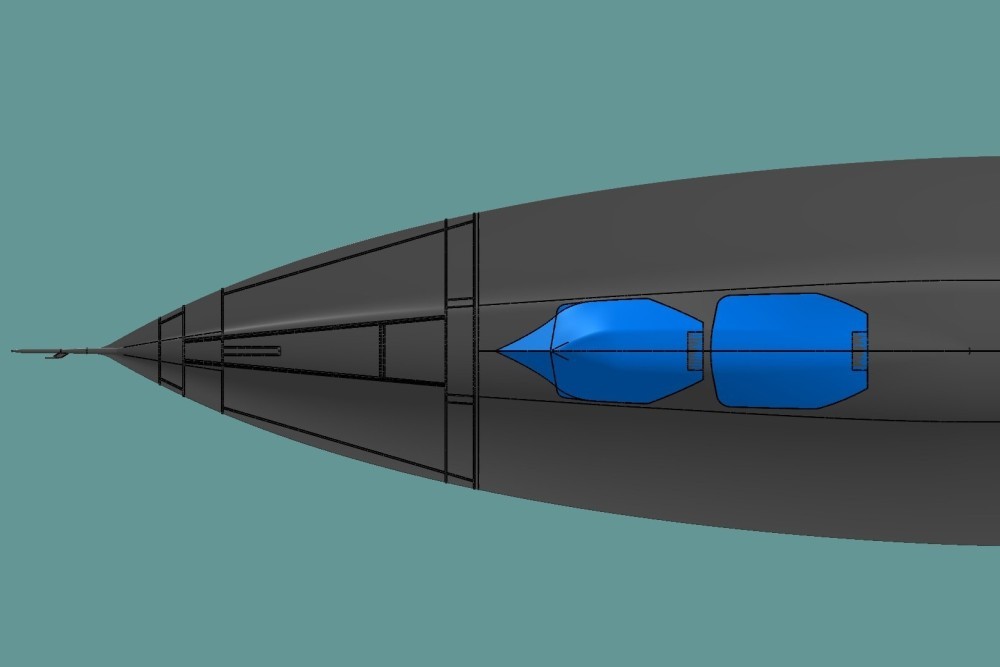
I have received many questions about the availability of closed nozzle feathers option during this build. I have recently updated the nozzle model to cover both options:

Also I have added opened engine bay details on outer wing half. I will finish this task and post the images soon.
Serkan
-
1
-
-
Very impressive start for 2024 Tony! I am also in big trouble printing the clear parts. Although the Blackbird and Oxcart clear parts are significantly smaller than Wasp I wasn't able to get clear parts printed nicely. I have used several clear 3d resin products without having an acceptable success.After printing the parts I soaked the parts in Future or clear epoxy resin, sprayed parts over with 2K clear coat, sanded the surfaces with 3k to 12k grit polishing papers, polished them with Tamiya polishing compounds. Each method has some pros and cons but none of them was perfect.
My next try will be to print a canopy with proper base for casting, polish it as much as possible, use it as silicone mold master and cast the clear parts with PU or epoxy clear resin. Unfortunately for my project vacuform seems not to be an option.
Serkan
-
2
-
-
Very impressive build and significant amount of information about this beautiful aircraft. Thanks for sharing with us.
Serkan
-
 1
1
-
-
Very impressive work. Well done!
Serkan
-
1
-
-
Very Impressive work Ian.
Serkan
-
1
-
-
Very impressive work with great weathering!
Serkan
-
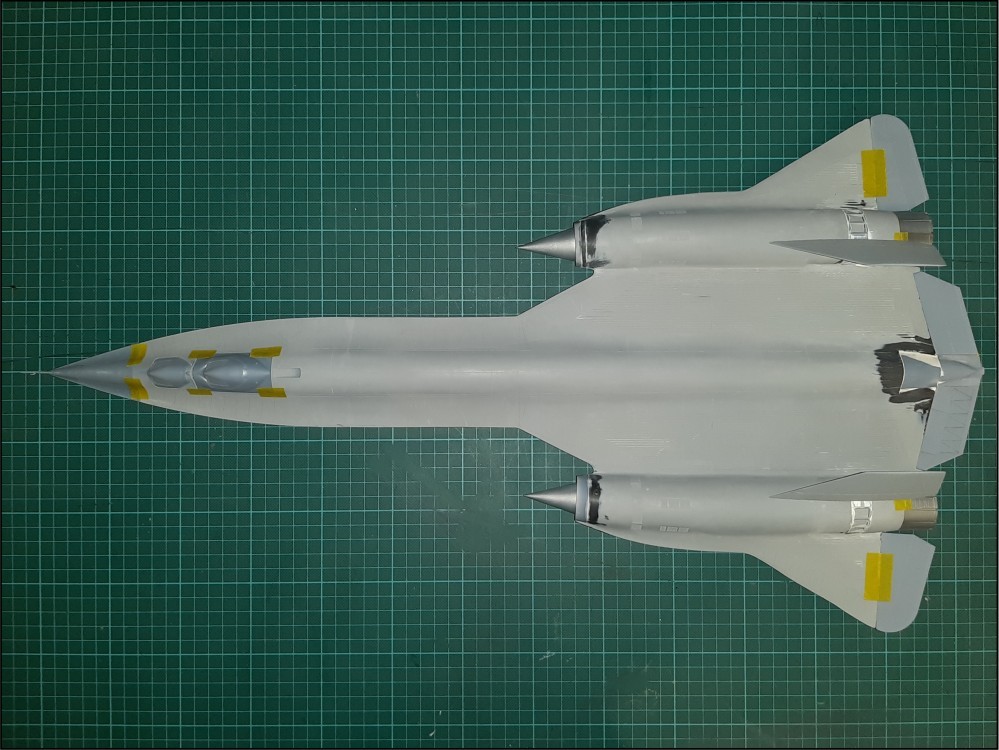
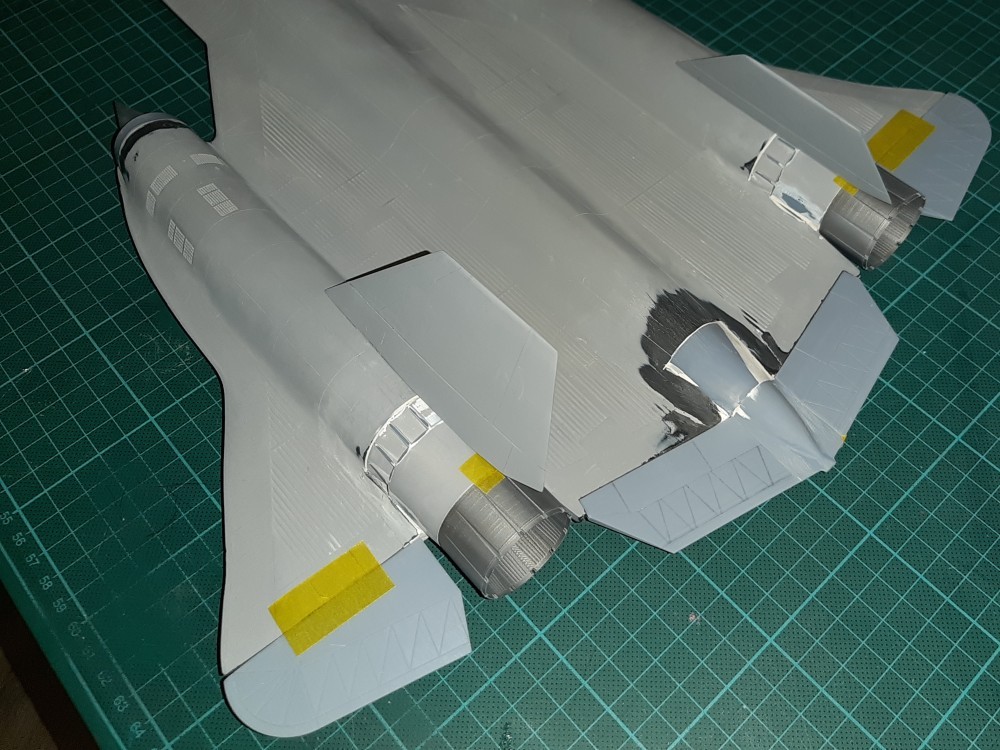
Last weekend I have worked on YF-12A missile bays doors. Most of the work was to correct the lower surface curvature at NLG bay area. After two days effort the shape looks now much better. Here are the real aircraft and new model bay views:
The door actuators are still missing but they can be added later very easily.
Serkan
-
9
-
-
11 hours ago, The Podfather said:
Last picture of the evening - started putting together the engine intakes into the Revell mouldings for the M21. The intakes are more parts courtesy of Serkan, they're beautifully printed, and fit together very accurately. Need to do a bit of surgery on all the parts for the final fit still.
You can have a look my build to see in details how to fit the intake assy into Revell cowling:
Serkan
-
I am afraid it is not possible to fit printed front fuselage neither to Revell nor to Italeri/Testors kit without opening a slot along the rear fuselage upper surface to match/correct the fuselage diameter. Although I shared below images in my build progress report, please let me share them again here:
Serkan
-
3
-
-
Here is my first post in 2024 😃
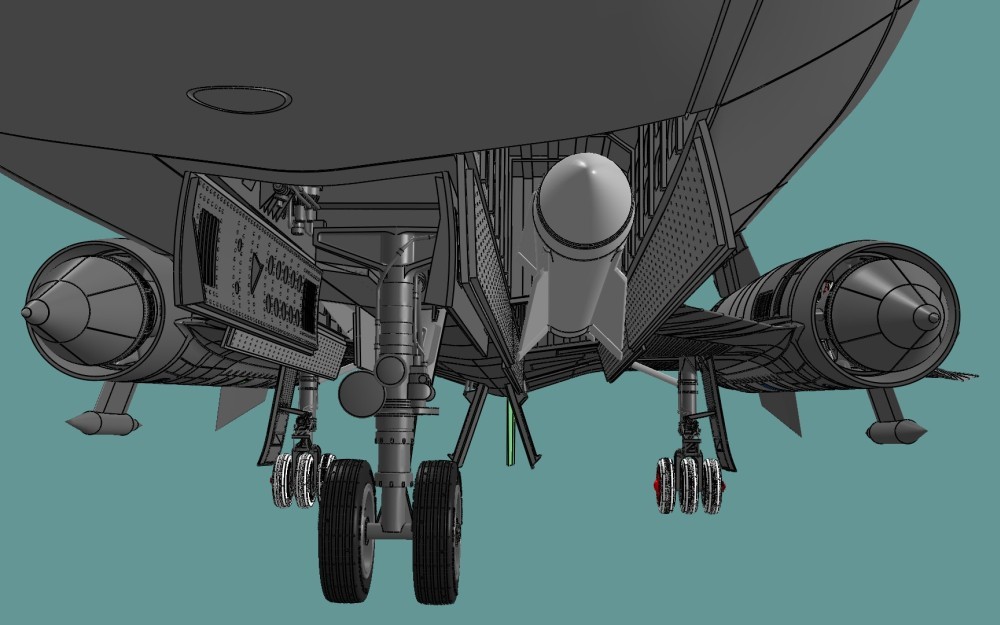
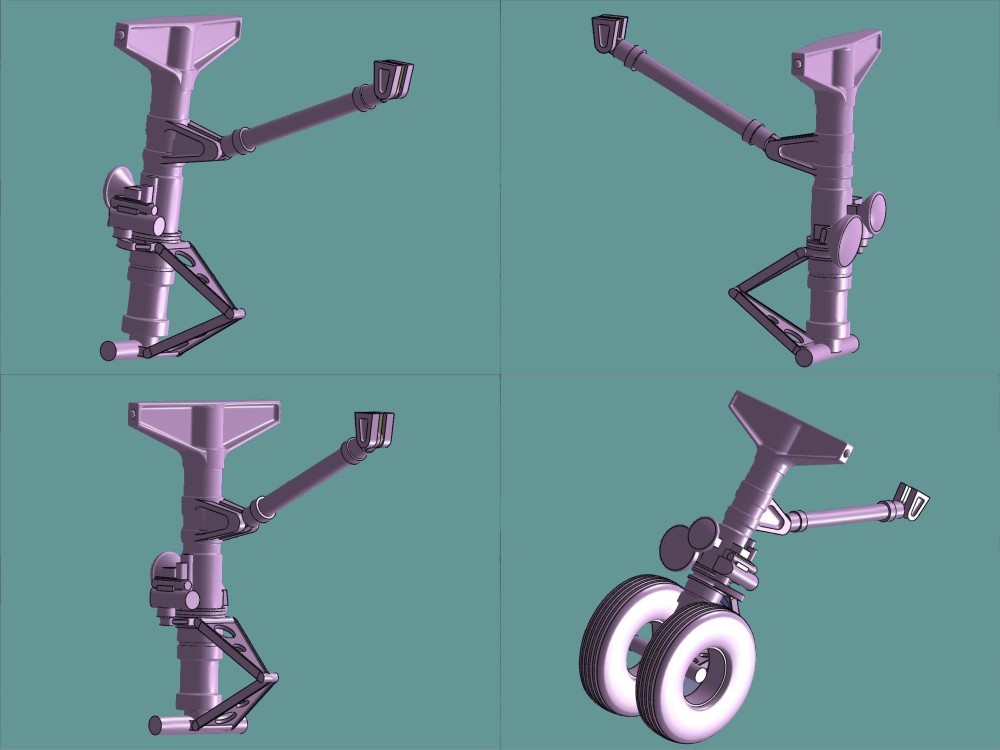
I have seen that the nose landing gear strut hydraulic routing were missing:
After a few hours work the model looks much better:
Next step is to model YF-12A missile bay doors (yes, I promise, I will keep my word this time 😄 )
Serkan
-
7
-
1
-
 1
1
-
-
Evening all,
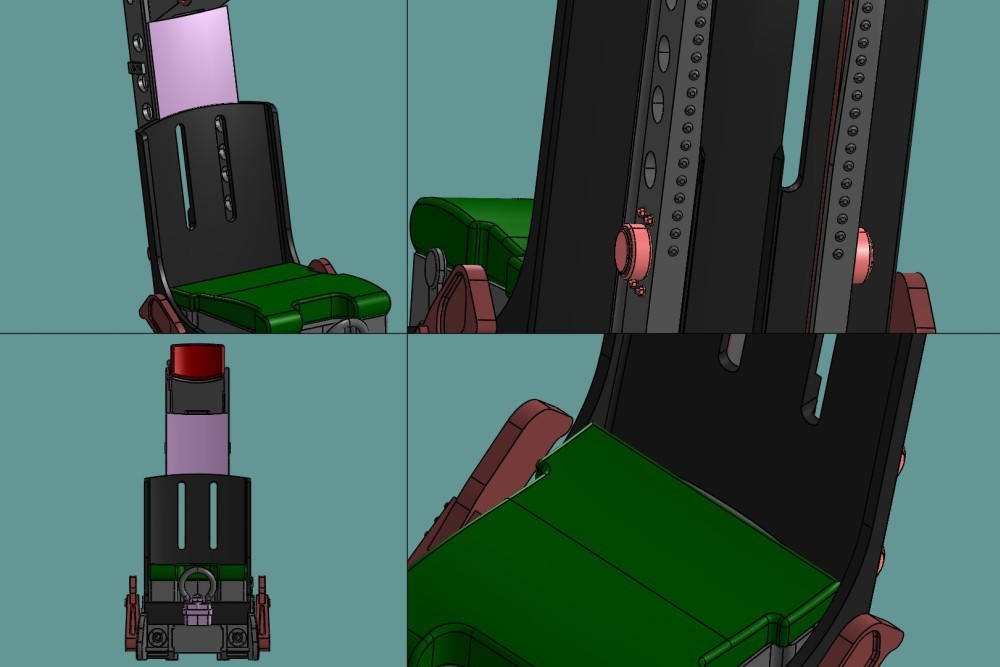
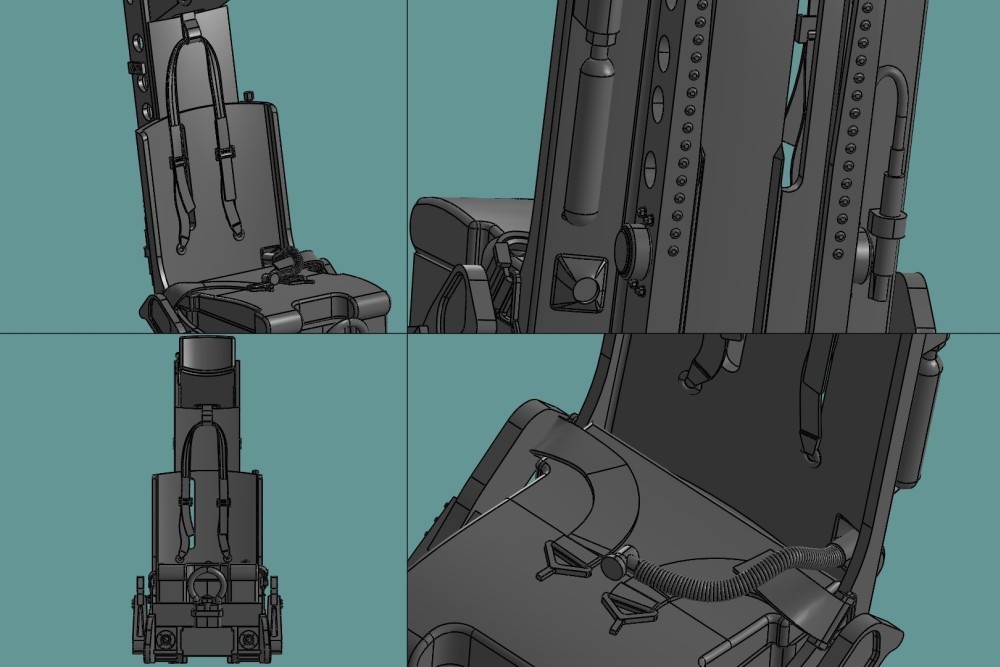
Here is my last post of this year. I have added the seat harness, cable cutter, vent suit line and many other details to the ejection seat model. Not to use the same seat on twin seater versions I have modelled the harness in two different layouts:
That's all for this year. I wish you happy and healthy new year!
Serkan
-
7
-
-
Amazing build Stuart.
Happy and healthy new year!
Serkan
-
1
-
-
3 hours ago, The Podfather said:
I should be updating my build thread shortly, and will try to send you a link to it, as I feel like I’m hijacking Serkan’s build here!🥴
No Chris, you are not hijacking at all. I am very happy to see your comments and posts here. By the way how are going your builds on?
I wish you all happy and healthy new year!
Serkan
-
1
-
-
Good evening all,
More progress on CAD modelling over the last couple of evenings:
Although my plan for the next step was to finish the YF-12A missile bay doors and Lockheed C-2 ejection seat hardware, I suddenly decided to start modeling the SR-71. ( yes, you are right. Seat harness modelling is a boring task, therefore I am postponing it as much as possible).
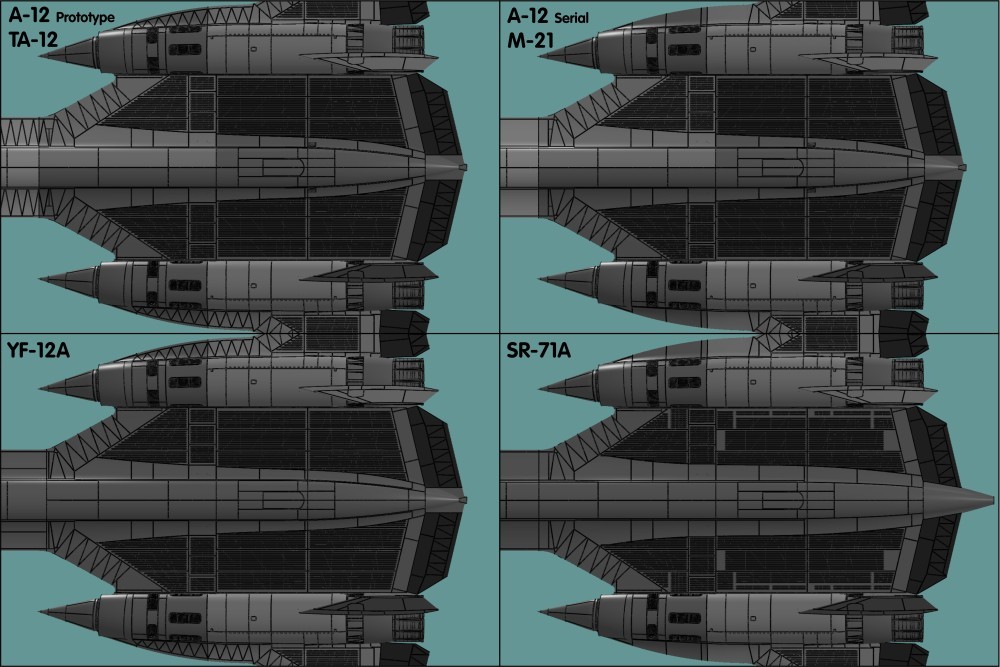
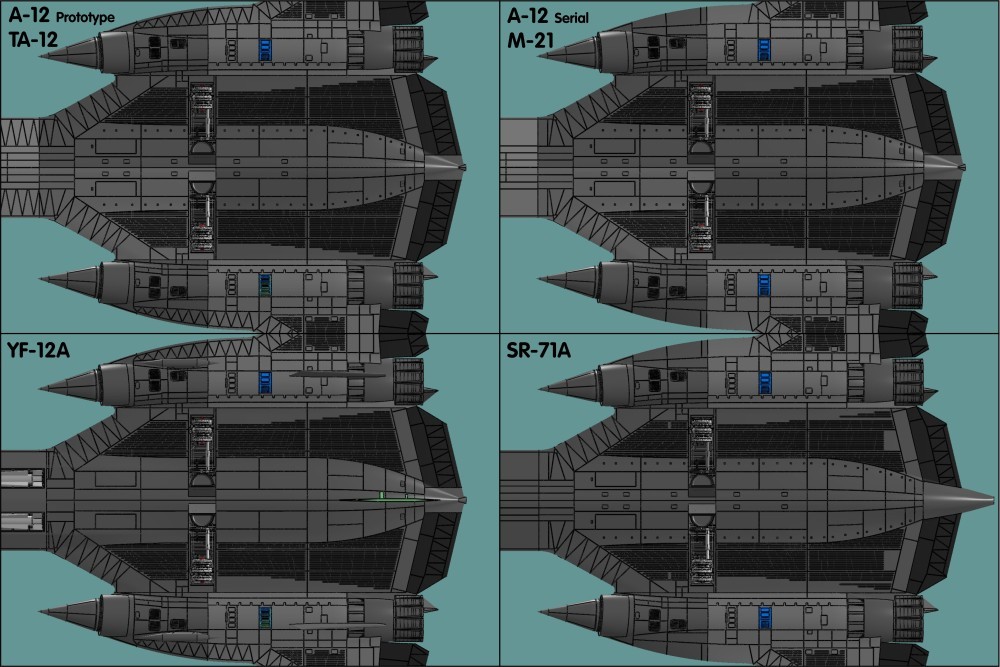
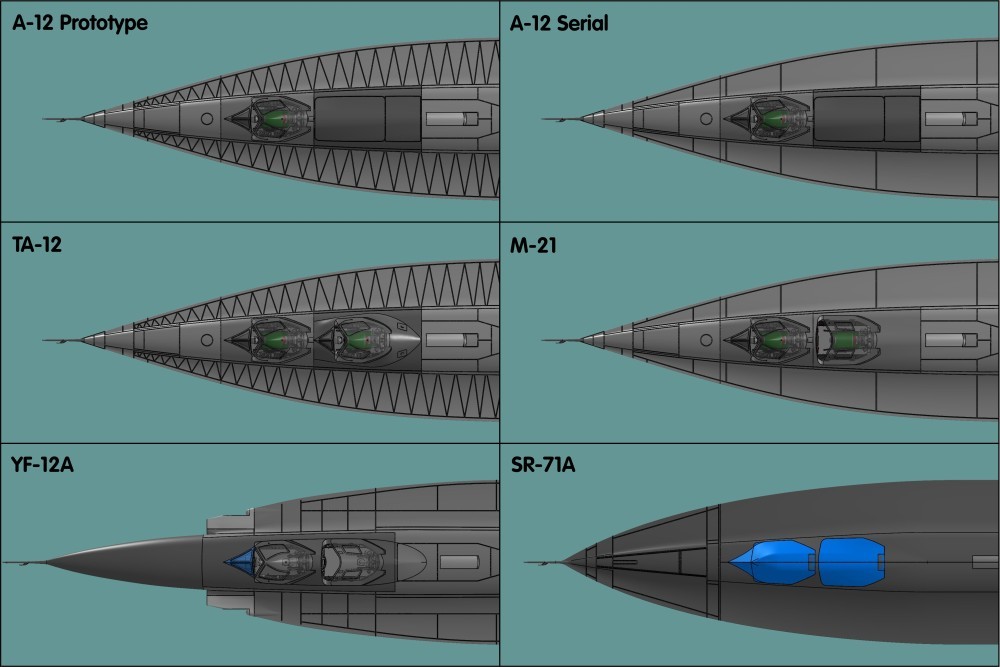
First of all, I started with the ferry nose (training nose with dead weights?) and the basic sections of front fuselage:
It was not an easy job to model especially the rear fuselage sections with longer tail cone, but the result looks quite good to me. Also the inboard elevon"s root section has been reshaped due to new elongated tail cone:
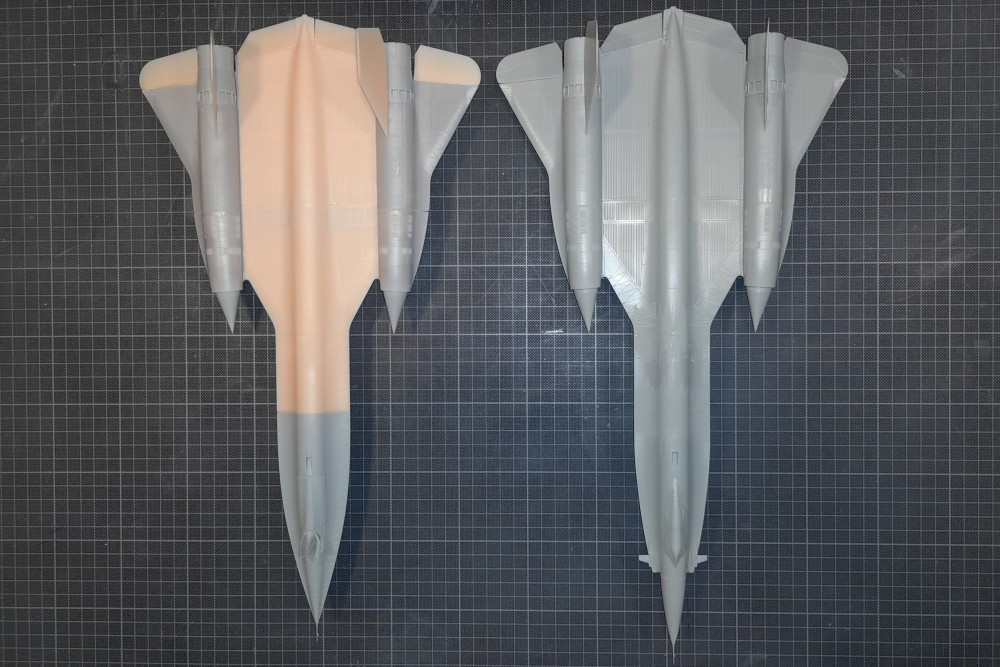
The patterns of SR-71's inboard wing upper surface corrugated skin panels are significantly different than the A-12 panels. Also the panels at fuselage-wing junction are much wider:
The difference is minor on lower surface:
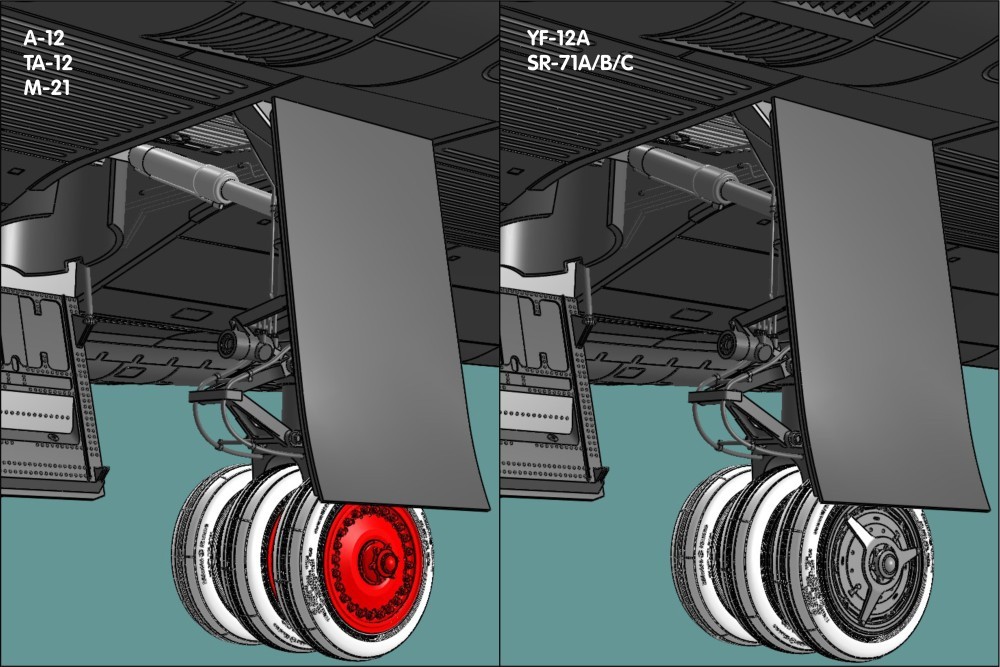
Also the main wheel hubs are different:
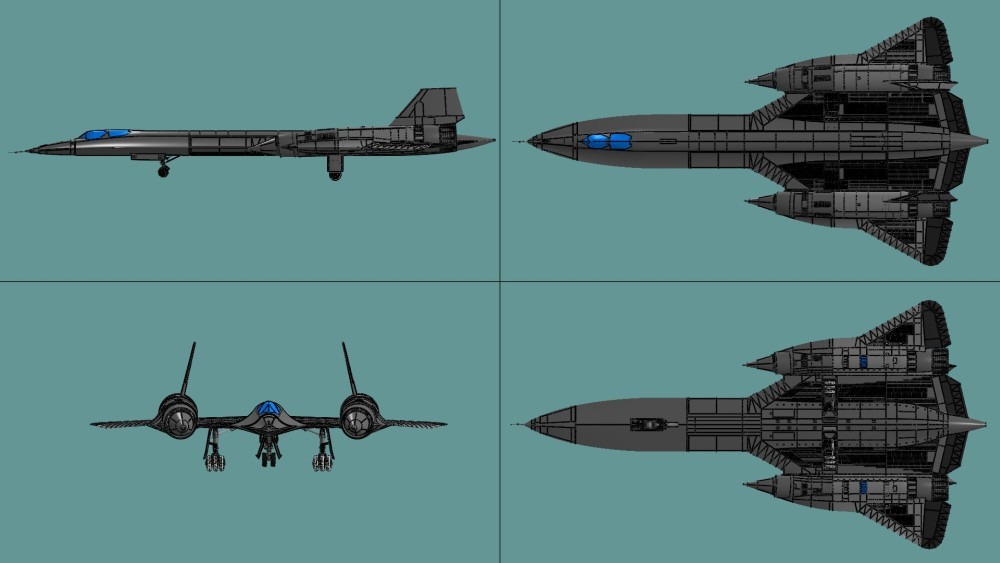
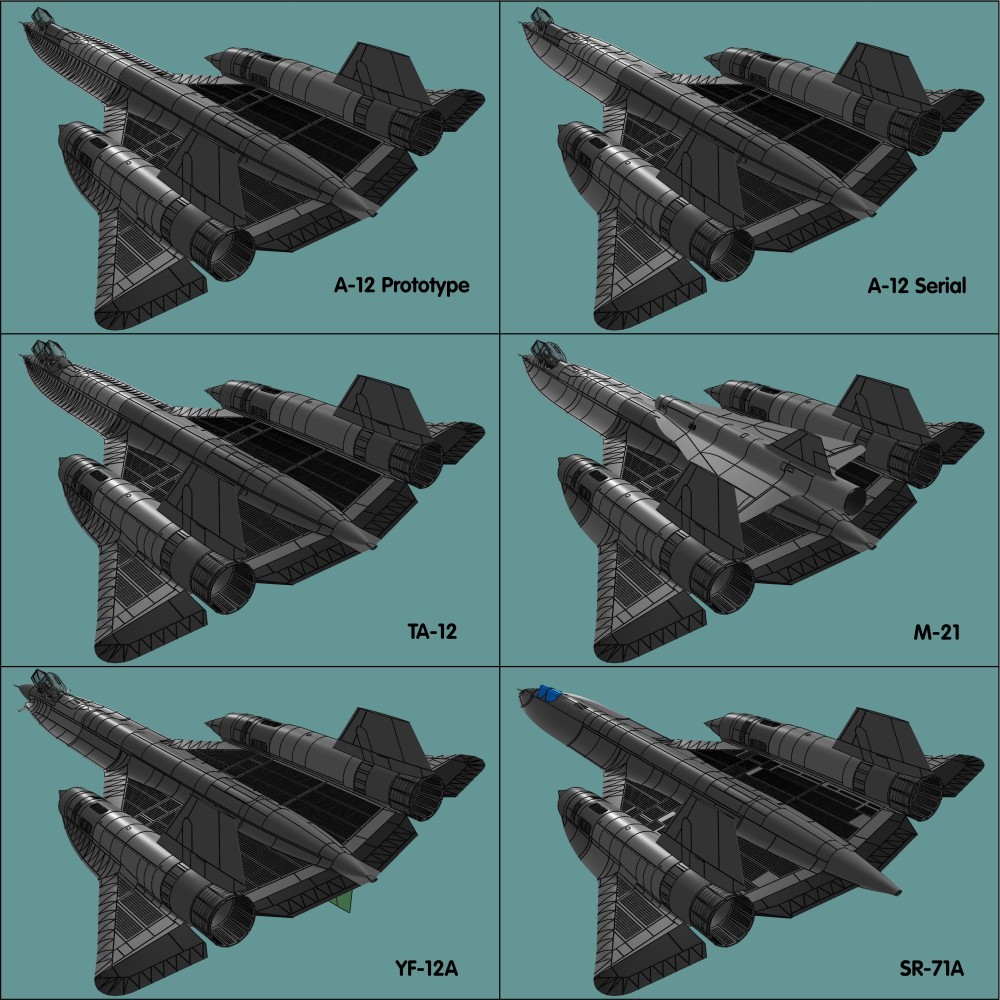
Here is the summary of all current models:
Now I can start to model some of the forward fuselage details (hopefully before Silvester). But I need to do a survey on the nose cone variants (as far as I know there were three versions) in parallel.
Serkan
-
11
-
-
On 12/16/2023 at 11:19 PM, Pajarito said:
Hey, perhaps you could make a resin correction for the height of the Revell 1/48 kit?
")
Cheers,
Infact I have another plan. I am currently working on full 3D model of SR-71 variants (in addition to A-12 family) and the basic model has been almost completed. I will post some images before Christmas.
Serkan
-
2
-
-
17 hours ago, Pajarito said:
And now, judging by the evidence shared by Ph.D. @Serkan Sen, doubt raised his ugly head once again.
Do you think it's doable to graft the forward fuselage of the Revell kit onto the Italeri Sled?
I would strongly advise not to do that. It will be worthless effort in terms of time and money. If you really want to do an intensive surgery then try to convert old Testors kit into Oxcart and build Revell kit as is despite of all known issues (as I did).
Serkan
-
5
-
-
Very nice (and brave as well) start Chris. Taking the final decision is always hardest part. For me once it is made, the half of the work was already done.
I will follow all these builds with great interest.
By the way have you seen one of my latest posts that shows the comparison of all existing Blackbird kits' cross section avaliable in the market?
Serkan
-
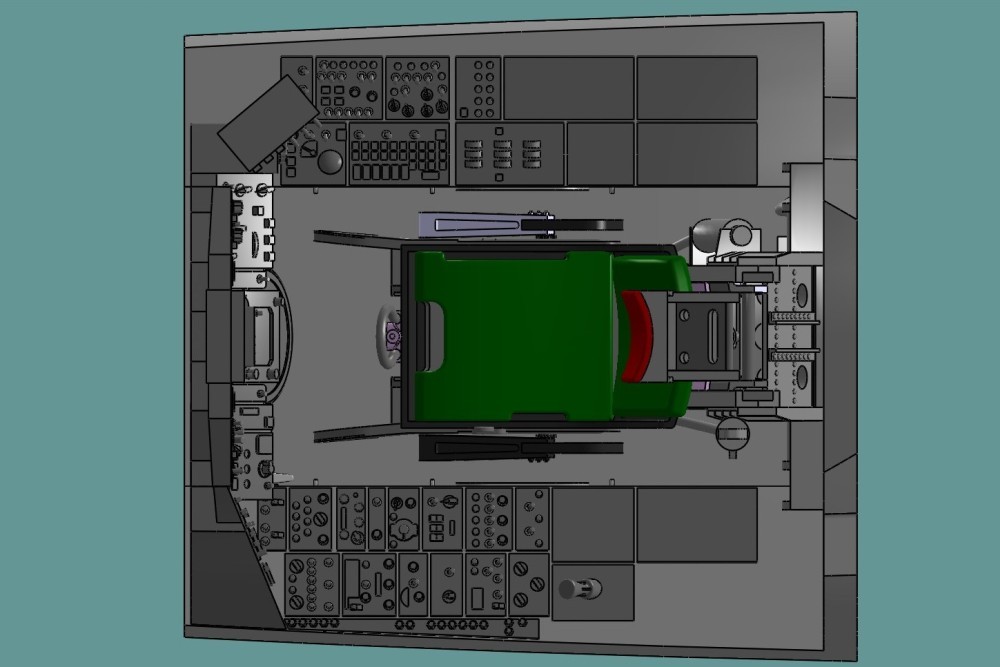
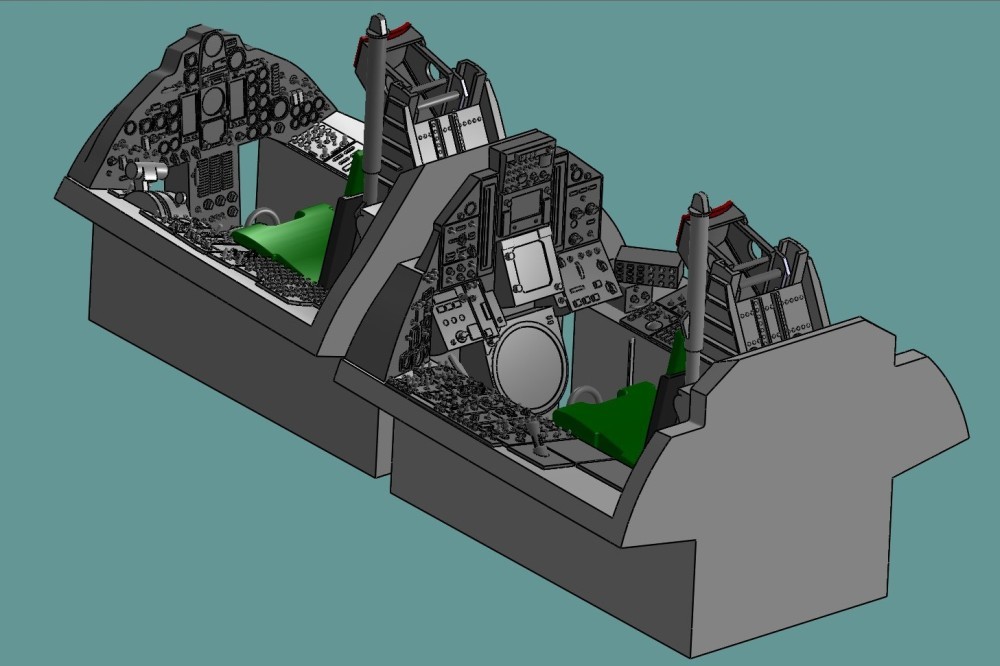
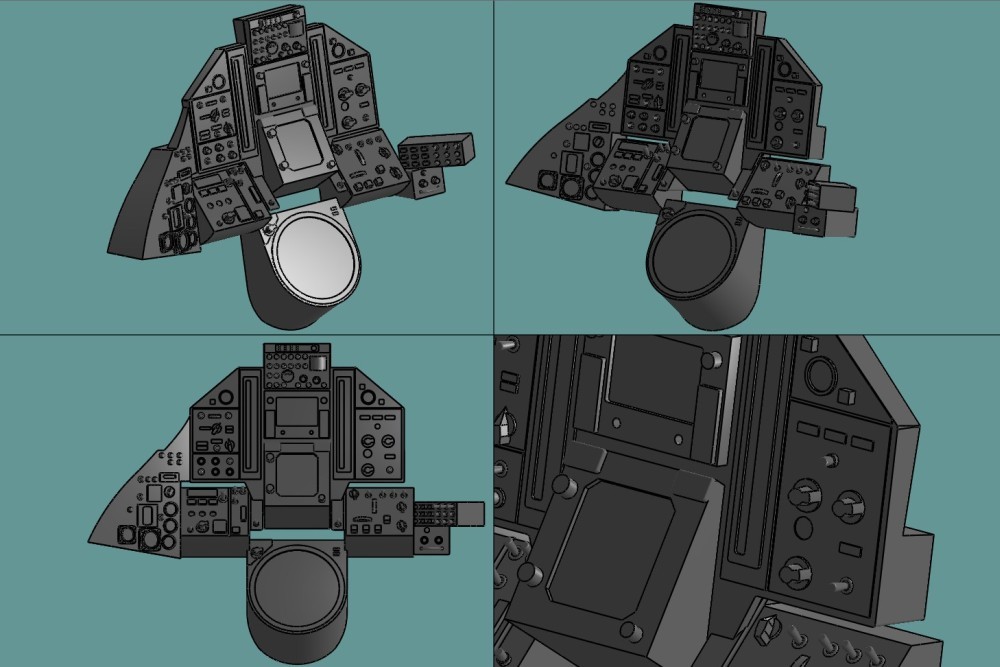
Yesterday I finally finished the cockpit tub details. It was again a bit painful to select most proper side panel layouts. Here is the result:
And both front and rear cockpits together:
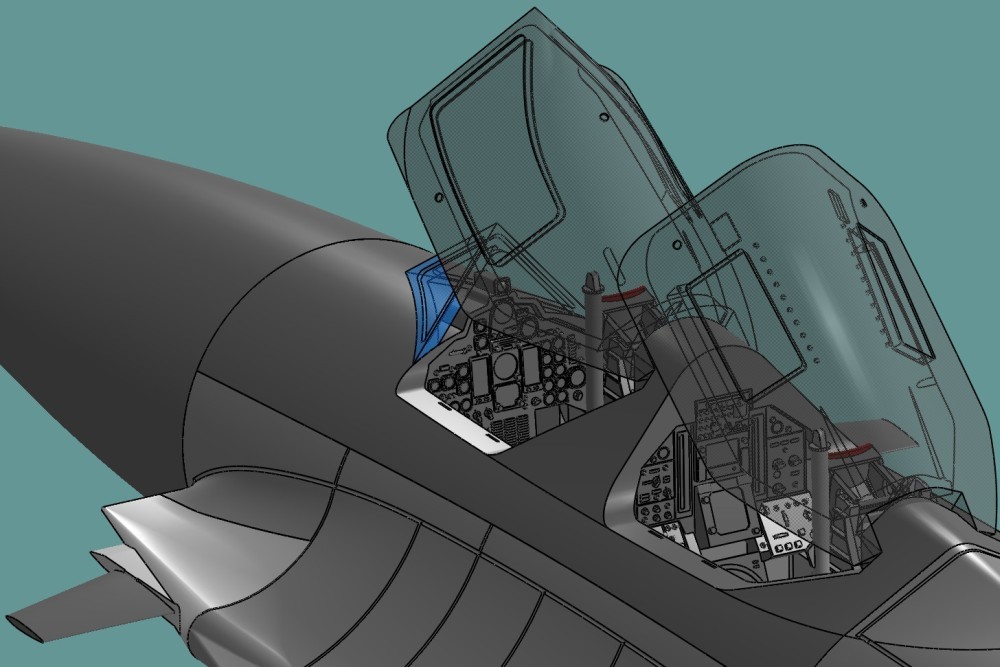
And finally placed in front fuselage:
In overall I am very satisfied with the result although there are few points to be improved. Now I can start missile bays doors modelling.
Serkan
-
15
-
-
Wow! Looks extreme extraordinary and very beautiful as well. Great work Bill.
Serkan
-
1
-
-
Many thanks for your encouraging replies @billn53, @Fritag, @Alan P, @PeteH1969, @TheBaron, @Neffan , @Back in the Saddle, @Hoops, @Zorglub, @Courageous, @Iceman 29, @Gondor44 . I am doing my best to complete this huge project as soon as possible. But it seems that it won't be possible within next few years! At first glance I can list the following tasks to do;
- A-12/TA-12/M-21 Ejection Seat (90% completed, the seat harness is missing)
- YF-12A (95% completed)
- Engine bay details (10%completed)
- Engine details (20% completed)
- SR-71A/B/C (modified chines, nose variants, new cockpit layouts, new ejection seat, long tail modification) (0%)
- AG-330 Starter cart (90% completed)
- Engine Dolly (70% completed)
- D-21 Drone (90% completed)
- Drone Dolly (0%)
My plan is first to complete the YF-12A rear cockpit details and missile bay doors. After then I will work on the early ejection seat harness (which will be very hard work).
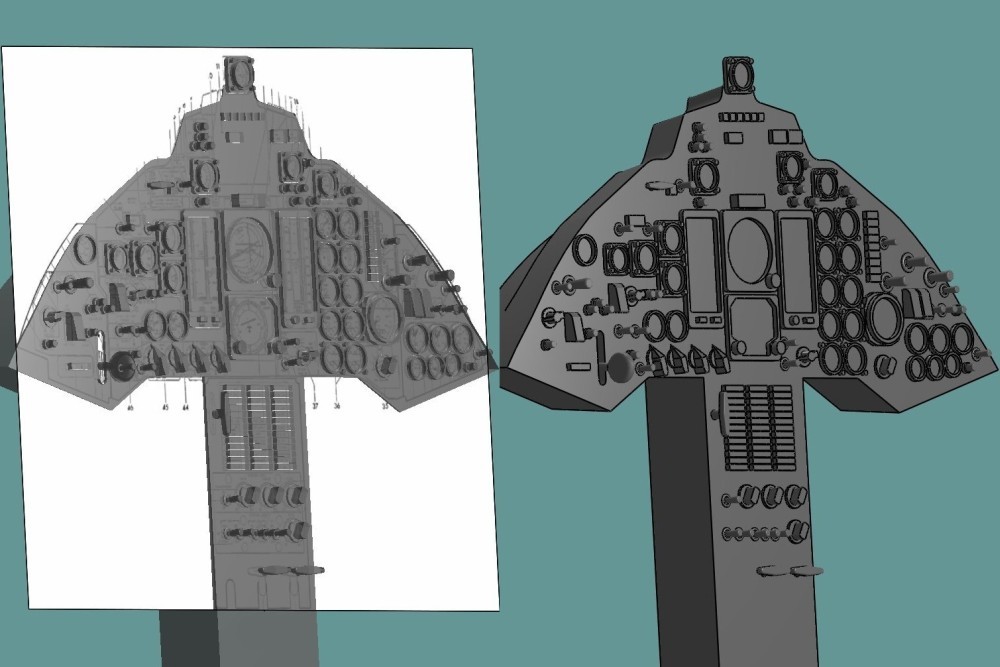
YF-12A instrument panel model has been completed. It was really challenging task to find most appropriate reference pictures to create entire panel. Each YF-12A has some different panel layout than the other one. Also NASA did their own modifications both in forward and rear layouts. Here is the model I have created:
Next step is to finish cockpit tub layout.
Serkan
-
15
-
Recently I received many questions about the correctness of the fuselage section. This question was always on my mind and I did checks in the past several times but without any documentation. I went through all these checks and I did the following comparisons.
First of all I have compared the 1:72 and 1:48 Blackbird kits' fuselage sections. The bottom row shows the 3D printed fuselage sections:
It is very interesting that both Revell and Italeri kits in 1:72 scale have better cross section shape than 1:48 ones.
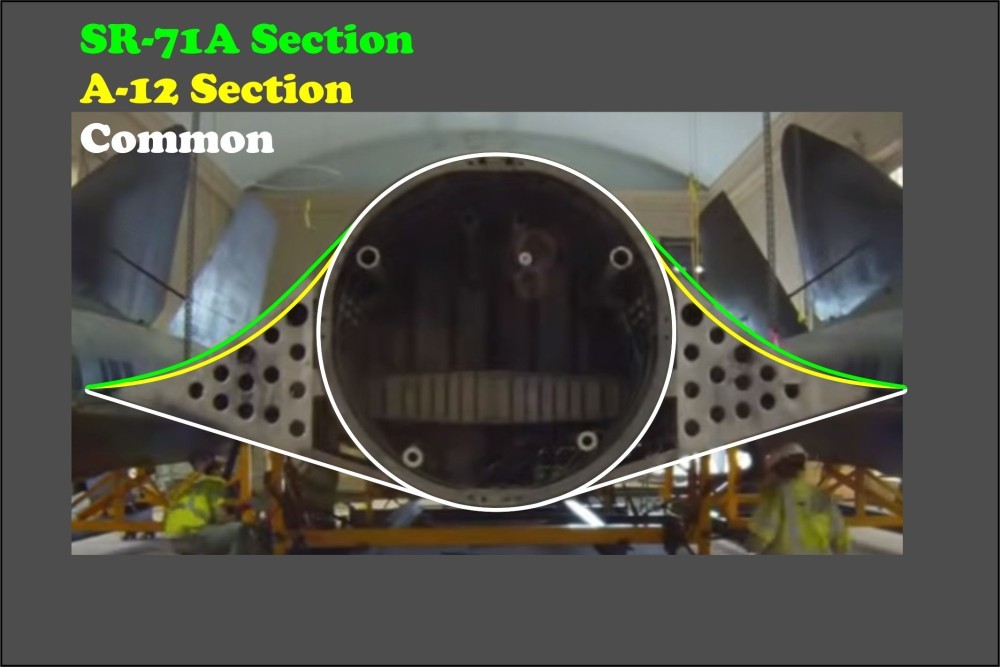
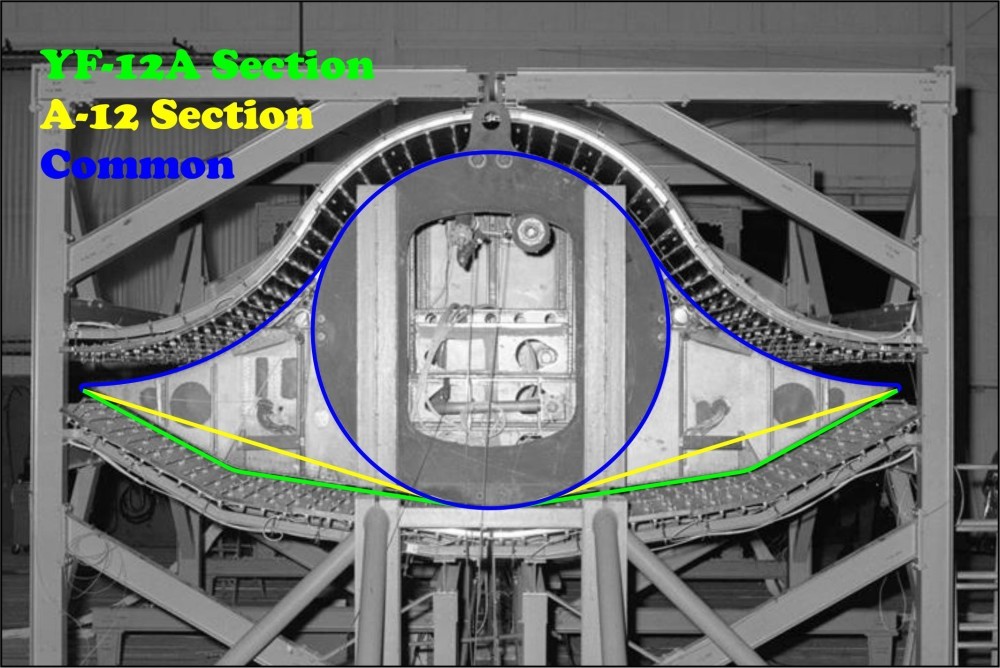
The second check was the comparison of available reference pictures with the kit and 3D printed sections.
The A-12 and YF-12A sections are exactly same on upper surface and have differences only on lower surface as expected:
SR-71A and A-12 sections have differences on upper surface curvature. SR-71A has less concave surface than A-12 which is most probably to have more space for the chine located cameras:
I have also compared new Revell Blackbird kit's section with above ones. It was really big surprise to see that Revell fuselage circular section was undersized:
Therefore my conclusion is, without doing significant surgery/modifications on 1:48 Revell kit (for Italeri it is even worser) it is not possible to do A-12 conversion. For 1:72 conversion less effort is needed. For a pain-free A-12/TA-12/M-21 build fully 3D printed kit is the solution:
Serkan
-
13
-
-
As always awesome build Bill.
Serkan
-
1
-
-
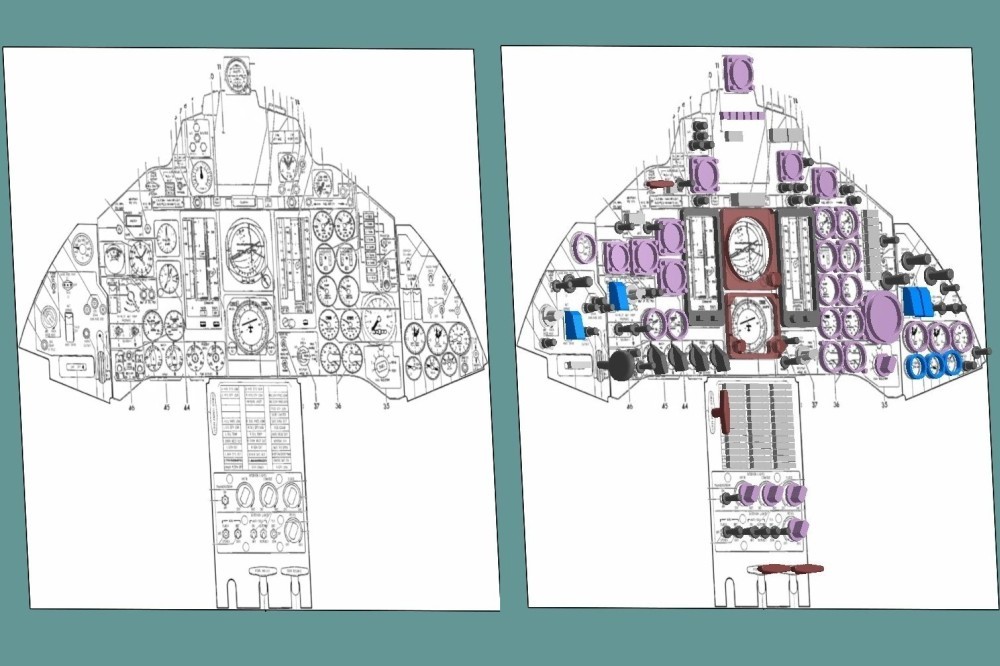
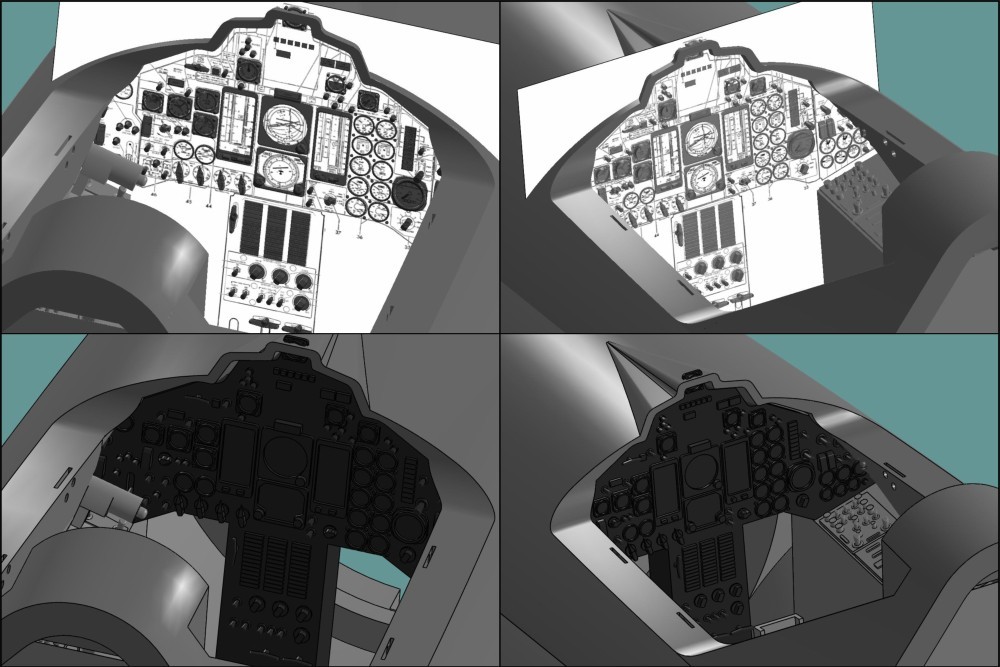
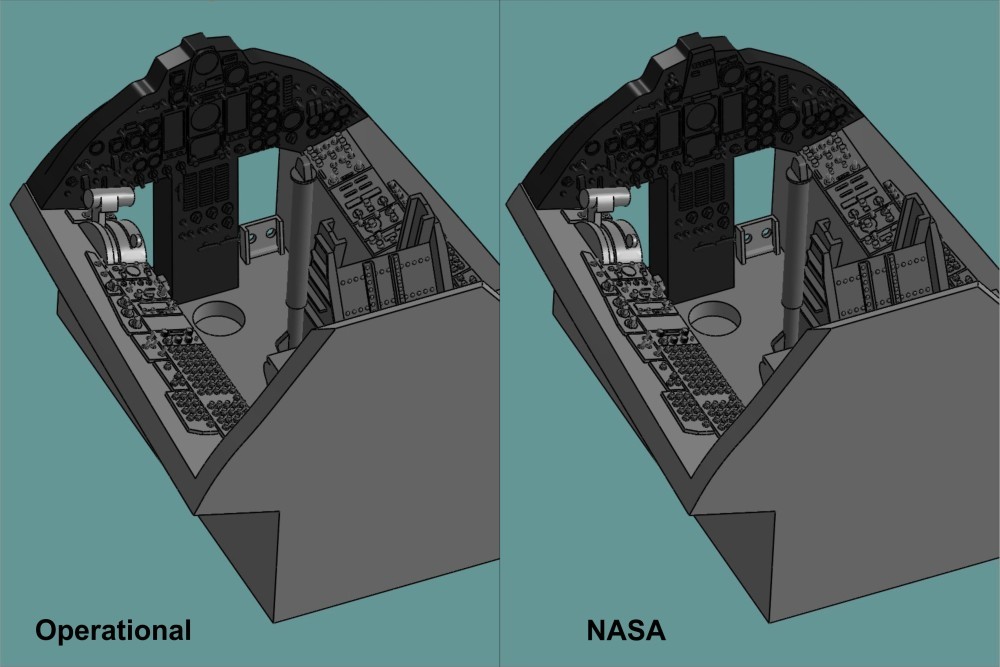
Yesterday evening I had a bit time to work on YF-12A front cockpit and here are some pictures of the result, As always I have started with the instrument panel layout I have found in operators manual and I have added each details one by one:
After few hours search in internet and reference books I realised that there are some differences between the operational and NASA YF-12A instrument panels. NASA has removed all instrumentation which was part of interceptor mission. Here is the comparison of both instrument panels:
Next step is to model YF-12A rear cockpit details.
Serkan
-
6
-


Legendary Blackbird - Part 0: Genesis... (3D Printing)
in Work in Progress - Aircraft
Posted
Actually I was very happy with Mars3 Pro but only reason having a new Mars 4 Ultra was having a higher resolution (18 micron instead of 35 micron). I can strongly recommend Mars 4 (preferably Ultra) if you don't need larger print volume, otherwise Saturn 3 Ultra. There is no much difference in price but occupied size. The new Saturn 4 Ultra has been announced recently, but personally I wouldn't go with this because it has a new tilting vat mechanism that increases the risk of potential mechanical failure.