

davecov
-
Posts
1,322 -
Joined
-
Last visited
-
Days Won
1
Content Type
Events
Profiles
Forums
Media Demo
Posts posted by davecov
-
-
Thanks Adrian. 😀
Yes, I did have a good time away and I got home today. Hopefully, I will be able to resume modelling tomorrow. My DH4 build was made for a Scale Models group build and you can read about the build here. My Sopwith Pup build is also on that site.
Dave
-
 1
1
-
-
It has been a while since I posted in this thread but that is because I haven't been spending much on cars, having achieved my aim of having every 1/32 Airfix car kit. However, I couldn't resist another purchase:
Airfix 1/32 Morris Marina (03405-0)

I already have one in my stash and the price paid for that one was the most I have ever paid for a kit. This boxing was almost £30 cheaper than the other one so I couldn't resist it. As Airfix damaged the original moulds for this kit and it can never be produced again, the price of these kits will increase over time. Even so, I intend to make this one.
Dave
-
4
-
-
At last I can report a bit of progress in that I finally had a CT Scan (colonography) yesterday. After two failed colonoscopies already in the last couple of months, it was a relief to finally get a procedure done. I now have to wait up to ten days to get the results. Hopefully, that will reveal just what is going on inside and they can untangle the web of symptoms caused by a host of illnesses I am suffering. The main thing is that I will know one way or another if there is a tumour, polyps, bleeding within a body cavity or nothing at all.
I was also told this week that I may have hypothyroidism. A blood sample was taken for a T3 (Triiodothyronine) test and while I am just in the lower end of the normal range, I will have another T3 test later this year. As for my RA, the flare ups are reducing during the day but night time is still a problem. Still, things are a big improvement on how I was when it was diagnosed last August. I am still waiting for an end to my anaemia so that I can start on the Sulphazalazine immuno-suppressors.
I now have the luxury of having just over two weeks without needing a visit to my health centre or the hospital. Aileen and I are going away to Dunkeld next week for a break. It is a place we have been to a few times and by the time I get back home again I should have the results of the CT scan.
Dave
-
 1
1
-
-
I passed my test in a white Mini Metro in 1989 in Portsmouth. The BSM instructor who should have taken me for my final lesson that day, resigned and I had to cope with a strange instructor and an even stranger car. The test had it's moments too. The examiner took me down a back road only for us to be confronted by a dug up road. He told me to turn around in my own time and it wouldn't be part of the test. No pressure then, and I managed fine and he said that I didn't need to do the manoeuvre or a hill start as I had just done them.
BTW, he told me about one person who failed his test because he couldn't find his car. It was my mate and he had borrowed a different car for his test but he couldn't remember the make or colour! By the time he found the car, the examiner had to fail him as there wasn't enough time to complete the test!
Dave
-
1
-
 4
4
-
-
I haven't done any more work but I have been looking at the Gloss Black Base that I have in my paint store.
Here are three incarnations of Alclad 2 Gloss Black Base. On the left is my favourite version and it has been used very successfully over many years. There is still a small amount left that I use for small jobs. These 120ml bottles cost about £6.35. The middle version was Alclad's replacement which cost £3.99 for 60ml, and was the one I used for this Stratojet build. Alclad was sold to Ammo and they produce Gloss Black Base in 30ml bottles. They cost an unbelievable £6.95 per bottle. I have used the Ammo MiG with good results but it is too expensive to use on large projects:
When I had the painting issue with this build, I dug out another unopened 60ml bottle of Aclad Gloss Black Base and there is a problem with it. I haven't opened it but a lot of the thinner has evaporated and what remains is solid. I reckon the current opened bottle has started to go the same way and possibly explains the mixed results in the coverage:
That is all for now
Dave
-
3
-
-
I continued with the airbrushing but with mixed results.
I sprayed the inside of the engine exhausts with Alclad 2 Jet Exhaust (ALC-113) and then sprayed the outside with Alclad 2 Pale Burnt Metal (ALC-104):
So far so good but I then hit a big problem when I sprayed the wings and tailplanes with Alcad 2 Polished Aluminium. Patches of crazing have appeared and I will need to sand back, re-prime and spray again. I have had this happen only once before and that was due to a reaction to the last formulation of Alclad 2 Gloss Black Base. Ironically, I still have a small amount of very old Alclad 2 Gloss Black Base that works really well but I don't have enough for painting such a large model. BTW, Alclad recommended grey primer as a base but I always found that I got better results with Gloss Black Base. I guess I should do as I am told in future:
One tailplane was fine but the other not so much:
A similar result with the drop tanks - one good, one bad. This time I had used Alclad 2 Dark Aluminium (ALC-103) which would appear to confirm there is a problem with the Gloss Black Base:
I won't take any corrective until next week as I need to let the paint cure before I start sanding it back. I will now concentrate on the cockpit area.
That is all for now
Dave
-
4
-
-
My new Harder & Steenbeck airbrush arrived today:
It comes with two nozzles, .28 and .45 mm sizes:
This is my fourth H&S airbrush but as nice as it looks, I am going to use my trusty H&S Ultra for this build. I have been using it as my main airbrush for the last 11 years:
Priming of the white sections has been done. Although not shown, the white was covered with H130 Satin White:
I then masked off the white sections and have applied a coat of Alclad 2 Gloss Black Base which I normally use under metallic finishes:
The wings were also done:
That is all for now
Dave
-
9
-
-
On my inkjet printer, I always used to set the print settings to the highest quality pictures, use glossy decal paper and make sure that the paper setting is set to Glossy Photo Paper. Even then, if the original image hasn't the highest of resolutions then it will still appear "dotty". I stopped using the inkjet some years ago because it could be a bit hit or miss sometimes and there was the additional fixing of the print afterwards.
Dave
-
1
-
-
More progress to report.
The forward interior has been painted with H226 Matt Interior Green:
Although I could have installed the rear wheel well after the fuselage halves are joined, I decided to glue it in place now. Just as well, as I needed to add extra bits of plastic card to get the starboard side to match the port side:
The wheels have been brush painted and are dry-fitted at the moment:
The front wheel bay and wheels. This bay really has to be fitted before the fuselage halves are joined:
Front wheel bay has been glued in place:
I brush painted the front of the engines although I will probably airbrush them later:
Wings, tailplanes and engines were masked ready for airbrushing some white primer. I am not starting on that just yet as I am waiting for a new airbrush to arrive:
That is all for now
Dave
-
10
-
-
At last I can get down to some painting.
First off were the ejection seats but they still need a bit of fine detail painting and varnishing before they are finished:
The twin engines were filled and sanded and all raised detail was removed. They were then glued to the pylons which also had the detail removed from them. The pylons needed a fair bit of work to sit correctly on the pods:
The filler around the pylons has been smoothed off with a damp cotton bud:
I applied some H81 Matt Pale Yellow to the outrigger doors and the outrigger wheel wells:
The main wheel wells and doors have received two coats of H81 Matt Pale Yellow:
That is all for now
Dave
-
12
-
-
I'm not sure if they did use the exact same seats but they look okay to me, especially as I don't suffer from AMS. 😉
Dave
-
Real life has got in the way of this build but I have started work on it again tonight.
The fitting of the wheel wells has proved to be a real problem and has required a lot of fettling with a lot of chamfering of the bays. I have found that the front wheel well needs plastic rod either side to give a snug fit in the fuselage. Unfortunately, this means that I cannot fit the bomb bay doors until after the fuselage halves are closed. On the other hand, the rear wheel well fits a lot better if it is slid into position via the bomb bay:
I punched out some 10 thou plastic card discs and glued them into the ejector pin marks:
I have just received a pair of Wolfpack F-102A Delta Dagger seats in the post which means I can now start on the cockpit detailing:
They are quite nice and should look good once painted:
That is all for now
Dave
-
7
-
-
I got the information about the regiment from a Star Decals sheet that is on sale on Hannants and covers New Zealand and Australian tanks and AFVs in Africa and Middle East WW2. Sherman Mk III, Universal Carrier, M3A1 White Scout Car, Dingo Scout Car: https://www.hannants.co.uk/product/72-A1064 then it was a case of Googling 9th Australian etc. BTW, T21330, is one of the featured vehicles on the decal sheet but camouflaged and without the "Mr Chips".
Dave
-
1
-
 1
1
-
-
Last week I had a phone call from the hospital Rheumatology Specialist to say that they were very worried about my last set of blood tests. Not only am I anaemic but my white blood cell count is still very low too. I said that I was having a colonoscopy today (25th) which hopefully, would shed some light what is going on but alas, the colonoscopy didn't take place. Although I had taken the bowel preparation and fasted as directed, the doctor was unable to progress due to not having a clear enough route.
As that has happened twice in eight weeks, I said that I wouldn't like to do it for a third time. He said that it does happen quite a lot and he reassured me that they are going to arrange for a CT colonography instead. He said that should reveal exactly what is going on and he suspects polyps or a tumour. An upper endoscopy two weeks ago didn't reveal anything untoward "up top".
I can recommence my iron tablets now (had to stop for a week prior to the colonoscopy) which may help my anaemia long-term. Another blood test is scheduled for next week and so the investigations go on and on and on!
My RA has almost been forgotten over the past few days but I am afraid that I am suffering a big flare-up at the moment, thanks to the weather. That has limited my modelling time again.
Dave
-
3
-
-
-
3
-
1
-
-
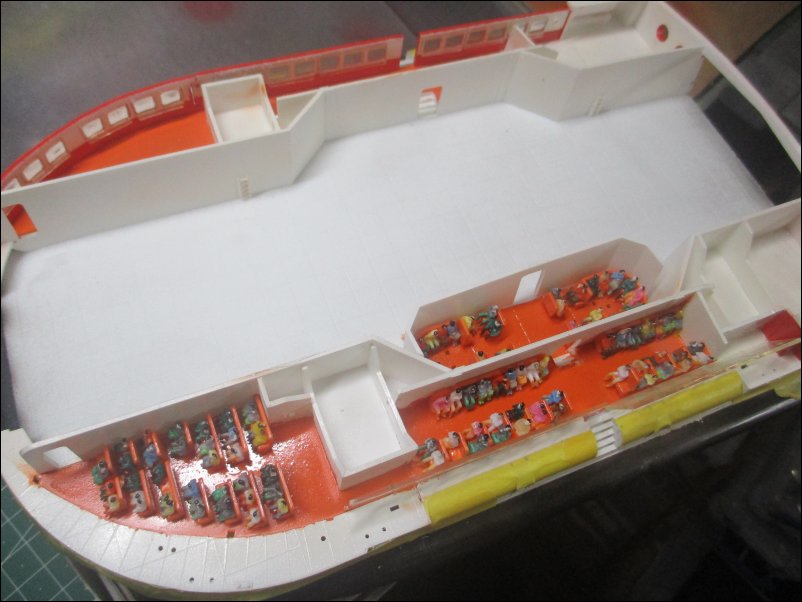
2 hours ago, Tribesman72 said:
Thanks for the tip on lining the skirt up with the hull first and filling the gaps, any idea where I could find some figures? Would N gauge railway passengers look too small?
I used N gauge figures and the difference between that and 1/144 is hardly noticeable. No, I didn't paint them, they came ready painted:
BTW, you might want to add some support between the Car Deck and the lower hull as the plastic flexes a lot and can affect the fitting of bulkheads later on.
Dave
-
8
-
1
-
-
I'm looking forward to seeing another SRN4 built.
I built one a few years ago. The skirts needed a lot of fettling but I got there in the end. Each of the skirt sections are made up of two halves which were glued together before fixing to the hull. I made sure that the top of the skirts met the hull topside as they would be visible, even though it meant there were gaps between the skirts underneath. They were filled with plastic card:
The seats are not a problem but you might like to add figures like I did when I built mine:
Dave
-
11
-
-
Dennis,
The best place to look for information about HMS Hood paint schemes, is the HMS Hood Association website. There is a page dedicated to all the ins and outs:
http://www.hmshood.org.uk/hoodtoday/models/tips/hoodpaint.htm
Dave
-
Hi Adrian, @AdrianMF
The interlocking locating tabs of the wings are not foolproof though as the outside tabs are very flexible and I found that if they were left unmodified, they would not always interlink correctly, passing to the wrong side of their opposite number.
Here the fuselage and wings have been dry-fitted and without the bomb bay fitted (as per the instructions), that makes it possible to manipulate the tabs as they enter the fuselage to ensure they align correctly. Of course, if you ignore the instructions and fit the bomb bay before closing the fuselage up, you can't do that:
Although I am not fitting the bomb bay, I will be glueing the bomb bay doors closed before the fuselage halves and wings are glued. Because of this, I needed another way to ensure that the tabs aligned correctly. My solution was to chamfer the ends of all tabs which forces them to the correct side of each other. It works fine on dry-runs but what actually happens in due course remains to be seen...:
That is all for now.
Dave
-
14
-
1
-
-
Thanks @Corsairfoxfouruncle I share your pain.
I was diagnosed with Osteoarthritis of the back, neck and knees in the Eighties. It was so bad that I was discharged from the Royal Navy being unfit for Naval service. Having suffered for decades I have learnt how to manage the pain of those quite well. However, I was diagnosed with Rheumatoid Arthritis just six months ago and I am now having to learn how to cope with that. Problem is, I overdo things on a good day and suffer as a result. I'll get it right in time.....
Dave
-
6
-
-
Steve Harley
in Chat
Sad news indeed. I saw him live a few times. In the Seventies, the single "Make Me Smile (Come Up and See Me)" was the first ever record I ever bought. To this day it is still a firm favourite of mine and I have always had an MP3 it on my computers and phones over the years, even now.
Dave
-
The cleaning up of parts continues but it has been a painful experience for my arthritic hands. I over-did things one evening and found that I was unable to do any modelling for more than 48 hours afterwards. Despite that, more progress has been made.
The drop tanks required a lot of filling and sanding but they are now ready for priming and painting:
The single J47 pods have been glued together. I had tried to preserve as much of the raised detail of possible but the ill-fitting resin parts have put paid to that. A lot of filling and sanding is still required, so I may well remove all of the remaining detail:
I had to take corrective action on the centre sections of the twin J47 engine pods. You can just make out numbers "3" and "4" in the centre of the lower pod ("1" and "2" are on the top pod). The lower numbers "1" and "3" should face forward. I glued them back to front and had to break them apart and re-glue them. As with the single J47 pods, the resin parts are ill-fitting and still require a lot more filling and sanding:
Although the engine pods still need filling and sanding, the other components shown are ready for priming and painting. I am tempted to remove all of the raised panel lines but that may be too much for my hands to cope with:
BTW, I was browsing Britmodeller for some Stratojet builds and discovered @adey m's Stratojet build and I am tempted to copy some of his cockpit work which makes a lot of sense of what isn't always discernible from photos alone:
That is all for now.
Dave
-
12
-
-
More done over the past 24 hours.
Lots of dry-fitting and fettling has been necessary during the clean-up phase. One area of concern are the bomb bay doors. I am not fitting the bomb bay so I have added extra plastic card for the doors to rest on:
After cleaning up seams and flash, I started to assemble parts. The drop tanks are ill-fitting and will need a lot of filling and sanding which will probably destroy the raised detail. When I start painting, the masking tape reminders will be replaced by green or red ink on the locating tabs:
A lot of time was spent cleaning up the first of the resin replacement twin nacelles and nozzles. Work on the other twin and single nacelles and nozzles will continue today:
That is all for now.
Dave
-
15
-
-
Meanwhile, back on planet Earth.
Another little update.
I would like to start by mentioning the great service I have been getting from my village health centre and the Borders General Hospital. Appointments are arranged very quickly and results of tests are returned fast too, sometimes the bloods results are phoned to me within eight hours of giving the blood.
This morning I popped into the health centre to pick up some medication and asked if it was possible for my GP to phone me at his convenience today, to discuss my endoscopy, biopsy and medication. Within an hour, my GP was on the phone. Very impressive. The good news is the biopsy was negative with no signs of Helicobacter pylori or anything else to worry about in the stomach. The irritation shown on my stomach lining is being blamed on Naproxen and I have been told to stop taking it. The replacement medication is Etoricoxib and my Omeprazole dosage is being doubled for the next four weeks to see if that settles the irritation, although I don't suffer any ill effects from it. In fact, I wasn't aware of it until the endoscopy.
For the past two days, my Rheumatoid Arthritis has hardly been noticeable compared to a few days ago. Then again, I haven't been doing anything silly following my exploits in my garden. Temperature and weather does play a big part in my symptoms and as things are gradually warming up, the flare-ups are lessening and I am able to do some modelling for longer periods.
As for my anaemia, still no word from my haematologist after the last blood samples, so the reason for that remains a mystery. Investigations are continuing as to what is causing my iron levels to remain low but while it remains so, I can't start on the Sulphasalazine. Over the next two weeks or so, I have to give another blood sample, undergo a colonoscopy and catch up with my GP again. Hopefully, it will be more good news, even if the anaemia problem isn't solved.
Dave
-
3
-


My Arthritis Hell Continues
in Chat
Posted
Thanks Steve 👍
Dave