

GazB
-
Posts
757 -
Joined
-
Last visited
Content Type
Events
Profiles
Forums
Media Demo
Everything posted by GazB
-

'Thunderbirds Are Go!' Aoshima/AiP 1/350
GazB replied to GazB's topic in Ready for Inspection - SF & RealSpace
Haha, thanks, Pete. Thanks, TEXANTOMCAT 😇 Gaz- 24 replies
-
- 2
-

-
- Thunderbirds
- Thunderbird 2
- (and 1 more)
-
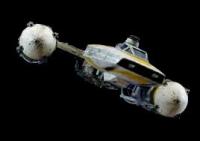
Ahoy once more. Finally posting up shots of this diorama I put together...flipping heck, it was back in April 😮. Anyway, got a request from my aunt about whether any Thunderbird 2 models existed, as it was my uncle's favourite. By chance I'd spotted the reboxed Aoshima offerings around October '21, and ended up building the Mole for my brother (don't think I've actually posted images of that one yet, may have to get hold of it for some pics), so I knew one was around. Snapped it up, and also got a display case for it. This was my first real attempt at putting an aircraft model in flight, and I'd later replicate the technique for my MiG-29 display (with the same style of case). Took a considerable bit of doing and a lot of trial and error to get it to sit where and how I wanted. Since its about to be wrapped up soon as a Christmas present, decided to get pictures before it leaves my possession. Overall, not a bad build. Needed a bit of modification for flight mode, notably adding in scratchbuilt landing feet pads to more resemble the original version. If memory serves I used all the decals except for those on the engine cowlings. Paint scheme was a combo mix of Tamiya Yellow and Flat Green. Minor weathering effects applied, with just a bit of a panel line wash and a small amount of oil fading at the top of the pod. The base took a lot more tinkering to get looking right. Initially brush-painted every individual field in, then went over with an airbrush to try tidying things. Adding the trees, the teeny tiny little vehicles (there's a FAB1 down there too), and the little town, as well as the mast, to give the sense TB2 is high above. The kit comes with a TB4 and excavator. Obviously they wouldn't fit into the planned scene, so I came up with making them their own mini scenes. Was something different from what I was used to, and helped me try some new things On with the pictures. Thank you as always for looking Gaz
- 24 replies
-
- 47
-
-

-
- Thunderbirds
- Thunderbird 2
- (and 1 more)
-
Thanks, Josh ^-^ Gaz
-
Thank you kindly, F-32 😇 Gaz
-
Thanks very much, Muchmirth ^-^/ Gaz
-
Thank you, Dave, Vultures1, and Ryan ^-^ I always seem to have problems with ICM decals for some reason 👀 Gaz
-
Same here. The 3rd Gen thinner, and the 3rd Gen retarder. Thinned to a milk like consistency. Paint speckles badky, but then also pools up. It's so weird. Gaz
-
Thank you very much, Hopesdaddy ^-^/ It does lack some of the small amount of stencilling data, but the decals were giving me so many problems I didn't want to risk using them in the end Gaz
-
Bit of a different one. Built this up as a Christmas present for my brother. Initially considered the newer Revell kit, but it wasn't available at the time, was a lot bigger for space requirements, and didn't have the same degree of detail. The Bandai offering was more manageable size wise and detailed, but had the problem of exposed ball joints. Had to bite the bullet and try my best at filling all those exposed areas after getting him into the pose I wanted. Surprisingly, went much smoother than anticipated. The figure isn't a hundred percent accurate for the series with all of those weapons handy, considering the right leg armour plate isn't the one worn when the spear is acquired and Bandai oddly didn't include two variants. Painted up with a variety of colours, largely taking reference from screenshots over the instructions. Armour was dusted with Mig Gun Metal pigment and buffed up. The base is two bits of insulation foam with rough cuts, stuck to the display case bottom, and coated in a layer of asphalt texture paste, which was then painted with a black/brown/purple mix to give it a cooled lava appearance. Overall, happy with the outcome Thanks for taking a look Gaz
-
Back again with another recently wrapped project, the ICM 1/72 'Ghost of Kyiv' MiG-29. Finished this months ago, but forgot to add the wingtip nav lights. Finish was also a little too glossy, so I slapped some liquid masking on the canopy and nose sensor and sprayed it down with some satin varnish. Had this idea in mind almost as soon as I saw the kit, and while the kit itself was a little basic and required a fair amount of filling and sanding to get right, and the decals were incredibly frustrating (being far too thin and flimsy, and near instantly sticking themselves) requiring that I try to duplicate the failed ones with Tamiya masking, I'm happy with the end result. Also a bit of a disaster with the one decal that didn't decide to stick down instantly in the right side intake number, which my thumb apparently touched at some point and bunched up. Decal was beyond use, so I had to hand paint the number back in 😬 Only major modification I made to the build itself was closing the upper louvres by moulding some Miliput. Model didn't have that as an option, but the aircraft close those in flight and open up the main intakes. Added a pilot figure, pulled from my Bandai X-Wing kit where I didn't use the rebel pilot in the seated position. Thankful I had him, because I could not find any aftermarket 1/72 pilots that were suitable (certainly not reasonably priced from what I can recall). Modded him up as best I could and in he went. Second attempt at mounting a model aircraft in flight, and the first attempting to replicate a fired missile. Smoke effect wasn't brilliant at first, but then I saturated the cotton wool (superglued around a wire) with diluted modpodge and was able to shape it into something tighter. Overall happy with how it turned out, even if I couldn't get that field to go brighter no matter how many times I tried Whole thing has a display cover as well. Anyway, enjoy As always, thanks for looking Gaz
- 10 replies
-
- 25
-
-
Hi George. I use a gravity fed airbrush, though, and while I usually mix up in the cup, this time I specifically did it separate. I didn't apply a primer to the piece of styrene sheet I was testing on, but the flow from the airbrush was still super poor no matter what ratio I mixed it in Gaz
-
The C ones Gaz
-
I tried giving these another go after watching a build video where someone used them. By all appearances, they went down look like Tamiya paints. Good coverage, easy spray. No pooling, no spitting. Ratio was 30 paint to 70 thinner, with a bit of flow improver. Great. Gave it a try. It decided to both speckle and pool, and then it tip dried on the third pull back. Tried a 40/60 ratio. Still too wet. Tried a 50/50 ratio. Too thick. There's literally no sweet spot with the stuff. Other paints always have that spot where they just work, but 3rd Gen really doesn't. That's multiple vids I've watched with ratios (because God forbid AK ever officially gives you instructions) and none of them work on my end. Even when my ratio is a little off with say Mig Ammo or Hataka, and a little on the thin side, they still lay down and critically, actually leave the airbrush smoothly. 3rd Gen doesn't. Its kinda laughable reading the formula blurb on the bottle mentioning how they 'beat all other acrylic paints', that they 'don't clog or tip dry', and they 'dry quickly'. None of those things rang true during my test. Incredibly frustrating, and I figure the new Dual Exo stuff they're currently advertising is probably the same deal. It'll be the 'best paint ever!' but they'll give you no direction on usage and it'll probably be a nightmare to use. Gaz
-
Thanks, Sanfrandragon 😇 Gaz
-
Thanks, Electric ^-^ Gaz
-
Thanks, Houston 😇 Pattern wasn't too bad on account of the vinyl masks, but they didn't really like anything beyond a flat surface, hah. Few touches up needed Gaz
-
Thank you, exdraken ^-^ Gaz
-
Another recently completed project to be a bit topical with. Inspired by various images and clips. A small sliver of humour out of something horrific: war machines preyed upon by hungry tractors Kits used are the 1/35 Zvezda Tor-M2, the 1/35 Hasegawa Yanmar YT5113A, and some of the new the Masterbox 1/35 Ukrainian Soldiers. Pretty straightforward builds. Only real headache was the Hasegawa decals acting like stickers at times. Thanks for taking a gander Gaz
-
Hi all, back once more. This time with a project I've had in mind since May. Time spent having to drum up the appropriate masks, and then a set of decals, and then finally some metalizing powder for the display stand. Overall, came about fairly painless, aside from a few niggling moments. Kit itself varied a little from going together nicely, to being a bit of a pain. Biggest areas of frustration were fitting in the lower fuselage, and getting everything to meet up, causing some overhanging joins, and requirement of filler and sanding. After that, it was largely the pylons and stores having inadequate mounting points to make them fit securely without a lot of adjusting. Overall, happy with how it came out. Final bit of fiddling was adding metalizing powder to the base. Came out fairly good, and then I wanted to put the emblem on. Thought I had it positioned, but then it was off. Decal tore during adjustment, so had to remove and replace. In lining up, put two indentations in the surface with my ruler, somehow 🤦♂️, then accidentally scuffed the surface to the gloss beneath with a paper towel while buffing out the water marks. Second coat of powder didn't cover it, so in the end I went over everything with a 4000 grit stick to make it all look a little worn. Came out better than expected. May or may not ultimately gloss the base to seal that decal, though tit'll probably dull the shine. Anyway, without further ado. Here be my Ukrainian AF (Blue 30), 1/48 Zvezda Su-25. Painted up with the Hataka UAF acrylics set, masking with the DN Models vinyl masks, and marked with Aztec decals (pretty good decals, but they take a fair amount of softening). Thanks for looking, as always Gaz
-
1/48 - Lockheed-Martin F-35A & B Lightning II by Tamiya - released
GazB replied to Homebee's topic in The Rumourmonger
Hopefully its not too much difference. Thanks, boom Gaz -
1/48 - Lockheed-Martin F-35A & B Lightning II by Tamiya - released
GazB replied to Homebee's topic in The Rumourmonger
Do we know of an estimated release date for December? Got one pre-ordered, but heard nothing beyond 'December' Gaz -
Might as well drop this here instead of starting a new thread. Anyone know if the Real Color compatibility thinner can thin Mr Color lacquers? I know you can just get the levelling thinner, but I was hoping for a less smelly alternative to maybe trying some of the lacquer gloss coats (depending on how stinky the actual Mr Color paints themselves are). Cheers Gaz
-
I KNEW it was like a vinyl! The way it would web and spit reminded me of what the One Shot primer would do after a while of spraying, only the AK stuff would do it immediately. I never confirmed it until I read this. Gaz
-
No worries, hope it goes smoothly, pun intended, hah. Gaz
-
I got one reply back from AK on the matter, but nothing beyond that on a follow up. They even went as far as to delete the original version of the Youtube video that included my original comment asking about the thinning, where I was told X-20A and water would work, and re-uploaded it, likely in an attempt to hide that exchange. Hi, Chris. I've found a roughly 50/50 ratio of paint to the high compatibility thinner works pretty well. I usually use that thinner to flush and clean the cup afterward. I tend to measure it drop for drop into the cup with two pipettes, one for the paint and one for the thinner. Lighter colours may need a tad more thinner, just to stop speckling, but not too much Gaz