

daneel
-
Posts
153 -
Joined
-
Last visited
Content Type
Events
Profiles
Forums
Media Demo
Posts posted by daneel
-
-
If you can mail order AK Real Colors, they do light gray (RC255) and blue gray (RC256) that might be a good match. I haven't used those specific colors yet, but I have been quite happy with AK RC line so far.
-
 1
1
-
-
I did the same, and had no problem. First applied gunze surfacer black on previously cleaned plastic surface. Then applied AK Extreme metal, then coated it with gx100 to ensure I can mask over it. Never had a problem with paint lifting with this system. However, for this to work, plastic has to be well cleaned, paints well mixed, and gx100 applied in a thick enough layer (not too thick, ofcourse. I usually apply a couple of thin layers). If you followed all of these steps, that would point to there being a bad batch of paint, and I would obtain a second bottle, from a different supplier, and test again, on a scrap bit of plastic. This combination really works, and you shouldn't have a problem using it. Hope you stick with it, and find out what was the issue.
-
Beautiful Viggen. Congrats mate, you've got yourself an excellent replica here!
-
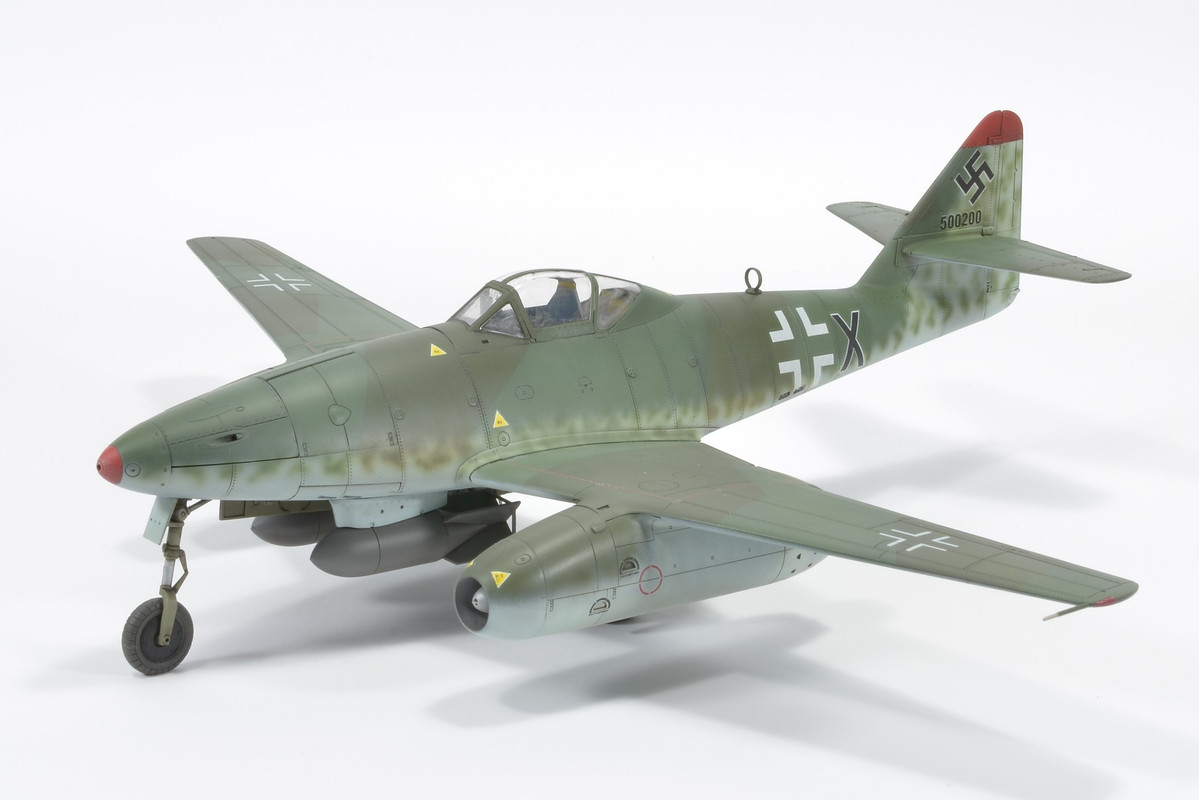
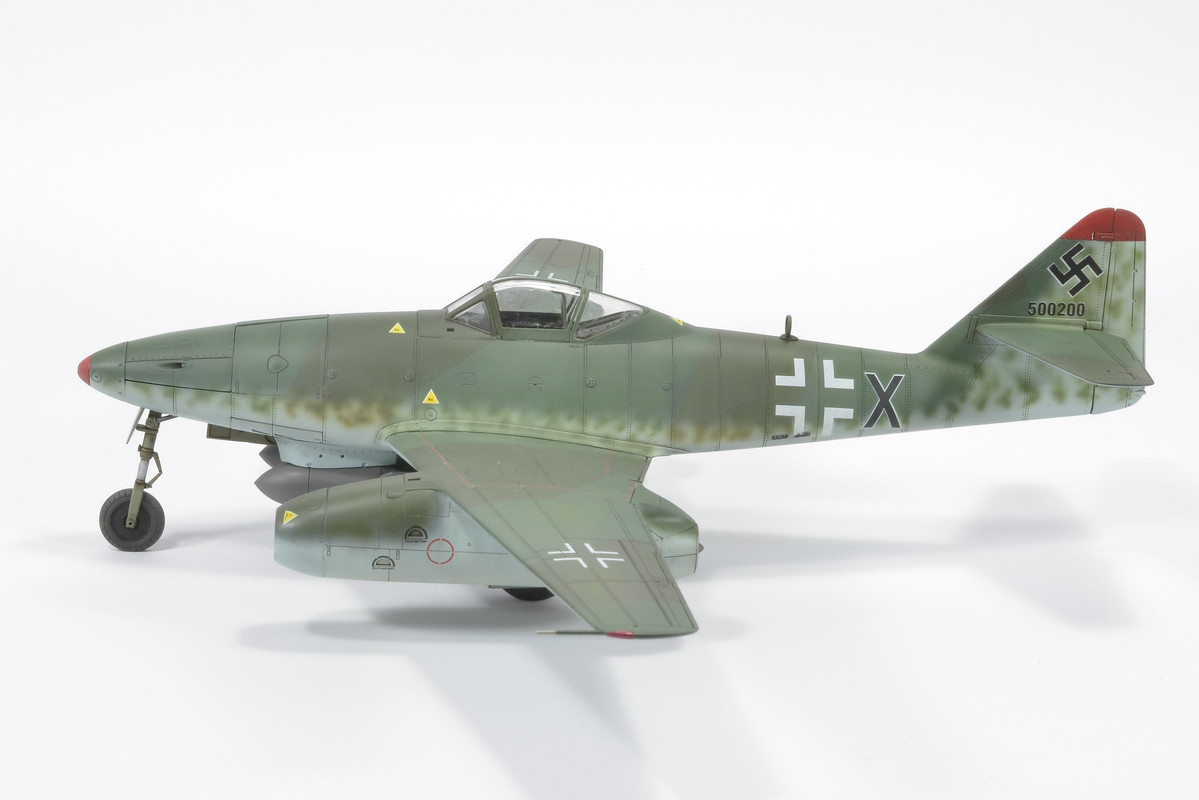
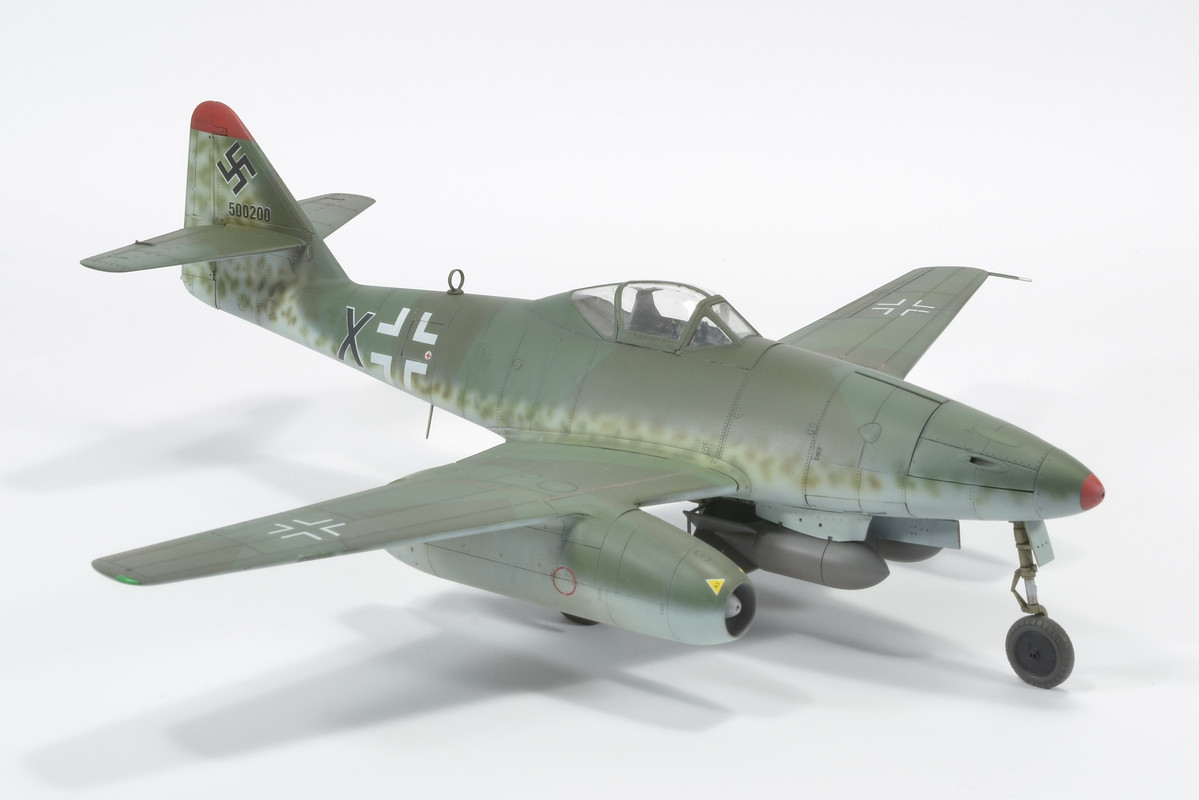
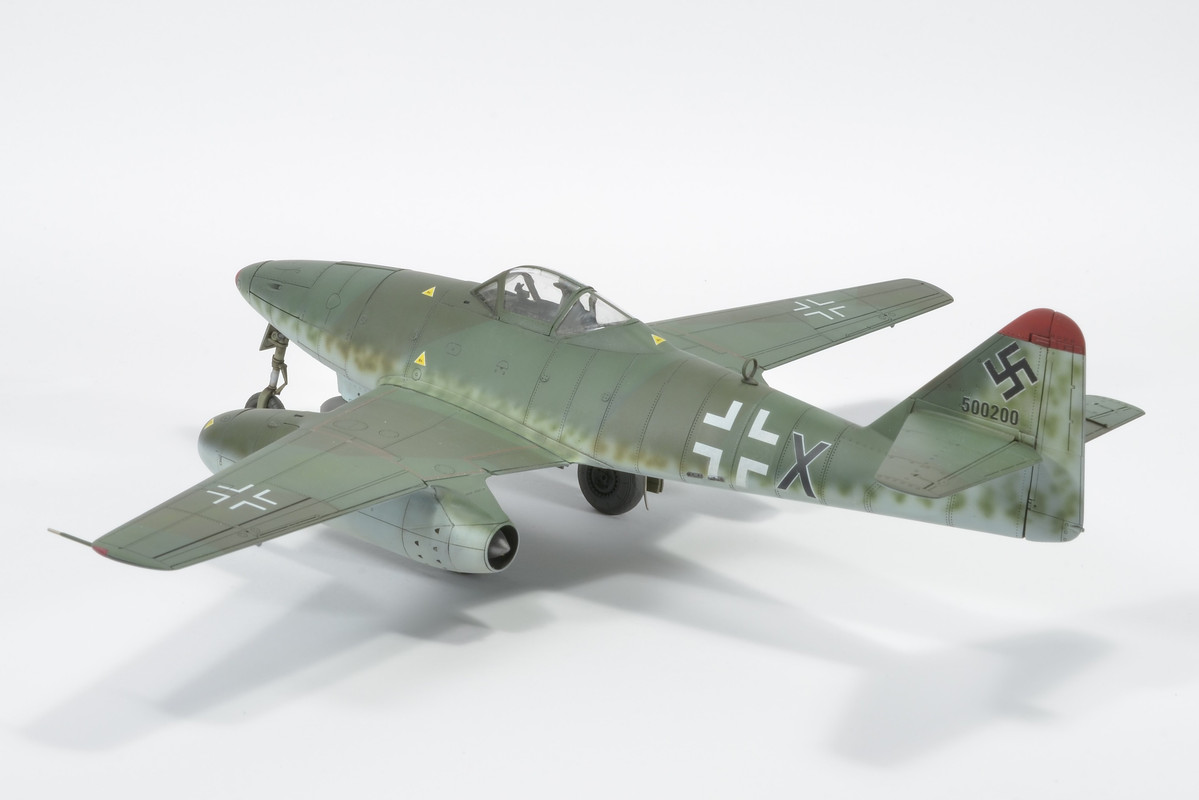
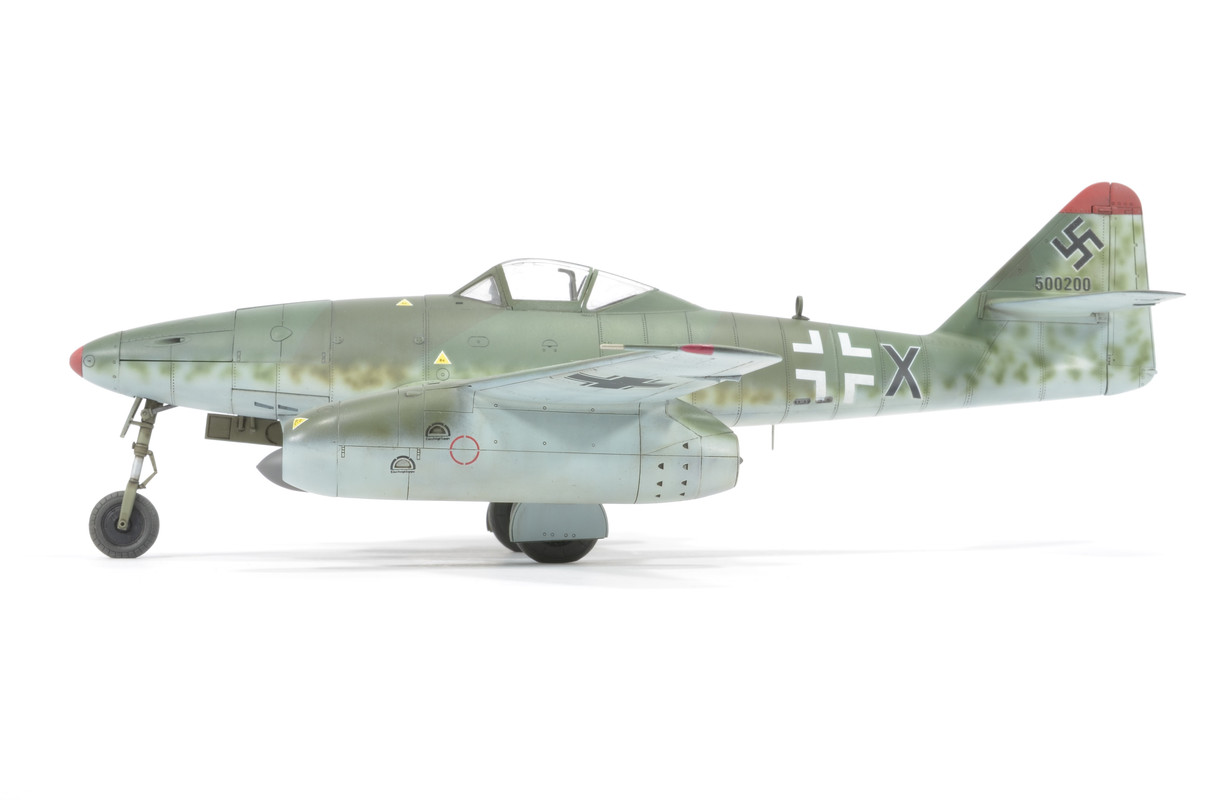
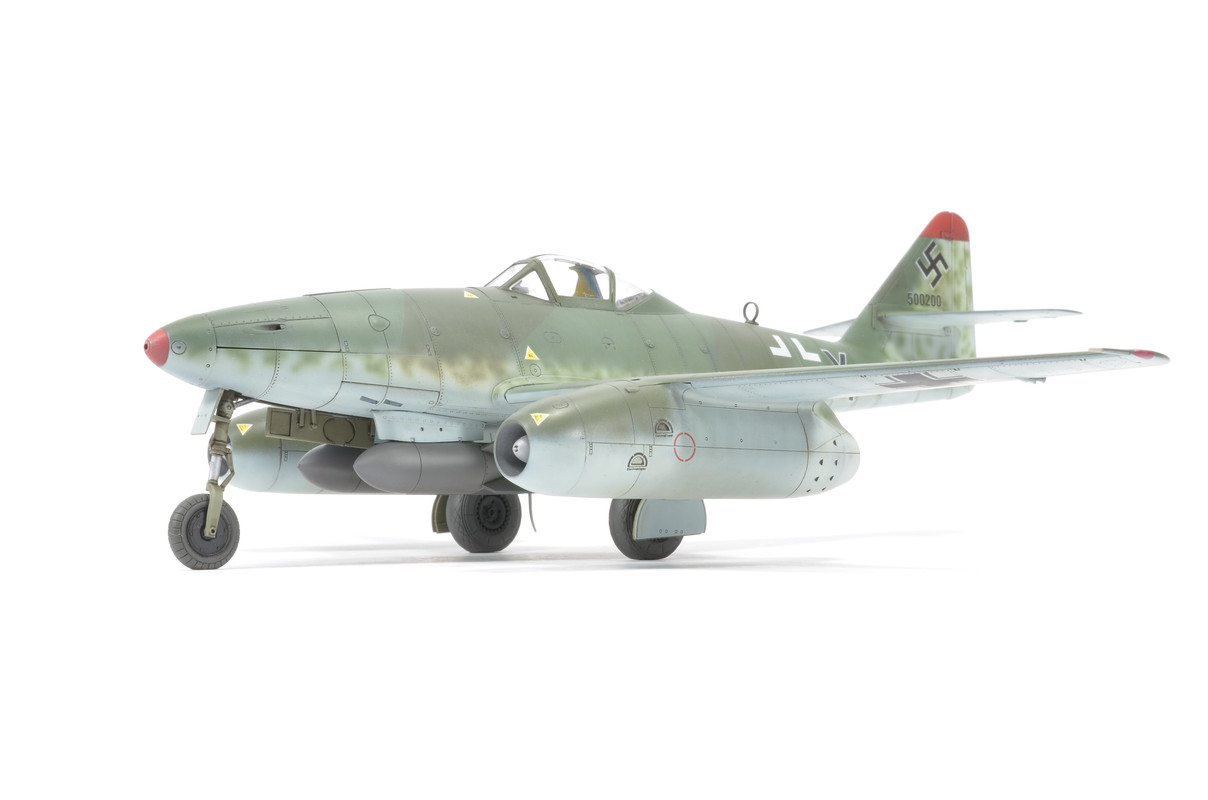
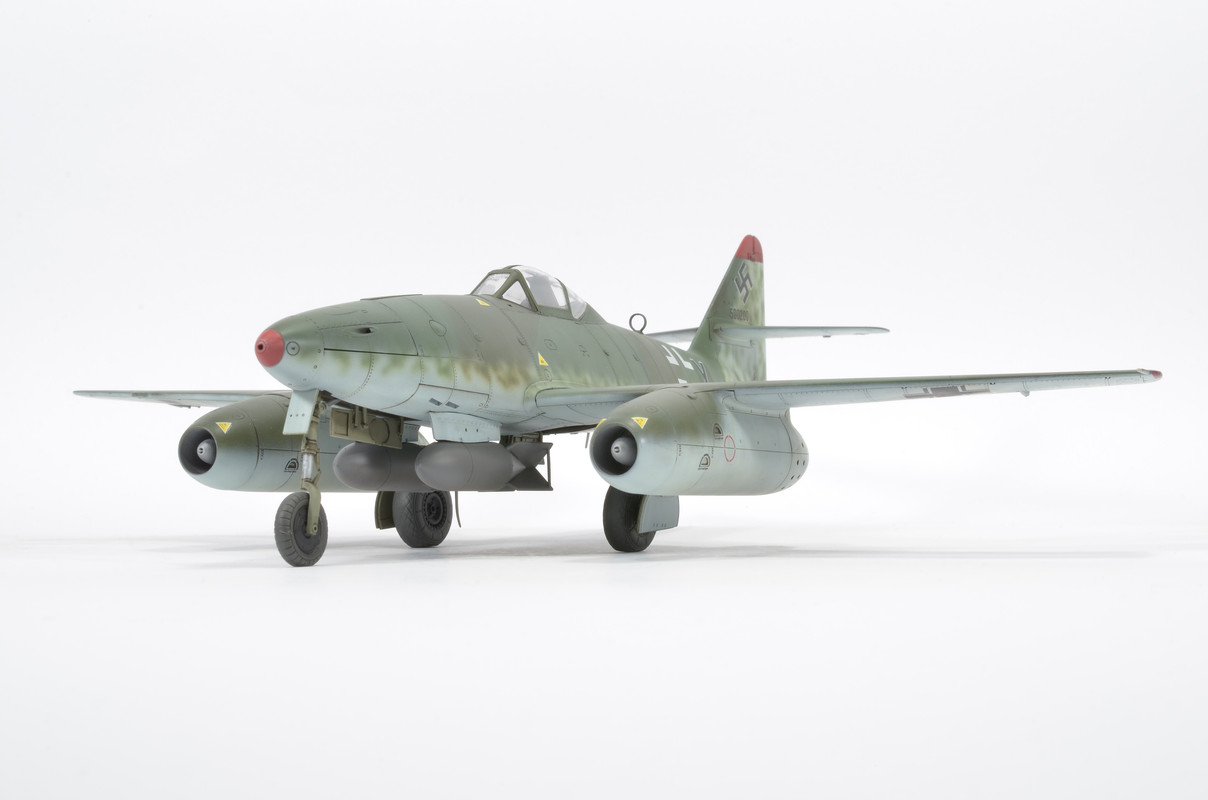
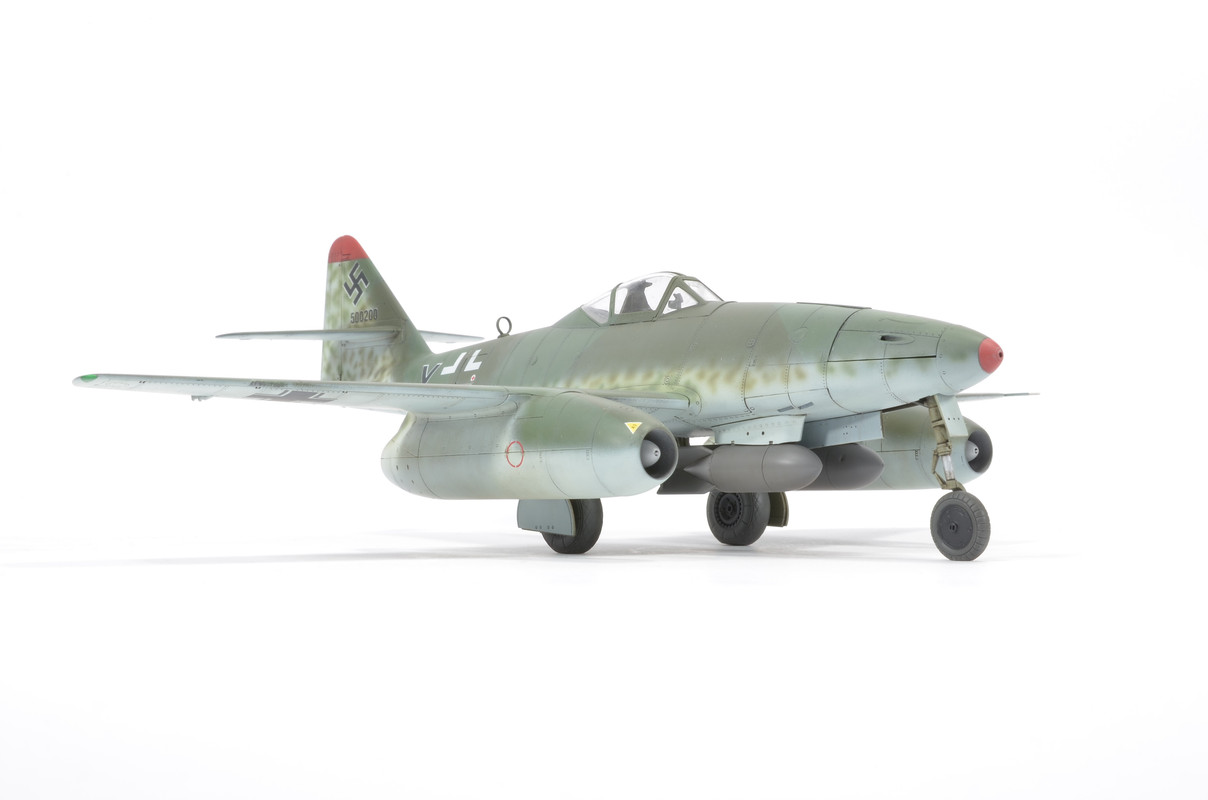
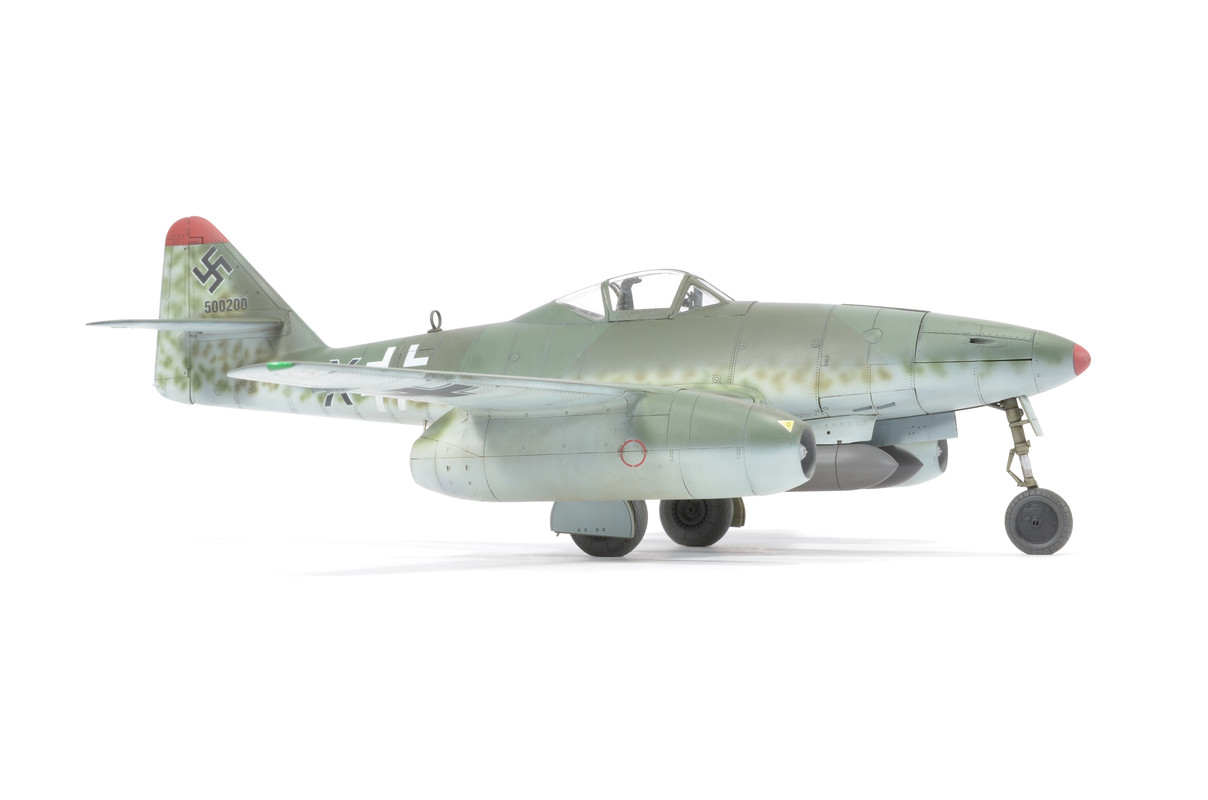
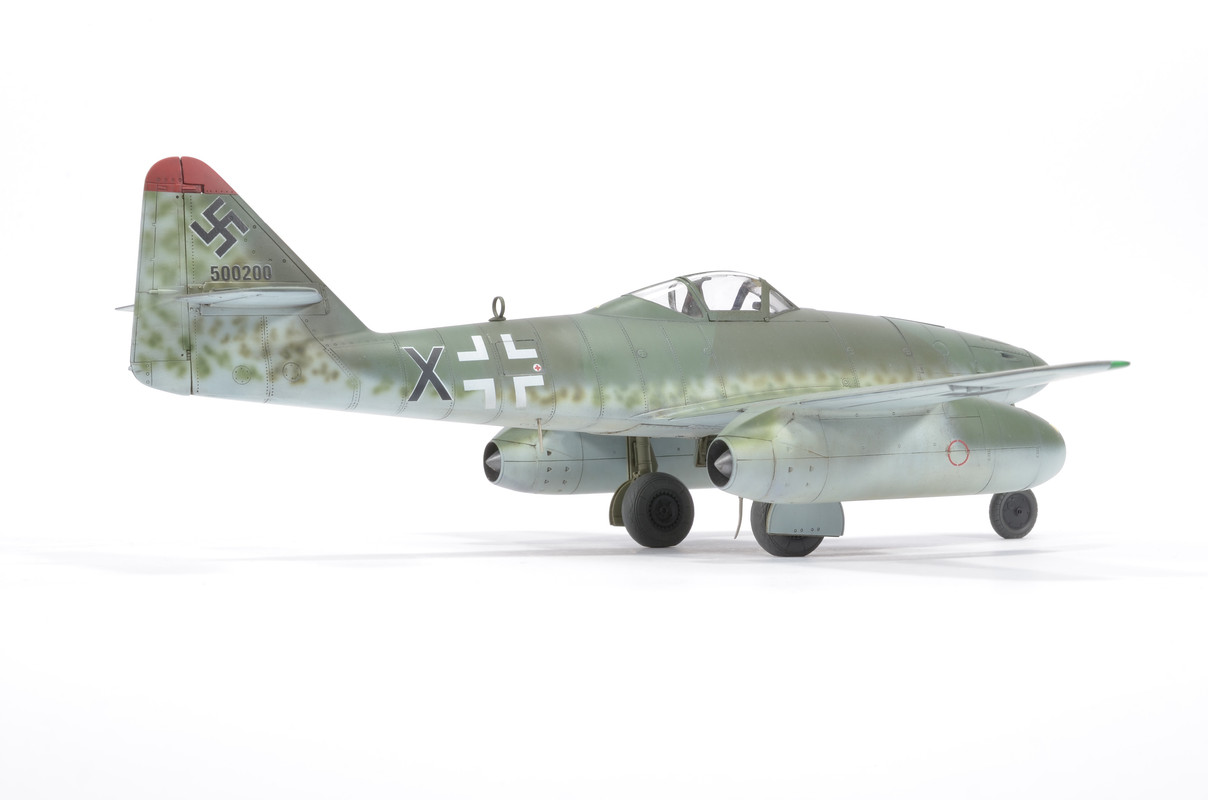
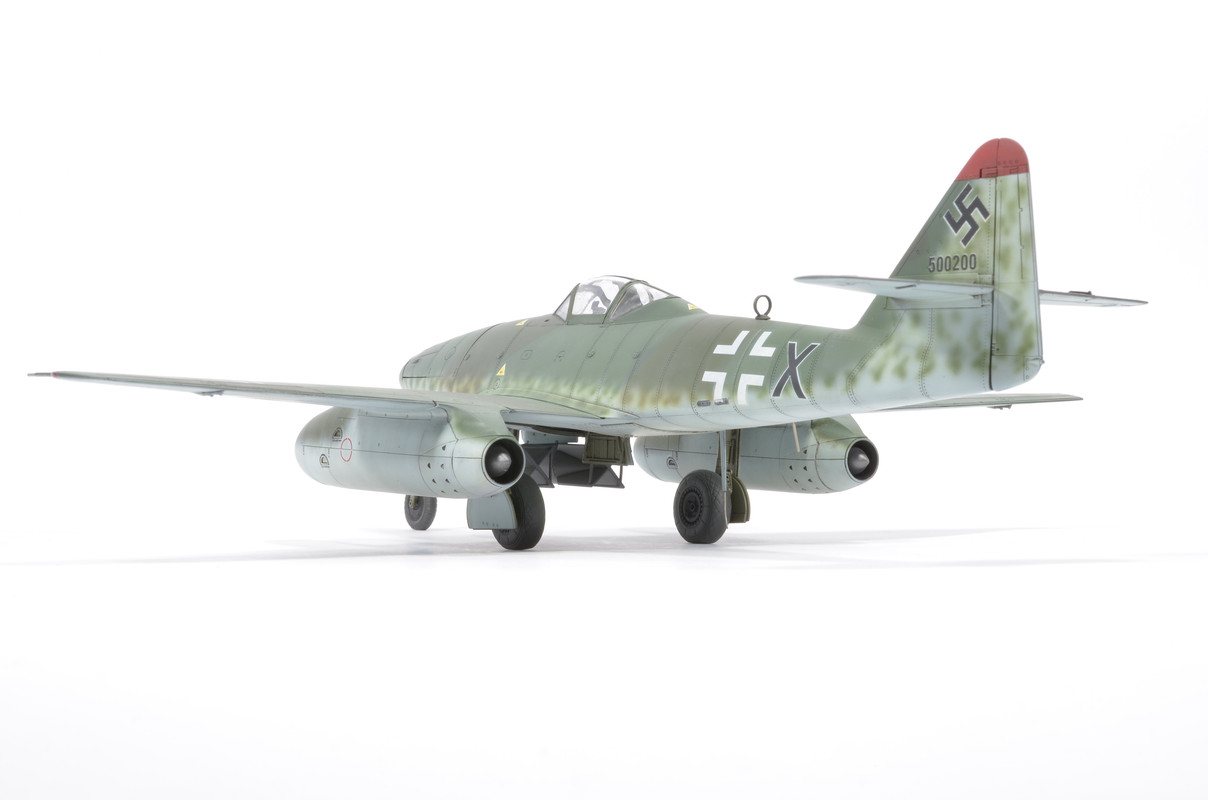
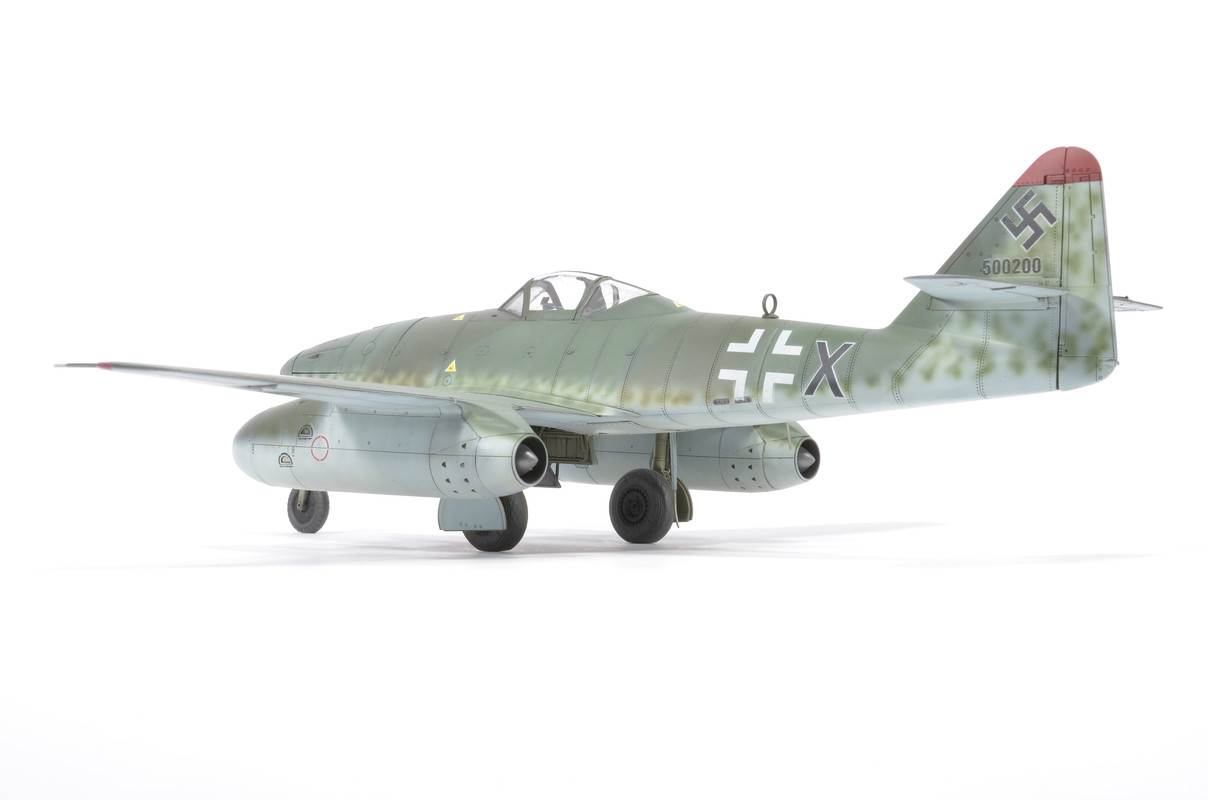
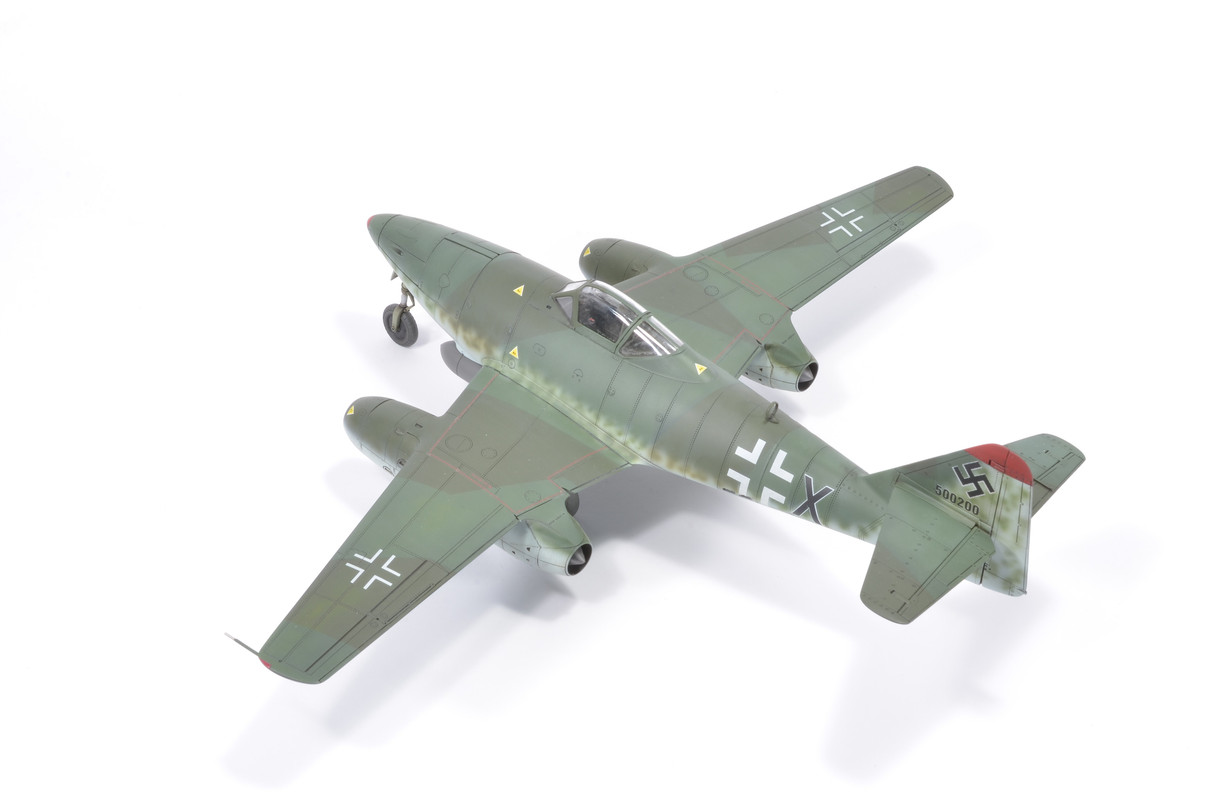
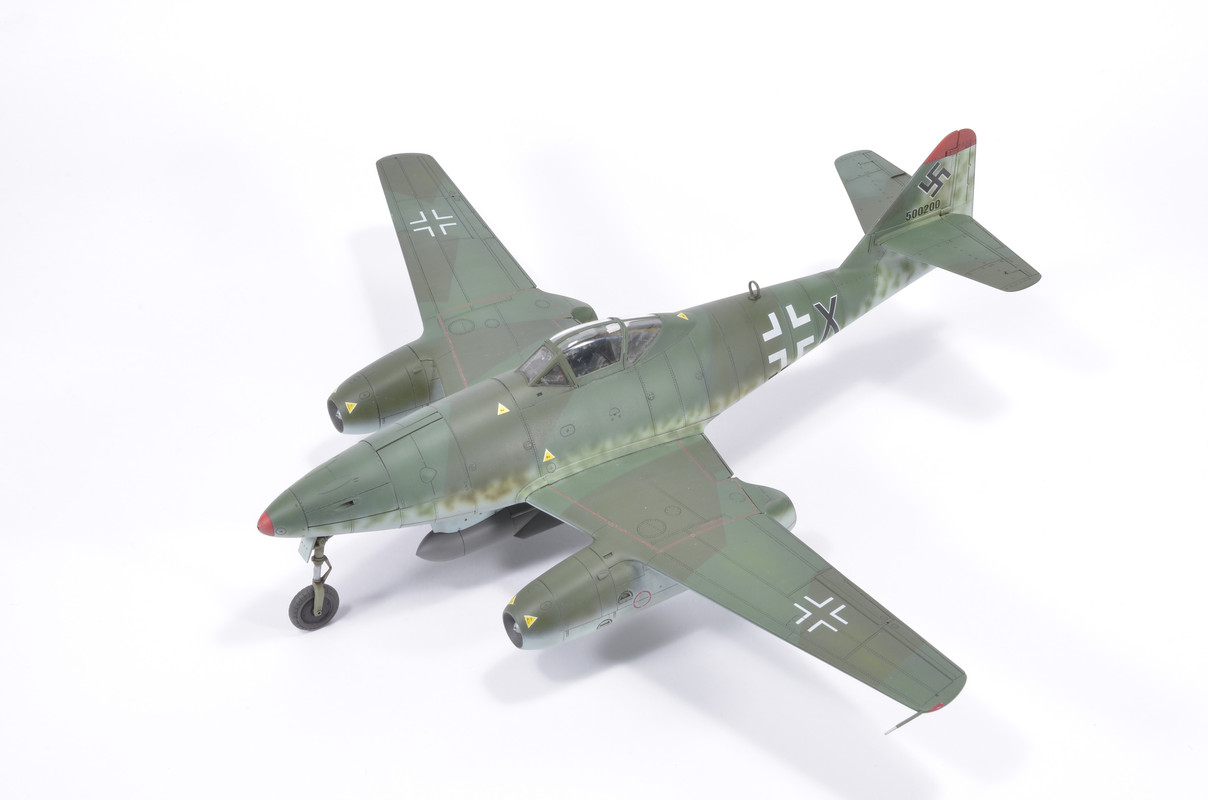
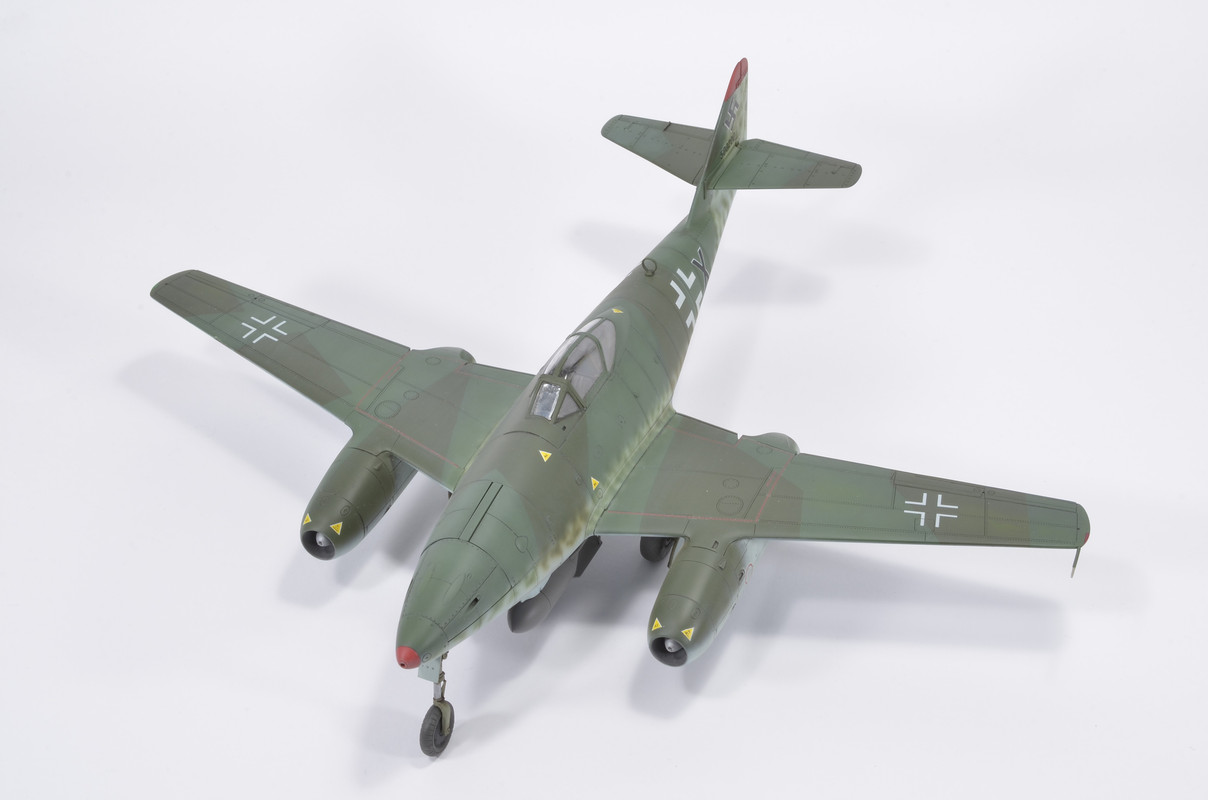
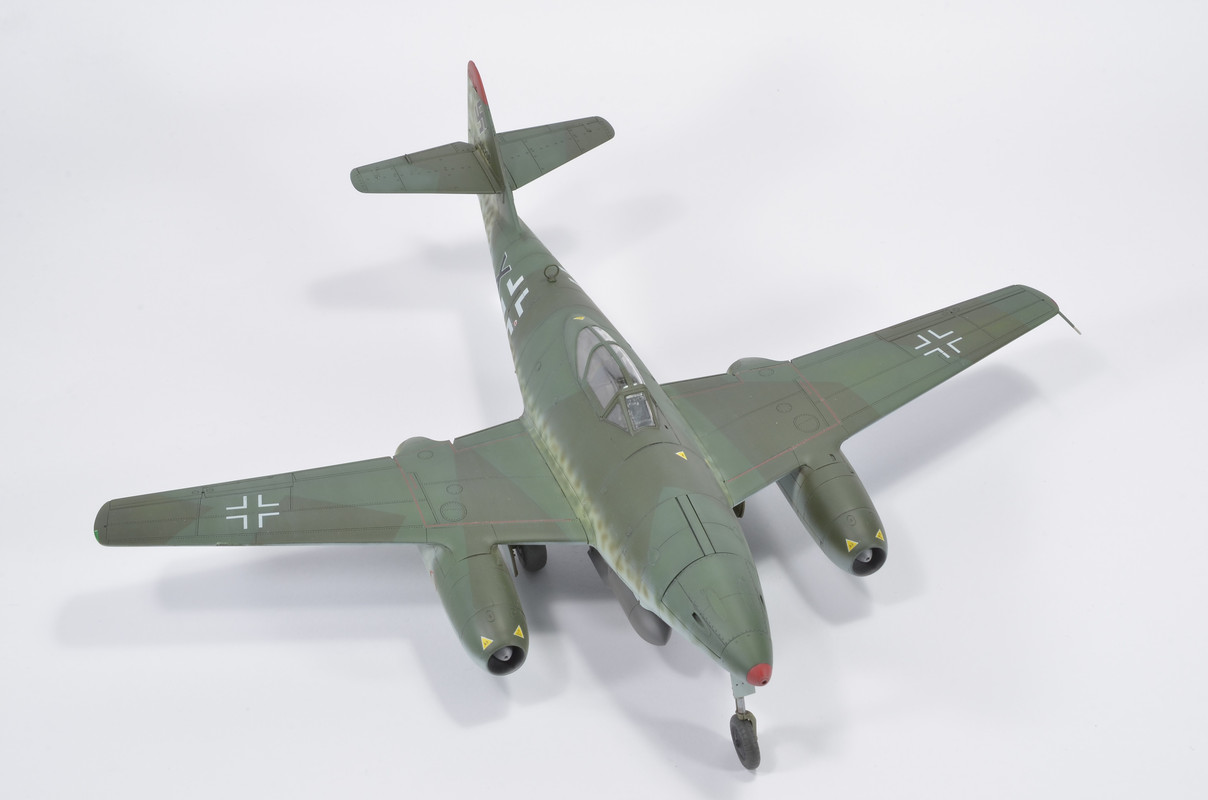
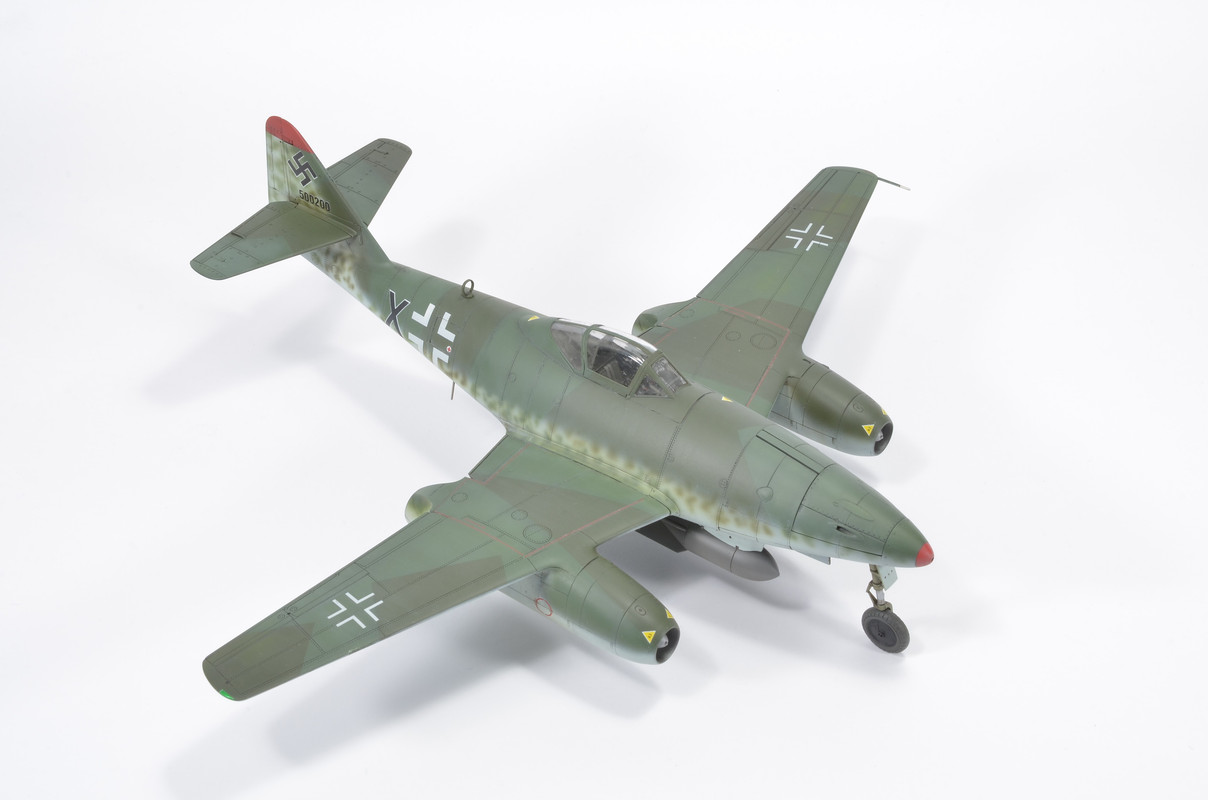
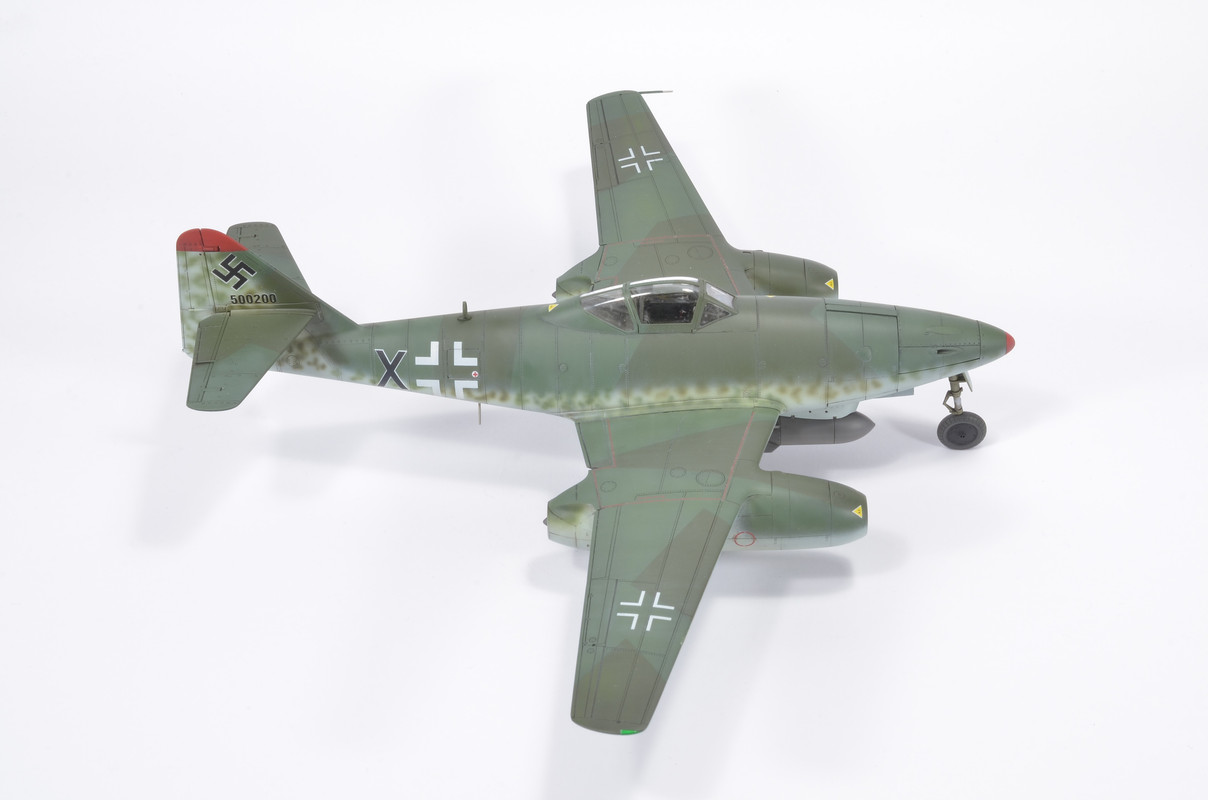
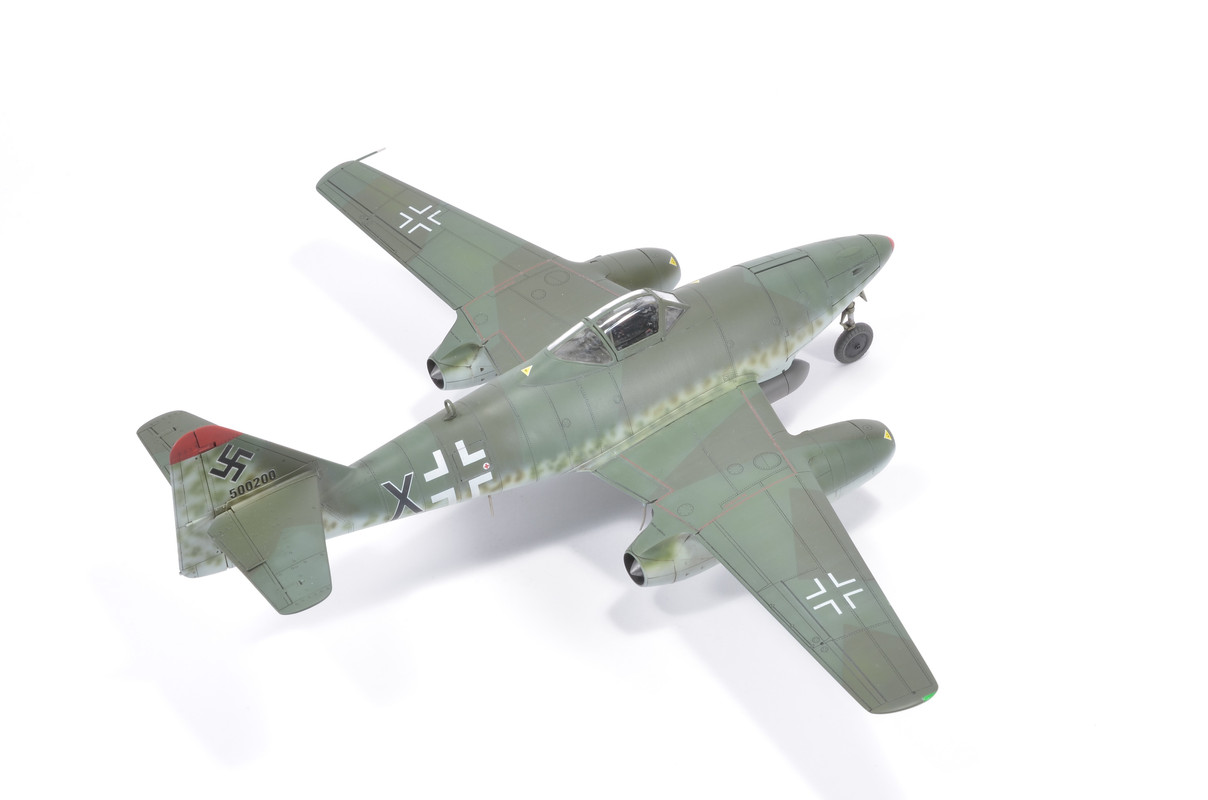
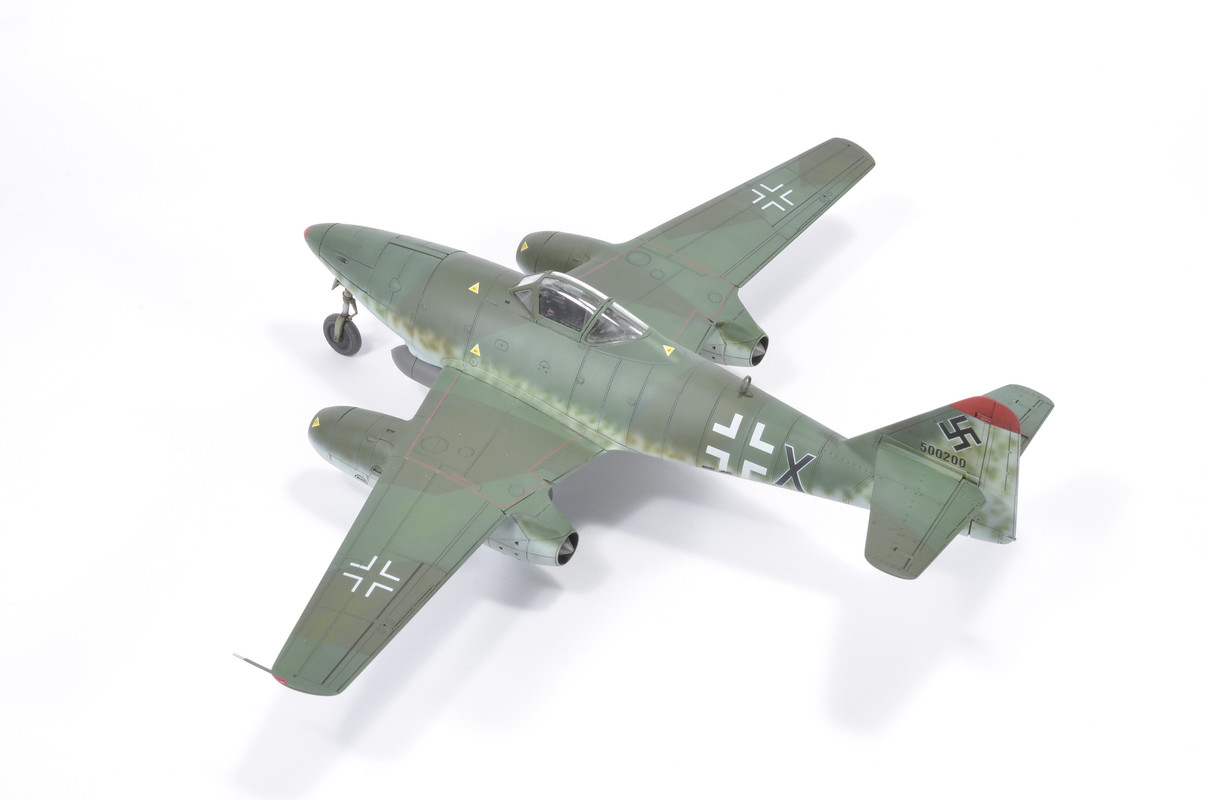
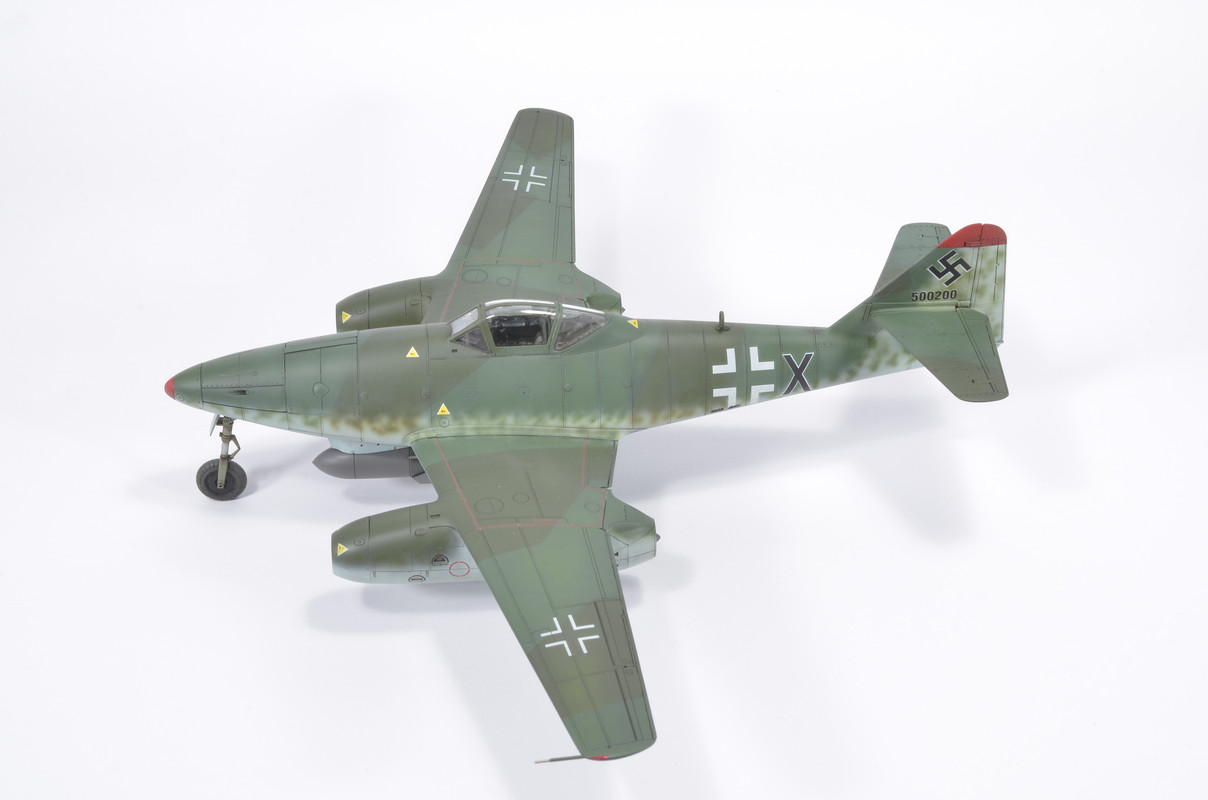
Hi everybody, this is a model I finished a couple of months ago, but have finally found the time to snap a few photos, Hobby Boss Me-262 in 1/48 scale. I really love the lines of this aircraft, they just scream speed
")

-
 37
37
-
-
11 hours ago, Pete in a shed said:
Great build and superb paintwork
 . Do the canvas strap seats in the cabin come with the kit?
Pete
Thanks Pete! 😀 No, the kit comes with PE straps, but I ended up making my own from some tape and aluminium foil
-
1
-
-
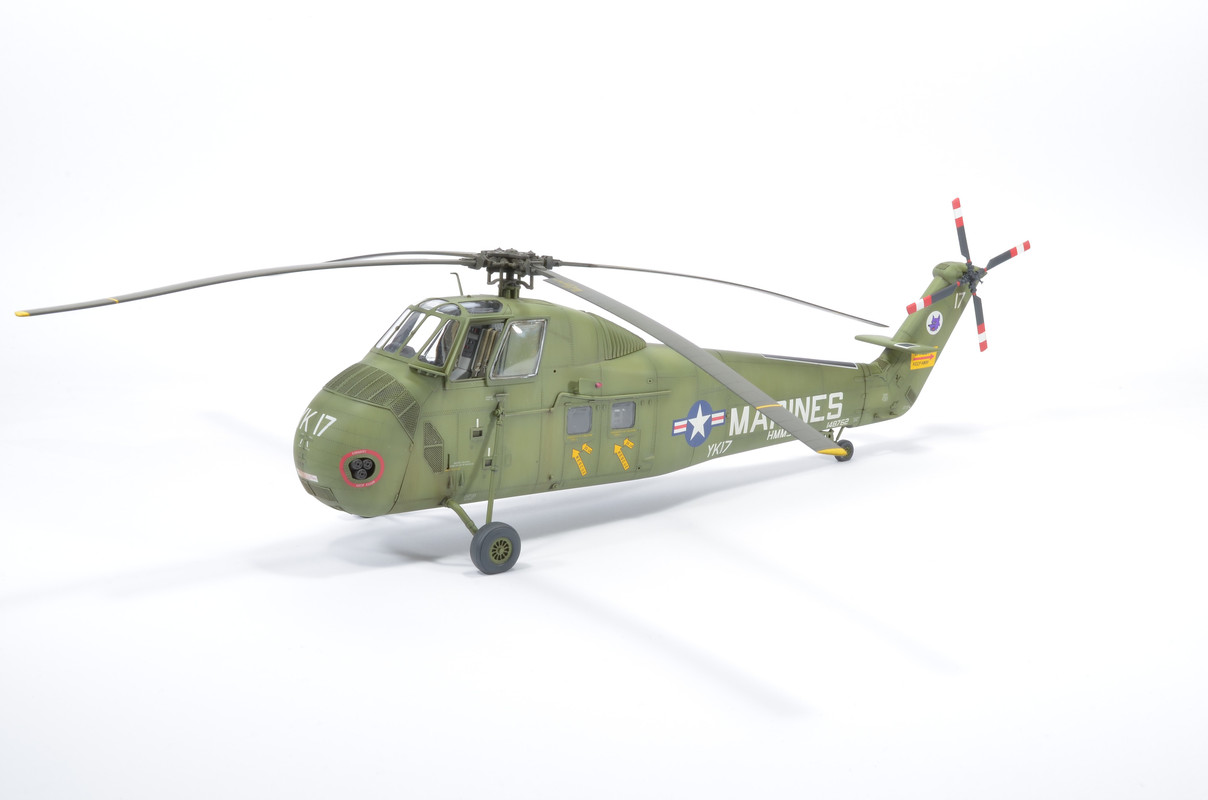
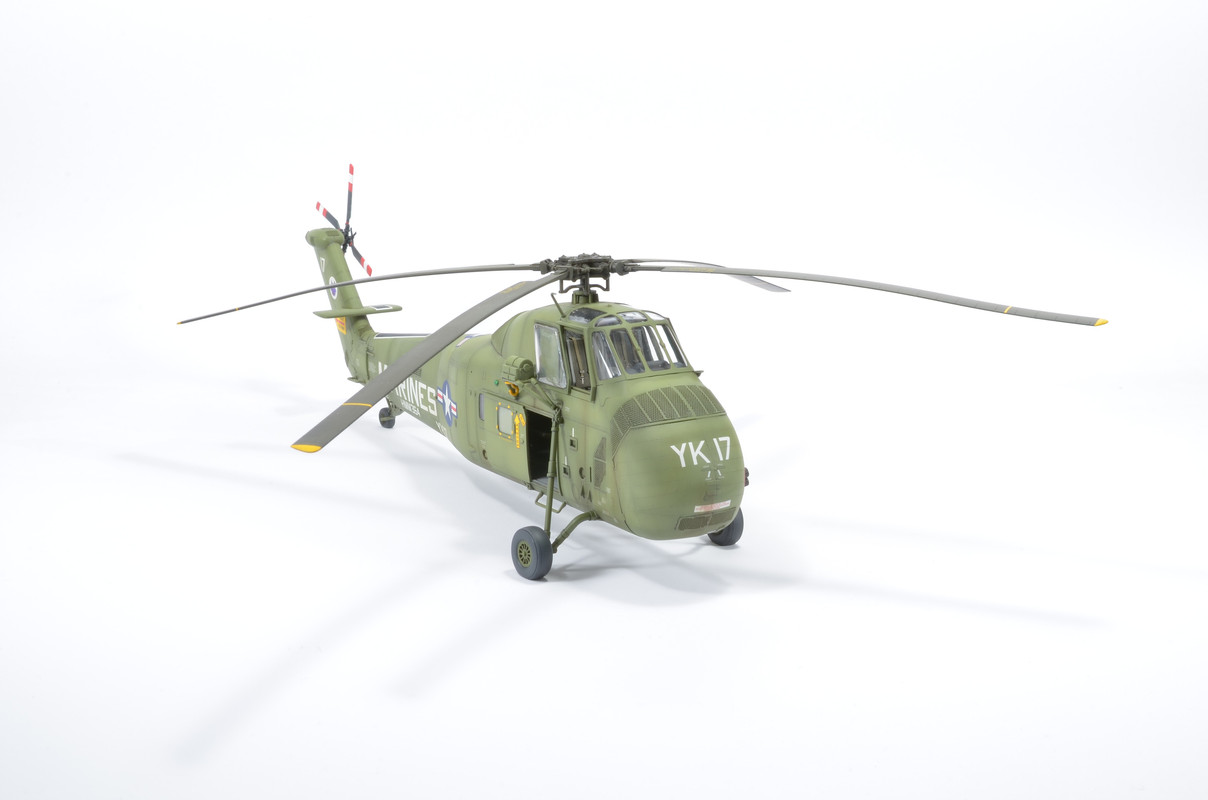
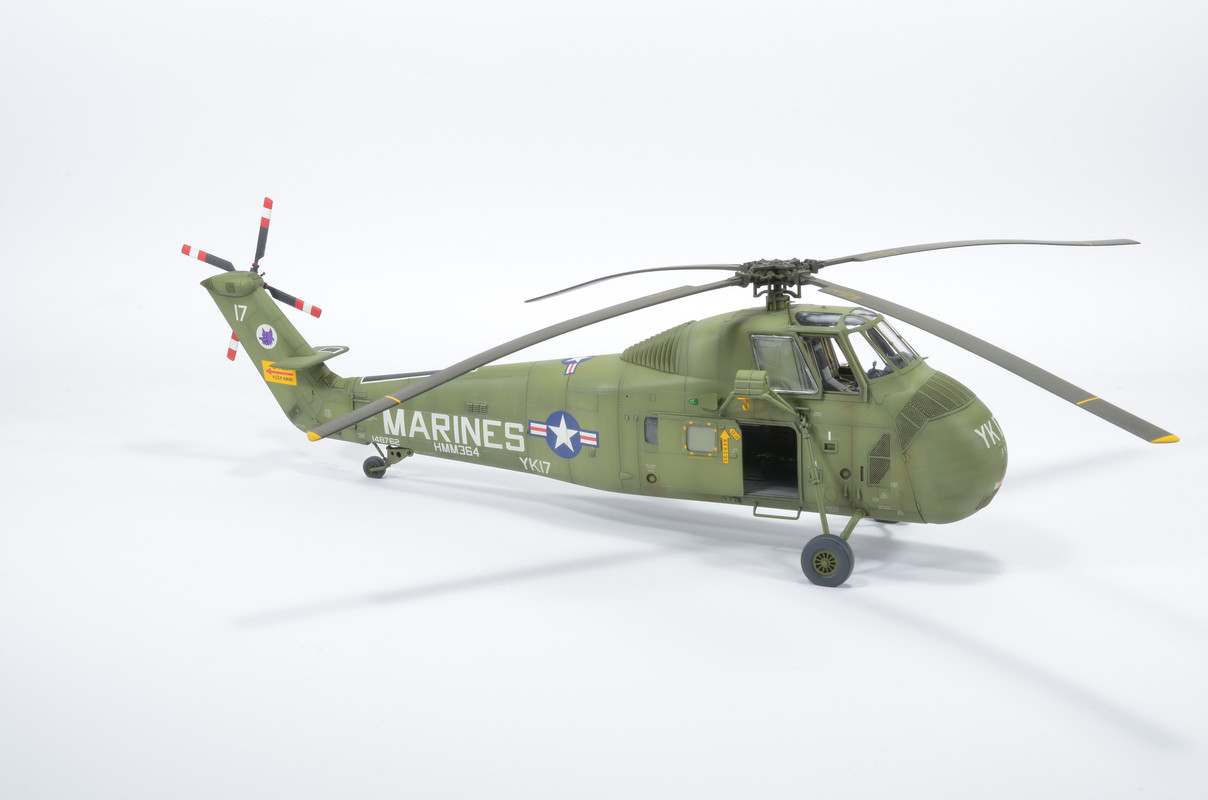
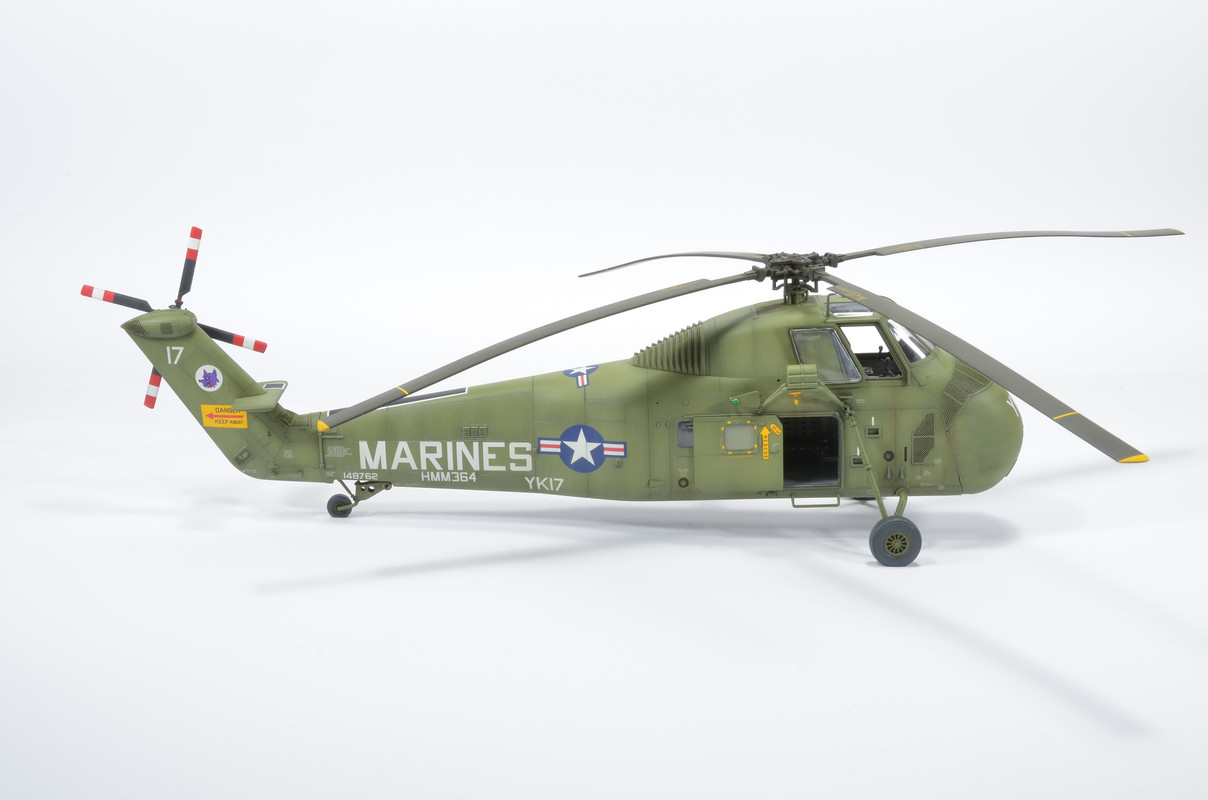
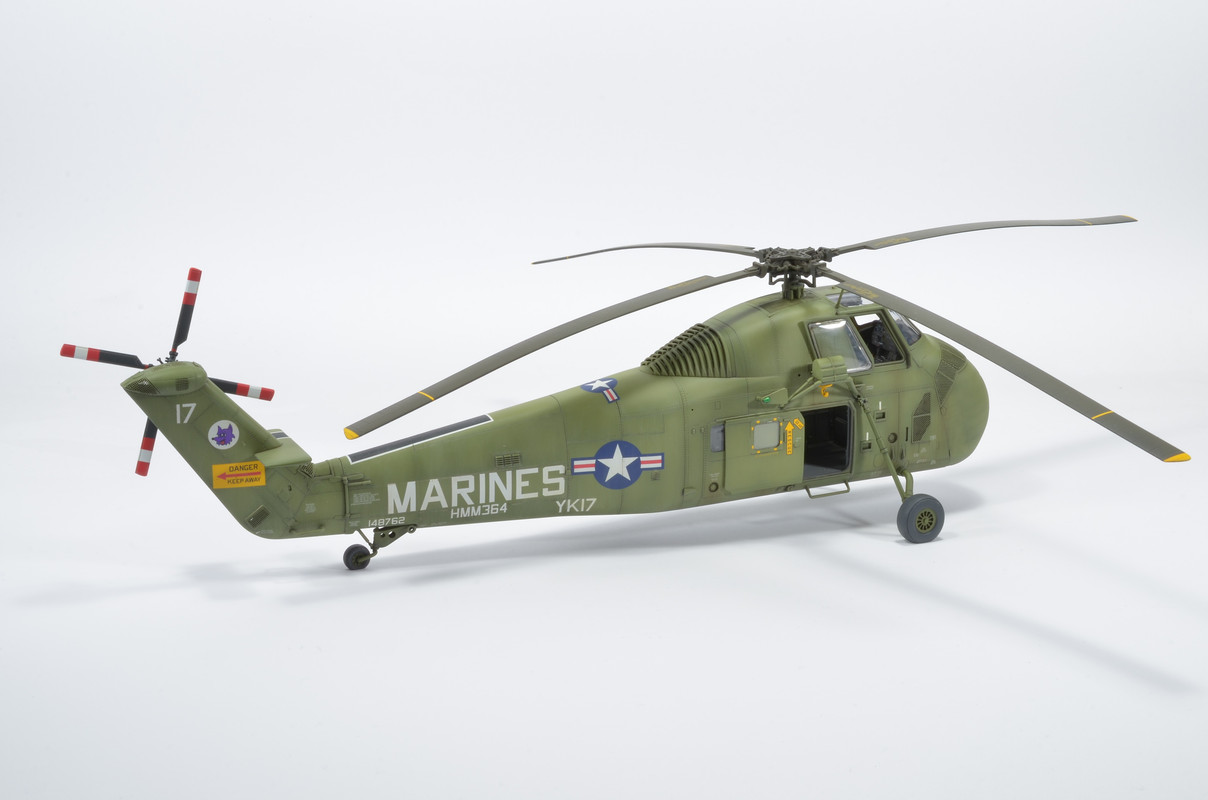
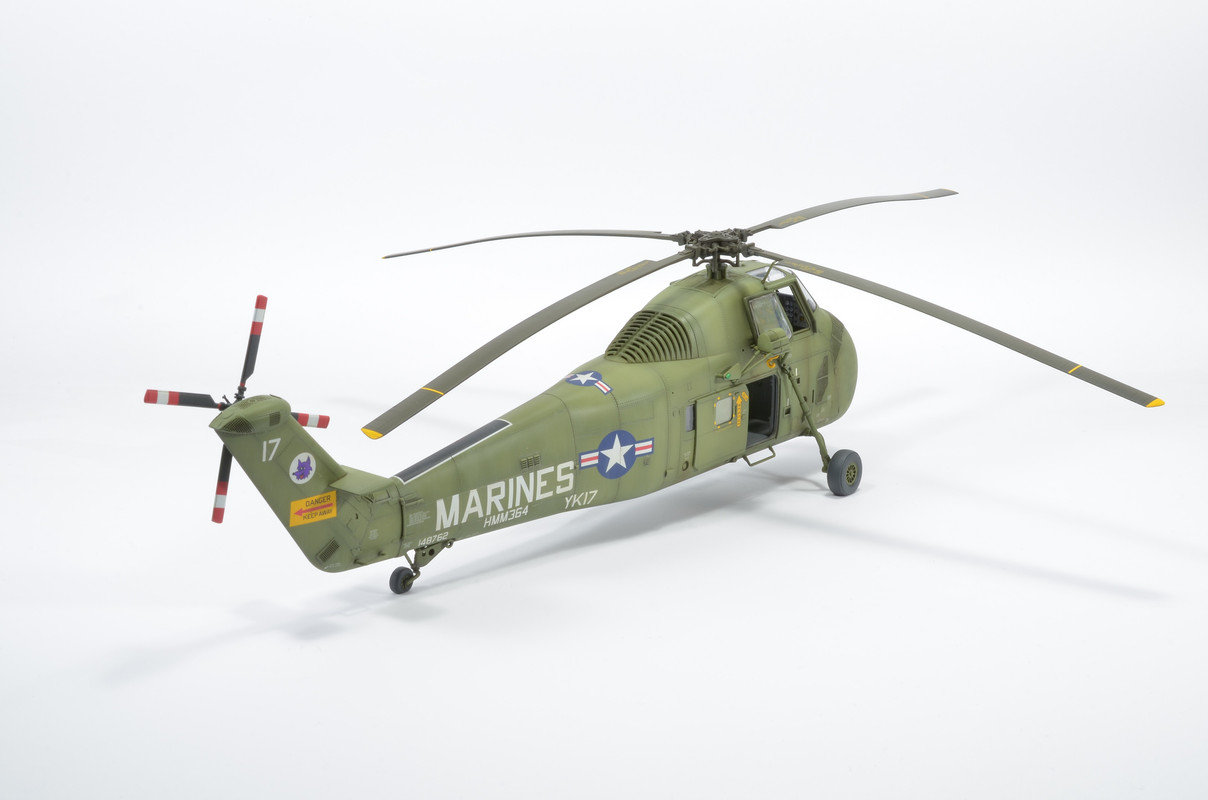
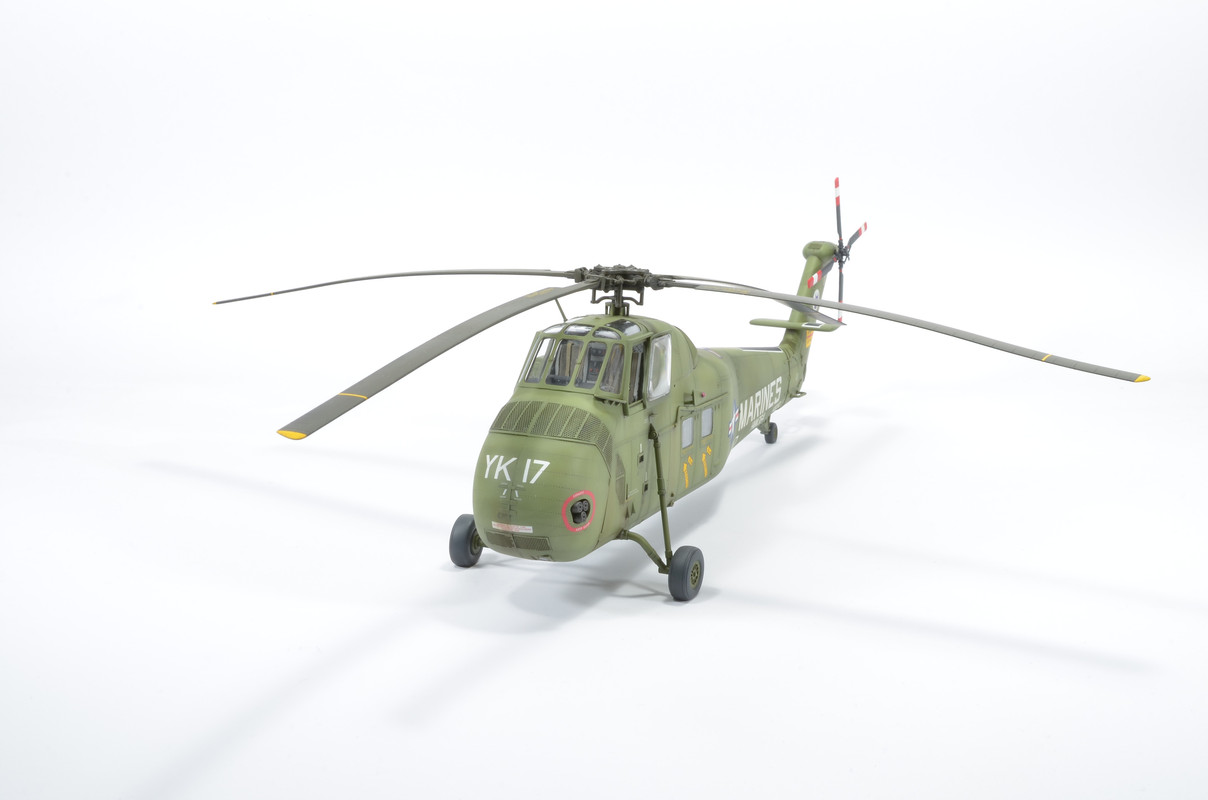
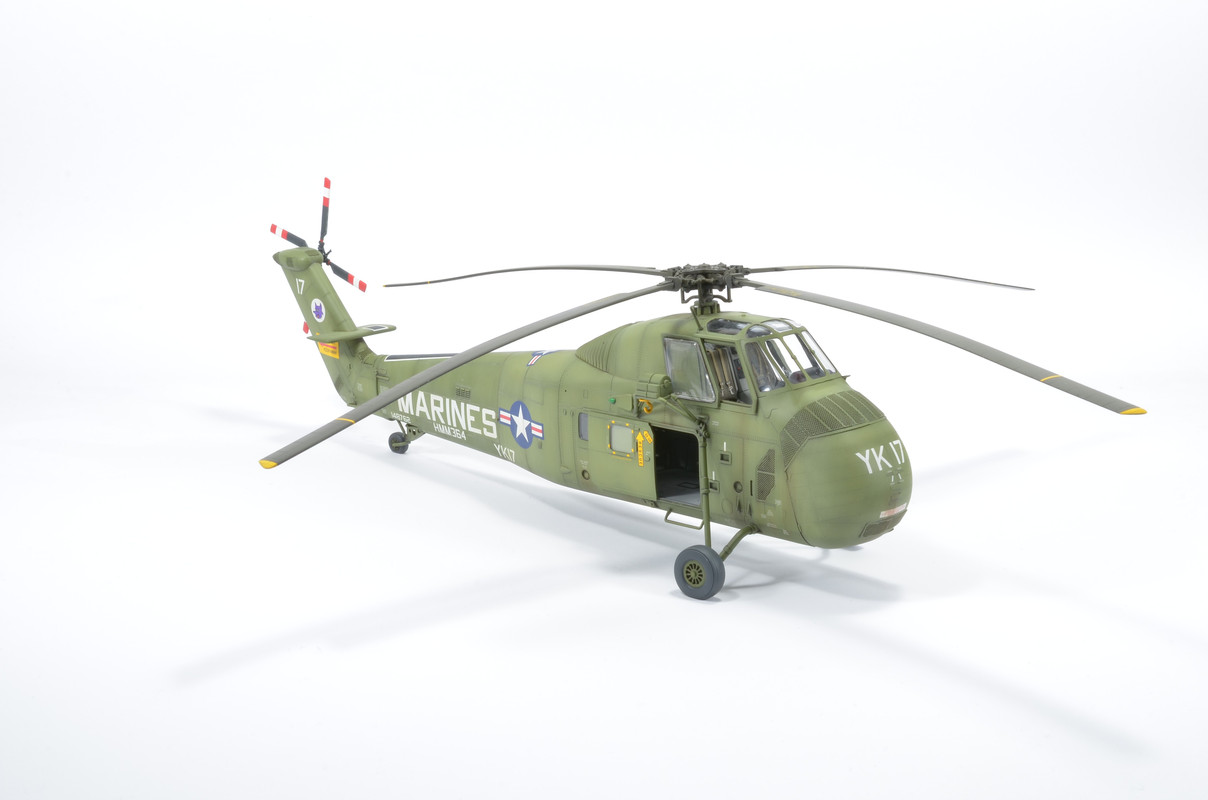
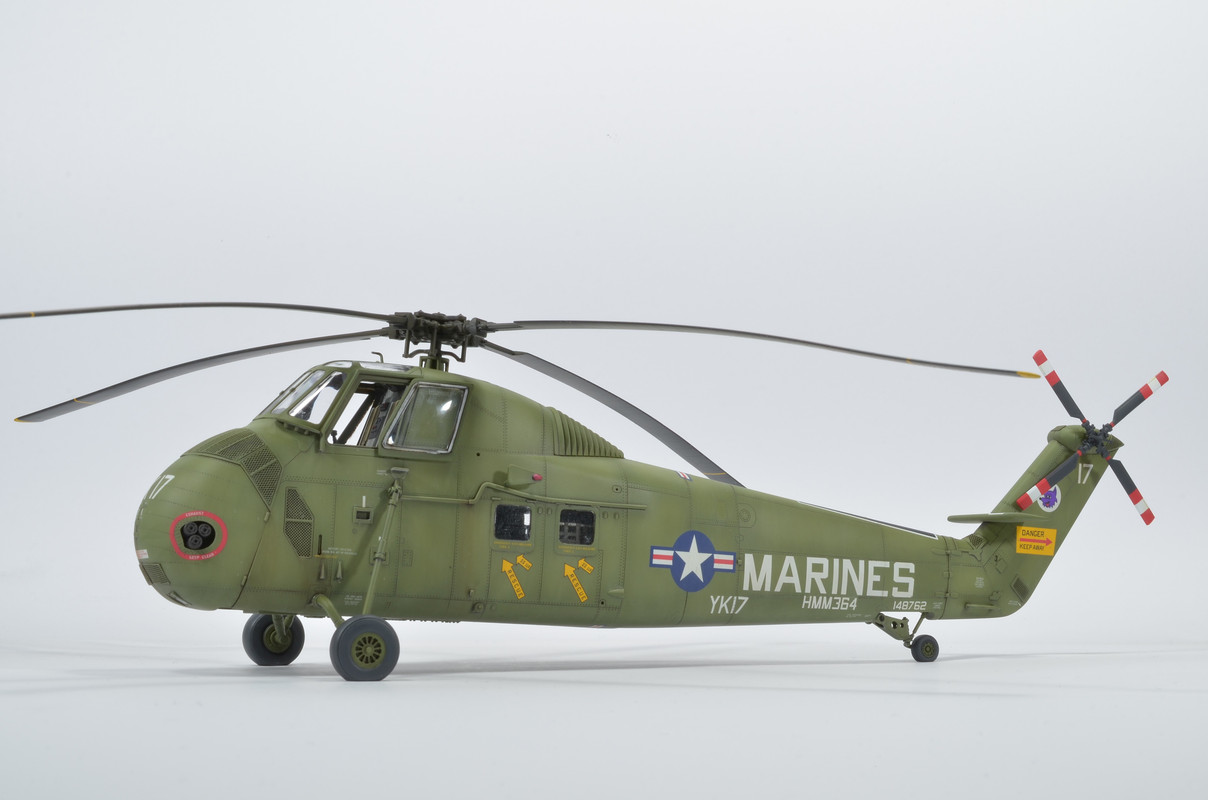
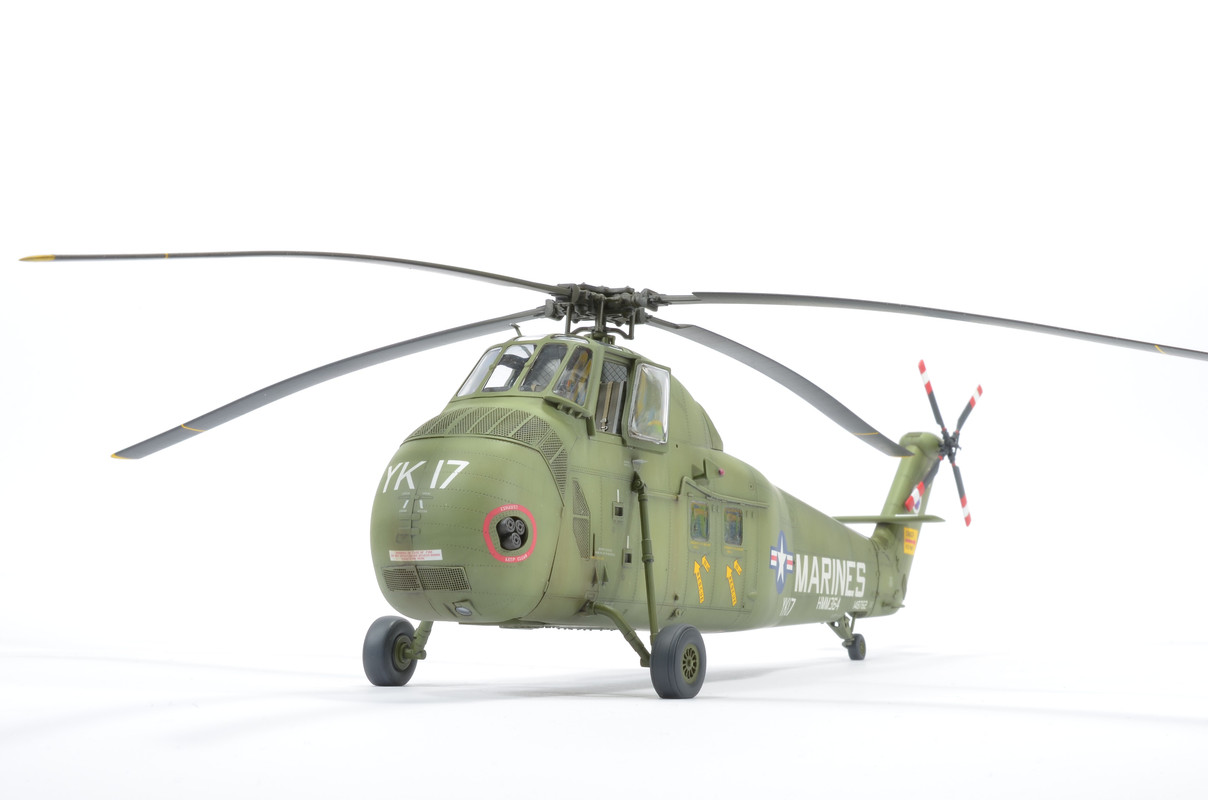
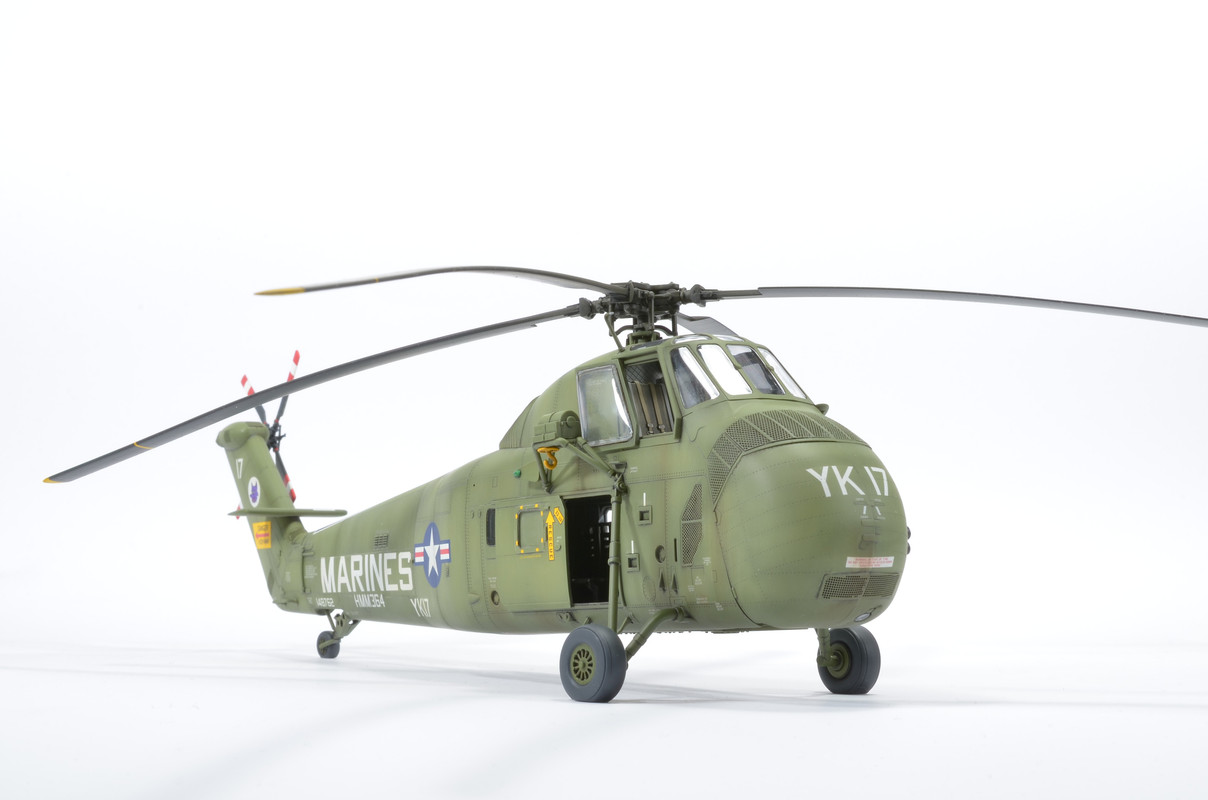
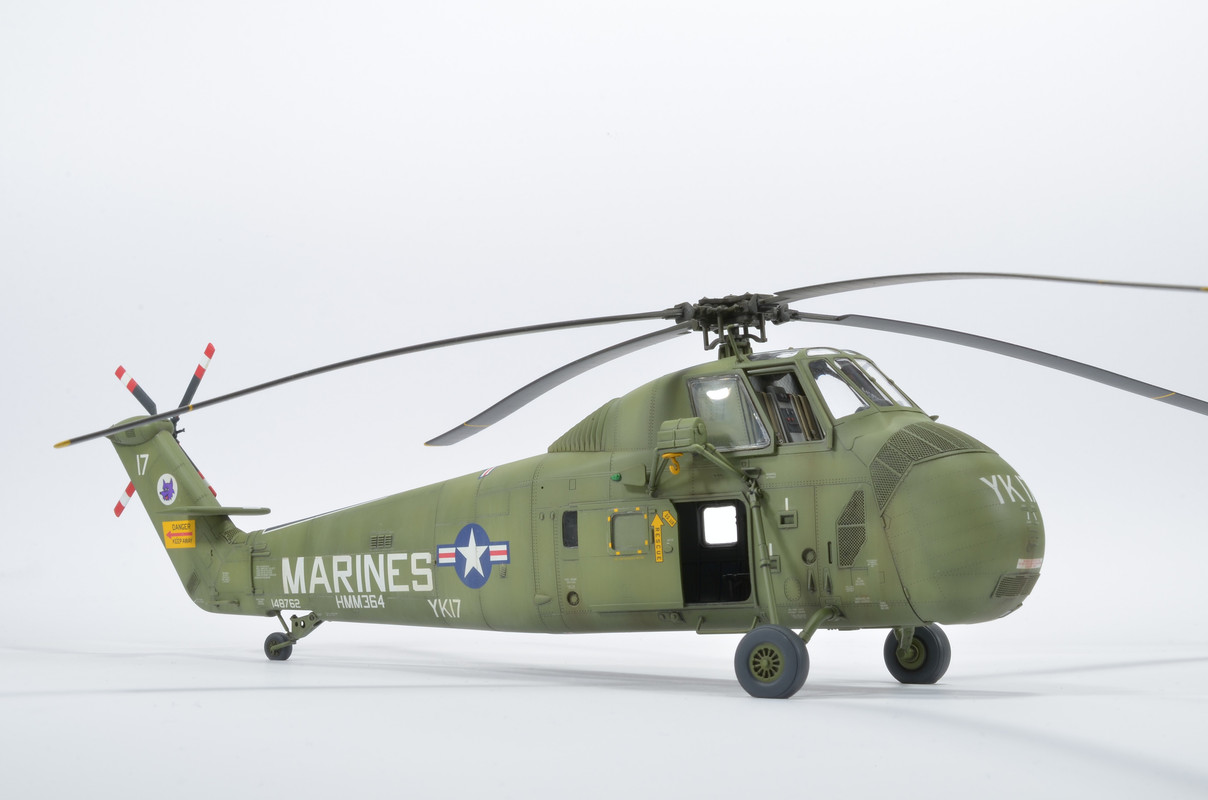
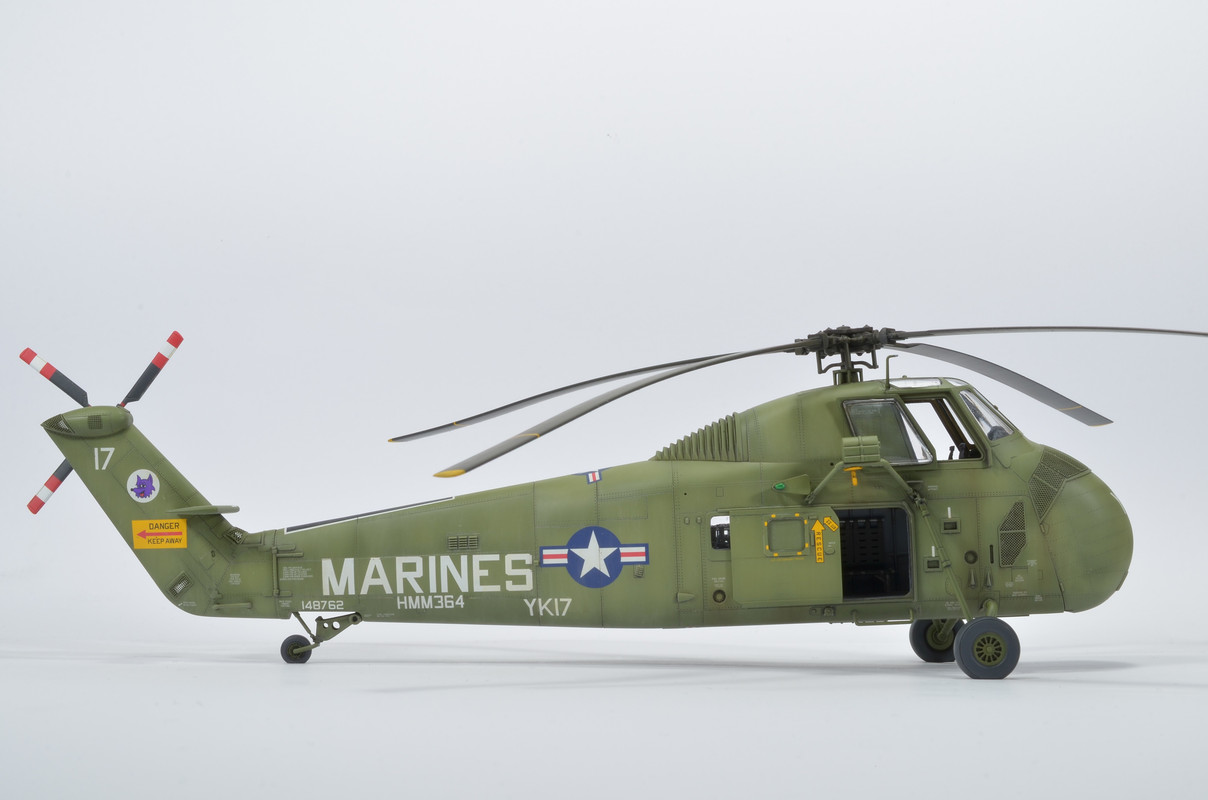
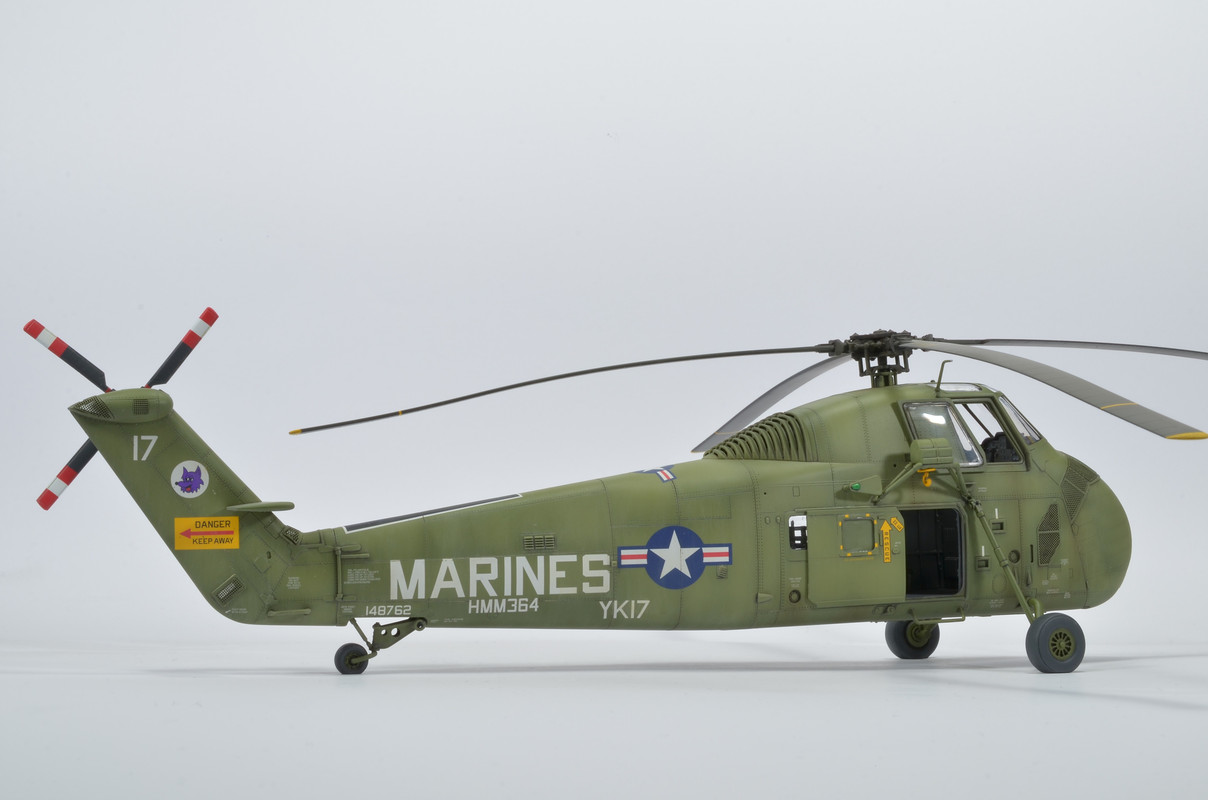
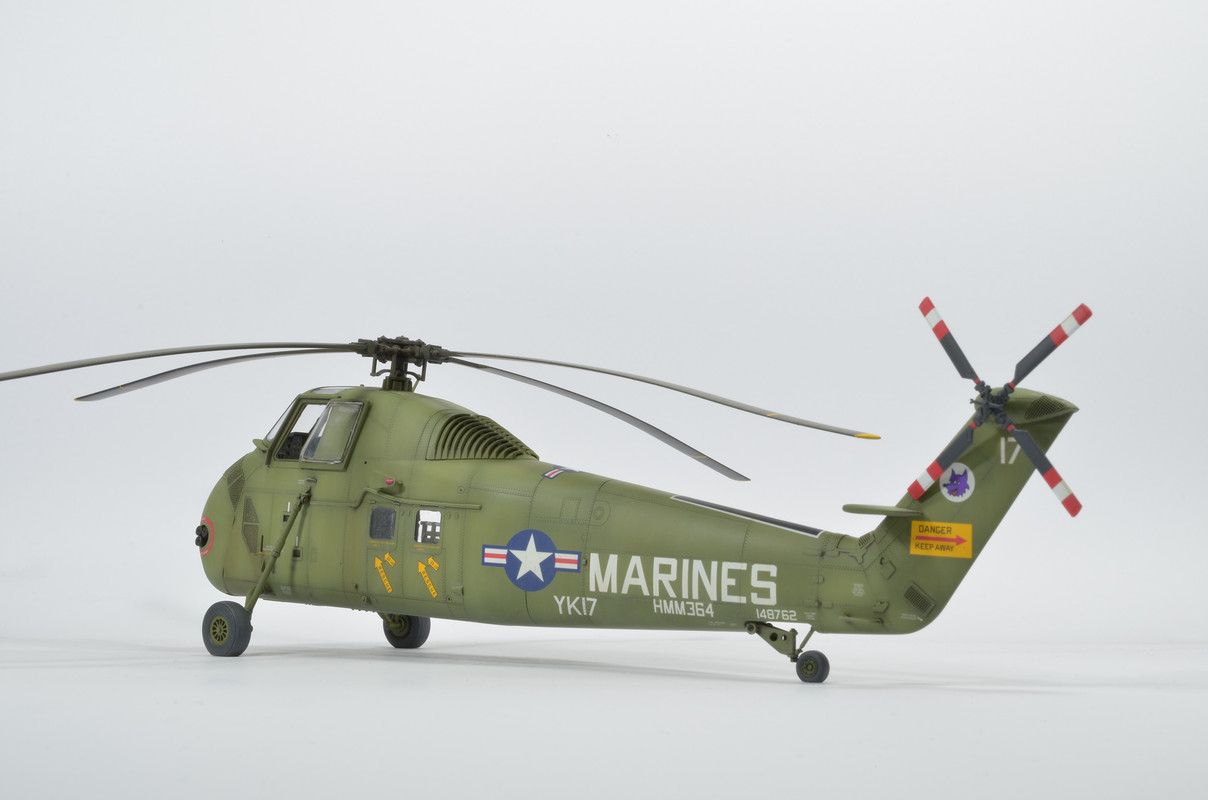
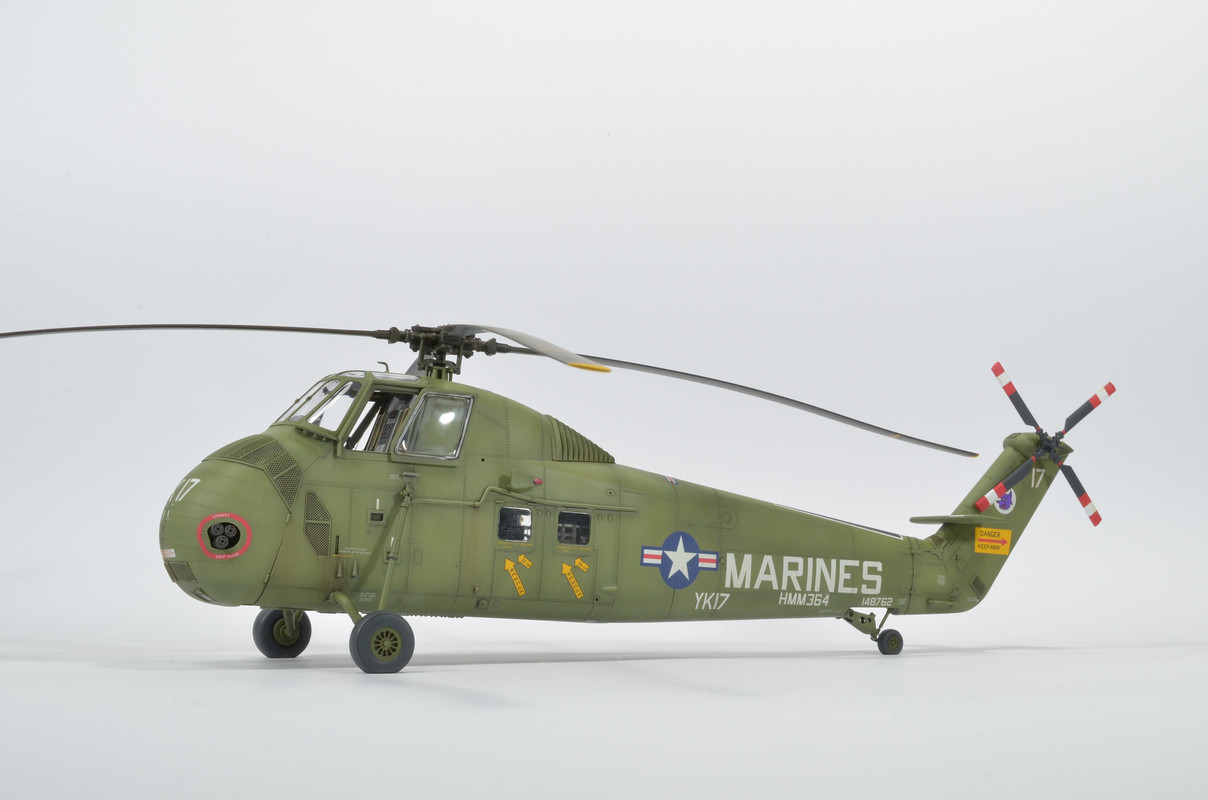
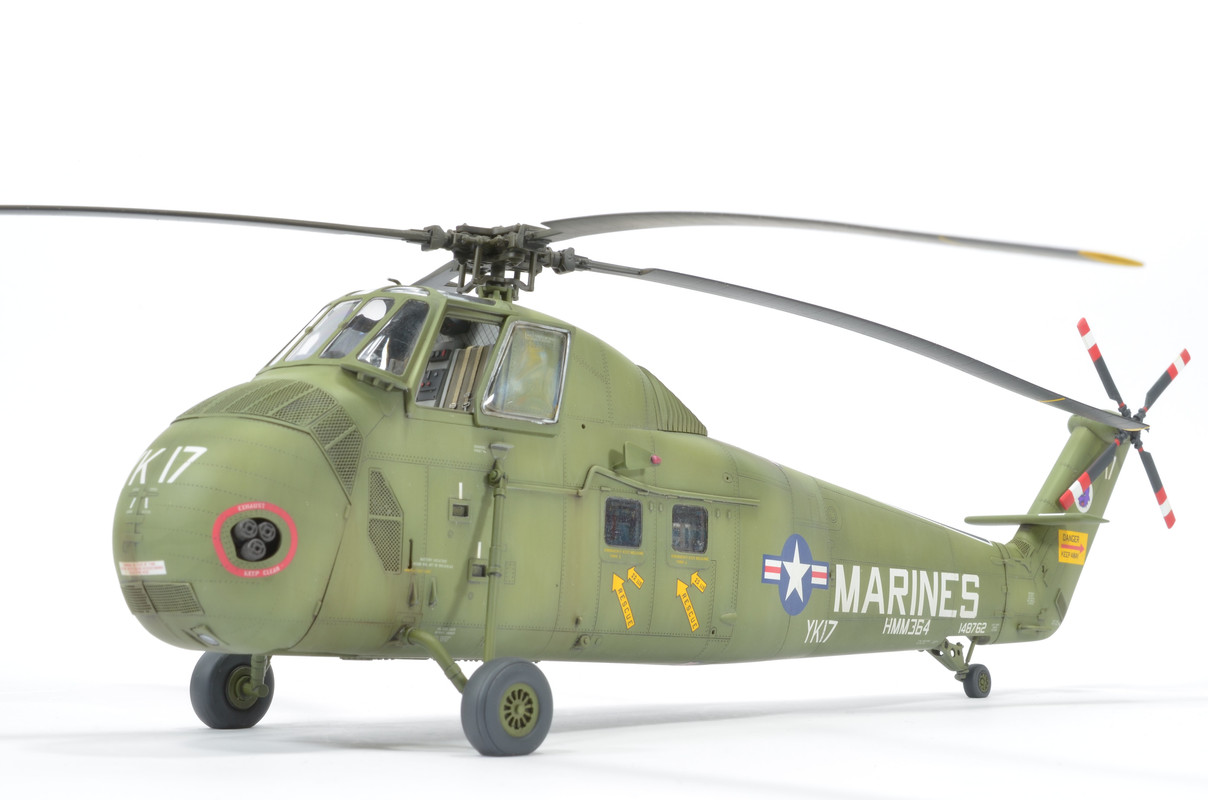
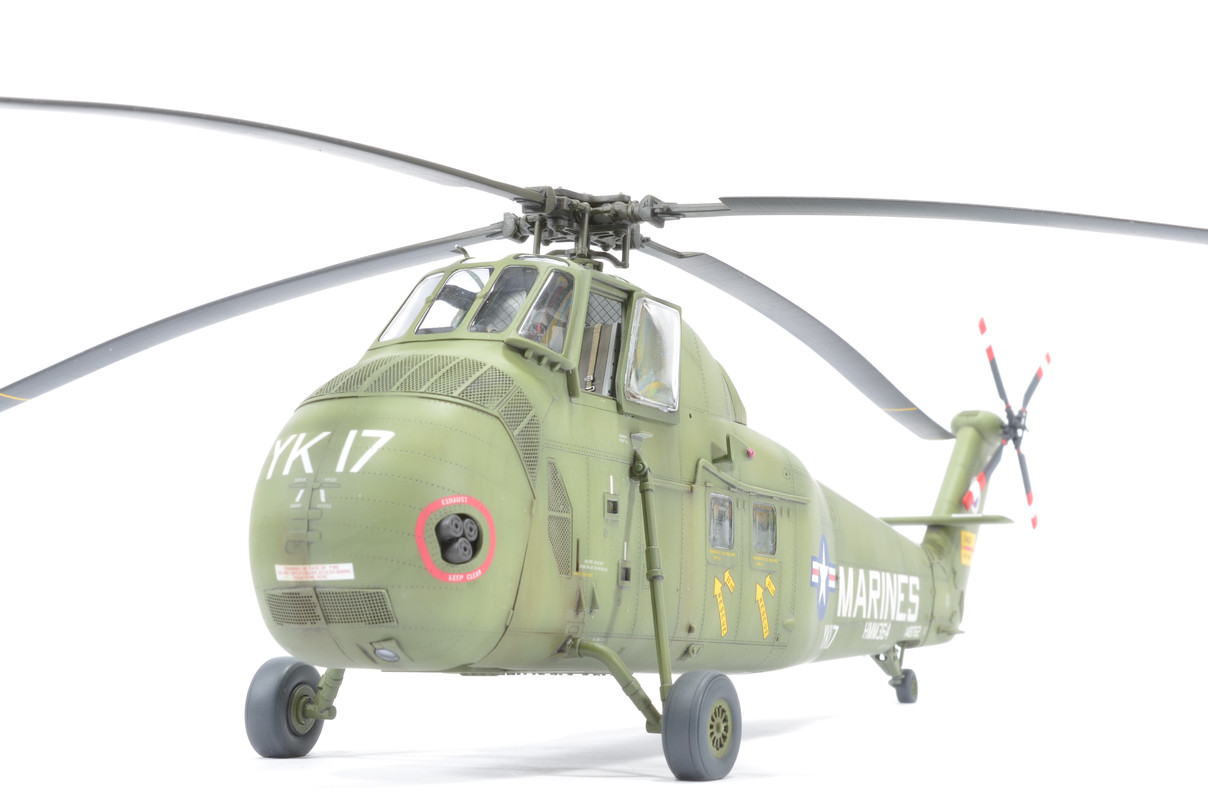
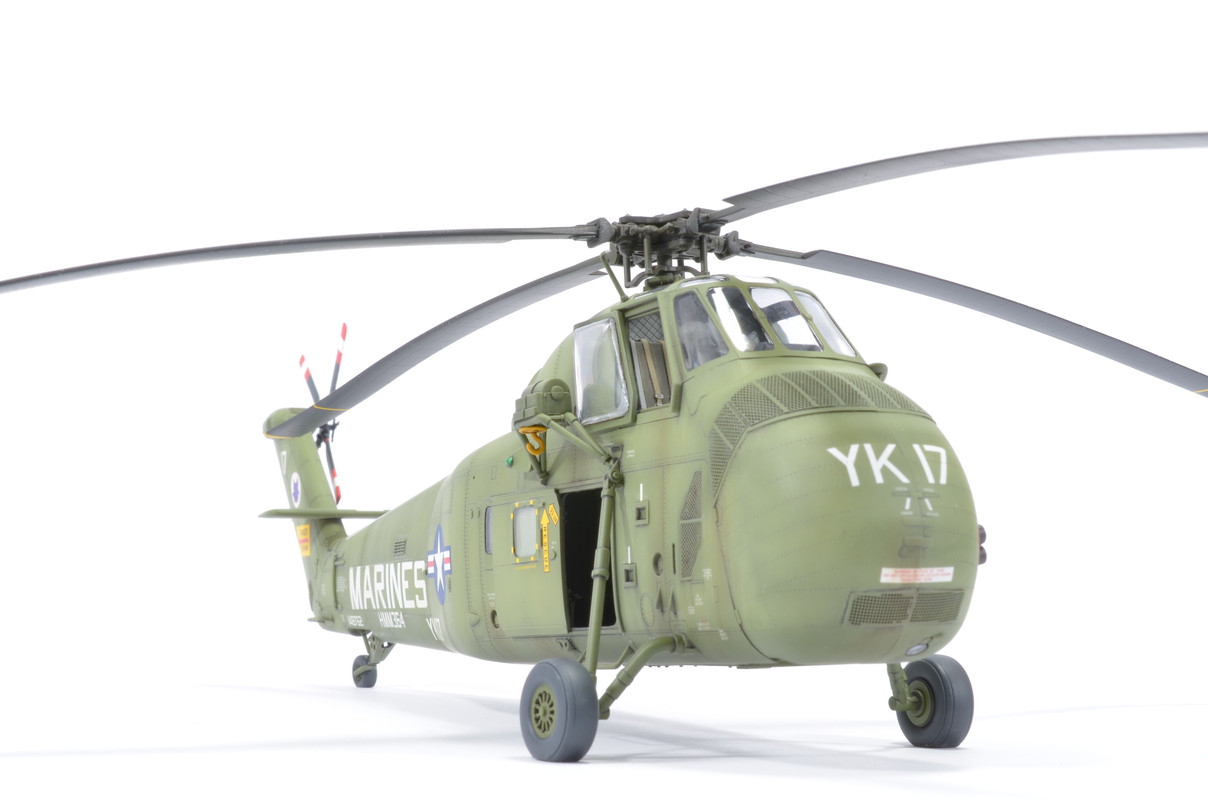
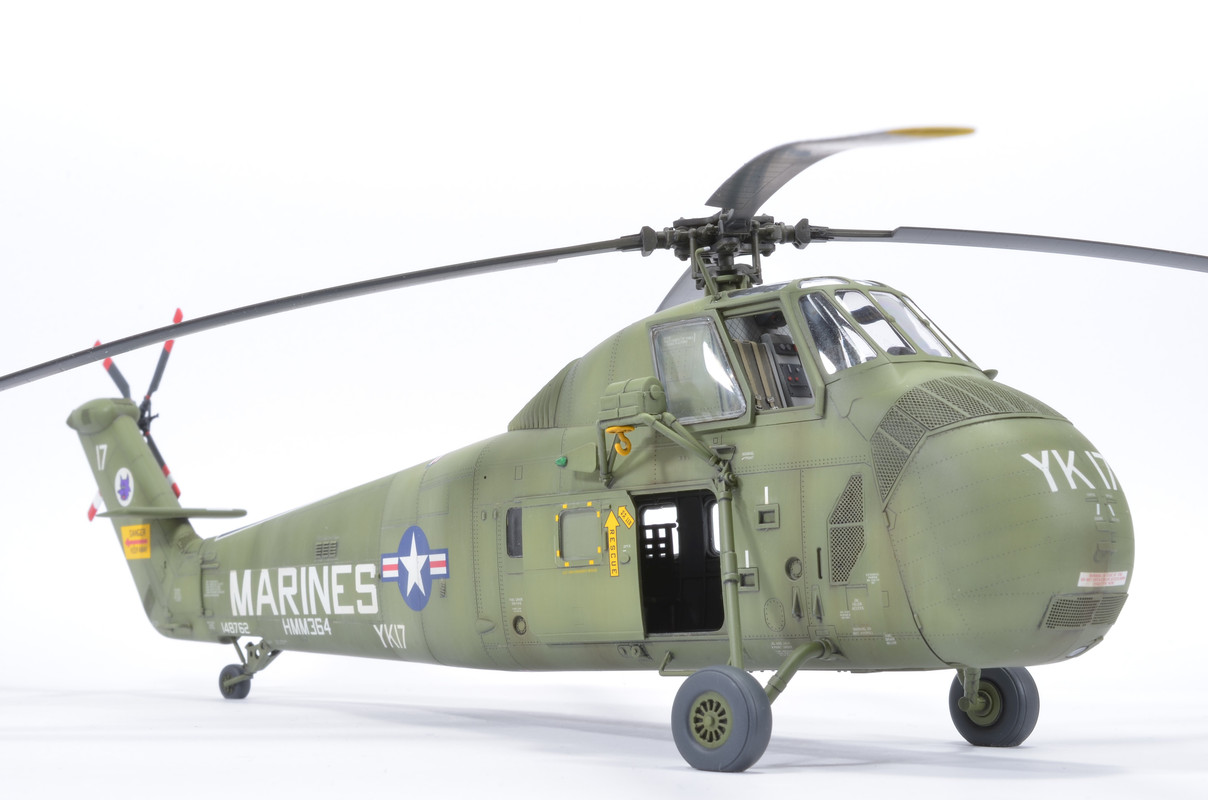
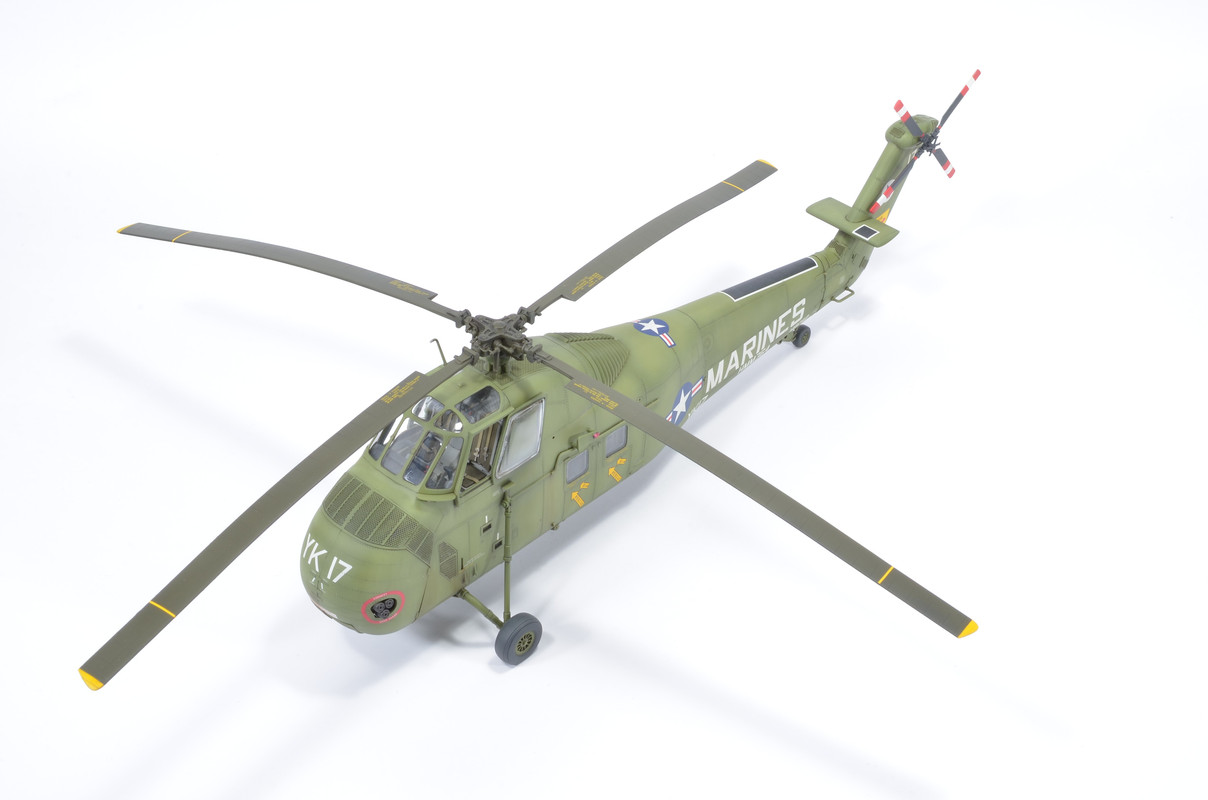
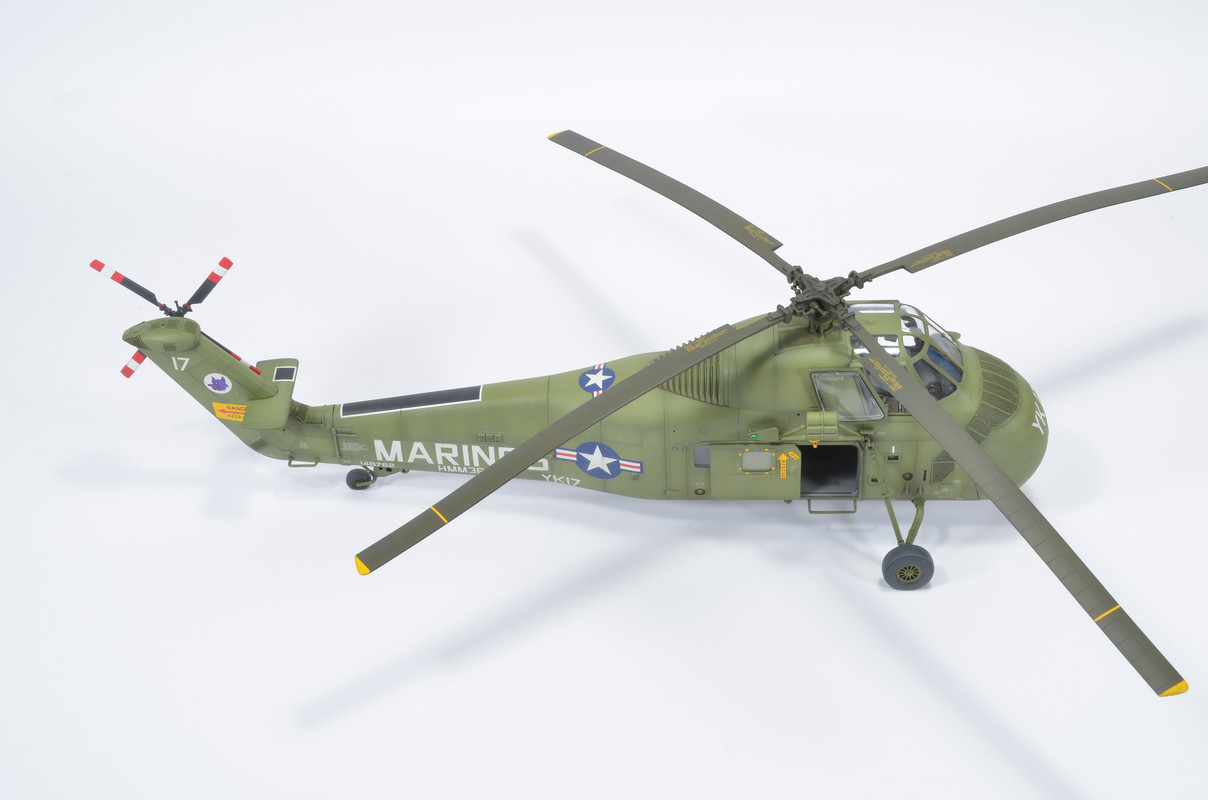
Hi gents, it's my pleasure to share with you my latest work, Gallery models' UH-34 D Sea Horse in 1/48:
-
47
-
1
-
-
59 minutes ago, MrB17 said:
Matching paint to a chip isn’t necessarily going to give you the exact colour seen on the real object. I have quite a bit of experience spraying automotive, aircraft, and a lot of other things. (1/1 scale) We had a fully stocked mixing room both at the body shop and the hangar. Acrylic enamel, urethane, polyurethane, linear polyurethane, lacquer etc. Customers can pick out a chip from the binder, but the chips are not always the same as the paint. Paint was mixed by weight, so you followed the paint codes supplied by the manufacturers. These codes didn’t always jive with the chips. In the body shop, where you had to respray say a fender (wing to some), after we mixed the paint, we would take the car outside and hold the stick (paint stirrer) up against the adjacent door etc. Quite often you would have to grab some of the tinters and adjust to match what was on the car. Usually they were pretty close but maybe a drop of black or yellow etc. would bring it around. There were some manufacturers whose codes were way off the mark. We had a contract to repair Lada’s that were damaged in shipping (a lot!) and we very soon disregarded the codes and mixed the paint with our eyeballs! Mixing paint by eye takes practice and experience, but it’s not that difficult once you understand how tinting colours effect things.
Aircraft were not as demanding, because you were doing a complete strip and paint, and none of our customers were anal about matching things to chips. We did both civil aircraft and warbirds, the bosses cars, boats, etc. With military aircraft in service, paint fade could be rather dramatic, because the exposure to UV was extreme at altitude and quite often they were seldom hangared. Rain, mud, dust, UV, fuel spills, oil leaks, scuffing from hoses being dragged over, dirty boots, etc. are things to consider. The more sorties, the worse the weathering. If repairs are made, quite often the replacement skins would be resprayed up to the adjacent panels. If a customer requested a paint manufacturer that we didn’t stock in our mixing room, and the job required several gallons, it was not uncommon to have differences with the same batch. With a car, you could “blend off” on the adjacent panel and even if the match was not quite right, the customer would not even notice. (There were exceptions!).
In modelling, even if you match a chip perfectly, it’s not a guarantee of accuracy because of the factors previously mentioned. If you model a restored aircraft or car etc. you may have access to the real thing to compare. If you have the ability to tint your paint to bring the colour around, that would solve the problem for most. Other factors to consider on a model are the way digital images appear on screen. Have you ever seen a judge at a contest walking around with a fan of paint chips, comparing them to your paintwork? For these reasons, I don’t waste my time trying to match a paint chip, if my eyeballs are happy with it, that’s a wrap.
The biggest I’ve ever painted, is this Grumman Albatross owned by Richard Sugden. Sprayed electrostatically with Alumigrip (Linear Polyurethane), which I added flattening agent (silica powder) to take the high gloss to a washable satin finish. (Looks more believable). This photo was taken approximately 15 years later. Can you tell if it doesn’t match the FS 595A colour chips exactly? I’m sorry (I’m Canadian) if I rambled on too much, but I felt it necessary in light of all this paint chip matching.
Cheers
Jeff
I believe this is the best comment regarding the colours of the real thing I have read in years. I too have had experience with 1:1 colours on the real things and know how colour fades in reality and can also change hue significantly. Therefore I usually avoid any discussion regarding model paint as I never see the point. The paints on the real thing can all come from the same batch and after a few years of exposure to the elements they will never look the same. Even different batches of the same colour can look different after applying. That's just how it is. I usually just check the paint against pictures (if they are reasonably good) and eyeball it. Yes, the manufacturers can be quite wrong with their hues (I'm not talking about different shades, but different colours entirely), and that's why it's important to check colour against a known factor, be it a picture or a colour chip. But it doesn't have to match perfectly, because nothing ever does.
-
2
-
-
I am a happy user of Paulus Victor decals since they started in the business, and have over 35 years of experience in scale modelling. I can safely say that Paulus Victor provides the most complete package in the industry. Their decals are of the highest quality, and go down great over a multitude of surfaces, so you can be sure there won't be any last minute hiccups when finishing your latest model. But what really sets them apart is the plethora of background information they provide with each set. History, colors, context... everything is covered. They're just such a pleasure to use that I have bought several models extra just so I can use these decals on them, they're that good. Really, the Rolls-Royce of the decal world. I just hope they will enlarge their portfolio soon, maybe with some US Navy types in high-vis
-
1
-
-
Vms paint remover, works great and won't damage the plastic
-
Like others have mentioned, aerosol paints are dangerous stuff ad should be treated as such, with a healthy dose of respect. Not saying you should stop using them, just use them with appropriate safety measures. If you have the option, then definitely use a spray booth. Well ventilated work area and a face mask with filters is a must. And after painting, leave the room and wait for particles to settle down, of course leaving the windows open. I have a separate work room, and have found layers of painting dust on my tool boxes that were inside closed closets, so imagine what would your lungs look like if not wearing a mask while spraying.
-
1
-
-
You can always use a double action airbrush like a single action, with a proper setup. Therefore, a double action brush is always a better option. Contrary to the popular opinion, a single action brush is not for beginners, but is better suited for specific aplications.
-
1
-
-
Blackdog has a GE T58
-
1
-
-
Very nicee! What are these colours?
-
1
-
-
Very sad news. I will remember her for her wonderful music, especially "Foggy dew" she did with "The Chieftans". Rest in peace, Sinead.
-
1
-
-
I had the same problem as you, white wouldn't cover at all, unless I get plenty of coats on, but that would obscure all the fine detail. It would be especially frustrating while painting sidewinders in 1/72! Then I discovered gunze white primer 1500, and it covers perfectly, in thin coats. Now I only use white paint to add to other paints to lighten them, and I never use white paint directly on a model.
-
1
-
-
Hi colsom, from what you say, I'm guessing your process could be better, however, maybe you could use better paints too. Now, as Farmerboy has said, a good start is to wash all the parts before applying first coat of paint. I usually first get as much subassemblies done as I can before this step. I don't wash small parts, cockpits, etc. But after I get, for example, the wings on, then I wipe the model down with some IPA. Some use mild detergent, I prefer IPA, as it is a good degreaser. Then, I let the thing dry, usually I use airbrush to blow air over the surface, this also helps with small debree that sometimes sticks to the surface. Then, use a good primer, well diluted, in thon coats. I use gunze surfacer 1500, but there are others. Leave this to dry and degass before painting further.
Now, not all the paints are made the same or in the same level of quality. More importantly, there are those that are more user friendly and those that are not. I'm not saying you can't use certain brands, more that you try different brands and stick with the ones that you feel comfortable with. Those that you can get consistently good results with. Usually at that stage, I would paint certain areas, like a nose cone, or tip of the tail first, then mask, and then paint the camo scheme. Now, here is my tip: after finishing the full camo scheme, I give the entire model a thin coat of varnish, usually gunze gloss. But, it's very important to keep this very thin. This will help with masking further on.
After this coat has had sufficient time to cure, I start masking and painting all the tiny bits. Then, I gloss coat if necesary, and apply the decals. Then it's time to seal everything in with another gloss coat, still keeping it very thin, and basicaly just going over the decals and spots not covered by the earlier gloss coat.
One more thing I forgot earlier; after each coat (primer, paint, gloss), it's possible that tiny specks of dust get into the coat. The thinner the coat, less specks will there be, but there may be some. for this, I keep sanding sponges handy, the ones from 3M, micro, and ultrafine. I use them to get rid of the specks, then I go back over those spots and touch up the finish before the next step in the process.
Again, leave to fully cure, and apply weathering as you find fit.
There are a lot of steps in this process, but if you keep to it, you'll consistently be getting good results,and more importantly, won't get frustrated with the hobby. I would recommend first getting some good quality cheaper kits, with a lot of flat surfaces for practice. Then get good quality paint and supplies, and start experimenting. Once you find a good combination you're happy with, things will improve for you, I'm sure.
-
Wow, this is really spectacular! Wonderful work mate! I actually thought this was the 1/48 kit. It was only when I went back to the article in AMW that I realised it was in 1/72... really, really great work! Love the finish and the subtle weathering. You've inspired me to do my 1/48 kit in french markings.
-
1
-
-
Hi Lex, great choice of subject! Love the Iron Works
As I am at the moment in the process of building Hasegawa's E-2 C, and am masking the deicing boots on the wings, may I offer a bit of advice? There are no deicing boots on the inboard portions of the wings, only on the outboard portions. I started masking them on my E-2, but then had another look at the images of the real article, then took the masking off. I guess it's just one of those little details you don't notice until you actually start building the aircraft.
-
1
-
-
Rip...
-
Tnx mate! Great pics, will be a big help when I start on my G.
-
Hi Martin! Greetings from Croatia, and welcome to the forum. If you have any questions, please feel free to ask, or send me a pm, I'll be happy to help.
-
Hi Julien, I saw that Speedhunter Graphics just put out this sheet. I plan on getting one myself for my Hasegawa Wild Weasel:
https://www.reidairpublishing.com/decals/early-weasels-f-4g-wild-weasels
Buz: I'm very interested in those SEA WW photos, as they are pretty scarce to find on the net. Could I ask you to share them with me at: [email protected]?
-
Beautiful build! Great Intruder 😀
-
1
-
-
However, AK real color, if you can get your hands on them, are perfectly brushable.


Me versus the airbrush; or, How I learned to stop worrying and love brush painting again
in Airbrushes
Posted
Hi, sorry to hear about your bad experiences with the airbrush. I can sympathize very much, as I also had great trouble at first. Actually, I have went through 3 different brands of airbrushes and several brands of paints to finally find those I am comfortable with. However, now airbrushing is my favorite part of the hobby, and I just love working with the airbrush to achieve different kinds of finishes. I have just recently won a medal at one model contest, so you know it's really possible to go from really bad at airbrushing to really good. However, the road is not easy, but if you persevere, you can really get great results. I also have the Fengda, and I think it's really a great brush for it's price.
If you'll allow me to relate my experience; I went over a couple of lower class brushes from several brands, but I wasn't happy with any of those, and couldn't really get any sort of normal result with them. Then, on an advice from an older fellow modeller, I purchased a Paasche VL, and a whole new world opened up. I thought: "So this is the way an airbrush should work, finally". Then I understood that the problem wasn't in me, just that those other brushes weren't really properly engineered, even though they were from big brands. Paasche was really my workhorse for many years, and with her I learned, slowly, how to work with a proper airbrush, and even with a 0.75 mm nozzle get a tiny thin line on the model. Then, after I coquered the Paasche, I thought it was time to move on to something better, and I got myself an Iwata. Boy, was I happy when it arrived! Couldn't wait to start using it. But, alas, my first couple of tries, it was a disaster. I just couldn't get it to work. I thought I got a bad brush, so I thoroughly checked it over, and couldn't find anything wrong. So I just chucked it back in the box, and went back to my trusty Paasche. Bit it kept nagging at me, how come this great brush that everybody is so happy with turns to junk in my hands? So, after a couple of months, I took it out of the box and started messing with it. Changed the air mix, changed the paint mix, and voila! It started spraying beautifully. Then I understood, every brush needs its paint and air mixes adjusted to suit them. The Paasche is much more forgiving in this manner, so I didn't really notice it when I was working with it, but Iwata needs more care taken.
So, if you don't want to just give up, I would recommend you change your paint first, the 3rd gen are really for more experienced users, as they require more fettling to work properly. For first time user, I would use AK real color, Gunze, or Tamiya, thinned with their thinners. Start with the matt greys or greens, they are the most forgiving. Then, as you master each step, move on to more complicated things. Try different paint/thinner ratios, and different air pressures until you find what works best for you.
And most of all, don't get discouraged, none of us knew how to use the airbrush from the start, but perseverance really pays off, and the work really gets easier with experience.