

Mark4700
-
Posts
1,942 -
Joined
-
Last visited
Content Type
Events
Profiles
Forums
Media Demo
Everything posted by Mark4700
-
 Wow. The hard work certainly paid off. Superb rendition of one of my favourite aircraft. I always thought these looked so elegant. A proper airliner.
 -
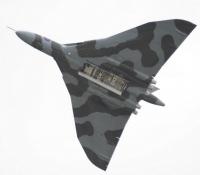
Always enjoy a Vulcan build.
-
Starsky’s Gran Torino - FINISHED
Mark4700 replied to Mark4700's topic in Work In Progress - Vehicles
To be honest I’ve not given the tyres much thought as I haven’t built a car in years. But looking at them now they aren’t as good as the ones on the Tamiya kits I used to build in the 1980’s. -
Starsky’s Gran Torino - FINISHED
Mark4700 replied to Mark4700's topic in Work In Progress - Vehicles
Work is moving on a pace now. As promised here's a pic of the body. Very pleased with the result. I used Humbrol clear gloss over the Vallejo Model Air. The interior is also finished. And I also now have a rolling chasis. Not many parts to be fitted now. Next job. The stripe!!- 77 replies
-
- 5
-

-
- Striped tomato
- Gran Torino
- (and 1 more)
-
What about a natural metal finish? Might look good selecting panels with varying finish. Other than that you may only be left with grey.
-
Interesting project. I think I’d do it wheels up.
-
Starsky’s Gran Torino - FINISHED
Mark4700 replied to Mark4700's topic in Work In Progress - Vehicles
I have been working on it a bit, honestly. Dare I say it’s been too hot. I decided to have a go at adding the ignition leads as I thought the engine looked a bit sad without them again I used my trusty fuse wire. Fairly pleased with the result. The dashboard is also finished and ready to be fitted. I painted some black rings around where the headlamp lenses will be fitted, just to add a bit of definition so they won’t look too toy like. I fitted the decals to the grill. I think I’ll add a wash to the grill, again to add some depth and definition. Finally licence plates ready to be fitted. The one I scratch built is on the left I have been working on some other little areas, but not worthy of photographs. I’ve also added a couple more layers of clear gloss to the body and it’s now ready for the stripes, but it’s drying for a while and don’t want to move it to photograph it.- 77 replies
-
- 5
-
-
- Striped tomato
- Gran Torino
- (and 1 more)
-
Anigrand 1:72 Lockheed C-5A Galaxy
Mark4700 replied to Wolfhound32's topic in Ready for Inspection - Aircraft
That is one HUGE kit. Looks awesome. -
Nice Spitfire collection. Amazing how you have to look past the colour scheme to see that the German one is actually a Spitfire.
-
Wow, you’ve done an incredible job of bringing an old kit back to life.
-
1:72 Airfix Mig 17 A red un with wiings NX117BR
Mark4700 replied to Cheshiretaurus's topic in Ready for Inspection - Aircraft
Very nice. That will certainly stand out on the shelf. -
Very nicely done.
-
Excellent. This kit is currently sitting top of my wish list by some considerable margin. I really hope I can do it justice in the way you have.
-
Airfix Gloster Meteor old style
Mark4700 replied to stevej60's topic in Ready for Inspection - Aircraft
Loved this kit as a kid. Seeing this takes me right back there. Thank you for posting -
As like the real aircraft. A thing of great beauty.
-
Airfix Vampire 1/72 - hairy stick build
Mark4700 replied to Adam Poultney's topic in Ready for Inspection - Aircraft
Very nice work. Hard to believe it’s brush painted. -
Amazing how machines can make you emotional. I remember the last time I saw a Vulcan fly at the Great Yorkshire Airshow in 2015. Made my eyes leak, as it did lots of others that day.
-
Thanks for the compliment. I hate attaching the ordinance to most models. This was extra frustrating though as there's little in the way of locating pins. It's always a pain getting them lined up looking good and not that they've just been thrown on. I've got a Hasegawa Strike Eagle waiting in the stash. I built this in the 80's in the lizard demo colour scheme and loved it. What's putting me off is the thought of the 22 bombs to be fitted 🤯
-
Starsky’s Gran Torino - FINISHED
Mark4700 replied to Mark4700's topic in Work In Progress - Vehicles
Engine build is going well. Most of the kit parts now fitted. Just a bit of scratch building to do. I at least want to add the HT leads. I've also started on the interior. Work on the dashboard continues. Must remember to keep working on the body 🤔- 77 replies
-
- 4
-
-
- Striped tomato
- Gran Torino
- (and 1 more)
-
Starsky’s Gran Torino - FINISHED
Mark4700 replied to Mark4700's topic in Work In Progress - Vehicles
That’s brilliant. I had seen this picture but didn’t realise that you could zoom in so close. one thing I’m struggling to make my mind up with at the moment is the black strips on the bumpers. On the photo you’ve shared their just on the over riders, and I’ve seen cars from the show where this is the case. But the kit instructions say it’s on the over riders and full width of the bumpers as well. I’ve been using this image https://www.rodauthority.com/news/top-50-tv-cars-of-all-time-no-4-starsky-hutch-ford-gran-tor/ but the resolution isn’t good, and it appears the black strip is full width on this one. I suppose either way is right as they used more than one car, even in the first series which this kit is based on. -
I built this a while ago, but never got around to photographing the finished kit, so here is it. It's the old Fujimi 1/72 scale A-6A Intruder. It was built straight from the box using the kits original decals. It went together really nicely with very little filler needed. Back in the 80's Fujimi were my favourite kits. I used Vallejo Model Air paints. Hope you like the pictures. And for those that are interested here's the link to the build -
-
Starsky’s Gran Torino - FINISHED
Mark4700 replied to Mark4700's topic in Work In Progress - Vehicles
I've been waiting to get the blue on the engine for a while now, but I've been busy painting all the ancillaries that are attached to it and masking them with liquid mask. Today I've finally got it painted and a gloss varnish over the top. Now looking forward to taking the rest of the masking off and building the rest of the engine around it. I've also varnished the dashboard and door cards. Before I did I gave them a very light dusting of dark grey just to take some of the blackness off them to give them a slightly more worn and scale look to them. Just the detailing to go on them. The seats have had the same treatment. First a light dusting with dark grey, then a coat of satin varnish. I'm very happy with how they look. I'm learning a lot from this build, a few techniques I haven't used in my usual 1/72 aircraft builds, but will try and use some of them in the future. I'm hoping that I can do a but of construction work now.- 77 replies
-
- 4
-
-
- Striped tomato
- Gran Torino
- (and 1 more)
-
Starsky’s Gran Torino - FINISHED
Mark4700 replied to Mark4700's topic in Work In Progress - Vehicles
The fronts are definitely discs and from the research I’ve done I’m sure the rears were too. The instruction pic is of the front wheels. -
Starsky’s Gran Torino - FINISHED
Mark4700 replied to Mark4700's topic in Work In Progress - Vehicles
I think Revell have made an error on the instructions as far as the wheels go. It states that the inner part, the brake disc, should be D - black and the outer part A - silver. Well I've seen a lot of brake discs over the years and they've always been silver of some description. So I reversed what the instructions said. As mentioned before I also de-chromed them and painted them aluminium. I've built them up and put the tyres on them. This is how they look now.- 77 replies
-
- 1
-
-
- Striped tomato
- Gran Torino
- (and 1 more)
-
Starsky’s Gran Torino - FINISHED
Mark4700 replied to Mark4700's topic in Work In Progress - Vehicles
The radio cord is fuse wire. I wound the thinnest one around a wider one then slid it off. Really pleased with the result. And thanks for the tip on the vinyl. This is the first car I've done in about 30 years and I'm really enjoying it.- 77 replies
-
- 1
-
-
- Striped tomato
- Gran Torino
- (and 1 more)
