

Mark4700
-
Posts
1,942 -
Joined
-
Last visited
2 Followers

Recent Profile Visitors
2,577 profile views


Mark4700's Achievements
")
Very Obsessed Member (5/9)
1.7k
Reputation
-
One word. Awesome.
-
I’ve built this model and painted it with an air brush. I can tell you it wasn’t easy. For your first go at air brushing you’ve done an amazing job. Well done.
-

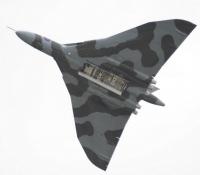
Heller 1/72 Saab Viggen
Mark4700 replied to theplasticsurgeon's topic in Ready for Inspection - Aircraft
I want to add one of these to my collection, but what’s putting me off is that paint scheme. Things normally look easy and turn out more difficult to get right. This scheme looks difficult to start with! You’ve achieved excellent results with this one. -
Short Sunderland MkII - 1/32nd scale vacform
Mark4700 replied to tomprobert's topic in Ready for Inspection - Aircraft
Stunning. That’s it. Just, stunning.- 82 replies
-
- 1
-

-
- Sunderland
- Tigger Models
- (and 1 more)
-
What an incredible tribute.
-
Can you put up some exterior pictures of your kit, there’s only the pictures of the real subject. Seriously though, that is top model making. Painting and weathering look spot on to me.
- 30 replies
-
- 1
-
-
- Tamiya
- F14 Tomcat
- (and 1 more)
-
I love the Phantom. I think it's my second favourite military aircraft only beaten by the Avro Vulcan I remember seeing them at the airshows I went to as a child in the 70's, always giving a fantastic display. I love the whole look of the airframe, the way the tail planes slope down in position to the end of the wings kicking up, just brilliant. I've had this in the stash for a while. Last month I was watching some YouTube videos on the British Phantoms and I couldn't resist it any longer. I built it straight out of the box, no third party add on's, no third party decals. The kit was a pleasure to put together with all parts fitting together very well and needing little or no fill and sanding. I love the new style Airfix instructions, they are very easy to follow with lots of space for notes if you need to make them. Paint wise, I used a mix of mig and Vallejo model air with Alclad 2 for the metal finish abound the rear, all applied with an air brush. Between the paint and the decals I used a couple of coats of Pledge floor polish and after the mammoth decalling job I gave it a coat of Vallejo satin varnish. It was then finished off with some weathering and a Flory wash. I did quite a bit of research into the weathering before starting. I wanted it to look well used, without being over the top. Here's some pictures of the finished model. Thank you for looking and I hope you like my interpretation. I know the upper silver probe has bent up on the above image. It has since been back into the hanger for repairs.
- 11 replies
-
- 45
-

-
-
Exceptional build. Very well done sir.
-
Thanks for you kind comments Ray. There’s nothing too difficult about it, it just needs a little patience and TLC. I really enjoyed building it.
-
Italeri 1/72 A-10 Thunderbolt 2
Mark4700 replied to ErikT's topic in Ready for Inspection - Aircraft
Love it. Well displayed on the base too. For me what makes this really good is the weathering, just enough to make it look like a well used operational aircraft without it being overdone. -
Excellent. Nicely photographed too
- 36 replies
-
- 1
-
-
- Airfix Buccaneer
- 1/72
- (and 1 more)
-
Thank you. It is very satisfying to make an old kit look acceptable next to modern kits. I'd recommend everyone build an old kit now and again. Thanks for your comments. Thank you for your kind comments, I'm really pleased with the way it turned out. To be honest the scribing was relatively easy as there are nots of straight lines and flat surfaces. Go one, do it. Have a go. You know you want to 😈
-
I wish I’d still got it, unfortunately it’s long gone. Probably met the same sad fate as a lot of real aircraft, used as for target practice, but in this case my mates air rifle.
-
Me too now. I really wasn’t looking forward to this one, but really enjoyed bringing it up to date and making my own mark on it. I’d highly recommend anyone having a go, the sen e of achievement when it’s completed is fantastic
-
Thanks Bill. I actually forgot what an imposing aircraft it was. Also the history of the aircraft surely makes it a deserving subject for a new tooled kit. Come on Airfix, downscale your 1/48