

TallBlondJohn
-
Posts
867 -
Joined
-
Last visited
Content Type
Events
Profiles
Forums
Media Demo
Posts posted by TallBlondJohn
-
-
Oooh! Ekranoplan!
And that's another item on the arm-long Hannants wish list. Thank god they don't do an injection Caspain Sea Monster.
-
Noticed this a while back, and now finally in a position to answer - the kit comes with perfectly fitting doors and bomb bay so no reason why it can't be built wheels up with no extra effort. Its a great kit, highly recommended. From the design its clear there will be further versions and boxings.
-
 1
1
-
 1
1
-
-
Note that the airfix kit's raised panel lines are (for once) correct - they are butt-joint welds. No rivets. Restoring them after sanding is tricky but can be done.
-
It was international orange (for visibility if ditched). In some lights this can look red. Film can deceive but paintings and posters from the time clearly show orange.
Wing flags are another subject, some Clippers had them and some didn't - one even had two IRRC. Also depends on the timing - Clippers had refits like ships and could have numerous detail and livery changes.
-
1
-
-
Thanks everybody, the Airfix kit has the old pylon which is what I want. I'll omit the practice bomb carrier (for now)
-
22 minutes ago, Harry Lime said:
Nope, it's a practice bomb carrier in use prior to the introduction of the CBLS.
Probably not, the tow bar type looks to be the standard USN type, would indicate the Bucc is on a USN carrier rather than Ark.
Mark.
That makes sense - still a universal pylon though, correct?
USN - Yes I realised that after posting. The deck markings aren't right for Ark, and the large numbers of people standing about with their hands in their pockets is a give-away 😉
Thanks
-
 2
2
-
-
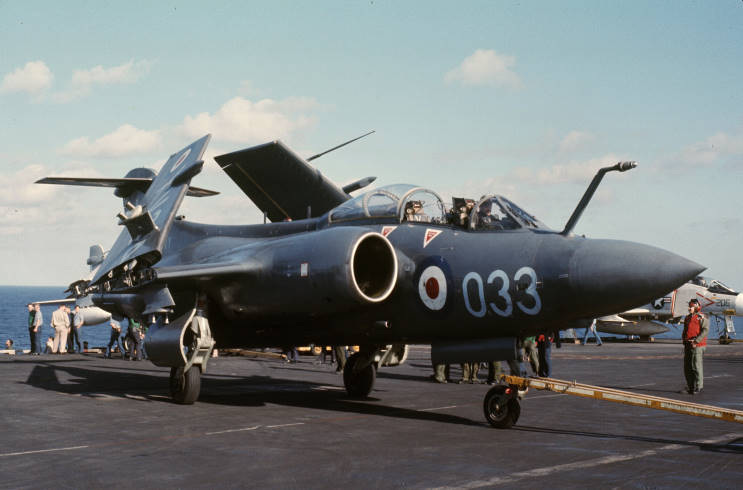
I see a lot of photos of RN S2 Buccaneers sporting this pylon on the folded wing:

Am I right that this is a universal pylon with an adapter for two 500/540lb bombs? Does anybody have a close up?
Just noticed the different shade of EDSG on the radome. Hmmm... its matt too, not satin.
And is that Ark's 'borrowed' USN Phantom in the back ground?
-
1
-
-
Lovely. Harrier looks so good in arctic, especially this white/green/grey variation
-
1
-
-
Finagle a longer strand, then glue the thread at the baselet. Contrafibulate superglue to the top apeturething before trimbling the extendabrilles.
Seriously, it helps to glue the rigging as close to its final angle as possible to avoid 'turning the corner'. Also less sheer force = less glue required.
-
2
-
-
On 11/04/2020 at 15:04, Vesa Jussila said:
This project is not stalled 🙂
But cleaning this takes lot of time.
I said that parts fit quite well, but there is some work anyhow. Like this:
Fitting around engines is bad in my case. So this will take some time to get it in reasonable level.
Looks like my experience - everything fitted nicely until the glue came out. I suspect the secret to building one of these things is to put the upper half of each wing to the fuselage first, maybe even with clips or bolts ot get it just right before adding extra thin glue. Then do the same with the lower wing, then glue the wing halves together and fill the wing gaps as they wont be so obvious. Maybe only then close the fuselage? (Its a good idea to reinforce the fuselage join, I had some cracking. Then again I did drop it on the floor several times.)
-
2
-
-
Thanks for the help guys - now my problem is getting hold of the paints. I do have Colourcoats in the drawer, but only KM colours - eh? Ah yes, because I used up all the RN.
After a light coat of Mr Surfacer, the Airfix blue-grey plastic looks about right for the undercart - so I may just see how that pans out.
The only EDSG I have to hand is Xtracrylics - which have worked for me as long as I don't try to mask over the top, which in with this subject should be minimal anyway. Fingers crossed.
Why not just order some other EDSG from Hannants? Because I have a dozen things I don't need in my wish list, and I'll bung them in to get the free P&P. So a tin of paint will cost nearly £100!
-
Got the Airfix kit (its lovely) and the refs are all Humbrol - but where they really? Does anybody have BS references for RN 1970s?
- Extra Dark Sea Gray - BS640, check
- Cockpit Humbrol 165 - Medium Sea Gray - does that sound right?
- Wheel wells and bays - 196 Light gray?
- Undercarriage - 127 US Ghost Grey - really?
Thanks
-
But how will you get it through airport security?
-
2
-
-
And of course I had to pop over to the Hannants website just for a look - no! no ! Must resist!!
Adding to Wishlist doesn't count does it?
-
Could have been the Apple store. I did that once after too much gluhwein at the Christmas Market. Woke up the next day to a pile of white boxes 😬
-
1
-
2
-
-
Lovely - built one of these as a child and thought it was the best I ever made. I remember being totally stumped by that bump though - couldnt figure out what it was for.
-
1
-
-
A Clipper! Here are links to the WIPs for mine (Pan Am and BOAC) if it helps:
Looks like you are making good progress already. Only thing I'd look out for is the RDF bulb-thing wasn't on the centre line, it should be offset to starboard to clear the walk area. I also binned the glass and used plastic strip and Krystal Klear instead, worked well.
I have spare NC-18605 decals but they are from the same boxing as yours so pretty yellow and I didn't trust them, I got a re-release (the WIP) and then used its decals to build two 314s. But I can post them to you if you are feeling brave.
-
1
-
-
Mine has just arrived courtesy of my LHS, it does like very nice. Have to hope my single tin of EDSG will be enough...
-
1
-
-
Personally I'd stick with the desert sand, the photos look a bit overexposed and maybe some fading over time that a 'nam TSR2 wouldn't have. Also a touch of scale effect?
Great build so far, as an owner of several what-if TSR-2s-to-be I know what a battle that 1/72 kit is.
-
Fab work and good story! Big Man Straker would be proud. I like the idea of a Shado CVR(T) - Maybe backed up by a few Gepards?
According to Clavework graphics (http://www.clavework-graphics.co.uk/), Spectrum also fielded TSR2s and F-14s:
But they are not deltas - oooh, how about a Spectrum XB-70 or Avro Arrow?
No Starfleet DC-3 (yet) but they take suggestions...-
7
-
-
On 27/02/2020 at 12:12, OutcastJoel said:
@GrantGoodale I had a bit of a play and discovered that the process below seems to work best for me:
- Place a small amount of CA on a clean surface, scrap plastic seems popular, I use a small pad of pot-it notes.
- Cut Ushi line a little longer than needed.
- Dip one end of line into the CA and attached where needed.
- Stretch the line beyond the other fixing point such that it touches the terminus point.
- Whilst holding in this location, apply a drop of CA using a tooth pick.
- Trim any excess line.
For anybody taking notes - always use new CA. Rigging with old CA is not fun. -
Look at the real aircraft photos above. A bit skuffed and worn, but no panel line pre-shading effect to be seen. Or on any other in service aircraft I've ever seen. That's all I'm going to say on the subject 🙂
Lovely build so far, - makes one realise how good looking the 144 is. Even better than Concorde in places? The canards do let it down a bit though.
-
1
-
-
2 hours ago, Coors54 said:
'What's the matelot in the fifth picture doing? Having a kip or trying to find his keys? 😃
Passed out from rum, s*d*my and the lash probably. There's always one who can't take it.
The ship's not in a bad shape for 8 months - no pre-shading to be seen!
-
1
-
-
Thanks for the photo work, hope the build is still going


Italeri Vosper beginners OOB with a twist
in Work in Progress - Maritime
Posted · Edited by TallBlondJohn
Terry is right, use thick or thin poly to 'thin' the putty. Even old dried out putty can be revived to the consistency you want. Very thin it can be painted, but as its mostly glue it will attack surfaces. Something similar is home-made sprue goo, just dissolve some sprue in thin glue (put both in a pot and leave overnight) and apply as required. The result should be the same hardness as its parent plastic, which makes sanding to an even surface much easier. There are commercial versions like Mr Dissolved Putty - one jar lasts forever.
If you want something more forgiving, try Perfect Plastic Putty, its water soluble so it can be 'painted' on and washed off - but its not as tough as the solvent based putties so its best used for running into seams, you can wipe off the excess with a cotton bud and its done. Again it dries out with age but can be revived by crushing to powder and mixing with its solvent, water.
Then there's Milliput, the HMS Dreadnought of putties. Its epoxy based so bomb-proof, but smells awful and takes a while to set. Can be thinnned with water until its set. It stinks and is very messy but ideal for large areas and sculpting. Some people also use automotive body filler for large jobs but I've never tried that.
Finally there is homemade thin CA superglue mixed with talc or cornflour. The result sticks very well and can be easily filed and sanded - just how sticky v sandable depends on the ratio so you can cook up what you like. I like it for raised bits as its less fragile than putty. Always use fresh superglue if possible, old stuff goes off and is hopeless.