

FG2Si
-
Posts
952 -
Joined
-
Last visited
Content Type
Events
Profiles
Forums
Media Demo
Everything posted by FG2Si
-

Hasegawa 1/48 VF-1S Strike Valkyrie
FG2Si replied to FG2Si's topic in Work In Progress - SF & RealSpace
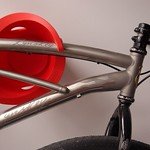
Here's the FAST packs after removing all the masking tape. The upper legs were next. On the Strike Valkyrie, the upper packs have one with a twin beam cannon and the other has missle launchers in the front. Hasegawa has really added quite a bit of detail into these kits. The missle pod nose even had individual missiles to be added before you close things up. You can just see them in the assembled one on the right. Here's the assembled upper boosters along with the legs/engine nacelles. A quick mock-up.- 20 replies
-
- 12
-

-
Hasegawa 1/48 VF-1S Strike Valkyrie
FG2Si replied to FG2Si's topic in Work In Progress - SF & RealSpace
I missed documenting the forward fuselage assembly but that was pretty straightforward. Same for the lower legs/engine nacelles. Here's some of the various sub-assmblies laid out. I then started on the detail painting. I'm basically following the instructions for all of this. There's also the vernier cones that need to be painted black. I used a circle template to mask those off. -
Hasegawa 1/48 VF-1S Strike Valkyrie
FG2Si replied to FG2Si's topic in Work In Progress - SF & RealSpace
I then started working on making several sub-assmblies. Intakes/upper legs Lower fuselage and swing wing pivots. FAST pack armour/boosters for the legs. Leg thrusters. -
My bench has been jammed full of 1/32 aircraft builds (my regular choice of libation) so I decided to mix it up a bit and switch gears from 4 engine heavies. At least temporarily. I've got a few Valkyrie kits in the stash, mostly Hasegawa 1/72 kits but also a couple of their 1/48 ones. There's also the Max Factory 1/20 release that I'm hoping to start later this year. So the 1/48 Strike Valkyrie seemed like a nice warm up build for big brother. Here's the kit in question: Sprues are in two colours plus clear. Here's the blue ones which are dedicated to the Strike bits. The airframe parts are in white. I started with filling many of the ejector pin marks in the visible areas. I had to full some a couple times to get them flush. Carl
-
The kit is definitely a great build. I just finished the Late model as well. My only real issue was the soft detail on the M35 gun barrels. I used an Aber brass barrel set and cut it down to the correct length. Carl
-
[MGS] 1/100 Metal Gear Rex
FG2Si replied to Yg Models's topic in Ready for Inspection - SF & RealSpace
Great looking Rex. Any plans to build Metal Gear Ray? Carl -
Dana Bell Corsair Cockpits F4U-1 Family (ISBN: 978-0-578-37642-4)
FG2Si replied to Mike's topic in Reference material
I picked this up as soon as Dana announced it. It's absolutely worth it for the details and information he's crammed into it. Carl -
what scifi stuff has the postman delivered to you today?
FG2Si replied to TimMather's topic in Science Fiction Discussion
I opened the box up and took a look. The tires are in vinyl. Hope that helps. Looks like if you leave the roof off you can do a convertible. Carl -
what scifi stuff has the postman delivered to you today?
FG2Si replied to TimMather's topic in Science Fiction Discussion
Thanks! I didn't know it had all the parts in it. I might just have to pick one up. My LHS had a couple in stock so maybe the next time I'm out there I'll grab one. -
what scifi stuff has the postman delivered to you today?
FG2Si replied to TimMather's topic in Science Fiction Discussion
Thanks! I haven't seen the Moebius kit in a while except for the Bane version or I would have bought that. The larger size would have been nice. -
what scifi stuff has the postman delivered to you today?
FG2Si replied to TimMather's topic in Science Fiction Discussion
The Gluag is my favourite Zentraedi mech but I couldn't pass on an up to date Regult kit. It's surprisingly large in 1/72. I wasn't expecting it to be as big as it is. -
what scifi stuff has the postman delivered to you today?
FG2Si replied to TimMather's topic in Science Fiction Discussion
Finally received my Regult. I also picked up the BanDai re-issued of their Batmobile kits. -
What are people's thoughts on the Takom kit that came out a couple years ago? My LHS had some on clearance for $30 CAD so I picked a couple up. I've started one and it's going together nicely. Carl
-
Fixing up my 80’s Zoids
FG2Si replied to rockpopandchips's topic in Work In Progress - SF & RealSpace
That looks great. Looking forward to some of the other ones next. Carl -
If you have a router and some woodworking skills, it's not too difficult to take two of the Ikea Detolf display cases and make one that's twice as wide. You have to make a new top and bottom for them from wood. Use the router to make a channel for the glass sides to fit into and drill the appropriate holes for the wire shelf supports. The bonus is I can now fit three 1/32 Spitfires across instead of just one per shelf. If you need more info, feel free to ask. Carl
-
The late Edgar Brooks managed to find a sample of the PRU Pink in an archive. He said it was so pale that the only way to know it was pink was if you held something white to it. Then you could see the contrast. When I built my FR IX, I did just that and used the invasion stripes to provide the contrast.
- 84 replies
-
- 14
-
-
Fixing up my 80’s Zoids
FG2Si replied to rockpopandchips's topic in Work In Progress - SF & RealSpace
If I recall correctly, the motors are the same across the different Zoids so maybe one of the ones you're not keeping has a functioning motor you could swap out. Carl -
Fixing up my 80’s Zoids
FG2Si replied to rockpopandchips's topic in Work In Progress - SF & RealSpace
Nice! I remember building a couple of these back when they first came out. I've got a few of the more recent HMM ones by Kotobukiya ones in the stash. Carl -
FG-1 leading edge slats information sought
FG2Si replied to Cees Broere's topic in Aircraft Cold War
I don't know enough about the British Phantoms but if they had the hard wing Wolfpack Designs made a dropped wing resin conversion for the Tamiya F-4EJ kit. I have one around somewhere I could get pics of if that helps. Carl -
I've had one of these for a couple years now and it's definitely worth the price. It's helped straighten several bent needles from accidents similar to yours. Carl
-
I mostly use HGW belts as well ones from a Japanese company called Feeling/Wako. In either case, it helps to thread the belts through the various buckles while they're still attached to the fret. This way, you're less likely to lose the buckle. Feeling sets up their frets with this in mind and show it on their instructions. The only PE belts that I've gotten a satisfactory result from are the ones included with Aires cockpits. The belts need to be annealed and then they could be draped accordingly. Carl
-
Apologies for the confusion from my end @Das Abteilung on which kit I had and thanks for the clarification. I've learned a lot about these tanks from your replies. Carl
-
Here's the gun barrel with the fume extractor. Looks to be the right one? Carl
-
Thanks for the reply @Das Abteilung I've got the interior kit version (37013). It looks like there are two types of gun barrels in the kit on the sprue diagrams. One has a fume extractor on it so maybe that's the 105mm barrel? The sprue (FH) that it's on has the full breech assembly on it as well. Carl
