


Jimbobtheflimbob
-
Posts
104 -
Joined
-
Last visited
1 Follower

Recent Profile Visitors
930 profile views


Jimbobtheflimbob's Achievements
")
New Member (2/9)
232
Reputation
-
Has anyone used this on scale models, specifically 1/48 planes? I bought some normal vallejo primer and it was switched with the mecha primer so its all i have at the moment.
-
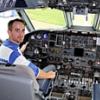
So at the moment I have an Iwata revolution HP-CR with the .5mm nozzle, and have found that it isn't precise enough for some of my modelling. I was looking at getting the optional .3mm nozzle but it costs almost as much all in as a H&S Ultra. I've also been considering the H&S evolution silverline and the Iwata Eclipse HP-CS. Would there be any real benefit getting an eclipse with a .35mm nozzle when i already have the revolution with a nozzle that isnt much bigger? Also, does the evolution spray any better than the ultra to justify the price difference? My first airbrush was an ultra but I had a nightmare with it clogging and ended up breaking it and getting so annoyed i got rid of it, so i'm a little hesitant to get another one when I may end up clogging this one again, although hopefully the years of practice since then will prevent a repeat. Will
-

Tamiya 1/48 Corsair F4U-1A
Jimbobtheflimbob replied to Jimbobtheflimbob's topic in Work in Progress - Aircraft
Painting is almost finished. For this project i've been using a home made airbrus spray booth made from foamboard and a delta 120mm fan. It has sort of been a WIP with the plane as it seems to evolve every time i get it out but now im pretty happy with it. Originally it had a standard computer fan but it did nothing to remove the fumes so i now have a 150CFM fan instead. It is terribly loud when you have your head anywhere near the booth but it does a good job at removing the paint fumes at least. I used the Hataka USN late war set and had very mixed results. Preshading was done with humbrol 33 and was a bit of a mess as the combination of a lack of experience and skill, the large 0.5mm nozzle on my airbrush and numerous different consistencies of paint made it a bit splotchy and uneven. Painting the white on the underside of the aircraft was without a doubt the most unpleasant experience i've ever had with painting a model. The hataka insignia white would not mix with any thinner I tried and it was a constant cycle of the airbrush jamming and then spraying pure thinner with a slight tinge of white. It took an entire afternoon to paint the bottom of the fuselage and the wing centre section. The intermediate blue and sea blue on the top of the aircraft went on much easier. strangely the white on the bottom was very thick but refused to be thinned, whereas the blue paints could be sprayed without thinning. It was a bit of a pain trying to get even remotely crisp demarcations between the colours with the 0.5mm nozzle but i dont fancy splashing out £50ish for a 0.2mm nozzle for my iwata revolution that i'll probably clog up immediately. I had to do a bit of touching up with a brush but im pretty happy with it now. I didn't notice until i'd already packed all the airbrush stuff away that i'd painted the tail sides for the wrong decal option - the intermediate blue (for 'big hog' which i'm modelling) should go to the end of the tail, so i had to patch that up with a brush. it looks better than in the photos as i did a bit more work on it after but the difference in finish is still a little apparent even after the clear coat. I did realize a few hours ago that the white on the bottom of the nose should go all the way to the front of the cowl for 'big hog' but id there's nothing i fancy less than spraying the insignia white again and besides i like the look of it as it is so i'll probably leave it as is - brush painting thw hataka white paint takes a seemingly infinite number of layers to get it to be opaque. At the moment i'm debating whether to leave it in display condition or weather it. I've not much weathering experience so I feel it might be worth trying out techniques on a project i'm less invested. On the other hand the idea with this aircraft was to really go beyond my comfort zone, as evidence by the first attempts at seatbelts and the engine ignition harness (which I somehow need to paint black with the cowl on as i forgot to do it before). Progress might slow a bit now due to work but I recently got an eduard dual combo 1/48 spitfire mkxvi set so i'm quite eager to finish the corsair within the coming weeks so i can have a go at that. Will -
Tamiya 1/48 Corsair F4U-1A
Jimbobtheflimbob replied to Jimbobtheflimbob's topic in Work in Progress - Aircraft
Normally I put masking tape around the weel well edges or just repaint it with a brush. I did see that the wheel wells are often white but I thought the green would add a bit of interest to the underside, and besides the instructions have the wheels wells as the same colour as the cockpit -
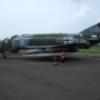
Second completed lockdown build and this one i'm pretty happy with. A nice kit which went together alright although there were a few fit issues with the top of the air intakes. Unfortunately the primer gave it a horrible grainy texture which is accentuated by the light in these pictures but it looks alright in person. I'm not sure if Black Mike ever actually carried armament, let along black drop tanks, after being repainted, but I just thought it looked good.
- 11 replies
-
- 38
-

-
Tamiya 1/48 Corsair F4U-1A
Jimbobtheflimbob replied to Jimbobtheflimbob's topic in Work in Progress - Aircraft
I've made a fair bit of progress since the last update. Wings are on and everything is masked up for painting. Masking the canopy was a complete nightmare as the tape kept moving around but its done now at least. Unfortunately I broke a bit off the windscreen, although it is part of the frame where it meets the fuselage so i've filled it and im just waiting for it to dry. the flaps were a little tricky to align but all good so far. -
Tamiya 1/48 Corsair F4U-1A
Jimbobtheflimbob replied to Jimbobtheflimbob's topic in Work in Progress - Aircraft
I've made a fair bit of progress with the corsair. First i assembled the engine. this included my first attempt at a wiring harness and second ever attempt at scratch building. Also painted the fuselage insides and put the fuselage and wing centre section together. I'm trying to decide whether to install and paint the gear before or after painting, but first i'm trying to get the main airframe completed before painting. So far this kit has been very enjoyable. Much easier to assemble than the last few airfix kits i've made. After dry fitting the outer wing sections don't quite seem to fit straight but i think it should go together fine regardless.- 17 replies
-
- 10
-
-
Tamiya 1/48 Corsair F4U-1A
Jimbobtheflimbob replied to Jimbobtheflimbob's topic in Work in Progress - Aircraft
They look very nice. I'll go with stock then. I've tried putting the photos on a different hosting site so hopefully they should be visible now. -
Well it's been a while since my last post here but the lock down has been the perfect opportunity to do some more modelling. It had been about a year since I made my last model, but recently I've gone on a bit of a spree making an Airfix Buccaneer and Phantom (for which i'm planning to do ready for inspections soon), all building up to this tamiya corsair. It's been in the stash for ages and I've been waiting to source the right paints and develop my weathering skills a little before starting. The corsair is a personal favourite of mine after seeing the fighter collection example at airshows a number of times I finally got around to buying the Hataka USN paint set so now it's time to start! I began with my first attempt at making my own belts. I've previously used eduard photo-etch belts but making my own from tape and copper wire was a whole different beast, although it was fairly enjoyable despite losing several belt buckles when they went flying across the desk! I haven't built a tamiya kit in years so i'm looking forward to a "glue in the box and shake it" build. handmade belts. I'm pretty chuffed with them for a first attempt I'm still undecided whether to use the stock engine or buy a resin aftermarket engine, but i have a feeling i'll go with stock since im planning to have the cowls shut anyway. Will
-
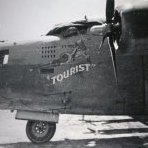
On holiday in the south of France and a Conair Turbo Fireboat flew through the valley at approx 300kts 500ft just as the sun was setting. A very impressive sight and quite a rare aircraft, also they keep flying in formation overhead at high altitude
-
Revell Hunter FGA 9 1/32
Jimbobtheflimbob replied to Jimbobtheflimbob's topic in Made In Britain II GB
sorry for the ;ack of updates, progress has been slow as i had to wait for ages for paints and then when i put the fuselage and wings together they wouldn't fit! it seems the intake is misshapen and so the wing cant fit into its slot. I had to do a lot of cutting with the dremel and its a bit of a mess now but at least the wing actually goes on! hopefully now i can finally get onto painting as long as i dont have any issues with the tail. -
its been back on its wheels at Duxford since the day after the accident. The right wing tip is damaged as there was a concrete post hidden in the field boundary were it landed which also made it slide sideways. the prop will need replacing obviously and the canopy was jettisoned so is shattered. The engine will need to be broken down and inspected both due to the prop strike and the engine failure which caused it in the first place. Apart from that damage doesn't seem to bad.
-
According to the pilot, Nick Grey, the canopy disintegrated at 360kts on the first pass. I saw it on the ground o the sunday and there is a dent in the vertical stabiliser from a fragment of the canopy.
-
The ban on flying civilian hunters placed on them after the Shoreham crash has now been lifted, so they will be allowed to fly again although with the new regulations regarding maintainance and also not being able to do aerboatics, as with other classic jets. Hopefully this will liven up the classic jet scene a bit! http://publicapps.caa.co.uk/modalapplication.aspx?appid=11&catid=1&id=6886&mode=detail&pagetype=65
-
Revell Hunter FGA 9 1/32
Jimbobtheflimbob replied to Jimbobtheflimbob's topic in Made In Britain II GB
The hunter is progressing nicely although i now have to wait for some paints which have been very slow to arrive. I have finished the cockpit (although a bit more was done after the photos were taken to improve the paint finish of the black paint) and also doing some odd jobs such as filling mould release marks on the flaps (which i forgot about until after they had been painted, so they will need another few coats of paint) and also a bit on the nose where it was damaged during sprue removal. i have painted the struts and the wheel hubs along with the gear doors but they need another coat as the wash went slightly wrong as it wasnt thin enough. During the painting of the gear i had a very near miss where i tripped on the air hose between the airbrush and the compressor, pullint the airbrush and the jar of dirty thinner that it was resting on off the table and onto a new carpet! i dont think i have moved that fast in years, but fortunately i was able to mop it up before the carpet stained hopefully nobody will notice! more filling will follow tomorrow and hopefully then ill be able to start assembly of the fuselage and wings. I have got some klear for the first time so im excited to see how much of a difference it will make to the canopy and also how it will improve decalling.
