

MiniModelPaint
-
Posts
30 -
Joined
-
Last visited
Content Type
Events
Profiles
Forums
Media Demo
Everything posted by MiniModelPaint
-
 If this were an episode of The Crystal Maze, I'd be looking at getting locked in the room right now. Either that or escaping without the prize. It takes a loooong time to paint these dreadlocks. Prepping them was a nightmare, but once primed and gloss black, I've had to paint each individual bead in a shade of gold, brass and silver - and then touching up the black where I've run over the lines. 43 dreads with an average of 2 beads per strand. So here it is at 23.41, just shy of 20 mins before the Group Build deadline tolls, and I still have 9 strands of predhair to attach. They're all painted in metal, and one has been tidied with black I love blu-tack. It's the best - after this build, I will never hear a word against it. But I digress. I have moved the paint on for the main figure - there's not a single part that isn't basecoated, nothing left just in primer. The Alien head is untouched - the zealous stupidity of attaching it early on has meant not getting any freehand pattern painted on the head (yet) - the angles are awkward, and it should look jaw-dropping, rather than "didn't he try hard?". Likewise the base - the supplied plinth is cool as a rooftop with cables and pipe, but in context with this new victim, I need to change the venue. I'll still use the base, but maybe turn it into a spaceship corridor. I've managed to get a bit of detail sorted, too. No. Not the netting. Green blood - "If it bleeds, we can kill it" - will be added towards the end, but for now, here's where I got to before getting locked in the room: So thanks for following this thread, guys - it's been a real blast sharing. I'll be finishing this fella off, and you'll see the results on another thread on Britmodeller. Alternatively, I'll be posting on twitter, and my own blog, too - @minimodelpaint, and www.minimodelpaint.com cheers!
 -
It's Sunday - the last day of this Group Build. I'll be honest - I'm not going to finish this Predator today. I could, but I'd rush and ruin. What I do intend to get done later is finish the dreadlocks. Last night I had another late one - got the armour washed, and got some more dreads attached. So, fingers crossed I get some time today - Family day out to the park first - and then I'll get the last glue, paint and photos done for this build.
-
Had a really late night getting the legs and armour done. 2am finish. And I only took this photo… …which doesn't show the legs or armour. Well, maybe the arm armour. It's a combination of copper/brass/gold - mostly GW paints, like Tin Bitz and Brass Scorpion, and will be weathered to match the shoulder. Legs have been spotted, and matte sealed to remove the purple sheen. And that's all for now. Let's see how much I can get done before this GB closes on Sunday.
-
Nice technique, Chris - is that the Billiken kit?
-
Cheers Kallisti, That's the plan - and no wet palette for that job, either. Still. there'll be a *lot* of breath-holding. I may pass out. Chainmail looks great on her, btw - clearly proving a lot of protection. =p
-
Managed to get some more dreads attached last night - 23 to go - almost halfway there! and I've dull-coated the skin, so no more purple sheen. I've also done some work on the shoulder weapon - gunmetals and chrome highlights, with a black barrel. I was worried I'd fitted it upside-down, but it's meant to swivel round when it deploys. https://www.youtube.com/watch?v=eP2IFFQQFpU It looks less like a quiver of arrows now. I also made some progress on the tusks, and started work on the necklace - good practice for the netting (I want to cry when I think about the netting), and some metal-work on the armour. I still have the rest of the lower body and the alien to do as well, so I'll try not to get too hung up about silly little details...
-
I performed a little test, to check how varnishes behave when applied to the Sharpie spots. I want to lose the purpley reflection, but don't want the ink to bleed or smudge. I had a spare hand in the Predator box, so I quickly primed and painted similar brown shades on the plastic, and then finished off by drawing spots with the pen. After drying, I applied Vallejo Gloss, Satin and Matte in strips across the spots. As you can see, each of the varnishes behaved well, except over plain primer, where it feathered past its original edge. This won't be a problem on the main model. Onwards...
-
Thanks Hunter - believe it or not, it's actually just a base of white/offwhite layered with 2-3 red ink washes, allowing to pool in the gizzard-y bits. I'll re-gloss the shiny areas (they're still wet in the photo).
-
Weekend update - with a week to go until the end of this group build, I'm not seeing the light at the end of the tunnel. Plodding on regardless, I've made some alterations, and got some more paint on. As I planned last week, I added some Green Stuff to the sword - to reshape the blade, hide the reinforcing wire, and to replace the leather binding. It'll take a day or so to fully cure, so I'll worry about painting it then. I've filled the gap in the leg holster and painted the legs - darker than the body, with slightly paler patches. Spots will follow, and then the fishnets. The skull is less bright white than this photo suggests, and I'll have some skin tidyup to do - especially after the netting. And I've splashed another load of Red Ink in the gullet. It's starting to look really gross and angry. I still have 2 layers of hair to glue...
-
Love this. Ripley and Jonesey look great, the corridor feels gritty and authentic, and the Peeping Tom Alien is a fantastic touch. Can't wait for final photos.
-
Client photos from the event: Yeah, boiii - that's a wrap!
-
Spoil sport! about 15 mins. Years ago, when I was a part of the old thehive.net forum, some of the members would repaint their Hot Toys AvP predator figures. They found that a Sharpie was much more efficient than a brush and paint - no runs or accidental splodges, but with a risk of a purple glossy sheen. My only concern is how it will react with clear coat sealants. I'll test on spare parts first! Next bit now - I've been a bit worried about how the Alien head has been moving. After cutting the sword and attaching the ends around the head, the assembly would wobble. I've added some wire to the sword as reinforcement, as I don't want it snapping at the wrist. I'll need to decorate with some Green Stuff or similar - the cloth wrap should go over the wire, and then it will be a part of the Pred's own customisation.
-
Always jumping the gun, me. I'm not 100% happy with the skin-tone (not light enough around the centre, I think), but I just have to try out the fancy technique I read about a few years ago to get the skin mottling. Who can guess the method, and how long it took?
-
I was asked last week to build a blaster prop for a friend. He's off to Secret Cinema's showing of Empire Strikes Back this weekend, and has been told he has to dress as a 'mercenary' - basically a Han Solo-type. He's got enough clothing to pull of the general look, but doesn't want to spend silly money on a prop on Etsy or eBay. "Pete, can you finish it in 10 days?" he asked me. Challenge accepted. A DL-44 Heavy Blaster Pistol. Not screen accurate, but more 'look and feel'. First job - I told him to order a toy Mauser from eBay. £4.99 and quick delivery It arrived last weekend, so I only got it Monday. Han Solo's gun came from a Mauser C96, and is quite distinctive. This thing makes a clicky noise when you pull the trigger. Cheap, plasticky rubbish. Let me give you a quick rundown of my schedule. 10 day turnaround was a pipedream. By the time this arrived, it was already 5 days after the initial conversation. He's going Sunday. I work from home on Fridays, which meant bringing in a finished prop on Thursday. Which means finishing it Wednesday. 3 day turnaround. First job on Monday night. Assemble the gun. On my way out of the office, I asked the IT department if they had a PC graveyard I could defile. I got a couple of heatsinks and a knackered GPU filled with capacitors and microchips. Win. I also found a toy sniper scope - my stepson broke the scope off his toy rifle, and it had been sitting around for 6 months. He said I could have it The batteries are flat, but I think there's a laser pointer (red light) in there. Next - shave the unnecessary bits off the pistol Glue the scope in place. JB Weld is strong, but takes a long time to set. Gaffa tape will help, and hide unwanted gaps. It's a prop, not a showpiece. 3 days, people - gimme some slack. I know, I know - gaffa tape. Add some capacitors and other greeblies to hide the tape, and give some visual interest, and we're nearly there. I even got some Warhammer on it. The problem was the muzzle - although not a replica/facsimile of Solo's weapon, I wanted it to look as part of the same custom-built family. There are at least 5 different versions used in the films - some of the early production photos don't even have a scope! What they all have in common, though, is the flared muzzle-end - a drilled I found the answer in the supermarket. A bottle of mouthwash had the perfect shape lid. Worth 65p, I think. I drilled the muzzle holes and found a couple of other bottle lids to glue it to, cut the main barrel and attached. This was Tuesday night. I ran out of JB Weld as well, so Araldite was found in the garage recesses. I gave it 24hrs to cure, and then set about painting. Mixed materials on the gun, so Alclad II lacquer primer and gloss black, and metals, and acrylic brown for the handle. A few touchups here and there where the silver oversprayed, and it's done. 1am tidy up, but 3 days from start to finish. Fun little build. Next one will be tidier, I reckon. I'll post a photo of this one in use after Sunday's event (if he send me one)
-
Star Trek U.S.S Enterprise Flight Display (AMT / ERTL)
MiniModelPaint replied to wimbledon99's topic in Sci Fi II Group Build
This looks great! I was never a fan of the clear flying displays, but it works well for this formation. -
Spent a bit of time yesterday with Vallejo acrylics, blending the torso skin tones. I'm not sure it's as bright as I want it yet, but this is where it's at. And some more work on the face. Slowly, slowly wins the race.
-
Here's a bit of Typhus Corrosion on the armour. One bit of advice for anyone using this paint - you have to be sure you want it where you're painting it. It's a gritty wash, and dried with texture, so once it's on, it on forever. The texture does mean that you can drybrush rust over it and get a great (and quick) rust effect - I'm not making this armour 'rusty' as such - I don't think the predator has ferrous materials for his body protection, unless he's been inspired by the crusades... https://youtu.be/YRD8jAk274I I've started applying a black wash to get some deep contrasts in the recesses and edges as well. Citadel Nuln Oil is another magic wash that can be controlled really easily. Very tempted to get the actual oil paints out when he's finished for more shading and weathering. We'll see...
-
Cheers guys! I'm really enjoying this build. Some mild use of adult language, granted, but it's more fun than I expected. Matt - the dreads fit okay - not excellently, but okay. Gotta go plastic to plastic, though, scraping any paint away that has got in the way, otherwise the superglue doesn't work quickly. Going left to right, I've had a couple of tangles - the instructions don't say whether the next strand goes above or below the one before (it would be 50 pages long!), so there's a fair amount of dry fitting for each one. So far, it seems to have worked alright, but I'm dreading (sorry) the second row. I have no idea how they'll fit in with the first row - if they'll intertwine or just sit above. I do know the leftmost strand is going to swing over the shoulder, which is why I've paused the hairdressing, and working on the skin and armour. Hunter - the blue is actually a gorgeous chalky turquoise: Citadel Technical Paint - Nihilakh Oxide. It's brilliant for verdigris patinas. I'll be using their Typhus Corrosion on a lot of the armour, too. Great range of paints - I'd definitely recommend them if you haven't already found them. BTW, I shot video reviews of these last year - links are on the paint names above. (shameless plug, I know). More predator paint and glue when it's ready...
-
Here's a little more work achieved of an evening. Some weathering and patina detail to the shoulder armour (going for an Egyptian gold look), and tidying up of dreadlock beads. First layer of dreads is complete - some more work needed on the other shoulder before starting on layer 2, as the first strand flows to the front of the model. Started on the face as well - as this is the focal point (in theory) of the figure, I don't want to leave it until the last mad panic painting session. So far, I've only based the mouth flesh and eyeballs in a pale skin tone - several coats for coverage. The breastplate will get some heavy grunging with GW's Typhus Corrosion, among other things.
-
Cheers! I have a rescue Power Loader, which I got on eBay about 12 years ago. It's in a real state, and is missing the Ripley figure (I gave it to a friend to get a better sculpted head, but it got very lost in several house moves). I need to get it fixed, wired and lit ASAP - and get the Ripley back... Not sure what happened to Halcyon, other than 'it closed down'. I do know, however, that Aoshima have a lot of the moulds - the Delorean and Aliens stuff in particular. More on the Pred when I've got to it!
-
A couple of pics to show some progress. I've blocked out the colours on the main figure. and I've finished cleaning the mould lines on the dreads. These have been a nightmare. All done, though. Actually, I've done a bit more than that, too. Primed and painted the dreads gloss black. And started detailing the beads, and attaching the dreads to the head. ZOMG! I realised after attaching the first 3 that the armour and skin underneath probably *will* be visible. Better to get it painted before it's too late! Waiting for washes to dry, and then some more details as I attach them layer by layer.
-
And now, onto the dreadlocks. The dreaded dreads. The problem: 43 individually numbered strands which only fit in the correct order. They need mould-lines removing, priming and painting black before attaching to the head. Once a dread has been removed from the sprue, it's no longer numbered... This is the only way my brain can get around this problem. I hope nothing knocks them off the blu tack! Either way, it's going to a slow part of the job...
-
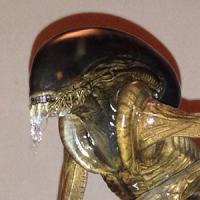
At Christmas, I received a 3Doodler pen. It's a cool toy, and you can make interesting geometric wireframes with it. Lots of users freehand-doodle cars, figures and buildings. It's not controllable enough to create greebly details on plastic models, but I thought I'd give it a go. A plastic stick goes in one end, gets heated to melting point inside the pen, and then pushed out of the nozzle where it cools down and hardens again. As you can see from the picture, the results are a cross between a glue gun and an icing sugar piping bag. My aim is to make some gore - primarily to hide the cut & glue seams between the Alien head and the Predator's sword - and also to detail some exposed bit of the head. There's a flat area on the neck that would be glued to the Alien's body, and a gap in the mouth where the tongue hasn't been fitted. Narrative-wise, though, it needs to look like the victorious Predator has sliced off the head and ripped out the tongue. And the Xenomorph has gloopy acid for blood. I think my ability with the 3Doodler, although severely limited, is perfect for this application. This created on a piece of paper, and then trimmed and glued to the model. I didn't want to melt the head! Gory bits through the head wounds were created on the head - there wasn't a way around it, the mouth has bits of tongue ripped through, and the tongue itself has some mess hanging off it now. There's be lots of yellow and green in the paintup. Next step is to prime the whole thing and check for the joins I've missed. Just got hold of some Mr Dissolved Putty for this exact job.
-
Sometimes experience and knowledge gives way to newbie excitement. I definitely should have shaved and filled some edges before assembling the larger parts. Still, it's done now, and I'll just have to use the right tools to clean up. The seams on the teeth are easy to clean off, but the edges where the face meets the cheeks and forehead are going to a nightmare. Add to which, I've gone and done this: This obviously adds a little extra weight to the hilt-end of the sword, but chopping the blade and reattaching not only makes it easier to work with, it elongates it to epic Predator proportions. I'm tempted to do something with the gauntlet blades, too. We'll see - plenty enough to do here...
-
Next phase on this. I've glued the hands and sword - so far, so OOB. A thin coat of Alclad II grey primer with microfiller helps to soften the moulded plastic's reflections so I can see where the major (and minor) scraping and gap-filling is needed. Conversion plan: The Alien head is going to be an on-sword trophy, with gory bits dangling out of the neck, and in place of the boxed human skull/spine, it'll be the ripped-out Alien tongue, which I may have to reconstruct for size - the one in the Alien kit is a touch small and undynamic. Not sure if I will actually use the provided base. If I do, I definitely won't use the movie title plate.
