


Carlosee1974
-
Posts
42 -
Joined
-
Last visited


Carlosee1974's Achievements
")
Newbie (1/9)
20
Reputation
-
Wow I’ve just bought this kit, could you send me a link to the WIP so I can steel some tips
-
This is brilliant can I ask you did the canopies open?
-
1/48 F4U-7 Corsair -Hasegawa
Carlosee1974 replied to rom1's topic in Ready for Inspection - Aircraft
Hi thanks so much..I’m going to try it on my Hellcat later -
1/48 F4U-7 Corsair -Hasegawa
Carlosee1974 replied to rom1's topic in Ready for Inspection - Aircraft
Hi did you put any undercoat under the mr hobby 218 or did you spray the 218 straight onto the model? -
Airfix 1/72 SBD-3 Dauntless
Carlosee1974 replied to Dan Hayward's topic in Ready for Inspection - Aircraft
Now that I can do many thanks for this. A gap of 35 years and I decided to detail up an old kit!! -
Airfix 1/72 SBD Dauntless
Carlosee1974 replied to Carlosee1974's topic in Work in Progress - Aircraft
Starboard side of the cockpit done....I missed off some of the levers by the pilots position...too fiddly and can’t be seen anyway -
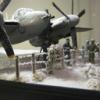
Ah ha, I had no idea they used Willy’s Jeeps onboard....of course seems logical - small and can pull heavy....now I know what to do with the one I was about to have spare from this set I picked up on eBay.... The Kubelwagen and Kattenkraftrad are for a diorama I’m doing with a couple of Stukas and Me-110s...the Jeep was going to be left all by itself 🙂
- 102 replies
-
- 1
-

-
- U.S.N. 1945
- Hasegawa 1/72 TBM
- (and 1 more)
-
Airfix 1/72 SBD-3 Dauntless
Carlosee1974 replied to Dan Hayward's topic in Ready for Inspection - Aircraft
H Hi Dan, thanks so much for this - I’m not sure I’m up to vacuum forming.... maybe I’ll give it a try -
Hi...I don’t suppose you’ve come across a good 1/72 scale WWII Flightdeck tractor? I’ve got a SBD and a Corsair that need some help being towed around the diorama 😀
- 102 replies
-
- 1
-
-
- U.S.N. 1945
- Hasegawa 1/72 TBM
- (and 1 more)
-
Airfix 1/72 SBD Dauntless
Carlosee1974 replied to Carlosee1974's topic in Work in Progress - Aircraft
So more progress with the port side of the cockpit: you can almost see some of the switches..but they are tiny and make me swear a lot.... complete.. -
Airfix 1/72 SBD Dauntless
Carlosee1974 replied to Carlosee1974's topic in Work in Progress - Aircraft
I was worried that the airbrushed paint would mean losing some of the detail of the frames and ribs so I turned the pressure down a little....still looks ok. A little internal chipping on the frames And now ready to start adding the detail of the various panels and switches - trim wheel and tiny leaver: -
Airfix 1/72 SBD Dauntless
Carlosee1974 replied to Carlosee1974's topic in Work in Progress - Aircraft
Ok...so some more progress...... I’ve primed in green then added aluminium and Vallejo chipping medium and internal grey green.....The marks you can see are the result of sanding back and being a little heavy handed with the airbrush.....I’ve only had the airbrush for 2 months so this is a voyage of discovery. 🙂 Then Vallejo internal grey green - still seems the wrong colour - probably needs to be a bit darker but I’m not brave enough to mix acrylics just yet.... -
Airfix 1/72 SBD Dauntless
Carlosee1974 replied to Carlosee1974's topic in Work in Progress - Aircraft
Shipmate thanks for this!!!!!! -
Airfix 1/72 SBD Dauntless
Carlosee1974 replied to Carlosee1974's topic in Work in Progress - Aircraft
To start with I pulled the cockpit detail apart and started adding PE parts. I cut away the seat and bulkhead and add some plastic card to act as the support for the radio rack (blu-tacked in place to see if it is in the right place) Then I cut the flaps off and drilled the holes which are on the dive brakes Then I started added the PE frames and ribs ready to prime -
Airfix 1/72 SBD Dauntless
Carlosee1974 replied to Carlosee1974's topic in Work in Progress - Aircraft
Ok so originally I was experimenting with PE parts that I had left over from other kits and I managed to get the cockpit looking like this... The instrument panels were from a Wessex that I had. I made the radio rack from a PE frame from an Airfix Warrior AFV and added panels from the Italeri Wessex set I had. The colour is also too dark for a USN aircraft. What I realised is that unlike lots of 1/72 models you can actually a lot of the cockpit. So I’ve sanded it all back and started again with the Eduard cockpit set for the Hasegawa version - I know it isn’t recommended using a PE set from another version of the model but I’m going for it!!!!
