

lunarhighway
-
Posts
391 -
Joined
-
Last visited
Content Type
Events
Profiles
Forums
Media Demo
Everything posted by lunarhighway
-

Hobby Boss Gloster Gladiator 1/72
lunarhighway replied to lunarhighway's topic in Work in Progress - Aircraft
Thank you. I won't be throwing out all my decals just yet but if nothing else it certainly is a fun exercise to paint some markings... -
Pavla 1/72 Supermarine S.6
lunarhighway replied to busnproplinerfan's topic in Work in Progress - Aircraft
I build this kit back in 2015... it took a little care but all in all went together without big dramas. for the flat wires i used metal wire squashed flat between pliers... I also replaced the spinner with the tip of a German bomb looked more crisp than the kit part -
Hobby Boss Gloster Gladiator 1/72
lunarhighway replied to lunarhighway's topic in Work in Progress - Aircraft
It's been a while but we're on the final stretch now. i did rigging with elastic rigging wire. installing one end with superglue was fairly easy but getting the other end to stick took some trial. finally i figured out that aceton works as a superglue kicker... for some wires i filled the hole with acetone, applied superglue to the wire and stretched it into the hole... it still takes some practice and a third arm would have been handy. some last details to be added and i'll call it done.- 20 replies
-
- 8
-

-
- 1/72
- gloster gladiator
- (and 1 more)
-
The bulges are correct. the spitfire was designed with a very thin wing. but this meant there obviously wasn't much room inside. because the tires are angled to aid with ground stability the bulges where needed. there are rather subtle though so not always easy to see. as the thickness of the wing is just one sheet metal at this point later strengthening strips where added to keep the skin from buckling in flight. on later wings some pannels used thicker metal sheets eliminating the problem later spitfire variants with the B and C and E wing had additional blisters over the cannons as these to where to tall to fit inside the shallow wing
-
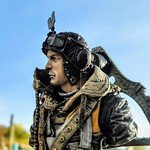
Thanks, the sculpting is quite superb. And or as simple as they are i quite like how the eyes came out. I added some facial shading and texture and worked on the helmet leather, as well as the jacket and life jacket. slowly building up the shades with thin glazes seems to work well thanks to the floor finisher as thinner. i will need a flat varnish in the end but the glossy paint helps spot where the highlights should go.
-
When i saw this model a while back i thought it would make for a nice break from 1/72 aircraft models, and still look at home on a shelve next to them. I had been sitting in my stash for some time but a while back i cleaned up most of the parts, still i was a bit nervous about starting the model. i never painted anything in this scale, the largest figures i finished to a decent standard where some warhammer 40k figures but that was more than 20 years ago (oh dear...) nevertheless youtube has some great tutorials, so between that and my past experience i dove in... i primed the model in black and than came in with a misty coat of white, mostly sprayed from the top to create artificial shadows. works superbly in 1/72 so.... the sculpting on this model is just phenomenal and this just brings it out further. i tacked the head and collar in place but started painting with the head on a little wire stand. i gradually build up the skin tones with very thin tranclucent coats, i made a littele wet pallet (thank you youtube for enlightening me) but also my "secret" thinner, being parket floor polish... the main advantage of this stuff is that it has a lower surface tention than water, it helps the paint self level. it also gives the paint a lovely satin sheen wich helps if you build up a lot of layers anyway, i took pictures at 3 stages, but unlike my models the pictures actually look better than the real thing stage one first layer of skin tones, still a little rough and a little pale, so it needed refining since i had to leave i rather hastily came in with some lighter tones finally i blended the skin tones together and gave them a little more brown and red to make the sin look more lively i stared on the helmet using references on line... this model is very detailed so i hope i can finish it to a decent standard. the goggles are a glaze of sand brown over chrome silver with some lighter reflections painted on, still rough but i thin kit already captures the sheen of the real thing a bit already.
- 10 replies
-
- 12
-
-
Hobby Boss Gloster Gladiator 1/72
lunarhighway replied to lunarhighway's topic in Work in Progress - Aircraft
that also looks like an interesting colour scheme, looks like you have the rigging all sorted as well... it's one more hurdle i must take on mine... speaking of which... i installed the side struts to the lower wing first, i had pre rigged them with stretched sprue i added little ticker stretched sprue disks to the centre of these next i hand painted them and installed the top wing... this took a little fiddling and some care as it was ever so slightly warped so that i had to use a little masking tape to keep one of the side struts from popping out, the central struts also needed some care to line them up with the holes in the top wing, but all in all nothing dramatic for a biplane. later i realised that i had forgotten to actually glue the top cowl to the fuselage... however flowing some extra thin glue in from the front sorted everything out.... ouff. The front cowl is also still detachable so that the prop can be painted separate but in the end the little grommet that allows the prop to spin can be fitted. i painted in the black roundles... i cut masks and pondered breaking out the airbrush, but considdering they where black i descited to hand paint them, using very little paint but finally unmasking them and doing it by hand... not perfect but not worse than the big masked markings. i went in and tried the fix the comet and some overspray on the roundels... i probably still fix some things here and there... some things that stand out in the photo's are not really that noticable in reality I'm most pleased with the lettering so far, the roundels are not great but with practice i think i should be able to get better results... the outline of the comet was most disappointing, although i didn't expect this to some out perfect... if i where to do it again I'd probably go for a yellow comet only and carefully paint in the red. A little more rigging and some weathering here and there and she will be done... and i'll have a look trough my collection for those other kits i've been putting off for lack of decals- 20 replies
-
- 8
-
-
- 1/72
- gloster gladiator
- (and 1 more)
-
Hobby Boss Gloster Gladiator 1/72
lunarhighway replied to lunarhighway's topic in Work in Progress - Aircraft
I believe airfix is about the rerelease their gladiator with Belgian decals, so that might interest you. I certainly don't consider decals cheating but it's always nice to have a few tricks up my sleeve Considering in the last picture it's just held on by the central struts and is not glued yet, i'd say, rather good the side struts are held together by horizontal braces that fit in slots in the wings... i think this might leave some minor gaps when they are glued in place, but getting the geometry right should be rather easy. the centeral struts are also linked in pairs that slot into the central top cowl in such a way that you can't get their position wrong (i had actually labeled them before i noticed Hobby boss had thought of that) Although the kit is simplified and has a few errors, the overall engineering is excellent, with parts that could be mixed up having different sized slots to avoid that. and most parts being snap fit. in fact you have to be carefull when dry fitting as otherwise some parts light be on permanent. Hobby boss plastic is fairly hard, but not really brittle so overall i don't have the impression small thin parts will break easy either, which is sometimes a problem on biplane kits.- 20 replies
-
- 3
-
-
- 1/72
- gloster gladiator
- (and 1 more)
-
Hobby Boss Gloster Gladiator 1/72
lunarhighway replied to lunarhighway's topic in Work in Progress - Aircraft
i repainted the silver and unmasked everything... not to happy with the way the comet turned out, thin outlines seem to be pushing the boundaries of this technique, but than that was the point of this exercise.- 20 replies
-
- 11
-
-
- 1/72
- gloster gladiator
- (and 1 more)
-
Hobby Boss Gloster Gladiator 1/72
lunarhighway replied to lunarhighway's topic in Work in Progress - Aircraft
Time to put the masks to the test... back basecoat and some silver... the copper is some 20 year old citadel paint the actual copper ring is masked, the circle cutter came in handy to make a fitting mask for the front Masked the bottom serial... actually realised i made a mistake at this point as the 22 should be to the right of the gun, but i put the roundel to close so it wouldn't fit.... lessons learned i'll leave it like this... and this is how it looks under a coat of silver And at this point i changed my mind on the masking order, looking at the demarcation it seemed that it would be easier to mask the green rather than the silver, so i went on to paint on the main camouflage color, and i'll mask it later and redo the silver I used my own custom blend (mainly Revell, Italeri, Valejo... i ordered some empty paint bottles and leaving of the nozzle allows me to pour any unused paint back on the bottle) It's quite handy to mix a small batch of custom colour. I went over with two shades or Hataka dark green to add some modulation i unmasked the tailnumber it looks OK-ish, but the masks should have been more precise... i once worked with a vinyl sticker cutter plotter, and i wish i still had access to such a machine to cut these masks the roundels look better, or rather the ribs hide the imperfections and that's all for now- 20 replies
-
- 7
-
-
- 1/72
- gloster gladiator
- (and 1 more)
-
Hobby Boss Gloster Gladiator 1/72
lunarhighway replied to lunarhighway's topic in Work in Progress - Aircraft
I wasn't very happy with the round masks, in that they where not as round as they could be... I have a circle cutter but while it could match the diameter of the large roundels on it's smallest setting the blade would flex and the roundles where not much better than those cut freehand. I tried a curve cutter, a hobby knife with a free pivoting blade, but the result wasn't much better than those cut freehand. For the smaller circles i used a metal scribing template and this worked well, but the diameter wasn't large enough to match the bigger circles... what to do I recently piked up a drafting compass, which didn't turn out to be the best quality, however it had an attachment to hold a drafting pen or similar in stead of the standard pencil point, and while it would hold a hobby knife this would increase the diameter to much and introduce to much flex. But this evening it dawned on me i could try and attach one of the spare blades of the curve cutter to the compass... much to my surprise it worked brilliant, no flex in the blade and as close to a perfect circle as i could hope to get... the blade is very sharp and only a light scoring will cut trough the tape. As a little experiment i cut a circle inside a circle. While i doubt the resulting ring will easily be put back in it's current shape when removed from the cutting mat it does show the precision that can be achieved. I replaced all the red masks, and while i haven't gotten round to further painting yet,I'm quite pleased with this little step forward... especially since the this build was mainly intended to gain more experience in masking markings.- 20 replies
-
- 4
-
-
- 1/72
- gloster gladiator
- (and 1 more)
-
Hobby Boss Gloster Gladiator 1/72
lunarhighway replied to lunarhighway's topic in Work in Progress - Aircraft
Time for some paint.... Since the main idea behind this build was to practice painting markings i gave the model a base coat of white... i designed marking in inkscape and printed them as outlines I put low tack masking tape over the printed paper, and as you can see the lines show trough well enough so i could cut them out the comets will be red with a yellow outline so first the red of the comet was applied...this was a custom mix i had left but i added some gloss varnish to the mix to make the paint more glossy, the that masking would be easier next i came in with a coat of white to provide a base for the yellow so far so good next all yellow roundels where masked and the red paint was loaded up again which gave me these nice roundles and than masking again for the red outline Rather tempting to leave it this way but next well go to silver and green- 20 replies
-
- 9
-
-
- 1/72
- gloster gladiator
- (and 1 more)
-
Hobby Boss Gloster Gladiator 1/72
lunarhighway replied to lunarhighway's topic in Work in Progress - Aircraft
another small step in this build... making the hinges, i drilled holes in the separated elevators and superglued metal wire into it. the drill broke trough the surface in a few places so some filling was required. this little spool of metal wire originally intended for floral arranging has lasted me since my early days of model making I can forgive hobby boss with it's low part count for not including separate control surfaces, but it would be nice if more kits would come with them separate. imho it adds more realism to a model than a fully detailed cockpit that can't be seen.- 20 replies
-
- 4
-
-
- 1/72
- gloster gladiator
- (and 1 more)
-
Hobby Boss Gloster Gladiator 1/72
lunarhighway replied to lunarhighway's topic in Work in Progress - Aircraft
Pull up a chair 😄 The aifix kit is probably more detailed and accurate, but these hobby boss kits are refreshing and fun to build, and parts the alternative parts breakdown is surprisingly effective. They tend to have some inaccuracies but surface detail is quite nice so with some carefully painting you quickly have a nice model.- 20 replies
-
- 1
-
-
- 1/72
- gloster gladiator
- (and 1 more)
-
Hobby Boss Gloster Gladiator 1/72
lunarhighway replied to lunarhighway's topic in Work in Progress - Aircraft
baby steps... I like to separate controle surfaces whenever i can and pose them slightly offset, make the plane look more alive.- 20 replies
-
- 2
-
-
- 1/72
- gloster gladiator
- (and 1 more)
-
It's been quite some time since i posted anything, but I recently started hobby boss's Gloster gladiator (or RAF gladiator as they call it). (i hope the flickr pictures will show up as it's the first time i use this site for pics) I also have airfix's gladiator wich is a more detailed and accurate kit, but since i will be finishing this kit as a Belgian maschine i will be airbrushing the markings and since i have limited experience with this i wanted to try it first on a kit that would build up quickly so i could get right into painting. contents of the box 3 piece cockpit At this point i realised the belgian gladiators had a differentstyle windshield but fortunately the airfix kit had this style and the option of an open and closed canopy so since i'll be building the airfix with an open canopy the closed item would be a straight swap right.... Turns out the hobby boss made the rear taper far to wide so the solid portion should only be half the with... what to do... moddify the hobby boss clear part... a lot of work and no accurate result still so out with the saw for the solid portion i made a mold from milliput and plug moded a nes piece from clear blister plastic Cardboard backing with CA reinforcement... took a few tries as usual but works well enought for such small parts. More sanding needed but much better I added a few more details to the interior, i didn't go all the way, as not much can be seen trough the canopy. i'll save that for the airfix kit. For the interior green i started with a much darker green and than came in with a dusting for a much lighter shade followed with an enamel wash since i had some color left i sprayed most of the top as well, it gives an impression of the final color and to play with the wing shading And that's where we are right now
- 20 replies
-
- 10
-
-
- 1/72
- gloster gladiator
- (and 1 more)
-
Airfix Hawker Hurricane Mk.I Has Passed on!
lunarhighway replied to dogsbody's topic in Work in Progress - Aircraft
Duplicate post -
Airfix Hawker Hurricane Mk.I Has Passed on!
lunarhighway replied to dogsbody's topic in Work in Progress - Aircraft
I haven't measured the tires but visually they look ok to me. If they are the wrong size they don't look it on the finished model. For the wing tip lights I used microscale clear. I first added a little sprue bulb and than applied several coats of clear leaving each enough time to dry and schrink before applying the next building up the shape like that Depending on the effect on could paint a translucent color on one of those layers. -
Airfix Hawker Hurricane Mk.I Has Passed on!
lunarhighway replied to dogsbody's topic in Work in Progress - Aircraft
Marabu has a little photoetch set of spitfire hubs, the bubs on the spitfire where the same size although the actual tires where smaller, i used these on this kit, and they work great, just drill or sand away the platic hub and overlay it with the pe part https://www.marabudesign.com/spitfire-wheel-discs-p-166.html?osCsid=mo6guil8siiflor3hp3b9ebrofr2g5c4 also comes in handy for revel spitfires with their oversized hubs -
Spitfire MK.XIVc Academy 1/72
lunarhighway replied to pbaudru's topic in Work in Progress - Aircraft
This tread ticks so many boxes. I actually did a model of the same spitfire using the same decal sheet, but using the old Frog kit, the academy spitfire i build a very long time ago. looking good so far!! -
i don't think can fix the part in a way the repair cant be seen, but that said, you can sand and subsequently polish clear parts with polishing pads (fine nail buffers of ebay work for me) to a near factory shine. if you can find aftermarket parts i'd go that route, but you could also try to hearform one from clear sheet. it might take several attemps, but i've made a few very acceptable malcolm hoods for my spitfires this way, you just need to make a solid copy of the part from milliput or sumilar as ht original plastic will melt with the heat and stick to the sheet. posing the canopy open if possible will also hide it's imperfections. good luck
-
White Knight - Short Crusader
lunarhighway replied to greggles.w's topic in Work in Progress - Aircraft
I've had some success making airfoil shaped struts from soda can metal cut the top and bottom of the can and than cutting int lengthwise will give you a nice sized sheet of thin metal. it will want to curl up slightly but once fold it's will keep it's shape. scissors are best to cut it, and best trim any jagged edges to avoid injury as the edges can be rather sharp. This can be folded round a suited diameter rod, wire, or straight edge to produce the leading edge, it can than be trimmed to shape and the trailing edge glued with superglue... a metal wire or rod can be ran trough the hollow core (depending on how thin it is) to give strength and provide mounting pins these mounting pins could be placed into drilled holes and when using metal wire can even be bent into the right angle after glueing considering it's virtually free it lends itself well to produce quite a number of details -
1/18 Spitfire Mk. XIVe - Race #80
lunarhighway replied to airscale's topic in Work in Progress - Aircraft
I agree with Pastor Rich, sometimes we attempt to make our models more perfect than reality, however the true quest is to make all imperfections in our models, intended or not, look like scaled down representations of real scratches and dents. I recently found plastic canopies can be sanded to the point where they're barely transparent and look rather ruined and subsequently using sequentially finer grits of sand paper (i use cheap nail care sponges of ebay) can be sanded and polished back to an immaculate shine also i find vacuum forming clear parts is a bit of hit and miss and provided you have enough material, it's best to make multiple attempts and pick the best ones. but once again, a very inspirational build! -
1/18 Spitfire Mk. XIVe - Race #80
lunarhighway replied to airscale's topic in Work in Progress - Aircraft
Once again super work, the canopy is really bringing it to life. i've had some modes successes with covering sanded down original plastic parts with metal tape to shield them from the heat and use them as a mold, but of course in a much smaller scale. Here's a nice picture of the real thing. interesting, the canopy covers the forward interior frame, something that's hard to see when not up close -
Fouga magister 1/72 heller
lunarhighway replied to lunarhighway's topic in Work in Progress - Aircraft
thanks for the tip, pen-bleed is something that i've had troubles with in the past, although the ones i have now seem to hold up rather well, as it happenes i recently did a test by overcloating the marker by brush with clear, and it didn't bleed, so i think i'm good. the reason i got these markers is to apply small markings and perhaps serials where i can't find appropriate decals but the clearcoat i use seems to be ok, so i'll be sealing any pen with that from now on in the case of the wheel bays, i'll probably preshade with black so i don't think i'm much at risk here,
