

lunarhighway
-
Posts
391 -
Joined
-
Last visited
Content Type
Events
Profiles
Forums
Media Demo
Posts posted by lunarhighway
-
-
9 minutes ago, Marcel said:
Great! A lovely little model. Fokker D.VII next?
I did try the vintage Revell fokker D.VII, a long time ago, a fun mojo build but not to the same standard
but i have the Roden kit as well and that should make a better companion for this one...
-
Hi all,
First and foremost best wishes for the new year, including lots of good modelling time!
As a had a few days to relax these days i thought i'd look for an interesting little project that would be engaging enough but i could finish over the holidays. enter the Fokker by Arma Hobby
Post WW1 Belgium acquired a single Fokker E.V that had been brought up to D.VIII standard (as far as i can tell this was a mandatory upgrade made by the Germans as the early E.V had a serious structural flaw that could cause catastrophic failure of the, than very advanced, wing structure, so it was in essence an early factory recall.
in Belgian service this single machine participated in air shows and had a short career in a civil air school. a flying replica of this very machine exists today.
Arma Hobbies Fokker E.V in the "expert set" is a lovely little kit. it consists of a single small sprue and some photo-etch to supplement some of the finest kit parts. not much at first glance but a lot of fun to build with not much room for error.

the markings where painted on but kit decals where used for the instruments en interior wood and fabric textures and these worked beautifully, there is also a wood decal for the prop, but i chose to paint it.
i find a good technique for painting markings is to start with the light colours and masking those, working your way up until the entire marking is painted and masked, and only than paint the entire model.
this reduces the chance of heavy paint build-up against the masks when trying to get light colours to cover dark cammo. one this i forgot about was to coat with a varnish between each mask, the idea being the invisible varnish will bleed under seal all mask imperfections rather than the subsequent layer of darker paint as i has some minor issues with now.
there are a few differences between the model en the real thing, it looks like the real plane had the guns removed, and featured a different winshield,
but i installed the kit parts, it's on of the areas where photo etch makes all the difference
the engine, although largely hidden is also a thing of beauty, again here the photo etch pushrods add a lot or realism.
things to look out for when building this kit:
- two of the decals for the dials on the cockpit side and engine hood are swapped in the instructions, and as they are a different diameter this would give problems
- the framing for the sidewalls is very fine and a ended up breaking one so take care removing those from the sprue.
- there is a minor amount of flash and mold lines, witch need to be removed carefully. this is not difficult, but given the overall finesse of the parts it's sometimes hard to see if it's flash or a sharp edge that should be there
- the stick has a control lever that protrudes trough the bottom of the airframe, i didn't realise this until it was to late and i had replicate the arm and rod from scratch, i didn't do the best job.
Overall construction went very well, and fit and alignment was surprisingly good, the extra detail you get in the "expert" boxing was certainly worth it. the only downside is you have to get real close to see all the details at witch point every minor imperfection becomes visible as well, so there's the question of what level of detail you really want in this scale, regardless i had great fun building it!
-
 12
12
-
-
Very nice build, it seems this kit is more than detailed enough for the scale, i haven't seen details like the slipper tank hooks on many other kits in this scale!
Indeed the xvi might be the the best looking spit if the entire series.
Where, to me, the IX introduced the most balanced overall proportions of all the spits, the bubble canopy if the XVI adds to that a convertible or coupé like flare if it where a car.
always good to see another spit
")
-
It will be great to see it come together. I have one in my stash but i'm waiting for the right mood to tackle it. With her natural presence and you choice of paint scheme i'm sure she will make a good impression. good luck with the struggle!
-
 1
1
-
-
A small bright update.
i was able to sand away most of the grainy texture... not very keen on using the stuff again.
The organge/red section was put down, it will be oly the nose and upper section but i had some more paint, most will be asked.
-
1
-
-
i tried to unify the fuselage with some white ammo mig one shot primer. never really used the stuff before and i kind of regret it
It didn't seem to be all that "one shot" but rather multiple layers, and from a distance it looks ok, but it actually turned the surface of the kit into sandpaper

fortunately it's sand able so i think i've made a start at a rescue attempt with some careful sanding. i'd rather not strip it with all the details on this one.
I'm not sure what i did wrong, i suspect i might have to sprayed from to far away or got the air pressure wrong. getting to close made the paint rather runny so i dusted it on as you would mr surfacer or something...
if anyone knows how to make this stuff work i'd love some advice, but so far i'm not impressed... that said as nice as their paints are, Valejo's primer isn't sandable so while it goes on nice it's not that great either.
-
 1
1
-
-
4 hours ago, Marcel said:
Thank you. I found several pictures of the replica being built, good job!
Now I have to beg Special Hobby/Azur to make the Fairey Fox and/or Firefly - well not THAT Firefly but the lovely biplane 😀
there would be quite a few different variants of those to build so they would sure sell me a few
-
2
-
-
That is looking rather lovely! for being one colour i's say it's almost mesmerising, looking forward to see the thing together.
Btw there is a full size replica under construction at the army museum in Brussels. I sadly haven't been there for over a year now so i'm not sure about it's current state, last time i went the fuselage skeleton was done and in progress of receiving the metal front panels. Some parts of the wing to if i recall correctly. It will be a static display only but it's constructed using original blueprints so it will be quite spectacular to see the thing in the flesh again as none survive.
Hopefully the paintjob turns out as well as this
-
2
-
-
3 hours ago, heloman1 said:
An interesting build, sadly the HB kit along with the Italeri kits suffer from many inaccuracies. The fuselage length being one, the unloaded main oleo legs another. I wish you luck with it and nice to see the Belgian markings making an appearance.
Colin
I don't have the Italeri version but i do have a couple of their S55 heli's and i half suspect Hobby boss took some inspiration from the Italeri kit, they al least look fairly similar especially the seat design etc... than again, it's the same subject so, there's only so much you can do.
I'm no expect on this heli so it's mainly a fun build. There's always a risk in getting caught up in details and failing to produce an attractive kit. At least for me... Ironically my best models are those where i had fun just putting it together and putting on some paint rather than doing to much research.
i'm mainly looking forward to seeing how the blue and orange will come out... should add a bit more colour to the shelve
-
Hi all,
i've making some more progress on the heli. Because there where many small differences between the real thing and what came in the box, i've been going over all the photo's i could find and make small modifications.
these mostely consist of antennae and grab handles that where added, and some holes for original items that needed filling.
the most difficult modifications was a dome on top of the cockpit (radio compass?) and a large navigation light behind the rotor
i looked for a suitable piece of sprue and found this nice tree trunk
some strategic sanding ,filing and a strip styrene at the base, turned in into this:
The navigation light was similarly carved from some crear sprue and painted with translucent red, and than masked with liquid mask
Because the pannels lines on the large nose doors where quite poorely molded i've finally opted to cover them with aluminium tape and emboss the prominent rivets.
Although more conventional than previous hobby boss kits i've build , most things still fit together snugly without glue, witch will make paining easier
There are a few more bits and bobs to tweak, but i think she's almost ready for paint
-
5
-
-
A very nice start! I have this one sitting in my stash so it will be interesting to see how she goes together!
-
2
-
-
18 minutes ago, Jackson Duvalier said:
Strong work so far. I didn't know HB had released a Choctaw.
I've always been a bit disappointed with plastic representations of those nylon webbing seats they put in helicopters. When moulded in plastic they look like rigid uncomfortable metal gratings rather than floppy uncomfortable nylon net.
True, although I'm not sure in this scale they are really doable in injection plastic. They are quite thick but at least the holes are represented. I resisted attemping scratchbuilding them as they can hardly be seen. That said something like precut masks could make a very convincing fabric seat.
-
Hi all,
Having some time over the weekend I was looking for another quick and cheerfull kit to build.
Since i build mostely models in a Belgian livery finding kits that come with Belgian decals is always a treat. I've build a few hobby boss kits before and they usually go together very well, and are nicely detailed however not always as accurate as i'd like.
the Sikorsky is no exception. I'm no expert on this helicopter, and i don't want to get caught on trying to replicate every last rivet, or try to superdetail it but some things need some attention to better replicate the original.
The first thing i noticed was the Belgian chopper had a different door with the window to one side rather than central as per kit unit. It makes sense to have it to the side as this way it will line up with the fixed window when the door is open.
I laminated some styrene on a clear sheet so that i could get the resessed handles and the window in one go.
at this point i realised some other thind didn't look quite right
the surrounds on the other windows needed a more rounded edge and there was a flappy-thingy below the window.
the fuel-vents (?) where nicely represented but not present on the Belgian example so they where cut away. as they where hollow i enlarged the hole until it could accept a length or sprue to act as a plug.
worse still the side of the real thing was treated my a mad plumber to look like a prop from an alien movie. fortunately marking it all out and running metal wires between predrilled holes made this a fairly easy detail to add
next i turned my attention to the interior
since the holes for the plumbing along with the ejector pins didn't do the sidewalls any vavours i made and insert to cover what could be seen trough the open door
A little test fit to boost moral (and see if the legs and the plumbing would get along later)
next i masked all the windows inside and out, Painted the interior black and than misted on some grey to create some depth and added some colour to the seats and switches
i also added some dials to the blank instrument panel by drilling some shallow holes.
The glazing is rather thick and destorts the view so i cut away one of the sliding portions so it can be posed open later
And that brings us to the end of this episode
-
9
-
-
That looks pretty good! I have had good results by taping the clear material to a bit of card with a hole in it that has the contours of the canopy. That way if you push through the master shape the edges won't destrot as much. I also tend to mount the master on a base so it can be pushed in a little deeper.
That said, your canopy looks the part!
-
Hi all,
To counter a few stalled builds that are awaiting paints or decals to arrive, i wanted to build something quick and fun.
It doesn't really fit my collection but this kit seemed quick and fun to build.
Revell can be a bit of hit and miss, you might find a state or the art kit or something from the 70's. in this case it's a fairly new re-box of a Zvezda kit, and the engineering is superb, mostly snap fit, yet pretty well detailed!
There is a lovely 3 piece pilot and and option for folded gear that actually looks rather convincing (wheel well detail was rather good but one has to make tough choices)
Overall a very nice stress free build. It's held airborne by a length of cloth hanger wire, yet it still needs a better base.
After messing around with stretched sprue and elastic wire, one of my own hairs turned out to be the ideal antenna wire.
It's not perfect but it paints the overall picture and most importantly, i had fun building and painting it!
Anyway, here are some beauty shots in the sky's over my backyard
-
17
-
-
Having build this kit myself i can only say you took it to the next level!! excellent paint job and finish.
I found it a very enjoyable build, and a great kit overall, not to mention the Belgian decal option. Just to bad Airfix only included the later four spoke wheels rather than the iconic 5 spoke ones that are accurate. In my case Marabu's set of photo etch spitfire rims came to the rescue.
very inspiring!
-
Lovely build! SV4's sure like a splash of colour and this one is no exception. well done!
-
1
-
-
That's coming along really nice! given my recent lack of progress this one might gracefully soar the living room skies long before mine
-
1
-
-
What a coincidence, i've recently picked up the Italeri kit and have a few gladiators in my stash to. In an interesting twist of history just prior to ww2 Belgium was able to buy some Cr.42's from Italy as also some British Gladiators, to "modernize" it's rather interesting but hopelessly outdated collection of interwar planes. Ironically after the capture of Belgium Italian CR42's where stationed here as well. All of this to say this pair or biplanes share quite an interesting history. It will be interesting and inspiring to see this pair come alive.
cheers
-
1
-
-
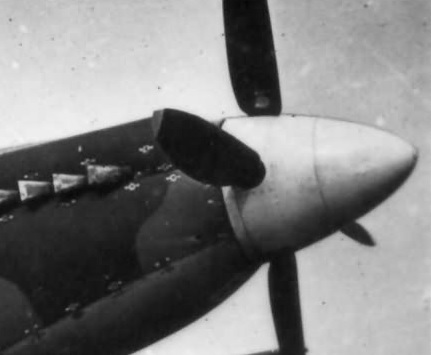
i have this close up of a late xiv spinner... since we're on the subject
looks a bit loose and very well might be in this static restoration
interesting how the baseplate and fillets are not the same color as the spinner, but again, restoration.
-
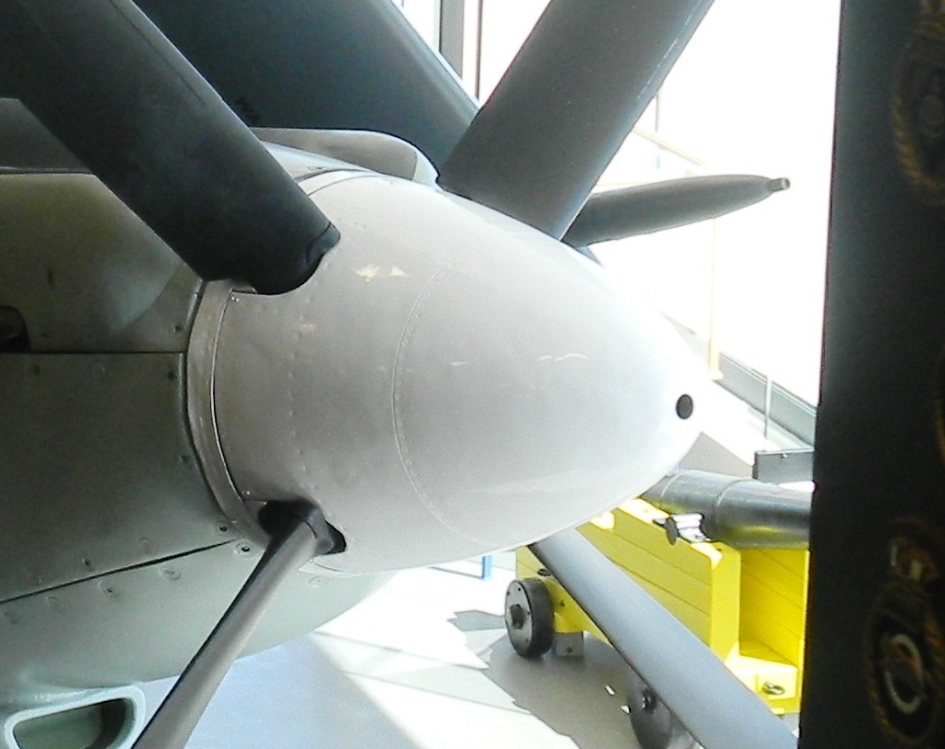
3 hours ago, steh2o said:
Addendum about the Griffon-engined prop spinners: although the shape of the spinner seems to be the same from Mk.XII onwards (except contra-props obviously), I noticed a difference in the Mk.XII/MkXV/MkXVII four-bladed props+spinners
Mk.XII
Seafire Mk.XV
Seafire Mk.XVII
The four blade propeller has a different spinner type: it seems that there are no fasteners at all, so how was the spinner assembled to the propeller baseplate?
Does anybody have a parts catalogue for one of these Marks showing this particular?
they all seem to have a hole in the tip so that's where i'd look for a screw
-
That's a very nice model! Well done, and a very cool representation of what is perhaps the prettiest spitfire variant.
-
1
-
-
Hello everyone,
here's a small update. Thanks to the additional info Glidingbob provided i noticed i had the red/white bands on the cowling wrong , front face should have been white.
fortunately the engine assembly and cowling where not glued to the rest of the model yet, so i just had to mask the engine and strip the paint with alcohol
ironically after painting it the first time the freshly painted cowling ended up behind the radiator and some dust stuck in the fresh paint so i had to strip it yet again.
now lets hope i don't screw up the red bands

thinking of painting the stripes on decal paper this time, sounds like a fun technique to try, what's the worst that can happen
-
1
-
-
@Glidingbob
thanks for the info! great article! I wish i had found it before i started. I was working from only two images so i had to guess a few details, but thanks to this new input i can make corrections. Especially the badge is new to me, and it should make the model even more interesting if can design a decal to match it.
I seem to have gotten the cowling stripes wrong as well... but now i know what to fix.
I'll try to do the real thing justice


Heller DH 89 Dragon Rapide 1/72 +Finished++
in Airco and De Havilland GB
Posted
I remember those seems from when i build this kit, however keep in mind that the real aircraft has a ridge from the structure showing trough the fabric at the top and bottom, in fact i think there should be two more to the side.
so while the seem might need some work the shape of the halves might not be totally inaccurate.
a very nice build so far!