


rjfk2002
-
Posts
451 -
Joined
-
Last visited
Content Type
Events
Profiles
Forums
Media Demo
Everything posted by rjfk2002
-
Thanks @Fozz. I have finally disassembled one of the shocks and will put the 2 mm plug in and test for the new height. Getting them apart was challenging and a four handed job. I don't trust the metal castings to hold up if I try to put it in a vice to compress. Instead I had compressed and asked the boss for help hammering out the pin. I have been doing some other work on the doors and headlights so I'm jumping around a bit.
-
Thanks for the pic and the reference! I sorted out the front suspension today and can confirm the upper wishbones needed to be swapped. Now the wheels are centered. What is the approximate distance between the top of the wheel and body panel on your build?
-
What an ordeal. I am glad you got it sorted out. Who knew the Tamiya de-chroming process would be so involved.
-
Agreed there is something off with the suspension. I think it may be the upper wishbones. I have since learned from Mr Koo that pocher mislabeled the right and left upper arms in the instructions and packaging. I will also double check the lower arms too. please upload the pic for the spring adjustment! That would be very helpful. Did you disassemble the shock and put plastic in the piston area to shorten the length?
-
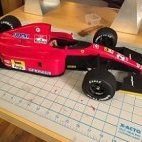
Test Fitting Begins I mocked up the body panels to test ride height. In trying to get the panels I discovered a few things. First off in the front, the hoses to the front radiator block two screw holes for attaching the front of the body. As I disassemble I will need to take careful look to see if I can route the hoses differently to avoid this blockage. On the rear body it seems to fit fine on the driver side, but on the passanger side I'm running into the issues as the others. I need to examine in more detail but I believe I have the same issue with the edge of the cockpit interfering that @Dinky pointed out earlier. As you can see this is still stuck in all terrain mode. I know Lamborghini and Audi share technology but I didn't know there was a Q5 suspension package offered for the Huracan! I did check the height with and without tension. The kit shocks do compress slightly - about 1 mm. Before I do finally measurements I will add the doors and hood to get it closer to full weight. As you can see some serious work needs to be done to get the chasis lower. Stay tuned...
-
The Frame Comes Together The trunk has been fixed. I sanded off the dried CA and moved through a series of grits to restore the plastic. Looks good as new... The front and rear frames have been attached to the cockpit and the beast gets heavier. The assemblies fit relatively smoothly as I had test fitted everything before. You will notice that the suspension has been left off. That allowed me to easily connect the steering column to the pinion gear up front. In the rear it helped to give me room to position hoses and other bits during the finally assembly. The engine is straight in the frame. I still need to add the X-bar and paint the black screws silver. The front view Now that the frame is complete I plan to test fit the body panels and finally tackle the ride height. I will be following the advice of @Fozz and @Dinky as I tackle the shocks.
-
The WIP pics are really helpful. Seeing the work and thought process that goes into your build is insightful and inspiring!
-
I stand corrected on the radiators! I will need to redo the trunk. Pocher showed the rubber part attaching to the top of the luggage tub. Looking at Koos DVD you are right it should come from below. Breaking the bond will be easy. The glue clean up will be a tad annoying… thanks for pointing this out. Much easier to fix now rather than later
-
The build isn't dead, just moving very slowly... I have completed the front frame. For the front radiator I brushed the part with black acrylic paint and then buffed it with a q tip to leave black pain in the recesses. I decided not to do it on the side radiators as the recessed areas were quite large and I didn't care for the look when I tested it. I believe those side radiators will be completely invisible when the body work in put in. Gluing the rubber seal to the trunk was a little tricky as the fit was loose. It was a little too big for the plastic. I was able to hide the slack in the curves. Fitting the rubber hoses was a little tricky. As @Dinky pointed out in a earlier post there are two ways to fit the hoses. In the Paul Koo DVD he suggested cutting the heads off so they can attach to the back of the radiators. The kit pieces were designed to attached to the side, which is technically not correct per the DVD. Based on Dinky's advice I decided not to cut the hoses. As they are molded out of the box they correctly thread around the frame. By modifying them I was worried that they would either not weave through properly or break off as I was adjusting the fit. I decided not to paint the rubber parts given my previous issues with the paint not drying. @silver911 offered some great advice about soaking in ISO and using fabric paint. I will file that away for later use. A final top down shot. I have left the suspension off as it is easier to attach the frame to the body without them in place. I continue to work on the rear frame. I'm struggling a bit to find the right kind of shrink tube for the air box. The kit part has a diameter of 15 mm so I need a bigger diameter shrink tube than I currently have. I have found some tubing that is the right size but seems to take too much heat to shrink (it's a little too thick). I will continue to search before I perhaps pivot and just use the kit piece as is. Stay tuned...
-
Excited to see you back at it Poul!
-
It’s always a good day when there is an update on this build! the tools look great. How did you get the tight bends on the wrench? Did you heat the tube and bend with a tool?
-
Staggering work! With each stage it gets more impressive and realistic. The metal work is spot on
-
Progress I was successful in straightening the engine on the frame! I filed the longer screw post down to bring it flat with the pan, filed away the edge that rings the metal frame and filled the hole in with plastic rod. After positioning the engine on the frame I drilled a new hold to firmly secure the engine. Everything looked good initially until I checked the height. The engine was too high and caused the air intakes to split. If I tilted the engine then there was no issue - the parts fit perfectly. I spent some time tinkering with it before going to bed. With a fresh set of eyes I realized the problem. The air box parts are secured to the oil tank and I didn't bother adding the bottom of the oil tank to the assembly (circle in the third pic). The bottom is molded to push the engine down to the proper angle so everything fits air box and exhaust.
-
I just did this fix and my engine is straight. You are correct they did not mold the screw holes in the bottom of the engine in a straight line so it introduces a twist. I will fill in the offending hold and redrill a hole. I am going to mount the engine based on the shorter distance as I seem to get a better fit with the air box. @Noel Smith thank you for the tip! That is helpful and a great source for screws.
-
 I have spent all morning reading this thread from start to now. Staggering work! Thank you for sharing. I loved your Bugatti work but I am blown away by what you are accomplishing at 1/24 scale!
- 295 replies
-
- 1
-

-
- John Fitch
- Mille Miglia
- (and 1 more)
-
Dinky I did not notice the lack of screws in the Koo DVD. That is a great observation. I bet he glued the engine in place.
-
A little bit more progress. I have started to build up the rear frame. The fuel tank and radiators have been added. I have picked up some wire and shrink tube to experiment with to see if I can replicate the boot for the air intake. I have not tinkered with the alignment of the engine yet. I would like to test fit the muffler first before I adjust the right/left angle. I have been working on the front frame also - specifically getting all the plastic parts painted. I would like to get the model back on its wheels so I can fix the ride height. Wayne's comments earlier were right, as more assemblies pile on the car does get heavier
-
Here are a few pics of the engine with a ruler to give folks a sense of scale. Nothing is permanently attached and there is a little play in the air boxes in terms of rotation. I'm thinking about super cluing wire rings to the plastic part and wrap in shrink warp to create the effect. Would welcome any additional thoughts from others out there!
-
Dinky that's not too bad a gap, especially when compared to the Koo example. I will get my pics posted shortly
-
That’s a really clever solution. Is the band at the bottom also tape? Does the mesh hold the dome shape well or do you need to glue a base to the bottom to keep it?
-
Any pictures would be great. Apologies Ron have gotten delayed on mocking things up.
-
Thanks Ron! Give me a few days to mock the parts up and measure. I want to see if there is a meaningful gap on my kit thanks for the tip Wayne. I forgot about Hobbyworld. Good to have you back on the forum!
-
Here is a pic of what I'm trying to create. The second pic is from Paul Koo's DVD of the actual model. In addition to recreating the look I may need to fill the gap between the parts. I have not assembled the air box and intakes yet to see how much a gap there is on my kit. I welcome any thoughts to tackling this one Thank you for the paint advice Ron! Dinky I would try Zero paints but I do not have an airbrush yet and zero paints can be tricky to source in the states. One day I'll get one...
-
Sorry for the delayed response. I have done some work on the car and hit a snag with some technology that delayed my update... I have been starting to assembly the rear bits of the car to give it some additional weight before I tinker with the shocks. First up is the engine which has now been affixed to the frame. I added the torsion bar and the drive shafts. In the second pic I have started to add the hoses. They are rubber parts which I painted with Tamiya spray silver. The paint unfortunately didn't take well to the rubber and remains sticky to the touch. In Paul Koo's DVD he mentions that Duplicolor paints will adhere to the rubber. I am debating if I buy some to spray the remaining hoses (particularly the radiator lines in front) or if I skip the expense as the lines will never be visible on the final build. I am working to assemble the the air manifold and intake ducts now. I would like to recreate convoluted boot for the intakes so I need to experiment with some copper wire and shrink tube. We had a stretch of warm weather so I painted most of the plastic parts for the front and rear frames. I am hoping to have a lot more progress to share in the coming weeks!
-
Thanks for the hose and connector tutorial! I for one didn’t appreciate how it is supposed to look. Very helpful to see the side by side comparison
