

Nomore Shelfspace
-
Posts
351 -
Joined
-
Last visited
Content Type
Events
Profiles
Forums
Media Demo
Everything posted by Nomore Shelfspace
-
 Thanks! I like posting to Britmodeller, even though I probably only build three kits a year now...
 -
Oddly I recall this and various other basic Airfix fare such as the Saunders Roe 53 being offered as a promotion with orange juice (Suncrush or something equally archaic), where you sent off so many botttle tops or whatever and got the kit of your choice in a plain box with no branding. They were crude even then.
-
Hello and hope everyone is okay, here's one of my now very infrequent models! This is my attempt at Airfix's prehistoric A W Seahawk, which is poor even by the standards of 60 years ago. It is more inaccurate than accurate. My copy was from the early 90's, an indifferent product of the Heller factory and the instructions refer to parts such as the stand that weren't even in the kit. I built it mainly because of my interest in the old RNAS Ford, or HMS Peregrine, which is just down the road from me and saw practically all Naval types during the 1950's. Apart from a lot of Revell Plasto filler, I added parts including the vanes in the air intakes, a cockpit coaming and gunsight, an ejector seat, jet pipes, a pitot tube, main undercarriage doors from sheet, the landing light in the nose, various new undercarriage bits and the two "fins" under the fuselage - I think these are cartridge case deflectors for the cannon, not antenna, although I may be wrong. I removed the weapons pylons. I also carved cannon troughs, sanded the trailing edges of everything that had one, reshaped the tail "bullet" and filled the areas on either side of the front canopy to remove the odd "bulge" which Airfix's designer thought was there. The model was airbrushed with Humbrol matt 90 and 79. Decals went on okay over two coats of Klear and using Klear as a decal agent. Luckily there's not too many... final coat was the indispensable Xtracrylic matt varnish. I do note that brush painting Klear always results in "pimples" which are either air bubbles or flecks of dust - these can be carefully rubbed down with micro-mesh before spraying the Xtracrylic, but this only works here because there's not much surface detail! Final touches were wingtip lights (clear Tamiya acrylic - mine has nearly dried out and had to be revitalised with alcohol - must be Navy) and silver pen for the nose light. I admit it's not the best model I've ever done but it looks like a Seahawk (which itself looks like a flying penguin...), at least from a respectful distance. Hope you like it anyway. Please excuse overspray inside canopy... What RNAS Ford looks like now;
- 21 replies
-
- 37
-

-

-
Airfix 1/48 Spitfire 1a
Nomore Shelfspace replied to Nomore Shelfspace's topic in Ready for Inspection - Aircraft
For your edification gentlemen, here is a (belated) photo of the above model with painted mirror and crowbar that is no longer red. -
Airfix 1/48 Spitfire 1a
Nomore Shelfspace replied to Nomore Shelfspace's topic in Ready for Inspection - Aircraft
Thanks! It does look good, very redolent of the machine and era. -
Airfix 1/48 Spitfire 1a
Nomore Shelfspace replied to Nomore Shelfspace's topic in Ready for Inspection - Aircraft
Yeah, I realised I'd forgotten to paint the mirror after I took the photos... the red crowbar is probably a misconception, don't know where that started. I wasn't sure if this variant did have the wire so left it off. I will have another go at it some time. -
Although I stopped aircraft modelling a while ago, I just thought I'd pick this one up last week. It's an excellent kit but needs work. I am still sure "New Airfix", welcome as they are, put really good Computer Aided Design before buildability! I did take Work in Progress photos but decided just to get to the finished model. The plastic is the well-known Soft Bluey Stuff and has to be treated with care - it just soaks up liquid cements and tube cement instantly melts it. There was no way I was going to give someone in Eastern Europe 8 pounds and wait three weeks for an aftermarket seatbelt printed on sticky paper or something so I made my own from pie case foil. So I didn't get "Supermarine" on the rudder pedals but did get "Birds Eye" on the seatbelts. I used a watchmakers screwdriver to emboss small pieces of foil to make buckles. The interior is tricky - the various bulkheads have to slot into the cockpit walls and these slots need "easing" with a knife etc. before it will all fit. The instrument panel is supplied as a decal which has to go over moulded detail... being mad I just cut out the dials and applied them individually. Some research provided a more accurate colour scheme for the cockpit. I had to file off a lot of plastic from under the cockpit tub before the lower wing would fit properly. Note there is a hole in the bottom of the tub, not to let water out but to accomodate the landing light... this thing has more detail than the old 1/24 scale Spitfire I built when I was (you don't want to know...)- years old! Amused to see another old friend, the pilot figure out of the above mentioned 1/24 scale Spit... complete with his sea boots. Must have been seconded from the Royal Navy. This model is brush painted. It was a bit of an experiment, and I won't do it again. I used the recommended Humbrol paints in two thin coats. The model was then brush coated in Klear, which wasn't enough to prevent problems with the (otherwise very good) decals silvering despite liberal amounts of Decalfix (which is really more of a wetting agent). One more coat would have worked, as I found out halfway through decalling. However, I will definitely go back to airbrushed Xtracolor acrylic if I build another aeroplane, I used to use this method with no problems. It's just all that masking!! I had to airbrush anyway with a coat of Xtracrylic matt varnish (after masking the transparencies...) Only potential problem if you aren't ready for it is the two-piece undercarriage legs... I know Airfix were going for dead accuracy etc. but there must be a less tricky method than fixing the top end of the leg into the undercarriage well before assembling both wing halves, then cementing the rest of the leg onto a hopefully secure stepped joint once everything has been assembled... Weathering was by pastels and a fine brush applied aluminium-ish paint. I used GS Hypo Cement for some of the transparencies - this is a jewellers cement that dries clear and doesn't fog. I actually had to pare down the fuselage top light before it would fit, with the aid of a head magnifier, something I used quite a lot in this build. I am wondering if Airfix could just scale this kit up to 1/32, it certainly looks like they could... Well there it is, as I say a bit of an experiment, I could have done better with the finish but it looks geat on the shelf with my few remaining aircraft!
-
Hello again, if you were watching my "in progress" thread here on this kit, here is the finsihed model. It looks okay, best I could get it really. There was so much rigging I felt I was building a model of a spider's web... The only additions I made were some fine chain instead of string for the anchors (I had to research the way these were stowed) and a new stand out of obechi stained a darker colour - it needs some retouching... I will see about name plates but haven't got round to that yet. There would be more photos but I forgot the golden rule of close-up photography, STOP DOWN, so they are mostly half in focus and I'm not going to set the model etc. up again... maybe I'll add some later.
- 4 replies
-
- 23
-
-
Revell 1/220 Cutty Sark
Nomore Shelfspace replied to Nomore Shelfspace's topic in Work in Progress - Maritime
Okay, THIS looks like the same kit, from 1977... "Quick Build" though...🤔? -
Revell 1/220 Cutty Sark
Nomore Shelfspace replied to Nomore Shelfspace's topic in Work in Progress - Maritime
Finally made some headway on this one. The rigging is in progress, and there is a lot. I don't like the billowing vacform sails and they are extra work so I'll leave these off. I'm not sure of the origin of this kit - an old Revell catalogue (probably 1967) I have only lists the 1/96 version but this doesn't mean it isn't Revell - the sprues have a Heller look to them, I dunno... anyway here it is so far. Filling in and eventually repainting the slots in the deck for the ratlines that aren't supposed to be there... Replacing the moulded ratty lines further forward, wrong but the only way they will line up with the mast... How to fix ratlines to mast with scraps of sheet. Note hole mistakenly drilled in earlier attempt to fix these things... Now I can start rigging. I had enough thread left from the Constitution kit to rig this one as well. I ran the thread through beeswax as shown here, knotting and then applying a drop of cyano to fix. Those 'horns" either side of the bow are in the wrong places but I fixed that... (correction; these are called "catheads". Sorry shipmates.) Correct placement of catheads according to photos of real ship. Always useful... Good progress with running rigging (brown) mostly in place. Sorry about the small photos, even out of my ancient (1999) Olympus C2500L I had to reduce them so they wouldn't take so long to upload! No more photos until finished. See you then. -
Revell 1/220 Cutty Sark
Nomore Shelfspace replied to Nomore Shelfspace's topic in Work in Progress - Maritime
Okay, decided I had to adress this issue properly (not by using a mallet or fire...) - the rear mast assembly needs rebuilding so it dosen't bend backwards like a drunken sailor. Put aside until I can be bothered with it... -
More from the now rarely spotted Nomoreshelfspace!! (I should change that now...). I think this is the only kit I built last year, after a visit to the real ship in Boston, Mass. A ship with a hell of a story, you should look it up. The kit is nice despite dating from about 1955 - judging by the stamp inside one hull half! If you don't misinterpret Revell's typically dud instructions you will be ok. Fit of the aft end of the deck is a bit questionable, those cannon should align with the ports if you get it right... but a good kit compared to their bum-aching Cutty Sark which I am struggling with right now (see "in progress" here). No essential notes here, just that I always prime plastic with matt enamel (in this case sand colour) before painting with acrylic. Stand is scrap mahogany, the supplied one poses a danger to ship and crew! One thing that strikes me is that it's impossible to build a truly "accurate" model of a ship, especially a sailing ship, because they were refitted and even rebuilt so frequently. THis one is really just a representation. That's it for the time being...
- 2 replies
-
- 16
-
-
Revell 1/220 Cutty Sark
Nomore Shelfspace replied to Nomore Shelfspace's topic in Work in Progress - Maritime
Okay, first let me say this kit is rubbish. It just confirms my opinion of Revell Germany as a packaging company. Second, it's no use throwing your toys out of the pram and winding up with nothing, you have to soldier on with it. I'm not sure what they were thinking when they designed this thing because the structure of the lifeboat deck clashes with the midships pair or ratlines. I totally rebuilt the lifeboat deck and relocated it aft of its intended position. It looks wrong, but the ratlines now fit - there are moulded cutouts in the peg rails into which they must fit, ignoring the similar cutouts in the upper edges of the sides where it LOOKS like they should fit... if you follow me so far. The aft mast (not sure if I'm using nautical terms, probably not) is now nowhere near the ends of the aft pair of ratlines, see photo... this is almost comical. They are in the correct slots in the deck as well. I had to tie back the mast with tape and rigging thread so it came anywhere near the top of the ratty lines and glued it with large dollops of Rocket cyano. It leans back much too far as a result. Now looking at the photos of a finished model online, the ratlines are fixed to the top edges of the sides. Really... if you do this the ends will not meet the knuckles on the masts, unless I'm getting something wrong here, but looking at photos of the real ship, I am doing it right! It's a disaster area, but I will finish it. I only bought this after reading poor reviews of the Airfix one... WTF REVELL. Seriously? YUK. -
Hello again after a long time, I used to post aircraft projects here, but they've mostly been sold - I still build the occasional kit of anything that catches my interest, if I have space for it that is... anyway I like sailing ships so I got this thing... 150th anniversary edition, in a huge box containing a poster of the box art, a bag of paints, plastic bottle of cement, the worst paintbrush I've seen in my life and a magazine-like instruction book, in true Revell style taking one numbered step to show where to stick one part, and no historical information on a supposedly historical subject (try Wikipedia...). The drawings are cut -and- paste variations on one view and occasionally misleading - I got the lifeboat structure completely wrong, thanks to the instructions, and had to rip it all apart, breaking most of it, and rebuild it with styrene sheet and brass rod, but more of that later. These photos show how far I got a few days ago - you have to admit the decals actually look quite nice! I used the paint supplied in the kit, why not. The hull cladding was Munt metal which has a brassy colour, not copper, but it looks ok or will do once I've retouched it after all the handling. Nothing special here, I am not a serious ship modeller, it's just a nice model... or will be.... Great, I've just got a photo in off my flickr thing. This is HALF the box it came in, made into a work box. The deck is warped so I just made up a solid hull before anything else. Be careful of those stanchions. Note step 3, "stick two halves of wheelhouse together..." Bit of a jump here, lots of painting.... loads of detail on the deck including the hand pumps and winches, I don't know how old this kit is, or even if it was originally Revell. excuse the bluey colour cast, I was trying out a 1999 vintage Olympus camera! As I pointed out, the Munt metal that clad the Cutty Sark's hull was a brassy colour, I used Revell enamel 95. I undercoated everything with Humbrol matt sand or somthething like that, makes it easier to paint in acrylic, which I prefer. Wouldn't like to have been a sailor on board one of these... Decals aren't bad at all, but need some application of the old Decalfix. Parts fit is rough. The front end of the ship. Really looks quite nice, although I'm sure the figurehead is supposed to be larger...? That's it until I can get more done, and have finished rebuilding the lifeboat tackle...
-
An Idiot's Guide to Posting Photos from Village Photos.
Nomore Shelfspace replied to Bullbasket's topic in FAQs
Got to point out, my usual browser (Firefox) wouldn't log in to Village Photos, telling me it was a security hazard. I have no reason to disbelieve it.... Today of course is October 16th 2019, I notice this thread started two years ago. -
Photobucket Eradication
Nomore Shelfspace replied to Navy Bird's topic in Help & Support for Forum Issues
I was thinking of doing that, but it's a lot of work and I more or less stopped modelling some time ago. Would be nice to let newcomers see my creations though. -
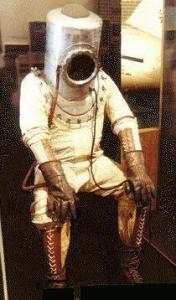
Presenting the Monogram 1/32 Apollo CSM, with New Ware etch interior (and other parts), and Space Model Systems decals, plus of course the Realspace Models resin unitary hatch. This kit was released in 1969 and is still available. It is the only accurate commercial kit of the craft, although it appears to be based on monochrome official drawings and some photos, and has inaccuracies as it comes - the biggest one being the gold plated Command Module! A full interior is included, although the complex instrument panels are for reasons that may never be understood, represented by terrible stickers in green, black and red. Most interior colours are wrongly specified in the instructions. The space suited crew figures are best discarded. With some research however a reasonable model may be produced. The CM chrome finish - strips of tape on the real one - is hard to replicate, I used Extreme Metal chrome. The build progress on this model is here in In Progress.
-
Okay space fans, some more photos of bits before I post photos of the FINISHED MODEL - and it is indeed finished as I type! The Four Tea Strainers antenna - I made a rudimentary jig after thinking about it for the space of a transmission "bleep" - (for the space, geddit) (ok...) - the tea strainers are tacked in place with double sided tape. These are the New Ware parts of course. Problem in painting them is not to let the holes get clogged with paint. I glued them in place with industrial superglue - this has to be applied quite thickly otherwise it doesn't set, but the dried glue can be retouched. The reinforcing "stars" picked out in alu. The white things are the feed horns. Some retouching needed... ok, it's finished as I say, and once I can take some good photos (i.e. not with this ancient Olympus) I'll post it to Ready for Inspection. It's been quite a journey, this one...
-
OKay, some actual progress on the mission... I used a Humbrol acrylic spray can for this, for one reason or another it came out really grainy, but responded well to a rub down with micro-mesh. It looks a bit wobbly because it hasn't been fixed to the stand properly. Note the small recessed panel left of top centre, this is an umbilical recess I think - I cut out the aperture, backed it with sheet and detailed it with bits of rod. It's quite noticeable in some photos of the real one. I'm not going to detail the top of the SM because as I pointed out before I am sane, sort of, and want to stay that way... Loads of masking later, and the structure at the end (not sure what it's called) was sprayed Extreme Metal chrome, without the black undercoat. It's still a bit grainy but I can't do much about that now. It certainly looks worse in the photos! Masking off. The white radiator panels need retouching, but this is a significant step towards completion.
-
Some minor updates before I start the Big Spray to finally finish this thing. I had lost two of the EVA handholds since breaking down the original build and stowing it away, so I tried making replicas by sticking the surviving part in moulding wax a few times and pouring epoxy over the resulting impression. I was surprised when it worked! However the resin was full of tiny air bubbles. I wasn't prepared to spend too much time on this so just picked out the better examples... This is the Extreme Metal Chromed CM, with details painted up and docking probe (almost intact from the original build) attached. The recast handholds are the two on the right. The decals for the yaw and pitch engines on the transparent section survive, but obviously the ones on the "solid" part were gone, so they had to be hand painted... the step between the clear and solid parts is noticeable here because of the lighting! Note the red seal inside the hatch. I used a mix of red and some sandy-brown camo colour to get a sort of "silicone gasket red" here. I think that's more or less what it was on the real one... I lost the cone on the tip of the docking probe so made a new one by chucking a piece of sprue in my old Rotocraft tool and "turning" it with a file and sanding stick. The CM was stuck to a piece of ply to avoid handling the extremely delicate chrome finish. There is some spot respraying to do, then I can coat the chrome with Klear. It might be worth noting that the chome extends around the edges of the heat shield by about 5mm. On the original this was strips of metallised tape, but I gave up trying to represent this on the model... I think I am sane and want to stay that way... The Business End. I had broken up the gimballing parts when dismantling the kit originally, and I wanted to fix the SPS engine bell in place anyway - you can see the old figure stand (Tsukuda Hobby) I intend to stand the whole thing on. I cludged the gimbal ring at the top of the engine bell in place with sprue, bits of sheet and industrial superglue blasted with that evil accelerator stuff - this I realise now was a bit pointless as the ring doesn't support anything... A hole had already been drilled through the top end to take the stand rod. The conical ring just at the top of the bell just rests on the edges of the aperture in the base of the SM here, I had to build up the "burger" of stryrene sheet to allow it to rest on the disc-with-a-cross-on-it (no other way to describe it, sorry) you can see inside the aperture, then drill through that - trusty old jewellers hand drill shown - to take the rod. And there is much still to do!
-
These are brilliant. I'd like to go to this show but it's too far for me to drive.
-
Airfix 1:32 scale B Type Omnibus
Nomore Shelfspace replied to ukmodeller's topic in Ready For Inspection - Vehicles
I think Dapol are really trying to keep up the quality of those old Kitmaster/airfix kits, although it's been about 20 years since I built one... might be worth a try as they are easy to get hold of. Just had the idea the best way to get a really good B Type is buy a new issue for the decals and an old one for the parts... -
Airfix 1:32 scale B Type Omnibus
Nomore Shelfspace replied to ukmodeller's topic in Ready For Inspection - Vehicles
Nice build, salutations on getting a rotten kit finished... I often think it's better to search for an old issue of some kits, as I recall the one I had about 40 years ago was pretty solid (and moulded in lovely red plastic). Same applies to the Dennis Fire Engine, I had an old issue a few years ago but sold it. -
O-kay, the mission resumes... Here's the RSM kit. It's mastered by 3D techniques and although there is a bit of flash on the small parts, pretty amazing. I used plastic rod instead of the brass rod supplied for the linkages - more scale looking and easier to cut - length should be about 4mm so no way is this fiddly...! A lot of filing and sanding stick-ing was needed to get the opening the right size for the coaming, which also had to be filed a bit. This resulted in even more dust inside which I got out with various devices including a Giottos photo blower, a vacuum cleaner and bits of lens cloth on paperclips. Think it's all gone... It needed a bit of re-forming to match the curve but this gap is fillable. After cleaning up the parts I swabbed them with alcohol and gave them an undercoat of matt grey enamel. I masked the hatch opening on the inside before sticking it in. Thick cyano for the chrome half, glue n' glaze for the clear! Mask around the opening, fill gaps with perfect plastic putty, smooth down wet and mask the rest of the clear areas when dry. I fitted the hatch into the opening with white tack. You can see a crack just above the hatch, I decided to paint this over as there's nothing underneath to show. Spray gloss black enamel, hatch and all! Secret of real gloss is to spray close at a low pressure. More to come...
