

Terry1954
-
Posts
7,178 -
Joined
-
Last visited
-
Days Won
1
Content Type
Events
Profiles
Forums
Media Demo
Everything posted by Terry1954
-
This could get interesting.............. Terry
-

Air Cadets, 1/72 Sedbergh T21 Vacform
Terry1954 replied to Terry1954's topic in Work in Progress - Aircraft
As promised, pictures of what's going on underneath the nose. I managed to drill a square hole for the cable attachment! Actually it started as a small round hole, and then a very sharp new pointed scalpel blade was used to shape the corners. I'm quite proud of my small square hole! Below that are two areas that I have filed away to take the small "wheels" that will support the skid: The "wheels" for the skid have been made from plastic rod, drilled out a bit on either side. They are pretty small! The skid itself will be made from some laminated 5 thou which will form a shallow curve from the inky line you can see back to just behind the rear skid wheel, ahead of the main wheel. I will need to put in a couple of very small shims of plastic card on which to sit the skid wheels. Hope that makes sense. Finally I also added a small fillet of plastic card ahead of the fin, to represent the same on the real thing. This needs more work to blend in etc. Lots of fiddly detail to get right at the moment, but we are making progress I think! More tomorrow Terry -
Interesting "rebuild", and already looking good. Two questions - what have you used for the scuttles and how did you do the plating runs? Difficult to see both in the pictures. Thanks Terry
-
If it helps, this is how I have done a couple this year. Blue tak or equivalent with masking tape/fluid as required: Looks terrible as you do it, but the results seem ok:
-
Very impressive so far Kev. It should look really good in the RAF camouflage, assuming that's still your preference. Terry
-
Just catching up on all this Roger after a couple of weeks travelling recently. The Harvard is looking great. Looking forward to seeing those last decals on the cowling! Terry
-
Just caught up on this. Great stuff John, really taking shape, and what a size she is! Terry
-
Thats what I like to see, a good bit of major surgery with a saw! Great thread again Tony. Terry
-
Air Cadets, 1/72 Sedbergh T21 Vacform
Terry1954 replied to Terry1954's topic in Work in Progress - Aircraft
Thanks Chris. I saw from a few pictures of original Sedbergh's and can vaguely recall myself, the position in front of the skid as you describe. I've modelled that today, pics to follow soon! Terry -
Air Cadets, 1/72 Sedbergh T21 Vacform
Terry1954 replied to Terry1954's topic in Work in Progress - Aircraft
Thanks John. Yes that was it aerotows! We always had winch tows so now I recall that it was always the one underneath, not the front. As you can see from the above, I have it on the wrong side on my T31. I can even now recall getting down under from the port side and attaching, never the other side. I guess I just blindly used the hole where Phoenix had put it, on the port side in the kit. I know it will anoy me, so may have to fix that one day! Terry -
Air Cadets, 1/72 Sedbergh T21 Vacform
Terry1954 replied to Terry1954's topic in Work in Progress - Aircraft
The T31 is fine in terms of shape of attachment points, so they don't need to be re-worked, however I have trawled through my RAF museum pics and realise that the second attachment point further back is on the wrong side! 😲 Maybe I should just keep quiet about that 🤐 What will need doing on the T21 is to make a square hole underneath and put some gubbins inside to replicate the real thing ............ assuming I can find out what it looks like. Probably not dissimilar to the above pic. I'll wait and see if anyone has any info for now, but meantime I will make a small square hole with my special square hole drill 🤔 Terry -
Given @massimo's comments above, I would say a small jar? 😁
-
Air Cadets, 1/72 Sedbergh T21 Vacform
Terry1954 replied to Terry1954's topic in Work in Progress - Aircraft
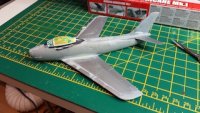
Last nights work involved producing a neat hole in the front of the nose, like this............ Then I needed to make the short stumpy tubular insert to pop inside. I used a suitable piece of plastic tube, which was subsequently "reamed" out a bit to make the sides a more realistic thickness. Popped inside and a bit of very fine liquid glue from Tamiya's finest and we get something that looks fairly true to lots of pictures I have looked at. Now that its well dry, I plan to sand that back so that it only protrudes just enough to look like the real thing. Then I have to focus on the underneath in this area. The good old T31 had two cable attachment points, one on the extreme tip of the nose, and one under the fuselage offset to one side (because of the skid). I believe this was due to it being a tandem seat aircraft, and depending on single or double occupancy, C of G could shift for and aft, thus needing a different attachment point. T31 experts out there are welcome to comment/confirm? You can see this on my T 31 below (under nose view) With the Sedbergh being twin side by side, the C of G for and aft shift was not an issue (I assume), so I believe there is only one attachment point needed? The picture below is from the Sarum aircraft, and given some of the comments around accuracy of the nose of this one, I'm reluctant to assume this attachment point is shown correctly. I also have another picture kindly provided by @stringbag which shows the attachment point in the same position. All looks good I think! The Sarum Machine Chris's picture So now need to refine the ballast hole (and work out if fitting that horizontal pin is feasible in this scale), create a square hole underneath for the cable attachment, and sort out that skid with its small wheels and the main wheel. I don't suppose anyone has a really detailed picture of what's up inside that square cable attachment recess? Thanks Terry -
HMS Dido (Ikara Leander) 1979 - [WAFU’s away match]
Terry1954 replied to Ex-FAAWAFU's topic in Work in Progress - Maritime
Thanks for that. A davit, of course, it seems obvious now I look at it, and I hadn't ever gone through the rationale of where one might be stowed if needed. A bit large to take indoors! But presumably that is a smaller davit, unlike the ones either side of the funnel? -
It's coming along nicely, looking just like a Phantom should! Terry
-
You see, someone understands me! 🤓
-
Air Cadets, 1/72 Sedbergh T21 Vacform
Terry1954 replied to Terry1954's topic in Work in Progress - Aircraft
Thanks Chris. A little more progress last night. Will post more updates later today. Terry -
He means yellow and black of course. Just saying again..... 🙄
-
Navy-ating Bucc's fizz - On the deck at last
Terry1954 replied to perdu's topic in Work in Progress - Aircraft
I use Premi Air Liquid Reamer or Spray Craft Airbrush Cleaner. They seem similar and will shift any type of paint. Mask and great care a given! Terry -
HMS Dido (Ikara Leander) 1979 - [WAFU’s away match]
Terry1954 replied to Ex-FAAWAFU's topic in Work in Progress - Maritime
Have caught up on this properly now and am seriously enjoying the attention to detail and admiring your dexterity! I like the open bridge door, nice touch, and the funnel rails look superb. One small question relates to that little hook like thing on the top of the Ikara handling room - I'm curious to know what it is? Thanks Terry -
Air Cadets, 1/72 Sedbergh T21 Vacform
Terry1954 replied to Terry1954's topic in Work in Progress - Aircraft
Thanks Martian. It is a bit like Triggers Broom! Terry -
Albatross, Get Your Albatross Here!
Terry1954 replied to Martian's topic in Work in Progress - Aircraft
Thank you Pete. This link, and other comments in response to my curiosity, have led me to places and sources of information I never dreamed I would discover, but feel especially privileged to have done so. The whole web seems to be intricately yet discreetly interwoven with facts regarding such things. I have absorbed it all and now feel very honoured to "be in the know" 😉 I shall of course, never speak of this again. Terry -
Air Cadets, 1/72 Sedbergh T21 Vacform
Terry1954 replied to Terry1954's topic in Work in Progress - Aircraft
Thanks Roger, still a way to go Thanks Tony. Still working on the shape, but the pancake residue seems to remain! Thanks. When I read your reply I remembered that's what it was. I did most of my gliding in the T31, and my T21 launches were always with an instructor. I had myself attached many towing cables to the T31, but never did any to the T21, so forgot where the attachment was I guess. I'm aware of the health warnings with the Sarum T21, so am checking against other references as much as I can. It was just so fortuitous to get so close the the "real" thing. Thanks again all for encouragement. Back to the hobby room shortly! Terry -
Agree, up there with the best. Terry
-
Albatross, Get Your Albatross Here!
Terry1954 replied to Martian's topic in Work in Progress - Aircraft
OK, I give in. This "Fruitbat" thingy, clearly either pre-dates my time on here, or I'm very unworldly wise, or ............... you are all completely bonkers. I'm tending towards the latter conclusion at the moment. Do I get a clue? Terry


