

Volksjager
-
Posts
135 -
Joined
-
Last visited
Content Type
Events
Profiles
Forums
Media Demo
Everything posted by Volksjager
-
I assume this is the Tamiya Kit. I have this one in the stash but I have built the Tamiya 1/72 and I agree it's awesome. Your finish is very nice & love natural metal finished Tony's with home defence bands. Very well done
-
 Thanks Troy. Great tip on the prop blades and I hope prop modellers take note as that is 100% correct. I did actually do this on my blades though the pics don't show it. I love the silver that I use on my kits but it only reflects when light is directly on it, otherwise it blends with paint around it quite well. Here is a pic from the build process after I had painted the blades. I could have weathered them a touch more but didn't want to take them over the edge. Haha, good point. The attacker version of the Dinah didn't achieve the same sort of performance as the recon version, though just as pretty in my eyes anyways. Thanks for very kind words guys. It was a labour of lover this one.
 -
Tamiya 1/48 Mitsubishi Ki-46 III-Otsu-Hei
Volksjager replied to Volksjager's topic in Work in Progress - Aircraft
I could but I did secure another kit last night I have been very keen to get my hands on, the Hasegawa 1/48 Ki-45 Kai Tei Here is the link to the topic in the RFI section for the Ki-46: -
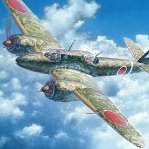
Just finished my first build of 2022, Tamiya's fantastic 1/48 Mitsubishi Ki-46-III Otsu Hei 'Dinah' Aircraft "24" belonged to the 16th Dokuritsu Chutai, based at Kiyosu in the summer of 1945. The Chutai was incorporated into homeland defence as the B-29 raids intensified & was equipped with this heavy armed Boku Sentoki (Air defence fighter). The aircraft were armed with twin 20mmm cannons in the nose and an upward firing 37mm cannon mounted in the central fuselage. The units emblem on the tail is the Kikusui (floating chrysanthemum) The Tamiya kit is a dream to build with no fit problems at all. Added was the Eduard PE set for the interior as well as their canopy masks. Also used were the Quickboost exhausts & their upgraded 20mm & 37mm guns. Brake lines were added with copper wire & the aerial wire is MIG rigging. The majority of the paint used throughout are SMS, mixing some custom colours where required, in particular the topside green to achieve the right tone. Pigments were used for the exhaust & walkway stains. All markings were painted on accept for the unit marking on the tail which is the Tamiya decal. The build thread can be found here : Here are the pictures of the finished kit :
- 23 replies
-
- 58
-

-

-
Tamiya 1/48 Mitsubishi Ki-46 III-Otsu-Hei
Volksjager replied to Volksjager's topic in Work in Progress - Aircraft
Thanks, glad you have enjoyed the build. I totally agree, It's coming to a close I am don't want it to end either! Really appreciate your comments Mark. I also really enjoy your builds and the Avenger is looking awesome. Glad I have helped with some ideas for the future and looking forward to seeing what you do with them. Soo..... This is going to be the final update on this one as I just finished the build. I have been working on the panel wash the last few nights and left it 24 hours to make sure I was happy. I went for a very light panel wash around the main airframe. Photo's of the Dinah never show it too dirty and as a fast recon aircraft it should be slick. The custom mix was made from Tamiya Panel liner light grey, black & brown, applied lightly and cleaned off with white spirit From here the process was only really a couple of hours work. The final assembly was done first, leaving the guns & pitot tube to the very end of course. Once the cowl's were finally fitted I was able to create the exhaust stains. Though I have tried air brushing I have never really like the results. For me pigments are the way to go and my usual go to is the Tamiya weathering master sets. For this aircraft only soot was used for the staining as it looked the best to me, though I apply the pigment powder with a cut off stubby brush then blend it with a larger, softer brush. Once happy some smaller oil/fuel leaks were applied with AK oil stains & weathering pencils. For the dust & dirt along the port wing various pigment colours like European earth, light dust, sand & light earth were used, again stippled on with my stubby brush & blended with the bigger brush. Once the nav lights were painted it was time to attach the guns & pitot tube thought some small details missing on the rear canopy. On a photo of the aircraft it shows a small rail above the rear canopy frame & a circular port with a small length of tube sticking out on the rear Perspex portion. I found I had a small disc left over on the PE sheet so this was applied with white glue before a small length of brass rod was cut for both the port & canopy. Once painted the aerial cable was strung out between the tail & cannon with a small return back to the rear canopy. And with that it was complete. I will post it up in the RFI section now but until I add the link here is a small teaser -
Tamiya 1/48 Mitsubishi Ki-46 III-Otsu-Hei
Volksjager replied to Volksjager's topic in Work in Progress - Aircraft
After being able to get some time Friday night, Saturday morning & today the end for the Dinah is in sight, though there is still a little way to go yet! So Friday night was just spent masking (bout 2 1/2 hours!). Earlier in the build I cut the Hinomaru's & the '24' on the tail on my little Cricut Joy so the time was spent placing these plus masking the surrounding areas from overspray. I also masked the yellow ID bands on the wind leading edges with Tamiya tape. I noticed I forgot to mask & paint the small yellow id plates near the base of the props so I also cut these rectangles on the vinyl cutter & placed them on the assembled props, masking the rest with tape & liquid mask. Fast forward to Saturday morning & I was able to get straight into painting, starting with the SMS white for the Hinomaru outer bands & then '24'. Then a touch of SMS red was added into the mix to make a pink primer for the yellow sections. After cleaning the cup, SMS Trainer yellow was used on the ID bands & the props. The Hinomaru outer bands masks were addeed & SMS Red with a drop of SMS Black was used to paint the center of the meatballs. I very much prefer masking & painting the markings after the camo as I don't get a step in the paint if I happen to go to thick with my layers plus I can chip the markings so the camo layer can come through. Anyhow here is what I am left with after the mask has been removed (in about 5 min!) The other part I unmasked was the landing light on the leading edge. Truth be told I forgot about this part and actually cut this into the wing after I put the first base coat of black on. I cut the opening to large and had to add in some styrene, sand and blend the clear part before I could mask and base coat. Glad to see it came out great. So this was all left to dry overnight and today I started again. First order of business to apply the one & only decal, the unit marking on the tail. I used some advise from Mike & Dave of the Plastic Model Mojo for Tamiya decals. I first put the decal in hot water, the put down some Mr Mark setter which the decal was put straight on to, then a second coat once the first coat was dry. After drying I applied 5 coats of Mr. Mark Softer once each previous layer was dry, running a sharp blade down the runned joint between layer 4 & 5. The result was a very clean and smooth decal with the underlying detail coming through nicely. Here it is after a couple of coats of SMS Flat clear once it was dry (plus I have a small touchup to do on the top left corner of the rudder) The rest of today was spent completing touch-up's and finishing parts that needed some adjustment. A quick summary of the work: - Fix the inboard ID bands as the chipping was to large (my mistake here, used a brush rather than sponge as the first chipping had come loose) - Fix the inboard cowl flaps on port side engine (glue had got on the painted surface by mistake, again it was me) - Paint small window in upper mid fuselage as it's not supposed to be left clear (I should read instructions more) - Paint pitot tube (happy with the kit part at this stage) - Install the wheels + tail wheel - Install brake lines on the main gear - Remove canopy masks and hope like hell there is no dust in there! And after all that here is what she looks like I have tested it out with all the rest of the bit in place and I am very happy. So from here I have to put on a panel wash, exhaust and general stains and some mud/dust before final assembly. Finish line not far away!- 27 replies
-
- 12
-
-
What you tested cut on is the silver stuff? You can get a clear stencil vinyl (has a faint grid printed on it as well) which is what I use myself, not as tacky and haven't had to much of an issue with it at all. Something like this: https://www.spotlightstores.com/craft-hobbies/paper-craft/cricut-stencil-material/BP80421935-clear
-
Nice work Mark, your Avenger is looking really great! Cutting your own stencils is the way to go. I use a little Cricut Joy, which is great but it does have it's limitations so I will be interested to see how you go with the Silhouette. Because of the difficulties of finding Oramask in Oz I tend to use either sheets of paper masking tape (same stuff Tamiya tape is made of, bought from BNA) or Cricut makes a stencil vinyl which I use quite a bit & seems to work. Might give you some option's while waiting for the Oramask
-
Tamiya 1/48 Mitsubishi Ki-46 III-Otsu-Hei
Volksjager replied to Volksjager's topic in Work in Progress - Aircraft
Well I can't quite believe it, 2 days in a row at the bench! As painting is my most favorite part of the whole process & because I got the underside done yesterday, the topside was just begging to be done. So with 3 or so hours to spare this afternoon I sat down to mask & paint the top. The custom colour was made just like the cowls, with Mr Leveling thinner, SMS Olive Drab & SMS RAAF Dark Earth. The first layer went down in a marbled pattern, then lightly oversprayed till happy with the coverage. Next I added a touch of SMS British light sand to the mix, spraying in some light highlight spots to various panels. Once happy I lightened the colour some more with British light sand and made some streaking & sprayed out the control surfaces. At this stage I washed out the cup, put in stright Olive drab and blended the lot. Then added quite a lot of RAAF Dark earth so the colour was more brown than green & picked out some fuel caps, shadow areas, wing roots etc. Then I added some drops of black to grey out some of the same areas for tone and variation. Finally I washed the cup out once again, added pure Olive drab & blended once again. Every mix also had SMS Flat clear added to it to control the sheen. Pretty happy with the results so far Sooo... the other ting I tested out was control surface masks. These help create a 3d illusion of the fabric on the control surface & add a bit of depth. The trick with these is to stick them onto the surface once you have the base colour down, then apply a thin black to the center of the exposed panels, remove the mask and overspray the control surface with the base colour. I am happy with them but not sure if I blended them in to far this time around. Finally I had to once again test fit the engines to check the colour balance & because I was keen to see it together Remeber the enigines have already had a wash applied so are a touch darker than the body which is yet to receive one. So from here, I need to mask off and paint the yellow identification bars on the leading edge. I also cut masks last night for the majority of the markings so they are ready to go plus I have a couple of very minor touch up's to complete, may add some more chipping then once all of that is done the panel wash will go down. Still plenty to do but over the main painting now -
Brewster B-339D Buffalo - IJAAF
Volksjager replied to Mig88's topic in Ready for Inspection - Aircraft
Nice work there. Couldnt begin to imagine working in that small a scale. -
1/72 AirFix Mitsubishi A6M Zero fighter
Volksjager replied to ErikT's topic in Ready for Inspection - Aircraft
Nice work on this kit. As the others have said the weathering is excellent. I also much prefer the restrained chipping on the Japanese aircraft, unless your following a photo of a certain machine. Well done -
Tamiya 1/48 Mitsubishi Ki-46 III-Otsu-Hei
Volksjager replied to Volksjager's topic in Work in Progress - Aircraft
Thanks for all the kind words guys, appriciate the time to post a comment! So I did manage to get a little done today while I was working from home, which was awesome. I did manage to get the canopy on over the weekend, again using the watered down Mig Ulitmate glue which worked a treat! I used Eduard masks on the canopy which just made life so much easier. Anyhow onto today. First thing's first, paint the whole thing black. Using a mix of Mr leveling thinner & SMS Black I was able to shoot the whole aircraft which showed up a couple of little blemishes that were sanded out and re painted. The result is pretty sexy if I do say so myself I love this shot! Once dry I shot a touch of SMS Super Silver for chipping, only required in the places I wanted to chip through Then pre shaded the underside as it's my first colour to go on. I am in 2 minds as to if it was really worth it. After shooting the final colour I find I get all my tones from the post shading rather than anything coming through from the pre shading. Anyhow I wanted to bring our the green in the grey green so I used SMS Olive Drab, SMS Dark Earth & SMS British light sand for the control surfaces Onto the final colour. So I start was SMS Grey Green in a marbled pattern, slowly building each surface. Once happy with the coverage I picked out the control surfaces & various panel lines with the same colour but with added SMS British light Sand for some warmth. Then I go back and pick out some shadows, panel lines & fine streaking with what's left of the above mix but with some added SMS Medium Sea Grey. As a little tip, I actually mix in some SMS flat clear from the start, keeps all sheens consistant. Pretty happy with the colour tones Should look good with some Dark grey panel wash I think. I also have a trick to use on the control surfaces before I hit the topside, just need to get them ready & test out my plan. Hopefully they will work Until next time -
Tamiya 1/48 Mitsubishi Ki-46 III-Otsu-Hei
Volksjager replied to Volksjager's topic in Work in Progress - Aircraft
Many thanks for for kind words. Though I have been guilty of it in the past, I don't rush the process at all. Much better to test fit, adjust & test fit again to make sure it goes together the best way possible The twin's are just pain sexy and I am glad this one has sparked an interest. Provided all things go well I was planning to bring this one along to WASMEx plus I have a couple of others I up my sleeve So I did manage to get a great day of painting & experimenting in with the Dinah once again. The main focus was getting the small bits finished as much as possible, getting the body finished and hopefully the canopy on & ready for a base coat. I managed the first part of the plan & the second half is almost there, just not quite ready yet. Onto business, so one of the main parts of today was working on the cowlings as I wanted the powerplants assembled. First job was to clean the seams & basecoat, which I actually did yesterday but missed a seam on the top of the cowlings. They are moulded in one piece but have a very slight seam on the top and bottom. The bottom I got the first time around as it's were the sprue joins but didnt see the top until the base painting was done. Out with the sander again and it was eliminated with some quick work. A layer of SMS jet black went down before a coat of SMS super silver. I had to take a pic before it dissapeared! Then some masking fluid was used to create my chipping effect. I didnt want to go overboard as the pics of the real aircraft aren't that worn but a little goes a long way. Once dry I picked out the panel lines with some black through the airbush, then onto my custom IJA late war green, using SMS Olive Drab & SMS RAAF dark earth (ratio was eyeballed as I want some variation to the main body colour when I get there). Once it was marbelled down I then progressively lightened the colour with SMS British light sand, with a final over spray though a mask with stright Olive drab to finish. After than was dry a light black/brown mix of panel liner was used for some wear. As you can see I have also removed the making fluid too reveal the silver basecoat. You might also spot what I did to the inside of the cowl ready for the engine. It was sprayed silver, then panel liner was flicked over a toothpick to creats some splatter & dirt. It will never be seen again but I know it's there The Quickboost exhausts were also cut, prepped and painted. Geez they are such an improvement over the kit exhaust's. Hard to see in the pic but they were based in black before SMS Steel was sprayed first, then a brown trackwash was used for the burnt colour, finally the tips were blended with a Q-tip dampened with white spirit before a light black soot was added with pigments. Then the egines were installed And finally the exhausts were test fitted. Nothing but the engines are glued at this stage, the majority are just fitted together The main wheels were also finished, a grey panel liner was applied to the tread & weathering pencils were used for aging (dirt yet to be applied). The Quickboost main guns were also completed. Once again and awesome upgrade from the kit parts. A simple paint in SMS steel before pure black panel liner is applied plus the green colour was used on the upward firing cannon. Finally I couldn't help myself and test fitted the cowls, exhauts & props. I am pretty happy with the colour choice here. Prop's are still a little light but I will bring the colour down with some panel liner wash. The eagle eyed might also spot the IP shroud, IP & gunsight has also been installed in preperation for the canopy to be fitted. I was going to model it all opened but after test fitting earlier I am etxremely happy with the lines with it all closed up so I will leave it closed. I have also installed the small rear cabin windows & found, just like the main canopy, the fit to be extremely tight. I decided to try a tip I heard on one of the model podcasts I listen to. After installing the glass panel I used watered down MIG ultimate white glue to wick around the panel which seems to work well. Clean up was then dead easy with a damp Q tip & water, job done. Hopefully canopy on shortly, then onto canopy masking, & body spraying!- 27 replies
-
- 11
-
-
Tamiya 1/48 Mitsubishi Ki-46 III-Otsu-Hei
Volksjager replied to Volksjager's topic in Work in Progress - Aircraft
Got some bench time in yesterday and was able to plod along on the Dinah. I did manage to get the aircraft together last weekend & left the model to dry for the week, doing my best to avoid ghost seams. I have to say the engineering in this kit is stellar with no filler required so far. Yesterday I did manage to get the primer sanded back & smoothed out across the aircraft. Definately starting to look like something! I also managed to get the smaller parts painted up while I have been waiting such as the props, the landing gear doors & wheels All parts we first painted SMS Jet black before a light coat of SMS Super silver which was left to dry a week before any colours were used on top. For the props I then applied a black/brown panel liner mix to the hub before it was masked with liquid mask. I also used the same product to mask the very fine paint chip's, applied with some foam. The propeller colour was mixed using SMS German red brown primer & RAAF Brown using my Mk1 eyeball for the ratio. Once painted the yellow tip marking were masked & painted with SMS trainer yellow. Once happy I was then able to remove the liquid mask with a rubber brush & toothpick to reveal the chips. Still need to apply some panel liner for age but pretty happy so far For both the landing gear doors & wheels used the same process as above before the top colour was applied. The gear doors are in SMS grey green (which will be used for the underside later on) & the wheels are Vallejo Tire black. Both parts still need weathering but are well under way Hoping for some bench time tomorrow as it's a public holiday & I get the day off 😃 -
Tamiya 1/48 Mitsubishi Ki-46 III-Otsu-Hei
Volksjager replied to Volksjager's topic in Work in Progress - Aircraft
So not a huge amount of progress in this heat! Still I wanted to keep this moving so I was able to spend some time at the bench over the weekend. I managed to get the main gear legs & wheel wells painted, though stupid me forgot to take some pics before I masked and covered them. I wouldn't usually install the gear at this stage but the way they install into the wings leaves little choice. Once fixed in place the wings went together well & were left to dry for 24 hours before the seams were sanded on the wings & fuselage. I love using SMS Black primer to check my work. It has talc in it so it will go down a little grainy as you can see but once fully dry I will be able to sand it very smooth plus it will fill slight imperfections so perfect for this kinda work. I also managed to get the engines detailed. Built straight from the box they were were painted silver, washed with black Tamiya panel liner & details picked out with acrylics. Once assembled a final wash was applied to blend it all. Will probably weather a touch more though you wont really seem them in the narrow Dinah cowls. With any luck the weather will cool down so I can get cracking on this kit. Once the primer has been sanded the wings will be installed and left to dry Thanks for looking!- 27 replies
-
- 12
-
-
Tamiya 1/48 Mitsubishi Ki-46 III-Otsu-Hei
Volksjager replied to Volksjager's topic in Work in Progress - Aircraft
Why thankyou kind sir. I think it's a little of both, I will be able to have the canopy open so a lot of both the front & rear cockpit will be visible but as always some of the work will be gone forever only to be seen in pictures. Always a hard question of knowing when to stop but at least it's good practice for more visible places like the wheel wells or engine/cowling -
Tamiya 1/48 Mitsubishi Ki-46 III-Otsu-Hei
Volksjager replied to Volksjager's topic in Work in Progress - Aircraft
Many thanks & glad to have you on board Not much achieved this weekend unfortunately. Has been very hot out here in Western Australia and even though I am inside, its still hot down in the modelling corner. I did manage to get the seems sanded off & I also prepped the landing gear & engines for paint. Hopefully I will be able to lay down so toward the end of the week. -
Very nice work and I am glad the chipping came out well, it certainly looks the part. Yep I would go with a steel or dark grey colour which you can add rust tone to is you prefer once they are done. I reckon you have it nailed though
- 208 replies
-
- 1
-
-
- 3D Pinting and maybe more. :)
- Silent Running
- (and 1 more)
-
Wow, I have just caught up on this build and I am very impressed. Your 3printing skills @The Spadgent are fantastic. Dewey is coming along very well and I am keen to see how you go with your paint & the liquid mask.
- 208 replies
-
- 1
-
-
- 3D Pinting and maybe more. :)
- Silent Running
- (and 1 more)
-
Nice work so far. I am interested to see how this one build up so I will follow along with interest. Are you going to try to expose the engine at all?
-
Valom Yokosuka Willow Floatplane
Volksjager replied to PatW's topic in Ready for Inspection - Aircraft
Well done on an interesting subject. What did the kit go together like? The beaching trolley looks great -
Tamiya 1/48 Mitsubishi Ki-46 III-Otsu-Hei
Volksjager replied to Volksjager's topic in Work in Progress - Aircraft
100% correct Jeff, this is the armed version of the Dinah Type III. Essentially the same aircraft with a redesigned nose for weapons. The Ki-46 III Otsu was armed with the 2 nose mounted Ho-5 20mm cannon. It changed to an Otsu+Hei with they added the 37mm upward firing Ho-203/204 cannon -
Tamiya 1/48 Mitsubishi Ki-46 III-Otsu-Hei
Volksjager replied to Volksjager's topic in Work in Progress - Aircraft
Small update - Got the fuselage together Sunday and had left to dry 24 hours. Have just given it a quick sand and it's looking pretty good: I also added some slight oil staining on the floor around the Ho-204 in the rear cockpit just to add some visual interest otherwise it's just to sparse. When I looked back at the pics I saw I had forgotten to paint the back cushion on the rear cockpit seat, so I fixed that with the brush tonight. I will leave the fuselage to sit for the rest of the week now to dry out to hopefully avoid any ghost seams. Next up I will prep the wheel wells & gear for paint- 27 replies
-
- 12
-
-
RAAF UH-1D Huey "Bushranger 72" - Vietnam 1970
Volksjager replied to mark.au's topic in Ready for Inspection - Aircraft
Beautiful Huey and for a good cause. Really love the weathering and how realistic it looks. Nice job- 27 replies
-
- 1
-
-
- Italeri 1/48
- Bell UH-1
- (and 1 more)
-
Nice work on your Tiffy. The camo is very well done & love the sharks mouth.