-
Posts
1,103 -
Joined
-
Last visited
-
Days Won
3
Content Type
Events
Profiles
Forums
Media Demo
Posts posted by Tail-Dragon
-
-
This is the Tamiya 1/48 P-51D Mustang, marked as John C. Meyer's "Petie 2nd".
Typical of Tamiya, easy assembly and a nice fit. The only weak points are the wheel well not going back to the spar, and a prop that is too wide and tapered at the cuff (easy to correct).
I used an Ultracast seat, and the sliding canopy is a spare from an Airfix kit (suitably reshaped).
Wheel well was opened to the aft spar, brake lines added, and the radio, battery and drop tanks wired, and plumbed.Decals are the kits (works well with VERY hot water), and the paints are all Tamiya acrylic.
Thanks for looking,
Colin


-
 41
41
-
 1
1
-
-
This is the early ICM (Tamiya knockoff) 1/48 P-51D Mustang, marked as "Miss Marilyn II".
As and early ICM kit, there were a number of challenges, HUGE sink marks, short shots, incorrect detail parts copied from other kits, and a canopy that looked like it had been removed from the mold with a shovel!
I used an Ultracast seat, and the sliding canopy is a spare from an Airfix kit (suitably reshaped). The front windscreen is from a scrapped Monogram P-51, that had to be reshaped, shortened, and polished to fit.
Wheel well was opened to the aft spar, brake lines added, and the radio, battery and drop tanks wired, and plumbed.
Decals are ancient Superscale (that tried to shatter on contact with water - to the point that some codes were masked and sprayed), and the paints are all Tamiya acrylic.
Thanks for looking,
Colin


-
 32
32
-
 1
1
-
-
-
9 hours ago, stevehnz said:
Are you referring to the chip from the book, in which case Troy has answered but if you're referring to the chips/ colour samples that @Tail-Dragon has produced, I think the two different shades of each looks as though it is the result of a clear coat on the lower shades marked with A B C & D.

Steve.
Yes, the darker (lower) colors are under a coat of Future. Note, they do lighten up with a flat coats.
-
 1
1
-
-
I did one a few years ago and attempted to replicate the scheme as closely as possible, referencing all the available photos. (Note: spinner mottle has since been changed to sandy brown mottle on yellow)
... big problem (other than the lack of truly accurate decals) is that there are no photos that clearly show the upper and lower surface of the wings. Thats where guesswork comes in.
-
 3
3
-
-
-
-
That is an absolute masterpiece! Congratulations.
-
 1
1
-
-
Small update today, added the Canadian specific right side step found on the target tugs (brass wire and sprue ...

... and decided to use the leading edges from a junked Testors Lysander as the basis for the slats - reqiures thinning and a bit of reshaping, but the tapered airfoil shape is bang on. Much easier than trying to form them myself. The Gavia wing plastic should be thick enough to scrape down to form the slat well.

-
 8
8
-
-
-
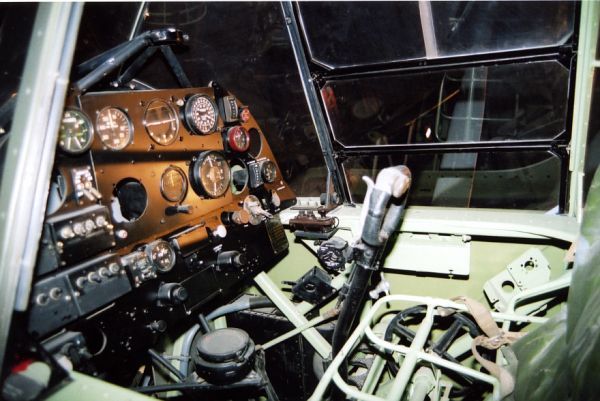
I've got some color on the interior now, and am ready to close the fuselage, after all the work on the winch assembly, very little can be seen!

The gunsight mount above the panel is made from various diameters of stretched sprue ...


... the exhaust collector will start out a bright metalic, and will be darkened and discolored later ...

-
 12
12
-
-
I have a couple of Monogram Kingfishers that I was doing interiors for, based on all the drawings and info I could find. (currently on the 'waiting for inspiration' pile). They might help ...
https://www.britmodeller.com/forums/index.php?/topic/235123093-148-os2u-3-kingfisher/
-
I'm continuing the Lysander cockpit work (adding cockpit details, RCAF style radios, winch details), but have finished the work on the engine, prop, and landing gear.
The big challenge will be the dropped slats and flaps, I'm still experimenting with different ideas.
Painting is next, so I can bring the fuselage, gear, and engine together, and the look at the wings.


-
 16
16
-
-
Somewhere in the distant past, I read that there were 2 different horizontal stab spans - between the M2 and M3 test aircraft, the stab was extended for stability reasons.
-
-
5 hours ago, Whirly said:
Is this a specific mod of tha Canadian built lysanders?
Just interested since I have one to build and found contrasting informations on the pilot seat....
Very nice start, by the way, I will follow your progress.
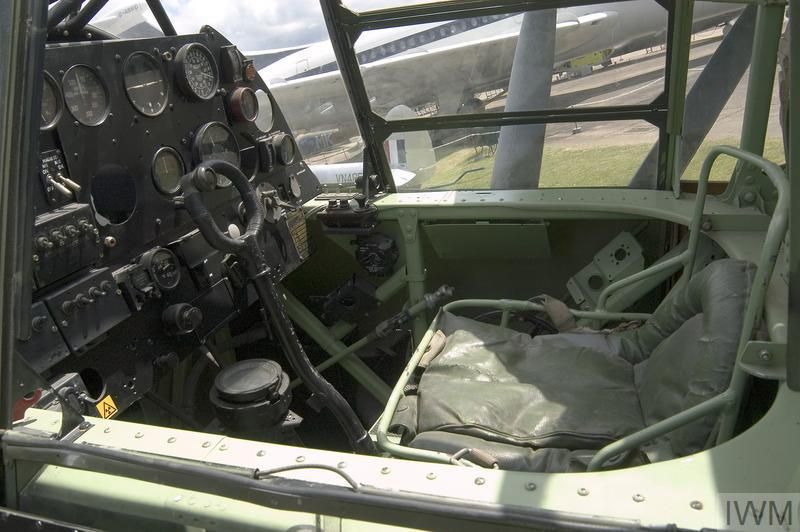
It's not specific to the Canadian Lysanders, it seems to be the standard construction, a framework, with a padded backrest, the pilot sitting on his parachute ...
see ...
https://www.largescaleplanes.com/walkaround/wk.php?wid=45


-
 6
6
-
 1
1
-
-
I'm starting a new project, a 1/48 Lysander Mk III target tug, in the 'Oxydol' scheme.

I'm using the Gavia kit, and have started on the big differences with the RCAF Lysanders ...
the tubular seat bottom from stretched sprue

replaced the aft floor with one with the hatch

the electric winch ...


and the extended exhaust pipe with the cabin heater muff (made from heated and bent sprue)


when I get to the exterior, I'll be adding the tail guard cables, the wooden belly doors etc.
I still cannot find any info on the winch operators seat, or the rear shelf behind the observer (size, what was on it, etc.)
Any help would be appreciated!
Colin
-
 18
18
-
-
This is Revell's original issue Type VIIc U-boat in 1/144. I replaced the ladders and tower handrails with brass wire, thinned the kit winter garden and hull handrails, detailed the guns, and removed the round sockets that were molded on for the winter garden rails.
Thanks for looking,
Colin


Here's the Type VIIC with my recently completed Type IXb ...


-
 16
16
-
-
-
From : 'silverhawk author - Harold A. Skaarup'
https://www.silverhawkauthor.com/post/canadian-warplanes-4-grumman-goose
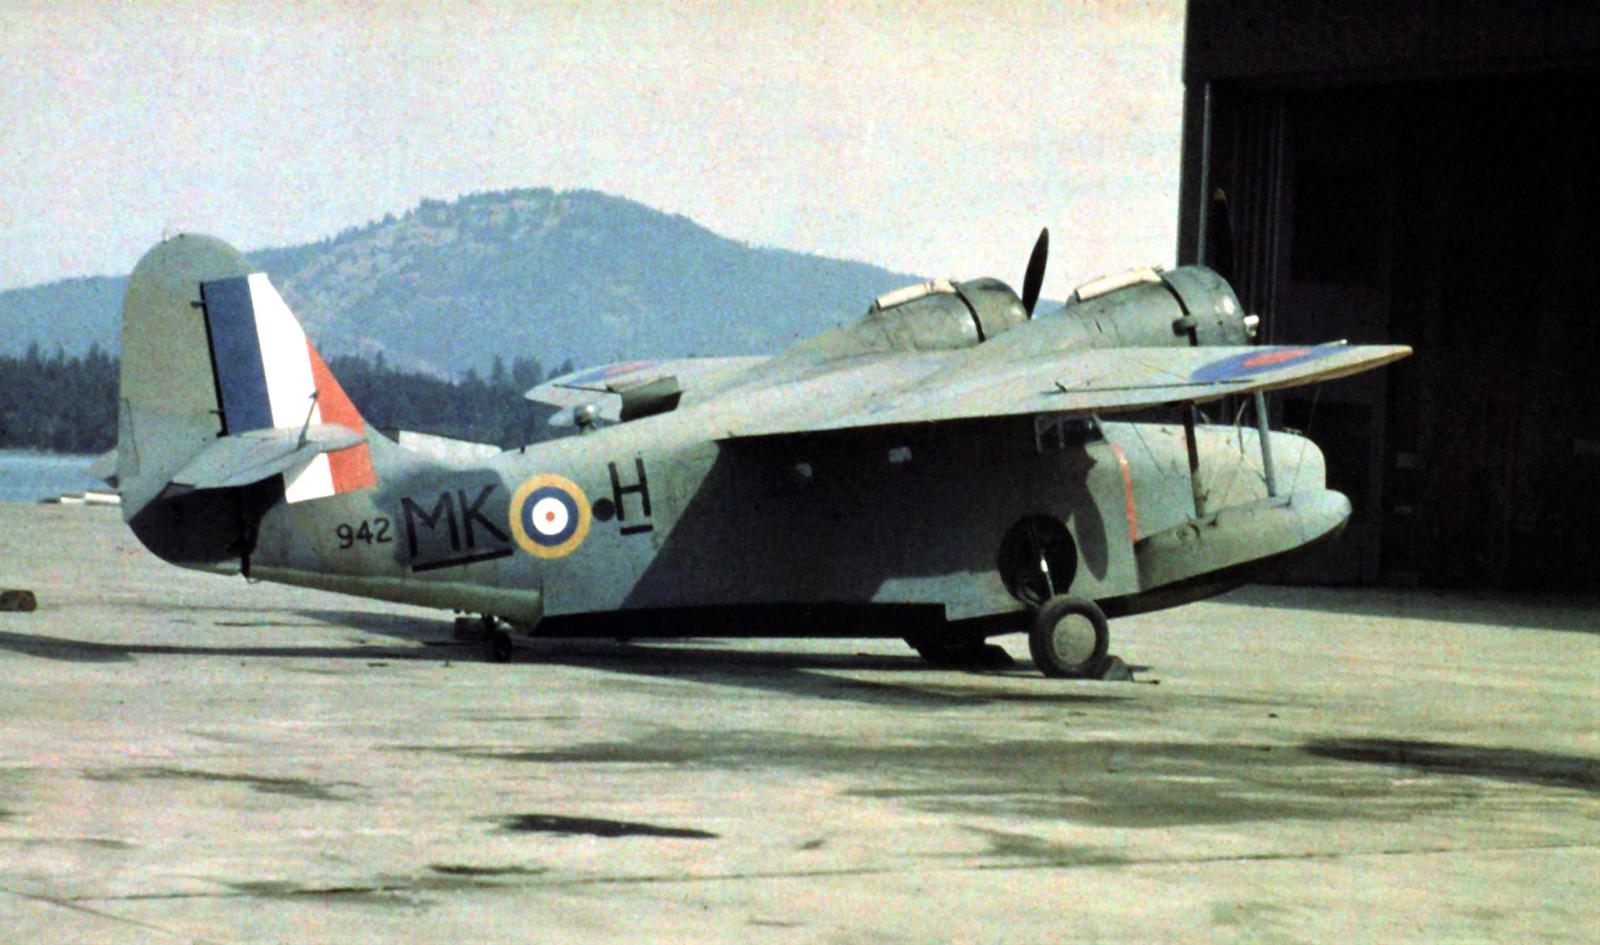
"Grumman G-21A Goose Mk. I (2), (Serial Nos. FP471, FP473), Mk. II (29), (Serial Nos. 382-397, 796-798, 917, 924-926, 939-944), for a total of 31 aircraft.
The first RCAF Grumman Goose Mk. II (Serial No. 917) was flown by No. 12 (Communication) Squadron then transferred to No. 13 Squadron in November 1940. 917 crashed on 21 July 1942. In March 1944, the Canadian government purchased sixteen ex-U.S. Navy Grumman Goose aircraft and three were assigned to No. 12 (Communications) Squadron, (Serial Nos. 383, 386 and 390). All three were painted with the first No. 12 (Communication) Squadron nose art, a Maple Leaf Roundel and red cowling with aircraft red lightning flash markings."
The only period color photo I found (camo'd) shows a red prop warning stripe.

-
 1
1
-
-
I almost always attach the transparencies before painting, and fill any unwanted seams.
I cut thin strips of masking tape with a ruler (never the full length of the frame), and outline the frame with strips (often overlapping the shorter lengths to get the corners right). If there are curved frames, I'll cut curved strips, instead. Curved corners are done with small tape disc's first. Then fill the gaps with tape scrapes. Never try to cut a single piece that covers the whole window piece, almost never works.

-
 2
2
-
-

Lots of Canadian Goose's (Geese?) photos and info here ...
https://www.silverhawkauthor.com/post/canadian-warplanes-4-grumman-goose
-
 2
2
-
-
-
Here's my interpretation of the U-123, a type IXb submarine that opened Operation 'Drumbeat' down the east coast of the U.S. and Gulf of Mexico in 1942, commanded by Kptlt. Reinhard Hardegen.
It is the 1/150 Academy IXb that is manufactured as a motorized 'pool toy', and required quite a lot of modification, scratch building, a huge amount of Millput and brass wire!


Thanks for looking, hope you like.
Colin
-
 30
30
-
 1
1
-


Dora's dashed hopes..
in Aircraft WWII
Posted
From what I've read, the early intakes were circular, and later ones were enlarged and oval shaped.