

Wilks
-
Posts
145 -
Joined
-
Last visited
Content Type
Events
Profiles
Forums
Media Demo
Everything posted by Wilks
-
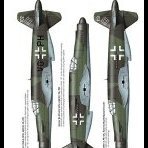
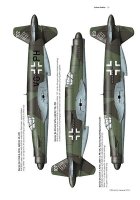
S&M Models 1/72 Canberra T4 RAAF A84-501
Wilks replied to Wilks's topic in Ready for Inspection - Aircraft
Many thanks for the kind words. I trust I've done some justice to the investment and effort the folks at S&M Models put into this one. I think they've done a marvelous job on it. The B.2/Mk-20 is already on the bench... Michael, thank you. The colors are relatively straight forward. The high speed silver is decanted Tamiya rattle can AS-12 which is my go to for this finish. It is so stable and dries rock hard very quickly. Same approach was used for these other recent finishes - all 1/72. The Dayglo Orange was a little more challenging. Firstly a white base was applied which was decanted Tamiya rattle Fine Surface Primer White, followed by two mist coats of Gunze Fluorescent Orange. This turned out rather pink and in my previous experiences once you have a decent cover it fades very quickly to pink. To stop this I added 25 drops of Gunze Orange to one jar of their Fluorescent Orange, thinned and sprayed. While the photos don't do it justice it came out rather well and has a slightly mottled effect which is typical as this paint as it fades in the elements. The process is detailed in my posts in the Work In Progress - Aircraft section of this site. Trust that helps... Cheers and again thanks for the kind words, AGW.. -
Love it. A favorite and you've done it very well. Cheers, AGW..
-
Managed to get this one over the line and put a RAAF Canberra in my cabinet. Something I have wanted to do for quite some time... I thoroughly enjoyed the S&M Models kit which went together very well. Based on my humble experience and knowledge they've done a very good job of re-creating these versions of the venerable Canberra. No major issues were encountered and there is plenty of scope for detailing this kit in either its T4 or B.2 boxings. Build notes and photos are in "Work In Progress - Aircraft" for those who are interested. Now on to the next one... A B.2/Mk-20 for the RAAF. Cheers, AGW..
- 30 replies
-
- 51
-

-

-
S&M Models 1/72 English Electric Canberra B2/T4
Wilks replied to Wilks's topic in Work in Progress - Aircraft
Construction Part 9 & Finished... Final steps in this one were relatively straight forward. After decals were dry another good coat of Future was applied to seal and protect them. Over the top of that was a half Future half Gunze Flat Clear mix to dull it down a little. with the masks off it really took a leap forward in look. Remaining fitment of the wheels, gear doors and trimming and paint of the pitot very straight forward. As I poured over my reference photos I couldn't help but notice the remove before flight tags on the nose. I had to make the silver plates these attached to from some thin plastic stock. They made it easier to attach the RBF tags so a win-win. A little bit of human hair was used to add the wire that connected the three RBF tags. Thank you to my dear wife for that contribution. Tanks were added and fit nicely. I picked out the intake vents with some black and added the black to the leading edge of the fin and we were done. I am glad I went as far as I did with the nose weight. While I thought I'd over done it, I was on the borderline. Overall I loved this build for both the subject matter and the overall fit and accuracy of the shape. I think the folks at S&M Models have done a great job on this one. I trust you like it as much as I do... Cheers, AGW..- 35 replies
-
- 19
-
-
-
S&M Models 1/72 English Electric Canberra B2/T4
Wilks replied to Wilks's topic in Work in Progress - Aircraft
Construction Part 8 With a slick coat of Future on and dry it was time to add the decals. These were a combination of the kit, some poached from High Planes Models 1/72 Canberras and an old Aussie Decals sheet. I had to make some assumptions again on what went where and why. As a T4 and relatively early on in its career I went with more of the RAF style stenciling and the best I could establish from the available photos of 501 and 502. Those are some big roundels on the wings! Wheels done up and ready and dark sea grey panel on the fin added. I'll leave the black leading edge until after the final topcoat is on. While I was hoping to call this a 2017 finish it is likely to be my first over the line for 2018. Cheers, AGW..- 35 replies
-
- 14
-
-
Eduard 1/32 P-40N 80 Sqn RAAF
Wilks replied to Andrew Perren's topic in Ready for Inspection - Aircraft
Perfect!!!! AGW.. -
S&M Models 1/72 English Electric Canberra B2/T4
Wilks replied to Wilks's topic in Work in Progress - Aircraft
Thanks John. Appreciate the additional information on the different Mks. James, thank you too. I've experienced that before and keep my completed daylgo painted kits out of the suns reach. It is an ugly Salmon pink too! Cheers, AGW.. -
S&M Models 1/72 English Electric Canberra B2/T4
Wilks replied to Wilks's topic in Work in Progress - Aircraft
Thanks. Not that hard. Extra thin cement to adhere it and Zap-a-gap to fill it. A little attention to ensure you sand in manner that ensures you retain the curve of the fuselage and all good... Cheers, AGW.. -
S&M Models 1/72 English Electric Canberra B2/T4
Wilks replied to Wilks's topic in Work in Progress - Aircraft
Construction Part 7 So with some further study of my reference materials - namely ADFSerials.com I established there was a small pitot in the nose that needed to be added prior to paint. I also established that A84-501 & 502 wore different versions of this scheme. Some had the dayglo painted right up to the canopy frame and various combinations down to the actual T4/Mk21 nose cone. I elected to follow one particular black and white image for mine. Interesting what research turns up. With the decisions made it was on to the masking. Relatively straight forward using Tamiya's yellow tape and some 1mm Low Tack Masking Tape from Jammydog. I am working with some fairly old images so some interpretation was required here. Overall I think I am fairly accurate for 501 which is my chosen subject. Some triangles were cut to help me get into some of the corners for masking. A good solution for this challenge and one I use a lot on Mirage windscreens. I spent a bit of extra time on the nose. Given the size of the circumference getting the line straight was important. With the masks on a fair number of post it notes it was back tot he paint shop/laundry. The white base coat was decanted Tamiya Fine Surface Primer L - White. It provides quick coverage and dries rock hard in minutes. At a constant 70 degrees F the time between base coat and color was 15 minutes. With the white down it was time to apply the Dayglo Orange. As you can see the first application looked pink. The second wasn't much better. I thought this would be the case as I've used this before. It takes literally a 1,000 coats and after a period of time fades to more of a pink. To fix this I added 25 drops of Gunze Orange to a jar of their Flouro Orange and thinned before applying by airbrush. While the photos don't do it justice it looks somewhat mottled given the base coat and initial coat. Handling the model and painting this number of sections was a bit of a challenge and required a stretch after I was finished. With about 10 minutes for the Dayglo to set up it was time to remove the masks. All good and no over spray. Off the drying cupboard/Wardrobe for the rest of the day ahead of some Future later today. With a couple of shades of paint on i am noticing how nice the panel lines are on this kit. Looking forward to getting it over the finish line on the weekend. Cheers, AGW..- 35 replies
-
- 21
-
-
S&M Models 1/72 English Electric Canberra B2/T4
Wilks replied to Wilks's topic in Work in Progress - Aircraft
Thanks Perdu.. Much appreciated... -
Hasegawa F-35A Lightning II 1:72 NOW WITH PICTURES
Wilks replied to replicant's topic in Ready for Inspection - Aircraft
Outstanding result on that one...! AGW.. -
Stunning! AGW..
-
S&M Models 1/72 English Electric Canberra B2/T4
Wilks replied to Wilks's topic in Work in Progress - Aircraft
Construction Part 6 With all the filling and re-scribing completed it was time to remove the tape protecting the canopy. They served their purpose well with no blemishes on the canopy or navigators windows. The undercoat layers needed some feathering out ahead of masking which was done with some wet and dry down to 1200. Painted Aluminum is very unforgiving when it comes to different levels and scratches. Masking was done - slowly - using a combination of Tamiya tape and a Canopy Survival Kit. The little circles and circle outlines made much shorter work of the port hole windows on the front of the canopy. Well worth the investment... With the masks on it was time to add some Gunze flat black to the canopy frame so that the inside looks black. With a little time to dry, I decanted some warmed up Tamiya AS-12 from its rattle can and ran it through my airbrush. The paint behaves very well and you can apply a very wet coat straight up that results in a very even and consistent painted aluminum finish. An appropriate sized straw over the nozzle sprayed into the lid makes for a good decanter for your airbrush cup. A quick inspection and all looked as it should. Now for some drying time... Although AS-12 doesn't take long to harden up and once dry is as tough as nails... AGW..- 35 replies
-
- 17
-
-
S&M Models 1/72 English Electric Canberra B2/T4
Wilks replied to Wilks's topic in Work in Progress - Aircraft
Courageous, the gear is holding up quite well. The main gear legs are very solid and the nose gear is in nice and snug with a good purchase so not expecting any issues... I don't think it will be doing any touch and go work so I think I am safe! ModellerUK, the kit is a ripper and goes together easily. Everything fits bar one part that only required a minor scrape with the back of a knife to be ready to go... It is like making any mainstream kit. In some cases better. I recently finished a couple of Vampires, a Meteor and a Macchi and it is no more difficult than any of those to construct. The little CMR Vampire was more difficult to build. I would liken it to the Airfix Vampire T11 only bigger. I humbly recommend it to you and anyone else looking for these Canberra Mks. Off the paint shop today... Cheers, AGW.. -
1/72 Welsh Models B737 BBJ
Wilks replied to Romeo Alpha Yankee's topic in Work in Progress - Aircraft
Outstanding result as usual Ray. I was messing around in my stash last night looking for a few odds and ends and saw my Welsh Models BBJ and Wedgetail... Thanks for reminding me how well they can look with a little effort! Cheers, AGW.. -
S&M Models 1/72 English Electric Canberra B2/T4
Wilks replied to Wilks's topic in Work in Progress - Aircraft
Construction Part 5 With the main assemblies together it was time to tidy up a little more in readiness for some undercoat to check my seams and filling. Ahead of that there is a gap under each of the horizontal stabilizers that need to be created. This was done on this occasion with a scriber to simulate the openings. On the next kit I may approach this differently now I know just how well the stabs fit. The undercarriage legs were added next which is far more straight forward than I thought. Five minute job and it was done. The designers were thinking here as the holes were well formed and everything went together nice and snug. I'm glad I added that amount of nose weight as she needed it. I elected to sharpen and deepen the vents in the engine air intakes. These are pretty prominent on the real machine. I masked up the canopy and wingtip lights roughly and hit it with some Tamiya Surface Primer (L). Overall I've done a rather good job filling and sanding the joins. No major issues at all. May need a couple of re-scribed lines made deeper on the fuselage is about all I need to do. So with those done we will be off to the paint shop tomorrow... Looking forward to seeing her in color...- 35 replies
-
- 12
-
-
S&M Models 1/72 English Electric Canberra B2/T4
Wilks replied to Wilks's topic in Work in Progress - Aircraft
Many thanks gents. Just adding the undercarriage components which are very straightforward ahead of some undercoat to check my filling before getting her ready for paint... I am glad I added that amount of nose weight. Look like we need it.. Cheers, AGW.. -
S&M Models 1/72 English Electric Canberra B2/T4
Wilks replied to Wilks's topic in Work in Progress - Aircraft
Construction Part 4 With the fuselage tidied up and any re-scribing complete it was time to add the wings. I spent a little more time fettling here to get a close join. A combination of Zap-a-gap and extra thin cement were used here. When setting the right dihedral I did create a slightly larger gap than planned on the upper surface of the wing. Nothing major and easily resolved with a thin bit of plastic card glued into the gap and some filler. The horizontal stabilizers are a butt join to the fuselage. Be careful to follow the instructions here on which parts go together. The top and bottom surface have a different lip which is important to how it joins to the fuselage. I established the instruction part numbers were incorrect but easy enough to establish which bits go together from the plan view of the parts in the instructions on the first page. For a butt join they are very well engineered and will need no filler whatsoever...! They are also at the correct dihedral which makes life rather easy... Extra thin cement was used here which worked very well. Now for some drying time and a tidy up tomorrow before we go to the paint shop for some undercoat. With a bit of luck we'll be painting for real the day after tomorrow as it is going together really well. I'm rather impressed...- 35 replies
-
- 12
-
-
S&M Models 1/72 English Electric Canberra B2/T4
Wilks replied to Wilks's topic in Work in Progress - Aircraft
Construction Part 3 She's a big one... Dwarfs some of the kits I have been working on lately. Added the forward undercarriage bay which was very straight forward. Like the mains it has some good detail and one could go to town on it if they wanted to. Will leave that to another build. Finished up the Pavla replacement ejection seats which came up rather well with some weathering. I rather like Flory Models 'Grime' for this work. I had to trim part 21 flush with the opposing cabin floor to ensure they fit and gave the right look under the canopy. I elected to leave the Nav's seat out on this occasion as unlikely one will see much through the two small windows on top of this compartment. Having read and watched a few 48 scale Canberra builds I was taking no chances with the amount of nose weight. I fear I have well and truly over done it but it will sit on its gear no problem... A further test fit revealed some fettling was required on the joint between the fuselage and the nose cone and the removal of some material from the top of the cockpit instrument panel - Part 13. I went as far as I could on the nose before letting the glue and filler do the remainder of the work for me. With the addition of some tabs inside the fuselage from some plastic card it was time to join the fuselage halves. Very easy and quite a good fit and panel line alignment. Extra thin cement and capillary action worked very well. No alignment issues experienced here. Next came the clear part and then the nose. Once the extra thin cement had dried I noticed a bigger than normal gap at the rear of the clear part. I added a strip of card with some additional extra thin cement that took care of that. With these dry there was some reasonable gaps and alignments to address at the join of the nose and fuselage. A little scraping with the back of a scalpel blade followed by a reasonable amount of zap-a-gap to fill the remaining gaps, and enough to ensure a good amount of material existed for some contouring to the nose where necessary. It doesn't take too long to dry after which I used a 180, 200 and 800 grit sanding stick and some water to tidy up the seams. The same process was used for all the fuselage and fin joins. A little bit of work but she looks the goods... A little re-scribing required here and there but no different to any other kit I've completed recently. Cheers, AGW..- 35 replies
-
- 13
-
-
S&M Models 1/72 English Electric Canberra B2/T4
Wilks replied to Wilks's topic in Work in Progress - Aircraft
Thanks Ray... Edited accordingly... Good luck with the old Airfix kit. If it does beat you I humbly recommend this one... Cheers, AGW.. -
S&M Models 1/72 English Electric Canberra B2/T4
Wilks replied to Wilks's topic in Work in Progress - Aircraft
Phil, sorry to hear that. All present and accounted for across my order. Excellent service on the part of S&M Models too. Continuing to make some progress on this one so here is Construction Part 2. Am well advanced on the cockpit and very happy with the amount of detail in this scale. One could really go to town on this interior but sadly any major efforts won't be seen once the fuselage is closed up. IMG_0195 I've used a bit of license here as we have picked out some of the details. I'll grubby it all up a little more before I put the fuselage together, again not that anyone will ever see it. IMG_0201 The kit seats are OK and could be detailed up to look quite nice. But for this one and I dare say my others I'll take a short cut with the excellent Pavla replacements. IMG_0196 Cheers, AGW.. -
S&M Models 1/72 English Electric Canberra B2/T4
Wilks replied to Wilks's topic in Work in Progress - Aircraft
71 Chally, Many thanks for the advice on photo posting. Much appreciated. Apologies to everyone else. AGW.. -
S&M Models 1/72 English Electric Canberra B2/T4
Wilks replied to Wilks's topic in Work in Progress - Aircraft
Fixed original post... -
Having followed the gestation of this much awaited kit, I received my order last week. Upon opening the box I was pleasantly surprised at the quality and detail staring back at me. I have been eagerly awaiting an accurate replacement for the old Airfix kit for quite some time so as to fill a large gap in my 1/72 RAAF collection. The five grey and one clear sprues are crisply moulded with finely engraved panel lines consistent with any of the major manufacturers. IMG_0199 The clear part that represents the canopy and navigator windows is moulded as single part that forms a section of upper section of the aircraft - Smart! It allows for easier attachment and clean up and less chance of messing up the canopy which is such a prominent feature on the Canberra. IMG_0188 IMG_0187 The instructions are clear and the decals look very nice and are in register. While I won't use the RAF version supplied in the kit the stencils will come in handy for my RAAF examples. Construction Part 1 Having surveyed the instructions several times it was time to remove the fuselage, cockpit, nose section and canopy. A little tidy up of each and some tape to check the fit and all looked very good, very good indeed. IMG_0189 IMG_0190 Things lined up rather well especially the cockpit bulkhead to fuselage and clear plastic parts. I added the nose which for my example that will be a T4/Mk21 that does not need the clear section. To make the B2 there is a different nose section that allows for the fitment of the clear nose. Note the clear nose does not come with the T4 boxing. The shape looks accurate to my references and way ahead of any equivalent Canberra kit that I am familiar with. There is some nicely moulded cockpit detail on the inside of the fuselage halves, along with the parts that make up the cockpit and navigators compartment. These should come up nicely once painted and detailed. Sadly not much will be seen through the canopy. IMG_0185 IMG_0174 With that done I set these parts aside while I tried the wings and horizontal stabilizers. All good there by the looks of it. The wing to fuselage join is a little different to most kits. Rather than a tongue and groove approach it butt joins to a lip on the fuselage. A test fit of that and it looked good too. So it was time to break out the glue and get started. I departed slightly from the instructions opting to get the wings well underway before detailing the cockpit and closing up the fuselage. The main undercarriage bays go together with 6 parts that fit neatly. Too easy. They are nicely detailed and lend themselves to much more if you wanted to go further. These were then added to a recess on the inside of the underside half of each wing before gluing the top and bottom wing surfaces together. A nice and accurate fit with a minimal amount of clean up required. IMG_0172 IMG_0175 I tested the wings again to the fuselage for fit and it looks like it will be a nice and close and with a bit of luck either no or just a limited amount of filler. Next was the intakes. Each intake is comprised of two sides, a ring and intake bullet moulded together with compressor blades. These go together easily with a minimum of clean up required. These were then put into position. This required a little fettling to eliminate the need for filler. About 5 minutes each and I was done. Much easier than my recent MPM Meteor Mk8! IMG_0182 IMG_0183 The exhausts which come in two major parts/assemblies require a little trimming of the cavity they fit in at the rear of the wing. A little fettling here goes a long way for snug fit. A little filler was required to get the right result. IMG_0181 The kit doesn't come with wing tip lights so I've elected to cut these out and will add some clear sprue and I'll fashion my own. IMG_0184 So far I am liking this kit - a lot. More to come... AGW..
- 35 replies
-
- 19
-