


Angus Tura
-
Posts
826 -
Joined
-
Last visited
Content Type
Events
Profiles
Forums
Media Demo
Posts posted by Angus Tura
-
-
So, start-time. Here is my set-up.

In the kitchen. Angle-poise, magnifier, loupes-for-painting-1/72-eyes, lap-top for grand-prix, charity-shield and demonstration of pineapple end result.
Alan
-
Beggsy,
I was going to say:
19 hours ago, Beggsy said:This thing looks small, so it should take less time......right......?
You poor, innocent, child!
But that is incredible progress. Fantastic build also.
Alan
-
 1
1
-
-
I'll watch this. I have a copy of the OKB Grigorov Chaffee on order but waiting for its photo-etch: apparently the OKB Grigorov photo-etch wallah is AWOL! If it arrives soon enough it may be in the Vietnam GB.
This Matchbox version looks a lot more manageable!
Alan
-
 1
1
-
-
Thanks chaps.
Manana
Alan
-
Having posted that, I just saw the Scottish option which I would definitely go for...but which undermines two of my reasons (work and family) to want to do this figure,
but is it OK?
Alan
-
Hi,
I hate to miss a blitzbuild but am having problems this weekend: wife and daughter away, so childcare to the fore; work that needs to be done; other group builds!
I'd like to enter a bust-style figure, in 1/72 scale, painted in enamels and oils, which I think would be fair enough, albeit odd. However, the figure is really part of the T-34 groupbuild:
Is this OK?
Alan
-
5
-
-
Hello.
I'd like to add this Australian Centurion. I ordered it from the Ukraine when I couldn't find one in the UK and hoped it would arrive by the first day of the GB: I'm a chronic non-finisher.
It arrived today in a broken down sort of way,
but reconstructed, it looks quite presentable.
I do like the customer service additions. Why don't Hannants send sweets with their orders?
Here are the bits. There are an awful lot of them.
The molding is pretty good but there are some sink marks and quite a lot of clean up of mold lines to do. The sprue to the right isn't on the parts-map. It and the little sprue beside it are the specific additions for the long range and Vietnam RAAC versions.
I'm glad to have it at the start of the GB and not half way through and am really looking forward to this. I've got a couple of things to get finished before starting this.
See you soon,
Alan
-
11
-
-
Nick,
This is fantastic. Congratulations on your build.
Alan
-
1
-
-
Another GB DNF. As Windsor Davies would say: "Oh Dear, how sad, never mind"
Doing the OOTB detailing has taken me a lot longer than I thought.
The muzzle brake comes with a weird moulding issue on the right only where the inner layer of the mold seems to have sat one or two off for the muzzle break only, while the barrel seems pretty well moulded:
I've wedged a bit of sprue into the defect in the back hole of the muzzle brake, and stuck a bit of tube in the end and after much careful carving and scraping it's quite presentable:
The periscopes are not very detailed and I've carved them out so as to be able to paint them better and put some mirror decals in them. Here's two of them carved out and one of them not:
The exhausts too are a bit solid. Here's one carved out and one not:
The fuel tanks on the engine decking are devoid of detail except for their filler-caps. The photos I have of these in Berlin 7/9/45 show them to be devoid of detail except on their ends. Here is some detail going on:
The right hand one has two disks of masking tape added and then Mr.Surfacer 500 blobbed on. The second right has been sanded flat. The second left has had its masking tape discs removed and the left one is half way through absent-minded-oversanding-repairs(!) I'm going to make some handles for the ends out of magic-sculp.
The cast-texture on the turret and glacis I've done with Mr.Surfacer 500:
I was surprised how long this took. I could only do little bits at a time to stop it looking too patchy. It is a pretty nice way to fill joints and to blend in the new right turret front.
So my state of play now is this:
I'm sorry I didn't get there. I have enjoyed the build so far a lot. I have an ongoing T-34 in the T-34 GB and I'm planning to paint it and the IS-3 together. I'm also looking forward to dealing with the tracks.
Here is a good, eco-friendly, solution to the problem of the dreaded end-opening model box. The top is also a good place to practise one's cast turret Mr.Surfacer technique (above)!
I hope it's OK to keep posting here till its done?
Alan
-
2
-
-
Evening all.
On 7/5/2020 at 6:47 PM, Jinxman said:They look really good - can't wait to see some colour on 'em.
Well, here you go, but only a bit. I've undercoated the reeds and started painting in the eyes:
but there is no way I can get these finished in a week and, in truth, this is a deliberate decision. The good book, above, and, I think, the articles in Military Modelling c.1976 would both say that these are not the best flats to start on because they have so much in the way of flesh tones to paint. I also badly don't want to mess these up because they are essentially irreplaceable, not to mention expensive.
So, I'm putting them in KUTA and am going to practice a bit on these soviet WWII soldiers:
These chaps have wide expanses of plain colour which they tell me is a lot more suitable for practicing painting. They are still in production and come in at about 3 euros a throw. I don't expect they'll be any easier of clean-up!
Alan
-
3
-
-
Bjorn.
I like this a lot.
I have one in the stash but also an older resin one (I'm not sure of the maker, maybe Mister-X,) which I picked up at a show when the world was young. The resin one has etched spoked wheels as I recall. I think the F-13 wheels look the part. There is also the WD models Lanchester (http://www.wdmodels.com/page6.html) which has wheels that would suit: but that would likely be a pretty expensive fix.
I'm interested too in your ply-plastic technique with the mudguards. I've tried that before but always ended up with something between molten-blob and corrugated-iron! What glue have you used to laminate?
I'm looking forward to watching your build,
Alan
-
1
-
-
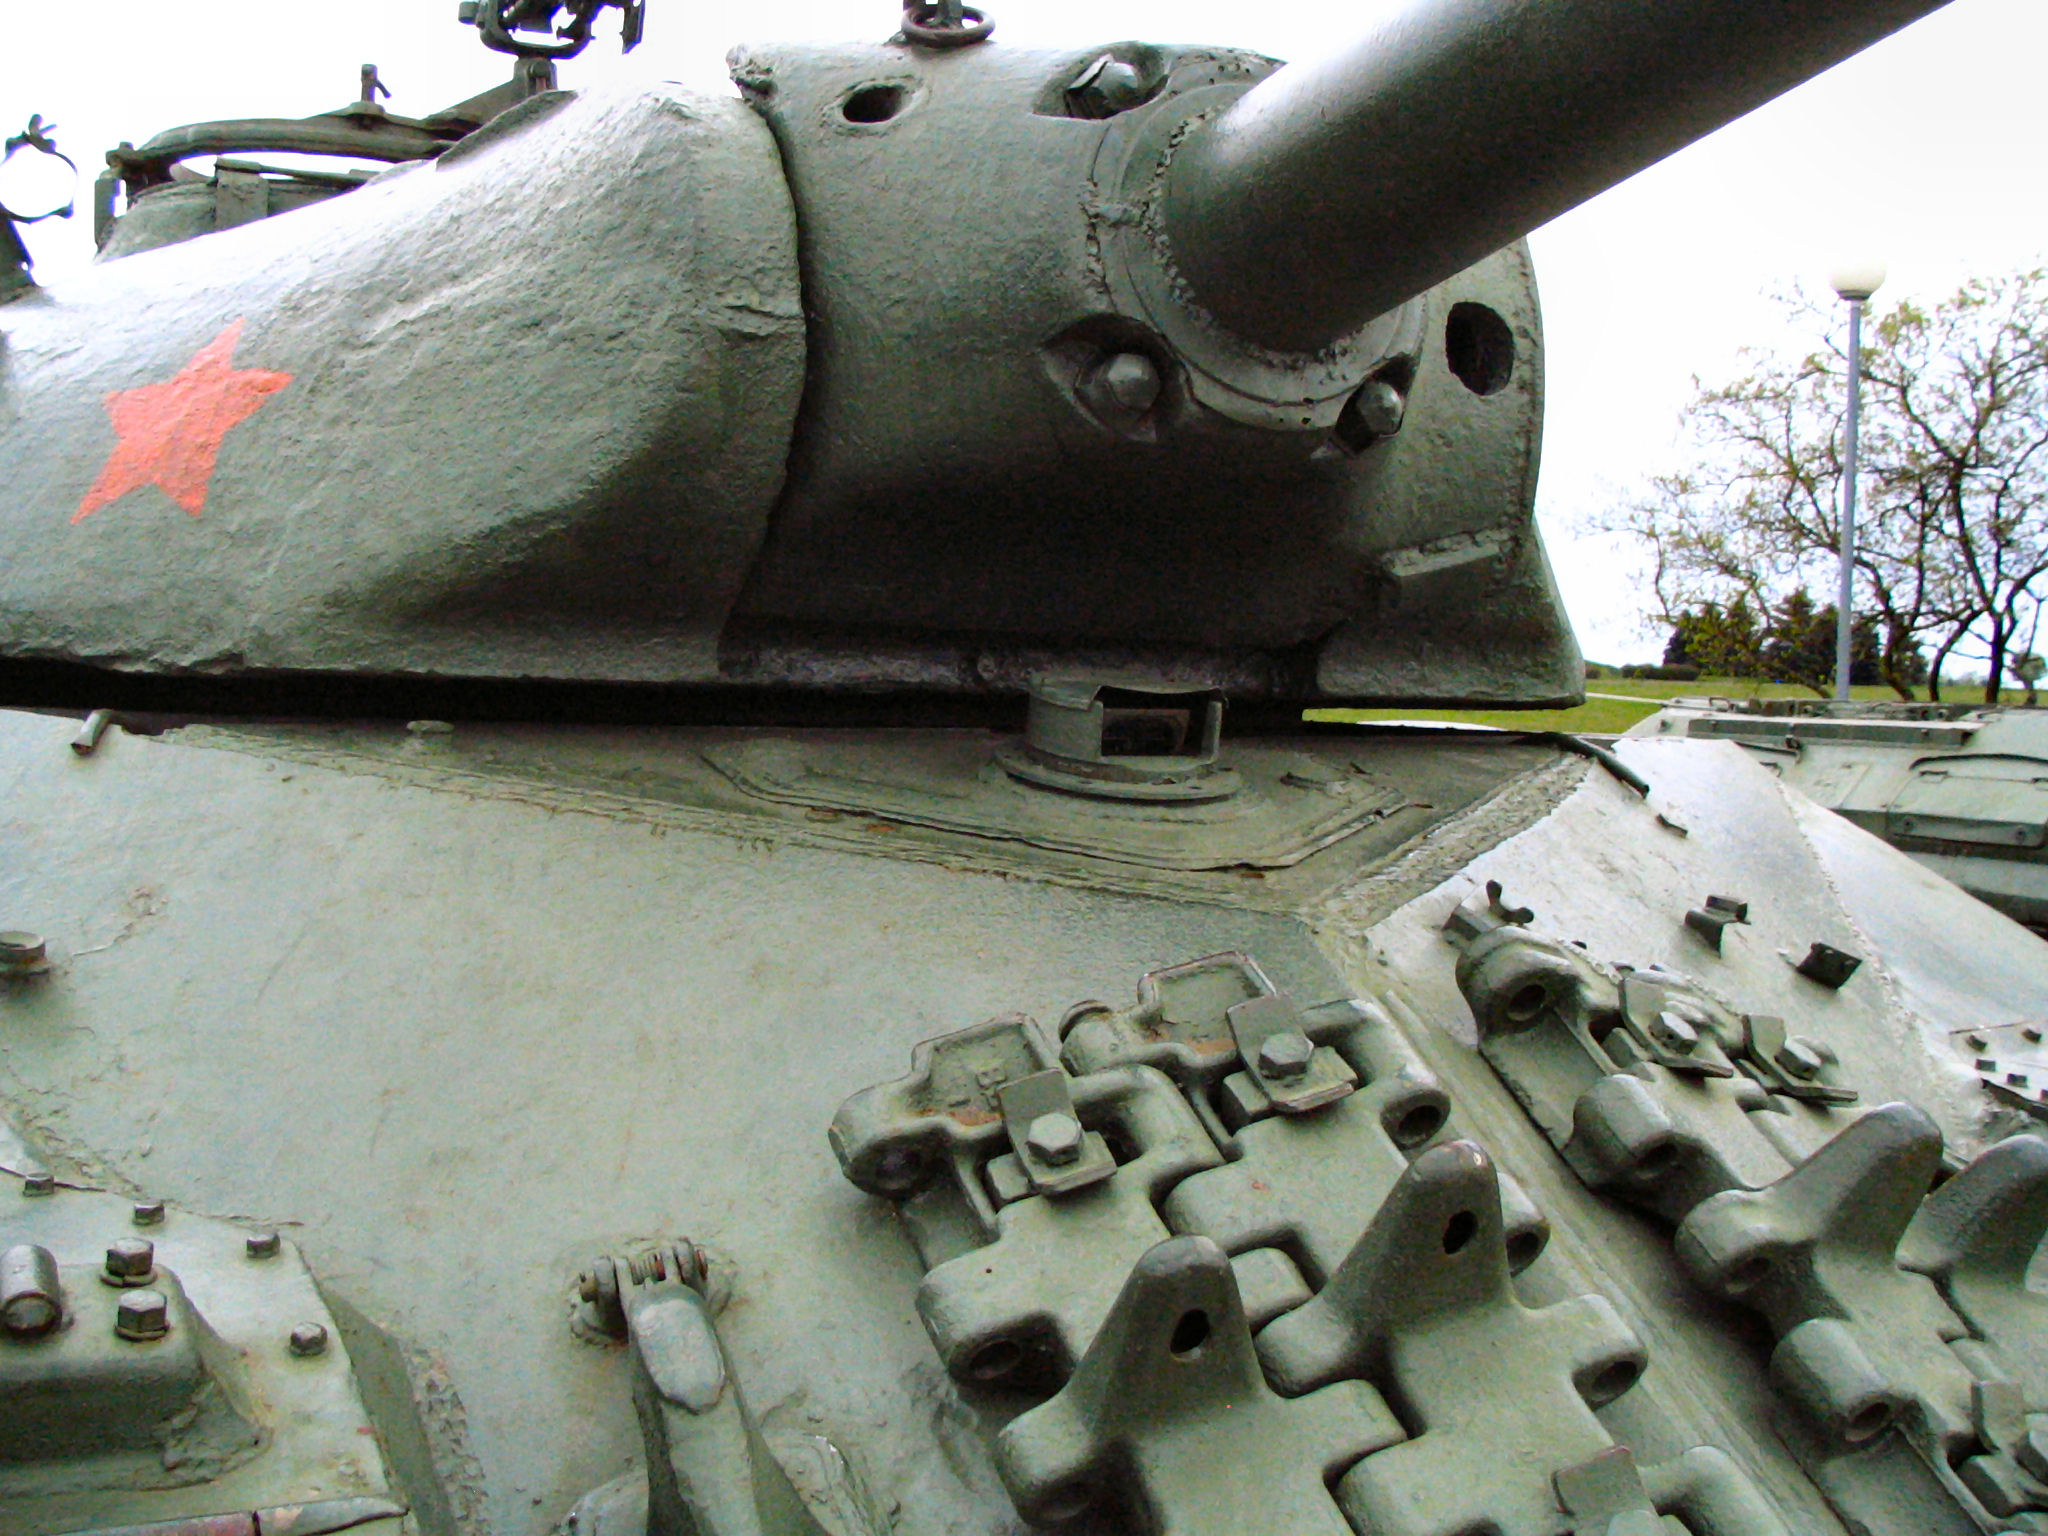
Hi. This is an up date on the fixes needed to this IS-3.
The bow plate fit problem was a bit of a production, frankly.
I sawed the top of the bow plate off the bottom of the glacis
and glued it to the top of the bow plate
and extended the width with some scraps of the kit plastic and filled the step with multiple layers of Mr.Surfacer 500. I should have used magic-sculp but was concerned that it might not stick well enough.
The photos of these tanks in Berlin 1945 show that they didn't have track links on their glacis, hence the filled holes on the glacis. I just had to look up the plural of glacis and apparently it's glacis! The sanded-down end result is pretty cool:
and all of this travail lets me have separate top and bottom of hull to paint:
The fix for the lack of trunnions was easy. The top trunnions are present although they don't have any positive locators for the cannon. I've trued it all up to the mantlet and the barrel, and then blobs of "proper" cement and a couple of reinforcing sprue numbers have done it.
The grab handles have just had a new hole each drilled out and the old one filled with Mr.Surfacer.
The fix for the fit of the mantle was the trickiest, but also the best!
The mantlet has been covered in clingfilm and taped on and then the front of the turret reshaped roughly with magic-sculp. The clingfilm stops the magic-sculp sticking to the mantlet and when the magic-sculp is dry its pretty easy to carve and sand it to the right shape based on walkaround pictures.
There should be a large bolts in each of the four depressions in the front of the mantlet. I haven't figured out how to put them on without breaking IPMS SK rules.
So, this is my current state of play:
Thanks for looking.
Alan
-
2
-
-
Another irritation!
The mantlet protrudes too far from the turret on the right side of the tank. There is a very good walkaround on-line (http://data4.primeportal.net/tanks/carrey/is-3/images/is-3_006_of_106.jpg) where it's clear that the problem is that the turret is too short on that side. It should come as far forward as the additional bit of the mantlet on the left side.
I'm going off the kit a bit, but I do love the subject.
Alan
-
1
-
-
Did I say this was a top kit? I have cooled towards it a little. I thought, having prepped the wheels up that I could just build it and paint it...
There are three problems.
The first, I knew about having read on-line reviews.
The holes for the grab handles around the turret are too far apart to fit the very carefully-cleaned-up grab handles.
The second is a peculiarity of the particular kit I bought:
The trunnions to hold the main gun have been broken off. I think this must have happened at Roden's end. The trunnions weren't floating about in the bag of parts and it hadn't been opened before I opened it.
The third is only really a problem because I want to paint the hull top and bottom separately so that I can paint the top run of the tracks when they're on:
There shouldn't be a step between the glacis plate and the front plate. The top of the front plate is molded with the glacis and its not wide enough.
All fixable but irritating, and eroding Zinnfiguren painting time!
Alan
-
1
-
-
That's easy for you to say!
I have one of these in my stash and I do like the result you've got from it. Pure dead brilliant, big man!
Alan
-
1
-
-
Craig,
Affa affa fine.
I was not going to join in with this GB thinking I've got too many on the go already. But I'm a bit homesick having read this thread and I'm going to have to have a go at a Drem Hurricane,
Thanks for the Caledonian inspration,
Alan
-
1
-
-
Hi. A little update, largely because I'm enjoying this kit so much:
The thing I like best about it, I think, is the separate bottoms for the side parts of the hull over the tracks. One of them is held on here with blu-tack and tape. The previous 1/72 tanks I've made have all had this part molded onto the tops of the lower hull sides so, if one wants to paint the top run of the tracks, one has to cut these free to add them to the upper hull so that they're not in the way. I've put the sprockets together using the tracks as a former. The domed hubs on the sprockets are separate parts and the sprue gates meet up with them where they are recessed into the sprocket. Getting them on was a bit of a trial. The road wheels and the return rollers are all cleaned up and reduced to one connection to the sprues so that I can paint them on the sprues. the last connection to the sprue can be where they contact the tracks.
Just a top kit!
Alan
-
2
-
-
Hello.
Here is a late entry. I hope it will fit the rules.
The IS-3 was introduced in 1945 and while it only might have seen service in Europe by 8/5/45, it was certainly in service in Manchuria before 15/8/45.
I was planning to build it as it appeared at a victory parade in Berlin on 7/9/45 but as it seems to have been unmarked and unweathered, I would hope that can be OK too.
I was planning to build it entirely OOTB including the vinyl tracks. I have some new (to me) glue which will stick the vinyl I understand, and some plastic primer which, according to polythene plastic figure sites, should let me paint the tracks with acrylics.
Alan
-
5
-
-
Very good. That's a lot of stuff! Great result, however,
Alan
-
Sean,
This looks great. I've seen a number of these painted and they've all been uniformly black and gold. I do like your colours. They're just muted enough not to be garish, while remaining colourful. Lovely.
What are you painting with?
Alan
-
Hello again, finally.
After evening upon evening of clean-up I got these to this stage:
Huntin',
and Fishin',
To degrease them and, I hoped, get the last bits of old paint off, I tried this:
This is my wife's ultrasound jewellery cleaner. I fairly nearly washed my wife's engagement ring down the sink when she gave it a quick blast after the Zinnfiguren. I loaded it up with considerable trepidation but it seems to work pretty well. It makes my wife's jewellery sparkle but, weirdly took the shine off the Zinnfiguren. It makes them look as if they've been anodised.
Before:
After:
And here they are primed:
The good book above and, I'm pretty sure, Military Modelling c.1976 both suggest Humbrol H34 to prime them but I thought it would be a bit stark for comparing shades and colours. So, I've primed with Tamiya Fine Grey.
More tales from the riverbank for all you Paul Weller fans shortly, I hope.
Alan
-
7
-
-
Hi,
I'm surprised that there aren't many more entries here. I'd like to add this:
This is the Revell 1/72 T-34/85. The CMK figures include one leaning on a T-34 hatch, as you can see. The decals include a tank with some white stripes on the turret which will add a bit more vim.
Here is an unstarted picture. I had thought about the Hauler etch detail set but it doesn't seem to add much. I had thought too about an Aber gun barrel but am just going to go for an OOTB build. I understand from online reviews that the tracks are a bit short. So I hope OOTB will be out-of-the-box, and not out-of-two-boxes.
Alan
-
5
-
-
Yep. I get you.
Alan
-
1
-
-
Dennis,
I'm on for this. Please sign me up. There's a large stash of unbuilt 1/72 scale British armour from which to pick!
Are you sure it shouldn't be two GBs? Pre-1945 and Post-1945. Maybe that would be too ambitious vote-wise.
Alan
-
1
-


)
Soviet Tankman (Bit-build Blitz-build?)
in Blitzbuild Pt 2
Posted
Oy, oy, oy!
There are a couple of gaps between the figure and the cupola of my T-34 which need to be dealt with and which are going to take a little time!
They're tiny gaps, but then he's a tiny bloke.
I've assembled the cupola and hatch so that I can fill these in such a way that he'll fit,
and will stop the clock there at 2.21.
Now make the tea.
Alan