

Rangi01
-
Posts
63 -
Joined
-
Last visited
Content Type
Events
Profiles
Forums
Media Demo
Everything posted by Rangi01
-
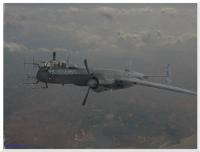
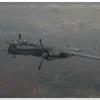
Hi All, This is my rendition of Italeri's Do 217 N-1 to go with my current build theme of Nachtjagers. I completed it late last year but only just now managed to find time to take some pictures. She is built OOB and in the markings supplied. It is an old kit with raised panel lines but I enjoyed the build. I must say I was never a fan of the Dorniers, always felt they looked too clunky but after building this kit the shape has really grown on me. She is finished in Italeri Acrylics and kit decals with after market swastikas. Hope that you enjoy. Thanks for looking. Shane
-
Hi Grover, That is a really cool little airplane and it really does resemble a scaled down Do 17z (but prettier) Nice work on such a small kit. Shane
-
 Hi Colin, Ignore the troll. I am certainly no expert on photography and have at most times struggled to take nice photos. Apart from the excellent advice from the others I can add that the best shots I have gotten are the ones that I took outside in natural light. However if you are doing this please be careful that if there is even the slightest wind you make sure that the background paper is well secured and that nothing can blow onto your model, I have had some very close calls. Anyway keep up the good work and I look forward to seeing some great shots of the Vampire. Shane
 -
Very nice mottling Sean, impressively done with a brush. Might I make a suggestion though. It looks a little odd with with a 'high tide' line just below the upper camouflage line. Maybe a thin strip of masking tape to protect the upper colours and bring your mottling right up the line. To help remove small parts, as Cedb said a nano saw is ideal. I bought a whole set from Aliexpress in China for less than 10 Euro and they are excellent. If you want to know more I can send you a link through. Keep up the excellent modelling. Shane
-
Hi All, I am very much a novice at airbrushing and learning has been a very steep curve for me. I am very pleased that I started on Tamiya Acrylics as they were/are very forgiving and meant that, for me, very little frustration with clogging and tip drying etc so that I could concentrate on technique. However, moving on, I find Tamiya's range of colours limiting, particularly when it comes to the RLM colours, so finding the Italeri Acrylic Luftwaffe set I was over the moon. After purchasing them my joy soon turned to frustration. I could not get them to airbrush nicely, constantly clogging and spitting, a real disaster! So I researched on the net and low and behold, from the little I found, I was really messing up using alcohol as a thinner (assuming it was the same as the Tamiya paint). So here is what I have learnt over what has been a number of months of pure frustration. 1. Never use alcohol to thin or clean your airbrush (if you clean it with alcohol make sure it is perfectly clean of any alcohol residue, even the smallest trace will cause your tip to block) 2. Some people say that they use windex or other window cleaner to thin the paint. I cannot say that I have had any luck with it and the tip either clogs or the paint dries on it. 3. Use distilled water to thin and clean your airbrush. As I mentioned the slightest contaminant will cause issues. (but you can use them without thinning. It looks really thick but seems to airbrush fine) 4. While not as forgiving as the alcohol based acrylics (and I would recommend absolute beginners to start with the likes of the Tamiya offerings because of this) once mastered they airbrush very nicely with next to no odour and very little aerosoling making them ideal for the home hobbyist. 5. They are not as robust as enamel or alcohol based paints so a good coat of varnish is a must before too much handling. Thanks for taking the time to read this and, of course, this is what worked for me. I hope that this can help others out there that may be struggling with these paints and cannot figure out why. Although I have never used Vallejo paints, I understand they are the same as the Italeri so the above should work equally well with them. Once again thanks for looking and any comments or tips are greatly appreciated. Shane
-
Thanks Duncan, I didn't fit the aerials because they are way too thick and, I feel, would distract from the rest of the model. I am planning on using some thin wire in the place of the kit ones, but I already have spent a lot of time on this one so I'm calling it finished for the moment. Hope you are enjoying the build of your one. regards Shane
-
Hi All, Here is my attempt at the very good Eduard Bf 110 G-4 Weekend Edition as part of my Nachtjager builds. Kit: Eduard Messerschmitt Bf 110 G-4 Weekend Edition (7422) Scale: 1/72 Finished as: flown by Hptm. A. Breves, Ofhr. W. Telsnig, Uffz. A. Ofers, Stab II./NJG1, Düsseldorf AB, Germany, December 1944 Aftermarket accessories: none Decals: Kit supplied While far from an easy kit with a lot of fine, well moulded parts this was very enjoyable to build. The only issues I had was with the trailing edge which formed a step (more than likely my fault), the decals which seemed to not want to slide when using decal solution however worked brilliantly with just water, although a lot of stencils are provided there is no placement sheet and although Eduard allow you to download the instructions for their aftermarket stencils, these are for the 'C' model and the reference numbers do not align. Also there are no positive attachment points for the likes of the radar array and aerials, they are simply glued to the surface. With only the one marking option as per the Weekend Editions I went with it as an overall RLM76 which, initially, I felt would be boring but actually looks really good and fits well with my other builds. Hope you enjoy. Thanks for looking. Shane
-
Like it! Like it a lot! Very nice conversion, well done. Shane
-
Three Heller oldies: Amiot 143, Breguet 693 & Bloch 174
Rangi01 replied to JWM's topic in Ready for Inspection - Aircraft
Well done Jerzy, a 40 year old model in such great condition and built so well to start with, Love it!! And the other two are just as exceptional. Thank you for sharing these with us. Shane- 44 replies
-
- 1
-

-
- Bloch 174
- Breguet 693
- (and 1 more)
-
1:72 Hobby Boss MiG-15UTI Indonesia
Rangi01 replied to Ryan Hothersall's topic in Ready for Inspection - Aircraft
Nice -
Thanks guys. Yeah sometimes I think my cheapy airbrush works just as well my more expensive one. I think the result is more down to the Tamiya Acrylics, I find that they work great. Currently I am using AK acylics and I just don't seem to have any luck with them, constantly clogging and spitting and don't even talk to me about Italeri acrylics, they went in the bin a while ago
-
Thank you gentlemen, It is truly a lovely little kit to build and well recommended to anybody. Cheers from the land of the long white cloud. Shane
-
Great looking Nachtjager, it is a very nice easy kit to build. Thanks for sharing. Shane
-
My final BoB Italian aircraft build, Italeri's very fine Fiat CR-42. I added stretched spue rigging and control wires to scratch built control horns above and below the wings. I used a mix of kit decals and home printed ones. I really enjoyed building this tiny kit. Hope that you like it. Again, thanks for looking. Shane
- 11 replies
-
- 18
-
-
Another earlier BoB build. The very basic MPC Fiat G50. The kit had a lot of issues with it, the worst being that the engine cowl, if fitted as supplied, sits with a horrible upward angle. It took a lot of fiddling, cutting, filing and general fettling to get it to sit right. I chose to pose it 'in flight' and used the kit decals that actually were very nice. Painted again with Tamiya acrylics and a chinese no brand airbrush. Hope that you enjoy. Thanks for looking Shane
-
Hi All, Inspired by JWM's builds I thought that I would post some of my completed Italian aircraft. The first being Italeri's fine old Fiat BR-20 and a build I thoroughly enjoyed. Painted with Tamiya acrylics and a very cheap chinese no brand airbrush. Finished in the colours of one of the aircraft that flew in the Battle of Britain. Decals are kit supplied with the 'Pluto' dog being self printed. Unfortunately I got some silvering on some of the kit decals. Please enjoy. And a shot with all three Italian types that took part in the BoB. Thanks for looking Shane
- 10 replies
-
- 20
-
-
Very nice and a tricky camoflage well executed. Did you brush paint it or airbrush? I found it a lovely model to build except the 2 piece, clear, nose, how did you go with the join line? Thanks for sharing, it is a fine model of a nice aeroplane. Shane
- 17 replies
-
- 1
-
-
- Fiat BR 20
- Regia Aeronautica
- (and 1 more)
-
I have to agree with the other comments, a very nice build there. If I could offer some suggestions from a, very much, amateur. If you want to reduce the sharp demarcation between the colours you could mist over a very highly thinned mix of the brown, that would blend everything in and could be done over the decals as well. I also like to use paper as the masking agent rather than frisket or masking tape that way it makes a softer change in colour which I find is pretty much bang on for 1/72. Definately not any critism of you build, it is lovely and I thank you for sharing. Shane
-
1/72 Eduard Messerschmitt Bf 110C
Rangi01 replied to Seamus's topic in Ready for Inspection - Aircraft
Nice builds there, but a bit of an uneven fight, better get a start on the Gladiator to give the Spit a hand -
Very nice, she looks very fine in detail. Well done.
-
Thanks for all the (mostly) positive comments guys, appreciate it. Using a pencil (Sorry Reserve_22 I don't know the type of pencil as it has no markings on it and I bought it a long time ago, but it is a fairly soft, dark one if that helps) was very much an experiment trying to replicate the way the painters applied the squiggles in real life (however in the negative as it is the lighter colour that was painted as a the squiggle). At normal viewing distances it looks realistic, but closer up you can see it is simply drawn on so the technique still needs a bit of work. I have a Uhu that will more than likely have the squiggle scheme and I will see if I can improve upon this. Thanks again for looking and the comments. Shane
-
Blackburn Roc, rescued from shelf of dooooooom
Rangi01 replied to Fishbed's topic in Ready for Inspection - Aircraft
Very nice, just a quick question, what are those 'things' under the wings, they look like bomb racks? Thanks for sharing Shane -
Hi All, This is the first of my multi seat/engined Nachtjagers of the late war. Kit: Revell Me 262 B-1a/U1 (04179) Scale: 1/72 Finished as: Me 262 B-1a/U1 “Red 12” as per the box art belonging to 10./NJG11, no WrNr 111980 Aftermarket accessories: none Decals: Kit supplied with after market swastika Extras: Scratchbuilt Naxos radar aerials. Paints: Interior/exterior. AK Interactive acrylic Luftwaffe set and Tyre black. Upper surfaces RLM 76 base with pencil 'sqiggles', wings RLM 70, lower surface Tyre Black. various detail painting with Tamiya acrylics, oil wash, Future gloss coat and Tamiya acrylic matt varnish. Overall the kit is well detailed with no need to add any extras, even if you were to pose the canopy open, the cockpit is well done. Radar aerials were well overscale so I replaced them with fine electrical wire. Decals went down very nicely, I used Micro Set and Sol to help but do not think it was needed. There are a good amount of stencils which add the finishing touches. With the camouflage I decided that the upper wings and tailplane would have been solid rather than the splinter pattern in the instructions. I based this on 'Red 8' which is in South Africa. I kept weathering to a bare minimum because these machines had very little use before surrendering. Overall a very nice kit and well recommended. In full sun Thanks for looking and hope that you enjoy it. Shane
- 12 replies
-
- 15
-
-
Very nice idea and well executed. Your pictures don't show but did you continue the boat hull through to the underside of the water surface?
-
Hi All, This is my latest and last of the single seat/engined Nachtjagers of the late war. Kit: Airfix Bf 109 G-6 (A02029) Scale: 1/72 Finished as: Bf 109 G-6n-r1-r3 Radar equipped Nachtjager (Telefunken FuG 350 "Naxos Z") This aircraft probably belonging to NJG300 no WrNr Aftermarket accessories: Squadron vac formed canopy Extras: Scratchbuilt Cockpit, underwing canon gondolas and barrels, Naxos Z housing and perspex dome behind the cockpit, headrest armour and dropped flaps. Paints: Interior/exterior. AK Interactive acrylic Luftwaffe set and Tyre black. Upper surfaces RLM 76 base with RLM 74 'sqiggles', lower surface Tyre Black. various detail painting with Tamiya acrylics, oil wash, Future gloss coat and Tamiya acrylic matt varnish. Please excuse the pictures, they were taken on my phone in a rush before heading to work And the last shot of all 3 Nachtjagers together. Next is on to the multi engined/crewed aircraft starting with the Me262 B1a/U1. Thanks for looking and any comments always welcomed
- 10 replies
-
- 20
-