

Rangi01
-
Posts
63 -
Joined
-
Last visited
Content Type
Events
Profiles
Forums
Media Demo
Everything posted by Rangi01
-
Mig-29K (prototype) Academy 1/144
Rangi01 replied to basaez.bruno's topic in Ready for Inspection - Aircraft
That came out nice as I know the Academy kit is not the best. Did you do anything with the nose as it looks a lot better than to kit one. I had to add a 6mm plug to get it to look right on my one. Is the armament scratch built because it looks great! Are you planning on doing anymore of these small Academy kits, they can be a challenge to get looking right but for me that's the fun part!! All the best, Shane -
Nice clean build Hadzi
-
I really like that, what a great looking aeroplane and a nicely finished model.
-
Hey Paul, Really nice job you have done there on the Mystere, thank you for sharing. Shane
-
MPM Focke Wulf Fw-189A-1 (1/72)
Rangi01 replied to Rangi01's topic in Ready for Inspection - Aircraft
Thanks Garry, Reini and eng, for some crazy reason I like these mottled schemes. Wyverns, Duncan, Andy and Polo, thank you for your comments, I really appreciate all you guys taking the time to look and comment. Cheers Shane -
Hey Hadzi, Well done on the Defiant. Bummer about the silvering but it does little to detract from a really nice looking model, I especially like the pose of the guns. Well done and well worth the wait. Shane
-
Hi All, A long time in the making, she fought me along the way, and, I ended up putting her to one side and finishing something. But she is now 'over the line' and, while my modelling skills weren't up to the challenge, I am happy she is finished. The last in my Nachtjager series I'm keen to do something more colourful I based the camouflage on the first picture and the kit instructions. It looks to me as if the light coloured 'splotches' (wonder what the German is for that!) were applied in the field so I painted the basic splinter camo, applied the decals and then sprayed the splotches, hope it looks all right. Complete OOB and while I would like to say it was a pleasure to build, I can't. Perhaps I'm a bit jaded after 7 odd German Nightfighters Thanks for looking and sorry about the photos, best I can do I'm afraid. Cheers, Shane
- 8 replies
-
- 19
-

-
- 72
- nightfighter
- (and 1 more)
-
Thanks guys, appreciate your comments. Airfix have really come a long way in their engineering and the kit goes together very well as those who have built her can testify. Little things like how the wing attaches means no visible join line and the turret that can be popped in at the end of the build make it a real pleasure. This is the first of the new tools I have built and I hope that the rest are just as good. Being a name sake I really wanted this to come out well and I am pretty happy with it. Thanks for looking.
-
Hello All, I would like to share with you my rendition of Airfix's excellent new tool Defiant (and a couple of pictures of their not so good old tool Defiant!!) I had a lot of fun with this build as it goes together so easy, I have another in the stash that will be done as a Night Fighter. Built OOB except for tape and wire seatbelts and wingtip navigation lights and done in the kit markings. Decals are nice but a little stiff, I found that they would not conform to the panel lines even with a good dose of Micro Sol, I ended up using a toothpick to help them settle in. Paints are (my favourite) Tamiya Acrylics with a light oil wash on the top to modulate the colour and a preshade on the bottom. I kept the weathering to a minimum. Also are some pictures of it's older brother that I made a number of years ago with a lot of modifications (Tail enlarged, new chin intake, altered ailerons etc etc) as a comparison. Sorry about the very average photos. Thanks for looking and I hope that you enjoy. From the land of the long white cloud Shane.
-
1/72 Matchbox F9F-5 Capt. Ted Williams
Rangi01 replied to Plumbum's topic in Ready for Inspection - Aircraft
Love the Panther, looks especially nice quite clean with no stores. Thanks for sharing Shane -
I have just come across this post and it is very do able even with light squiggles on dark. This is my rendition of the He 219 http://www.britmodeller.com/forums/index.php?/topic/234998754-dragon-he-219/and the squiggles were done with well thinned Italeri Acrylics and a (cheap) long bristled brush. Long bristles are important as they hold a reservoir of paint that means you can do a long stroke without having to recharge the brush lots. I did spend a lot of time practising before committing paint to plastic. Hope that this helps.
-
Valom Sopwith Pup 1/144 Rigged and finished
Rangi01 replied to Alan Sannazzaro's topic in Ready for Inspection - Aircraft
Oh I see what you did there Alan, nice job on the oversize tins of paint, just can't figure out how you got a BIG hand! Seriously, awesome little Pup there, I am sure you must have been cross-eyed at the end of your 3 hour session. Shane -
AND fly into a formation of B17's & B24's firing a couple of 30mm cannon. Just watched an Aerocinema Doco which spoke about the BV 40 and apparently only 6 were built and were to be towed up with Bf 109's until above the bomber formations where they would release and dive down through the formations then 'glide' back to the airfield. It says that the Me163 was thought to be a better solution so it went no further. Shane
-
Mistercraft/SMER Su-17M4R - VVS 1/72
Rangi01 replied to RidgeRunner's topic in Ready for Inspection - Aircraft
Like it, well done! Shane -
Airfix Canberra E15, 98 Squadron 1974
Rangi01 replied to RussG's topic in Ready for Inspection - Aircraft
That brings back some wonderful memories, built one as a boy but I am sure it looked nowhere as nice as yours Russ. Great finish and looks great in an 'in flight' pose. Thanks for sharing. Shane -
Thanks guys for your kind words. Reini and Alistair, I spent a lot of time thinking about how to do this and tried a number of techniques out on my poor old test model. My initial thoughts were to try and mask it with blutak or string but neither worked out at all. I nearly gave up but really wanted to do her in wellenmuster (squiggle) camo. I had recently bought a cheap brush with long bristles (almost like a pinstriping brush) and, after a lot of practice, was able to reasonably quickly apply the squiggles. The trick I found was to thin the paint to airbrush consistency, load the brush the touch it on a piece of paper to remove the excess then apply. With the long bristles it holds a lot of paint and allows for long strokes and nice curves. My initial plan was to use oil paints because of the longer drying time but ended up using Italeri Acrylics and, I almost forgot to mention, this was applied over a gloss varnish. Sorry to waffle on but hope that this explains the way I did it. Thanks Joachim, really appreciate your kind words. The radar array from the kit is an etched thing of beauty and the easiest to fit out of all the Nachtjagers I have done. I was concerned it would look 2d but because it is so fine it looks just right in 1/72. My first real go at 'photoshopping' and yeah that second one does look like my son cut it out with a pair of scissors and pasted it on to the background :banghead:Might have another go if I find time. Thanks again guys. Shane
-
That is nice, I assume that this is the new tooling? Looks a lot better than the old Airfix Beaufighter. You have made a very nice job of her, nice paint and not overly weathered. Shane
-
With the appropriate background she would be very convincing. Well done I like it very much. Shane
-
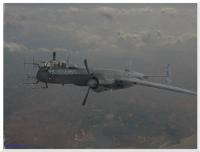
Hi All, Please find below my interpretation of Dragon's He 219. I chose to complete her 'in flight' as I love the shape of this aircraft. Completed oob with the exception of airfix aircrew. I based the scheme loosely on the one at NASM (http://www.warbirdsnews.com/uncategorized/nasms-heinkel-he-219-restoration-update.html) and some images from the internet. Weathering was kept to a minimum as they were still very new when the war ended. Paints are all Italeri Acrylics. Hope that you enjoy. And with a little photoshop (actually GIMP) magic.... Thanks for looking Shane
-
Very nice and like most good designs, very little change to the production machine eh. Shane
-
Hi All, Another in my Nachtjager theme of builds, this one I completed earlier this year and it is my interpretation of Hasegawa's excellent 1/72 Ju 88 G-6. Once again built nearly completely out of the box with kit markings, I only scratch built the radar array but I'm still not happy as it is still way too heavy and added foil seatbelts. Painted with Italeri Acrylics. Hope that you enjoy. Thanks for looking. Shane
-
Airfix 1/48 Messerschmitt BF-109 E3
Rangi01 replied to Filipe Fonseca's topic in Ready for Inspection - Aircraft
Lovely, what a great tribute to the 109. I like it very much Filipe. Shane -
Hey I'm at work so not much else to do Yeah I built the BR 20 a while ago in the Battle of Britain colours and you are right, I think I went cross-eyed doing the camo but it's a real nice little kit and well worth building Shane
-
Yeah and this was a simple one!?! Stuffed it up in a couple of places as I used a bit much flow improver and it should have extended to below the wings on the fuse and nacelles. Thanks Pat and when you consider that these still had the bombing capability meaning that not only did they have to carry the radar and not too inconsiderable armament but also the heavy bomb door opening and closing mechanism it's a wonder that they could catch up to even the slowest bomber let alone bring it down! Perhaps we should be thankful for that. The stand is actually from the Italeri BR-20. Thanks for looking. Shane
-
1/72 Mosquito FB MkVI "In Flight"
Rangi01 replied to sunray's topic in Ready for Inspection - Aircraft
Nice, I really like the way you have done the stand. I have done similar but with acrylic rod, yours looks so much nicer. And of course the Mossie is very nice and you have caught the clean lines beautifully. Shane