

DreadZombie
-
Posts
31 -
Joined
-
Last visited
Content Type
Events
Profiles
Forums
Media Demo
Everything posted by DreadZombie
-
It is, yes. Thank you, no idea why I didn't think of that.
-
Hi all, Just starting work on my first 1/35 scale model, a relatively old kit for a BM-13 Katyusha by Alan, it'll also be my first kit painted with an airbrush so that's quite exciting too. I was just wondering, does anyone have any good pictures of the engine? I'm not having much luck in my own searches and thought I'd try on here instead. Thanks, Corbin.
-

Smer Yak-3 in 1/72 (Pic Heavy)
DreadZombie replied to DreadZombie's topic in Work in Progress - Aircraft
Hi all, Finished the construction of the Yak today, along with the painting and the decals. I'll have the base cut out tomorrow, hopefully, and then may also have made a good start on the base as well. Started off this morning by finishing off the wheels and the wheel bays, and the air intake. Pretty fiddly but got there in the end. Glued in the masked canopy using Clearfix, painted the nose and masked it. I then stuck a layer of paint on the top ready for some Maskol before I apply the second colour. Added the Maskol in places to cover the one paint, then added the second colour. The Maskol took away some 'flakes' of the paint that has given the darker colour some rough edges in places. It seems to have been slightly exaggerated in some of these pictures. The Tamiya masking tape on the windows has worked really well, despite it bleeding a little onto the red nose (which was corrected easily with a fine brush). Painted the underside of the plane and also attached the exhausts (which can't be seen from this angle). I'd painted the area around the exhausts the red colour and then used a metallic pen on the exhausts themselves. After the paint had all dried, I stuck on a layer of Gloss Cote and then added the AML decals using Decalfix. Onto the base and the figures, next. Thanks for looking, Corbin. -
Smer Yak-3 in 1/72 (Pic Heavy)
DreadZombie replied to DreadZombie's topic in Work in Progress - Aircraft
Hi all, Made a decent start today, I think. I've got most of the construction of the plane completed and am quite happy with it so far. Slightly bad photo of the pilot in the cockpit, took it slightly early as I tidied some of the painting on the pilot not long afterwards. Really like the raised detail of in the cockpit, tried to use a recently bought metallic pen to add some chrome rings to them and seems to have worked quite well from this photo (it seems more obvious in this than to the naked eye, but that could just be me). Cockpit glues nicely to the top of the wings, even though it doesn't clip into anything it fits really well and barely needs holding in place. After a dry assembly of the fuselage halves to the top of the wings with this, I realised that the pilots arms were too wide to fit and they needed to be removed. Which was probably to be as expected, as the pilot was never meant to fit in a cockpit. I needed to swap my poly-cement for super glue to stick the wings to the fuselage, as they kept separating from each other no matter how long I seemed to hold it there. Finally, got the canopy masked. I decided to try using Tamiya's masking tape instead of Humbrol's Maskol. I find Maskol needs a much steadier hand than masking tape. Thanks for looking, Corbin. -
Hi all, I originally meant my next WIP to be an IL-2, but changed my mind after I seen a Yak-3 online that I liked the look of and wanted to make. This will be my first kit with aftermarket parts; currently only the decals, but I'm looking into some metal exhausts (with no luck so far). I'll be building a small diorama as well, with Zvezda's Soviet Air Force Ground Crew. I'll be building Lt.Col. A.D. Yakimenko's plane. "Yakimenko entered combat against the Japanese over Khalkhin Gol in summer 1939 [and] was given credit for 3 individual and 4 shared victories. Yakimenko met the requirements for the award of the title of HSU for his outstanding performance in Mongolia on August the 29th, 1939. During his GPW career, he flew 244 combat sorties, reaching 15 individual kills and 29 aerial encounters. His exploits won him the Order of Lenin, the Red Banner, Suvorov 3rd Class, the Patriotic War 1st Class, the Red Star and various medals." At first glance it seems like a nice kit, if quite simple, consisting of only 34 parts across 4 sprues. The decals I've got are from AML and seem quite nice. My only complaint is slightly petty, and it's that the small red rectangles (16) are meant to go on top of the medal shapes (15), rather than just being made as one in the first place. For scale, the squares on the background are 1cmx1cm. Finally, Zvezda's Soviet Air Force Ground Crew. Although not having as many figures as Airfix's ground crews, the Zvezda kit still seems quite nice. Also unlike Airfix, some of the people come in multiple parts. The parts seem very easy to fit together though, and it allows me to paint areas that (if each person came in one piece) may be slightly fiddly to get to. I should also mention that the kit lacks a pilot, and since I couldn't find a seated pilot online and I haven't posted enough on here to post in the buying and selling section, I've instead taken a spare pilot from the RAF ground crew I used in a previous build and, despite not being correct, will be using that in place of it. I could try to make some adjustments to it, though. I'll be starting the build soon. Thanks for looking, Corbin.
-
Thank you. It's a pretty nice kit, but the wings are a little big where they meet the fuselage and there are some gaps which I mentioned in a previous post to you, and the smaller part of the gear bay cover don't actually attach to anything on the wings so holding them in place while the glue dries is a little fiddly. There are various other little things, and I'm not sure about the accuracy but it's pretty detailed (especially so with the decals). As I said before, the decals are nice to work with, they come off the sheet pretty quickly and don't tear or break easily. I'm not sure how it reacts to other decal solutions other than Decalfix, though. I'd recommend the kit. I hope your build goes well.
-
Thank you. Thank you, the moustache is quite stereotypical of British airmen in WW2, especially so as their rank increases, so I couldn't resist adding one.
- 30 replies
-
- 1
-

-
- Airfix
- Supermarine
- (and 3 more)
-
Hi all, My final update on this, as the WW2 RAF Personnel figures I had in the post arrived today. Last night I got my smallest brush and, using Humbrol 24, dotted some yellow onto the grass to look like small flowers. As I'm almost certain that the RAF wouldn't have weeded the grass on the airfields. I've got the decals on and I don't think I've experienced nicer decals to work with. In the past I've had the longer, thinner decals (like the lines marking the walking areas on the wings) tear apart when moving them from the paper to the model but these were pretty tough and easy to move around with Humbrol Decalfix. I don't often make hugely positive comments on decals (as that stage is probably my least favourite) but these were actually pretty nice to work with. The creases in some of the decals have cleared themselves up with the Decalfix, now, these were taken not long after they had been applied. Went through the WW2 Personnel and picked out two that I wanted on the diorama and placed them on, to give me a better idea of how it will look in the end. Got the pilot painted with colours that were as close as I could get to the colours of the pilot on the box art. Used Humbrol 29 for the brown, 34 for the white, 61 for the skin and a combination of 33 and 65 for the blue (I can't remember the ratio, but it was basically about 4-5 small paintbrushes of 65 with the tip of a paintbrush of 33). The officer was painted with the same colours, minus the Humbrol 29. Not as clear in the picture, but if you look kind of closely you'll see the absolutely necessary mustache. Not completely sure why Airfix chose the material they did for these figures, as it seems to almost repel Humbrol's acrylic paint initially (and then it doesn't stick too well afterwards). I cut the bases off of the two figures and have glued them down with Humbrol Clearfix into the positions in the second picture. Thanks for following me on this WIP. I've enjoyed the build and I hope you've enjoyed reading/seeing it. By the time I get my next model, or start my next WIP, I'll hopefully own an airbrush with a compressor so the paint might look a bit better, once I get used to that. Thanks for reading.
- 30 replies
-
- 5
-
-
- Airfix
- Supermarine
- (and 3 more)
-
Thank you. And, okay, I hadn't thought about Clearfix. I'll glue them down with that, then.
-
Hi all, My Humbrol 56 arrived today so I've made some progress on the model, and I bought some "Grass green" acrylic from a local craft shop so I've only got a few changes to make to the diorama base before it's finished. Also, I've got the WW2 RAF Personnel in the post due in tomorrow or Friday. First of all, used a small brick trowel to put the texture gel onto the wooden base and masked off the area that is the edge of the concrete. I also marked down the rough locations of the wheels and two of the RAF personnel I intend to put on, to give me an idea of how much I wanted to make grass and how much to make concrete. It was left to dry overnight. Got the exhausts painted before I painted the Spitfire's fuselage and wings so it's ready to stick in once the body is dry. Thinned down the paint again and I think it's provided a pretty smooth coat, and has hidden some of the brush strokes pretty well. Glued the exhausts in place (needed a little sanding around them but they fit pretty well, so much so that I was almost tempted to not use any poly cement to keep them in place, but decided to use it anyway. After that I stuck on a layer of Humbrol Gloss Cote to help with applying the decals later on. Back to the diorama base: I stuck a screw in the back of it to hang it from (I figured that since that face would be face-down I'd be the only one aware of it) and got my can of primer and stuck a few coats on it. I got my "Grass Green" acrylic and stuck a layer over the rough texture and, despite it saying it would dry to a sand-like texture, I think the green on it works pretty well as grass. A (slightly bad) photo of the diorama so far, I now just have the figures and the decals to do. How should I glue the figures to the base? Would superglue do or is there something else that would be better? I'm also assuming that I take the bases of the figures off of them before gluing them down onto the diorama base. Thanks for reading.
- 30 replies
-
- 1
-
-
- Airfix
- Supermarine
- (and 3 more)
-
Hi all, Very small update today. Went into a local crafts shop and found myself some Reese's Coarse Texture Gel (it's supposed to produce a sand-like texture, but I'm sure that using the right paint might make it look more grass-like), but, I can't seem to find anywhere that explains how it's used. Have any of you used it, or anything like it? If so, any advice?
-
Hi all, As mentioned yesterday, pictures of some gaps I couldn't quite sort out (before using filler and sanding.) Just after I spilt most of the paint yesterday I'd put the first layer on some of the plane (before running out), just as I stopped I noticed I hadn't put the filler on or sanded down the gaps, so please ignore the paint for now: Just noticed the tires need a little more paint in places, so I'll sort them out soon. Yesterday was mainly finishing the construction section of the build, only had the cannons, wheels, intakes and a few other things underneath the plane to glue on. Got the cannons on as parallel as I could, where they join the wings needed a little sanding as the wings didn't quite align there. It did mean that they were slightly more fiddly to put on and keep in place, but I don't think I've done too badly. I painted Humbrol 33 underneath the intakes and then on the intakes themselves and then glued them to the underside of the wings. The painting looks slightly messy here, but I'll sort it out with the Aluminium paint soon. Painted the covers for the rear wheel, but as I took it off and sanded down where the cover had met the sprue it flicked out of my tweezers and I was unable to find it on the floor. Unless I find it, I'm going to have to go without (or I wait and see if I can buy or find a replacement). Fitted the wheels and landing gears as well. If you're making this kit, I'd recommend checking where the landing gear meets the upper halves of the wings while they're separate to ensure that the join is open enough. I had to sand it down through the opening with a small needle file and definitely regret not checking it earlier. Other than that, though, I'm quite happy with the landing gear, the smaller cover for the wheel was a little fiddly, as it doesn't actually attach to anything and needs to be held in place until the glue dries, but it wasn't too bad. I've also just added the filler to various points on the fuselage and wings and am waiting for it to dry before sanding it down. Thanks, all.
- 30 replies
-
- 3
-
-
- Airfix
- Supermarine
- (and 3 more)
-
Thanks for the kind words. I'll post my photos from tonight in an update tomorrow, but I may have to delay the build a little. I knocked over my little tub of the Aluminium paint when cutting a bit of the sprue (should teach me not to leave them open) and am currently ordering a replacement on eBay. It should be here by Thursday. Thank you! I couldn't get a very good picture of the cockpit internals, as the light was coming from in front of me so my photos might have let the cockpit down a little. I'm not too familiar with the internals of real spitfires, but it is quite detailed. There are a few gaps - On the top of the fuselage, the nose just in front of the cockpit wouldn't stick together properly (I'll get a photo of it for tomorrow). The top halves of the wings seem too long for the underside and so leave a gap between the top and bottom of them where they meet the fuselage, but sanding down the top (as they stick up a bit), adding some filler and re-scribing the panel lines should fix it. There are a few other gaps, but overall I doubt it would take more than half an hour, or even 20 minutes, to fix until they were unnoticeable under paint, excluding the filler's drying time. Thanks! I think Airfix have taken into consideration the fact that some people may want the cockpit open, because, other than cutting out the door, there weren't really any other changes I can think of that I needed to make. Thanks, again, all.
- 30 replies
-
- 1
-
-
- Airfix
- Supermarine
- (and 3 more)
-
Hi, all. Larger update than I intended today, but I've got a decent bit of the model done. I didn't have the exact colour for the internals of the cockpit, but figured that mixing some Humbrol 78 and 34 would get it close enough and I'm quite happy with it. I found a little tip on a Humbrol video on Youtube; if you thin down the acrylic paint slightly you can get your paint to end up looking pretty similar to as if it had been airbrushed. Or so the guy on the video told me, it's worked quite well for me in the past. Thought this measurement was a nice touch, haven't seen it on instructions in previous Airfix kits I've done. Thought I'd share that. Decided that this was a good point to cut off the door, after adding some more detail to the inner surface of the model (like adding black paint to what seems to be the handle). The lines aren't perfect, but I sanded them down and they look much better, now. I also lightly sanded over the small mark where I slipped with the knife a little and it seems as though it will be hidden once I paint over it. Turned it over and glued it to the outside, I think I'm pretty happy with the result there. I also painted the top edge of the door with some Humbrol 11 to give it a chrome look. The other side of the cockpit. Not sure I painted the blades of the propeller in the right order, did the black first and painted over it with the yellow, rather than the other way around. It doesn't seem to have had any bad effects, though, or darkened the yellow. Other than where a bit of the masking tape had taken away some of the yellow on the one blade on the left, I'm pretty happy with it. Possibly one of the most fiddly steps I've done on a model, where parts A12 and B3 fit to part A11, there wasn't really anything to hold it there, so I had to hold it still until the glue dried which ended up being more difficult than it sounded. Got there in the end, though. I left the pilot out of it, as I want him to be heading over to the plane, rather than already in it. Glued the seat and propeller to the one side of the plane, then checked that the other side fit it well before gluing them together. I stuck a little more paint on the sides of the chair, where I'd missed before. Finally, I glued the wings together after checking that they fitted well. I glued it all together after that. Where the back of the wings meet the rest of the plane, it didn't seem to glue down level (and refused to do so even with more pressure) so I've had to sand it back a bit. I'm not sure how much I'll get done tomorrow, but I should have the base of the diorama spray-painted and then coated in a layer of clear enamel, at least. Thanks for reading.
- 30 replies
-
- 6
-
-
- Airfix
- Supermarine
- (and 3 more)
-
Hi all, Only a little update tonight, decided to make a start on the diorama first, as I can look for some grass for it online as I make the model. Found a leftover bit of wood last night to act as the base for the diorama, there was a relatively large crack down it but I stuck some wood glue in there which had dried by earlier today. I figured that the wood didn't need to be in that good condition as it will be painted over in the end. Checked on it today and stuck some Milliput in the crack which will be sanded down tomorrow, and after that I'll be using some grey acrylic spray paint to cover it all with. May not have put the filler on as efficiently as I could, but that just means I have a bit more to sand down tomorrow. I'm not too worried about the marks on the edges from where the saw has cut it, as I think the grass should cover it up quite well. Hi Adrian, I'll make sure to look out for this when I'm putting it together, thanks for pointing it out. Thanks, all.
- 30 replies
-
- 1
-
-
- Airfix
- Supermarine
- (and 3 more)
-
I was relatively new before I'd left for a bit, just a little warning. Thank you all for the welcome, though. Thank you for the suggestion, I hadn't thought of anything like that and I'll definitely do that, now. Think I might make a start on it tomorrow, I'll post the results afterwards.
-
Hi Rob, Thank you! I'm doing the No.603 Squadron, 1951 scheme: Meant to put that in the original post.
-
Hi, Got back into modelling recently and I decided I couldn't help but get Airfix's Spitfire Mk.22. I'll be building it basically out of the box and also plan to make a diorama for it. I hope to make it so that it's landed on an airfield with various people from the WWII RAF Personnel, having the pilot running over. After buying it I was slightly nervous about the canopy, as I want to have the canopy open, but I was relieved to find that the canopy comes separated. I'm going to have to cut the door from the one piece to have it open. Haven't done it before but I think I know how to do it, or at least, how I plan to do it. I'll be getting started on it soon, just waiting for a few things for it that are in the post. Thanks for reading.
-
Thank you, both I really appreciate the feedback from all of you
-
Thanks, both of you
-
I decided to change the camo once again back to the original camo. I went over the panel lines with a dark green pin wash and then around some of the raised areas (like the vertical areas around the turret) just before adding the whitewash, also added a bit of rust to some areas, after seeing your suggestion. I think the hairspray has worked well for me, not as well as it could have, but it was my first attempt at it. It was more the actual removing of the white that was the problem. Overall I'm pretty happy with it so far, I'm not sure there's that much more I actually want to do with it other than adding a layer of matt over it. Any thoughts? (Sorry for the changes in colour of some of the pictures, that was down to my phone's camera playing up a bit. The second and last look closest, colour-wise, to the actual model) Thanks
-
Hi George, Thank you. After a bit more thinking, I'm partly leaning more towards giving the tank more of a 'snow on the tank' effect, rather than it being a camouflage, like this (despite that being a screenshot from World of Tanks, it's close enough) Okay, I'll keep that in mind, thanks again. Okay, I'll make sure to remember that. I think I'll have an update later tonight - I'm thinking of adding the pin washes to the surface after having my rethink about the snow camo. I didn't actually think of it like that, the 3's seem like a really good idea, I'll give that a try. Good luck with the rest of the Jagdtiger, it's looking really great so far. Thanks again.
-
Thanks Crossy, I think I'm going to start doing them more often, thanks for suggesting I do one. Okay, I'll have to have another look around. By mid stages of weathering, when do you mean? This'll be my first model where I'm attempting weathering. That's great, thanks once again for the tips. A little update: I've added the decals and a layer of gloss over them, I've also got the tracks on temporarily, I'll remove them again when I'm airbrushing.
-
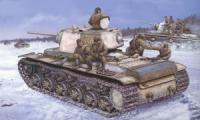
Hi, I've started this thread a bit late in the process, but better late than never. A bit before Christmas I was told not to get the Airfix version, and to look at some other ones (Here is that thread). But this was a Christmas present, and I've enjoyed the build so far. I'm disagreeing a bit with the box though. I'd have expected them to use to Russian name, or rather, Stalin's Russian name (Iosif, rather than Joseph.) But it wasn't my choice, oh well. So far I've assembled it and have painted the base colour and the machine gun: I'm just waiting for my airbrush propellant and the white paint to arrive in the post (due in tomorrow) to begin applying a snow camouflage to it using the hairspray technique. Just a few questions: How (and where) would you apply rust to it? Should I add the decals now or after the camo? And, do you know of any references for a Soviet tank (preferably the IS-3) with a snow camouflage? Thanks
-
Okay, what are the quick-build tracks like to paint? I mean, is it difficult/'fiddly' to get to the tracks behind the wheels? It looks great, definitely going to consider getting it. Thank you for the suggestions.