


Stew Dapple
-
Posts
7,354 -
Joined
-
Last visited
-
Days Won
34
Content Type
Events
Profiles
Forums
Media Demo
Posts posted by Stew Dapple
-
-
Lovely job mate, she's a beauty
")
Cheers,
Stew
-
 1
1
-
-
Turned out a beauty there Alan, nice work
Cheers,
Stew
-
 1
1
-
-
22 minutes ago, Procopius said:
Would my children even deign to try it? No they would not.
Their loss mate, you certainly made me hungry

The little fellas and AFVs are looking good too, just not in the same way

Cheers,
Stew
-
1
-
 1
1
-
-
If it's a 1/32 Beaufighter I'll be on it like stink on a monkey
Cheers,
Stew
-
1
-
1
-
-
Phew, broke my duck for 2024. I was very pleased to finish this one, not least because it was an xmas present from my Dad.

The kit was pre-owned and included quite a lot of aftermarket – the Ali Cat canopy set, Quickboost propeller and exhausts and the Master brass gun barrels set (this being particularly appreciated as the forward-firing MG17 in the kit seems to be a 30mm upgrade from the diameter of the barrel). I had another beef with the kit, in that it seems to be designed to be built with the wings folded and all the engine panels open... as a result the wings seem to be lacking the wing-root fillet at the top if you build them unfolded (it could have been me, but I couldn't find any such part or any part that looked like it might fit the bill) and the engine cowling panels don't fit at all well if closed up. Still, I made it in the end and as it's unlikely anyone else will produce an injection-moulded Ar 196A then you either build this one or you don't build any.
I did add the HGW resin seat and fabric seatbelt set, and the Quinta instruments sets, as the kit's moulded seat belts weren't all that impressive and there were no decals for the instrument panel.
The model was finished in the Maritime Scheme, with Colourcoats ACLW04 - Grun RLM 72 & ACLW05 - Grun RLM 73 over ACLW03 - Hellblau RLM 65, with the interior in ACLW12 - RLM Grau RLM 02, the propeller blades in ACLW02 – Schwarzgrun RLM70 and the bombs in ACLW11 - Dunkelgrun RLM71. Detail painting was mostly Vallejo acrylics with Tamiya Clear Red and Green for the navigation lights.
I used the kit transfers, they were good but I did ditch the large stencilled laurel wreath marking which commemorated 100 catapult launches from Tirpitz – I didn't like the way it was sprayed over the hand-hold ropes and there must have been a time when it didn't have that marking applied (the first 99 launches, for example).
I finished it with a mix of satin and matt varnishes, it still came out shinier than I expected but them's the breaks.
Thanks for your patience, apologies for the verbiage
Cheers,
Stew
-
52
-
1
-
-
Nice work mate
")
The gent in question is supposed to be Neville Chamberlain - apparently the Germans thought the fact that he carried an umbrella everywhere most amusing
Cheers,
Stew
-
1
-
1
-
1
-
-
Hi mate,
There's some pictures here:
https://www.hannants.co.uk/product/KAZ48017TAM?result-token=LhRA6
HTH,
Cheers,
Stew
-
1
-
-
8 hours ago, Alan P said:
this could be the most mojo-boosting kit I've ever made.
100% in agreement Alan, I finished mine thinking I might be a better modeller than I am
Kotare have gone to a lot of trouble so that I didn't have to, the kit must have been designed by a modeller who hates filling and sanding as much as I do. Yours is looking a beauty and I'm sure you will be pleased with the end result
Cheers,
Stew
-
1
-
1
-
-
Thank you gents

@Col Walter E Kurtz Thanks Andy, it's Infini Lycra Thread and I recommend it, I believe Uschi van der Rosten have a similar product too
4 hours ago, AdrianMF said:Are you going to stay with 1/32
Thanks Adrian, well I do have the Border Models 1/35 B5N Kate on pre-order, does that count?
I think I will stay with the bigger scale kits for the duration, unless or until I run out of kits I want to build in those scales (which given my build rate and the number of kits already in my stash is somewhere between unlikely and vanishingly unlikely)
Cheers,
Stew
-
2
-
-
Nice job Dennis, they came out really well; the leading edge camo should be a comparatively easy fix
Cheers,
Stew
-
4 minutes ago, georgeusa said:
Did you have a go at painting the included figure?
Thanks George, yes I did. Let's just say it didn't go well and draw a discreet veil over the subject
Cheers,
Stew
-
1
-
-
I managed to complete 8 this year, albeit with two sets of near-duplicates and all 1/32 scale. First up was ICM's lovely little Fiat CR-42 from the nightfighter boxing of the kit:
RFI and more pics here
Second was the Hasegawa FW190D-9 for the FW190 STGB
Build thread here
Gallery pics here
Third was also from the FW190 STGB, Revell's FW190A-8/R2:
Build thread here
Gallery pics here
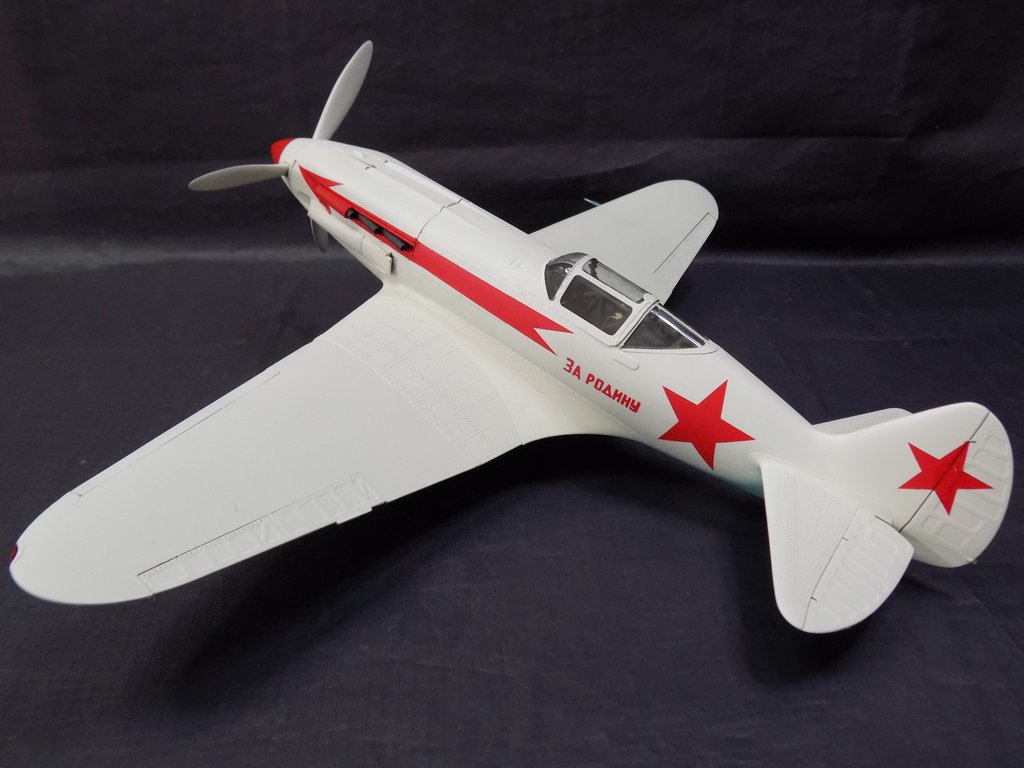
Fourth was Trumpeter's MiG-3:
RFI here
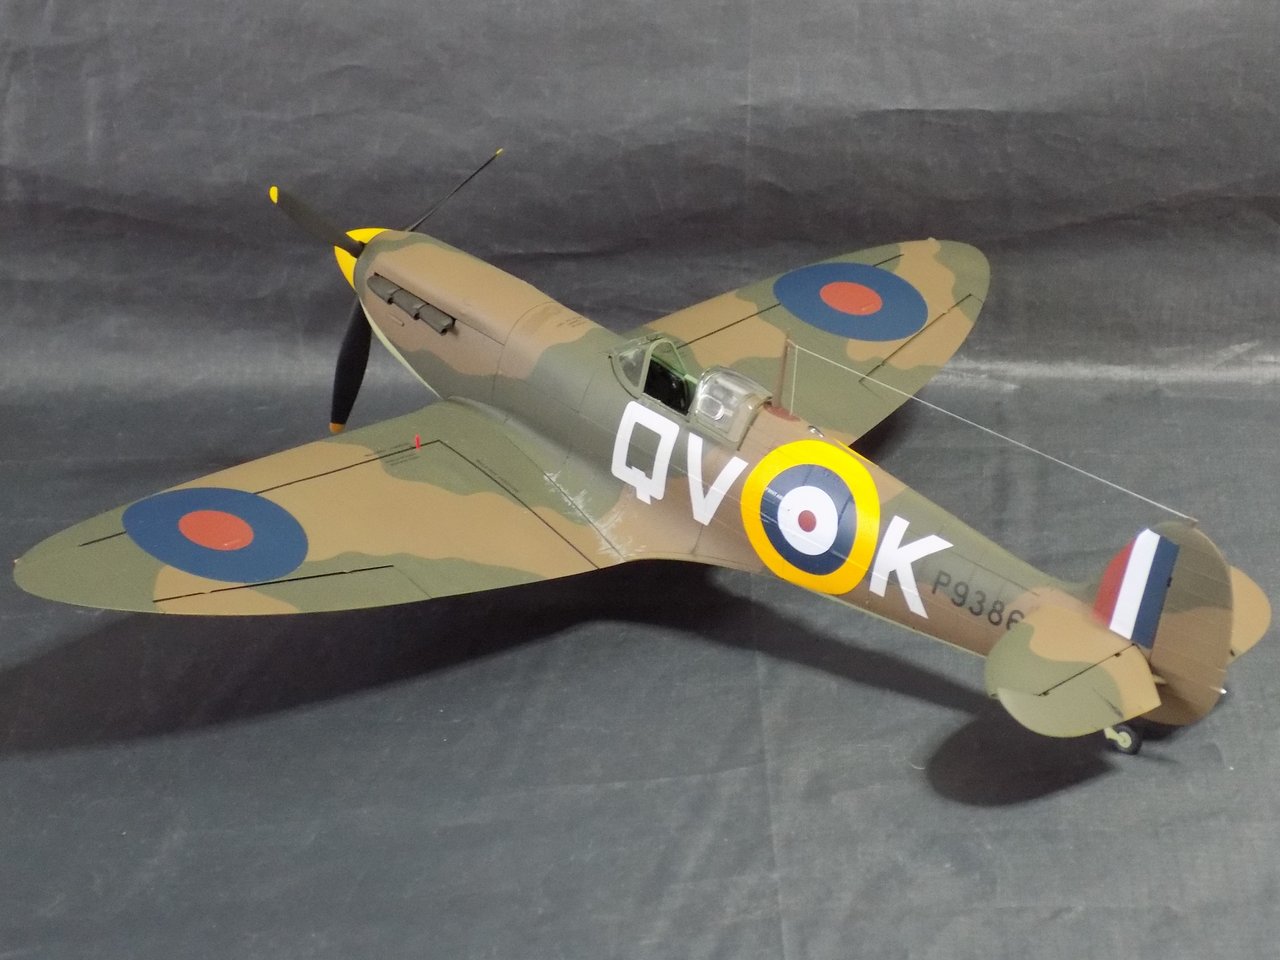
Fifth was Kotare's Spitfire I (mid) - the loveliest kit of the loveliest mark of Spitfire:
RFI here
Sixth was Revell's re-pop of the Dragon BF110C, converted to a C-6 version using the AIMS set:
RFI here
Which was swiftly followed by number seven, the Dragon kit of the BF110D:
RFI here
And the final entry, freshly done today, the Kotare Spitfire I (again) - this time the 'Brian Lane' edition:
RFI here
Thanks for your attention gents, hope you all have a good Christmas and a Happy New Year
Cheers,
Stew
-
40
-
-
Hello gents, here's my eighth (and no doubt final) completion of the year – my second Kotare Spitfire I, this one the 'Brian Lane' edition. It's OOB apart from the ASK 3D Printed exhausts and their canopy masking set.
Having already built the first release of this kit I got a bit complacent and thought I could just use the instructions as a rough guide and reference, consequently I didn't initially remove the cockpit door rims (as you need to if you are planning on not having the door open) and then wondered why the closed door did not fit properly; I didn't install the prop shaft before joining the two fuselage halves, which means I don't have a successful model – i.e. the propeller does not spin. I also managed to slightly misalign the spine part but somehow only on one side. However these things aside I enjoyed building it as much as I did the last one, indeed I'm slightly more pleased with this one. The next one should be great
")
The paints used were Colourcoats of course - for the 'apple' green cockpit colour I used ACRA08 Verde Mimetico 53192, uppersurface camouflage was ACRN09 Dark Green over ACRN10 Dark Earth and the undersurface camouflage was done in ACRN01 - Sky "S" Type. I painted the spinner yellow as per the instructions; in the most widely-reproduced picture of this aircraft it looks white
...but Brian Lane's fitter John Milne apparently told Dilip Sarkar that it was yellow and I didn't feel I could really argue with that. I did use a paler yellow than RAF trainer yellow so that there is a difference from the roundel surround as the original photograph suggests, but in the photos I took of my model it looks exactly the same shade

There is also this photograph, apparently of the same aircraft. Doesn't look like a white spinner there (and it does prove Kotare's assertion that it didn't have doped covers over the gun muzzle openings, though I imagine they would have been applied after the first time it was armed up, I'm pretty sure it was standard practice by September 1940).
TLDR, I went with a yellow spinner; it's your choice what colour you do yours
The markings are from the kit transfers, they are beautiful to use (they're made by Cartograph) and can take repeated applications of decal softener (and you may well need it to get them to settle down over the bumps on the gun covers and the rivets on the rear fuselage). My only gripe is that the grey for the codes looks far too light, the side-view photo linked above shows nothing like that level of contrast between the camouflage colours and the codes.
The final touches were a coat of AK Varnish (Satin with a little bit of Ultra-matt mixed in); an RT wire from Infini lycra thread – slightly underscale I suspect but I prefer the wires not to be too obvious; some wing-root chipping with Prismacolour pencils in a mid- and light-grey; a little exhaust staining from a brownish-black mix; navigation lights in red and blue Tamiya Clear and some staining from the cartridge ejector slots using black-grey pastel powder as this appears to be present on the original aircraft.
Apologies for all the verbiage, thanks for stopping by
Cheers,
Stew
-
48
-
-
Turned out a beauty mate, very well done
Cheers,
Stew
-
1
-
-
It looks good in those colours, I built a few of these back in the day and I thought it was a nice kit, but would have been lost - or maybe wouldn't even have attempted them - without a mask set so you got a good result there
Cheers,
Stew
-
1
-
-
In Les Taylor's 'Banff Strike Wing at War' he mentions that the 25lb AP rockets were used for anti-shipping work but some aircraft carried 60lb HE rockets for 'flak suppression' - as I recall he doesn't detail as to whether this was divided by sections, flights or squadrons or what percentage of aircraft were armed with the HE rockets but I think it would be a minority, I don't recall seeing a picture of a Banff Mossie with 60lb rockets fitted.
Cheers,
Stew
-
2
-
1
-
-
Sorry to hear about your brother Dennis, my commiserations.
The plane's looking very nice now, transfers soon I guess?
Cheers,
Stew
-
We had snow in Dundee, a good couple of inches in a couple of hours on Saturday morning, wasn't on the BBC forecast at all. Great, however, because I didn't have to go anywhere
Pretty severe frost again overnight so the snow's all frozen hard now.
Cheers,
Stew
-
1
-
-
Hi Bob,
The short story is "and then it was moved to the Shelf of Doom".
The longer version... well, I basically lost a lot of momentum when I was signed off work with a lung problem; I find it hard to believe now that I had two whole months of not working and I didn't do any modelling, but I wasn't feeling all that great and was on some quite "interesting" pain-killers which weren't really conducive to anything except sleeping or sitting slack-jawed on the sofa. When I eventually did get back to the bench I got to the stage of applying primer only to find that the majority of the seams I thought I had eliminated made a triumphant comeback. At that point I decided I simply couldn't be bothered with it any more "and then it was moved to the Shelf of Doom".
It wasn't so much the seams as the amount of time I spent not building it, I have found if I don't keep plugging away at a kit my enthusiasm for it evaporates and once that happens then (shameful experience shows that) there's not much chance of my ever going back to it and finishing it.
So my apologies gentlemen, but this one's been a bust for me.
Cheers,
Stew
-
 7
7
-
-
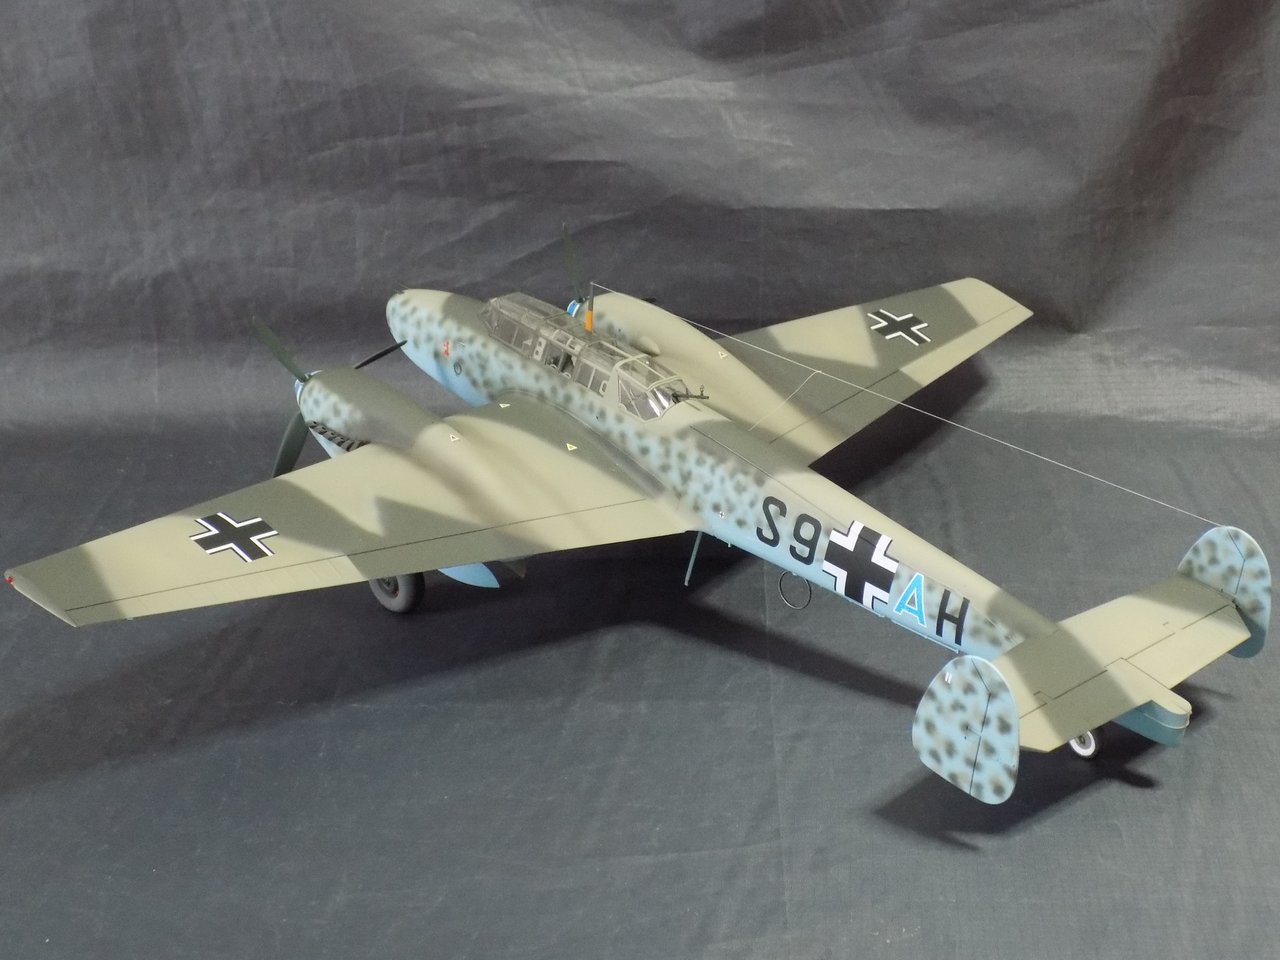
Here's my latest completion, the Dragon 1/32 Bf110D-3 (or D-0 as listed in the gruppe paperwork), it is marked as one of the aircraft used by Erprobungsgruppe 210 in the summer of 1940.
... and a whitewall tyred tailwheel. I'm not sure if it was prototypical, there aren't many pictures of the original aircraft but it does look like there might be one and it was reasonably common:
I used the same aftermarket as for my recent Bf110c-6 (apart from the AIMS conversion set obviously).
Paints were Colourcoats ACLW12 - RLM Grau (RLM 02) for the interiors, ACLW03 - Hellblau (RLM 65) for the undersides and the top surface camo was ACLW11 - Dunkelgrun (RLM71) and ACLW12 - RLM Grau (RLM 02) - again it's hard to be sure from photographs but the D-0's of Epr.Gr.210 look to have quite a soft demarcation so may have been repainted at unit level. The blue on the prop spinners was a mix of Citadel acrylic blues mixed as close as I could to the blue on the aircraft code letter.
Markings were a mixture of decals from the Revell re-pop of the kit and the squadron markings were from the Kagero Battle of Britain decal set kindly donated by our late forum-buddy Silver Fox.
Thanks for dropping by
Cheers,
Stew
-
43
-
1
-
-
5 hours ago, New Tool said:
Just a guess:
The statue of liberty.
To be followed by a "The Duellists" set with King Kong
Edit: Ah, damn my failing memory, it was the Empire State Building, wasn't it. That joke fell flat
Cheers,
Stew
-
1
-
2
-
-
There was definitely variation, I've built a C-6 from EprGr.210 and photographs of the aircraft show the fuselage recess for the gun and a semi-circular cutaway in the rearward pane of the gunner's canopy so that the gun could be used without opening up the rear canopy. It may only have been a 'field modification' at that stage but enough photo's exist of Bf110's in flight with the gun deployed (and the gunner's canopy closed) to suggest it was at least not that unusual
The trough/recess was also faired over in some cases. HTH.
Cheers,
Stew
-
1
-
1
-
-
Talk softly and carry a big gun.
Here's my latest completion, the Revell (ex-Dragon) Bf110C, with the AIMS conversion set used to modify it into the C-6 version with the 30mm MK.101 cannon and marked as one of the aircraft used by Erprobungsgruppe 210 in the summer of 1940.
To the base kit and conversion were added the Quickboost exhausts, Red Fox Studios 3D instruments and radio gear fronts,the HGW seatbelts and interior/exterior mask set and LF models mask for the camouflage pattern.
Revell re-jigged the Dragon instruction sheet which made it easier to follow but included quite a few errors, omissions and just-plain-headscratching assembly choices; I did my best with it and deviated where I thought it prudent and I pretty much got away with it I think. I found building the kit to be absorbing, at times a bit frustrating, but overall I enjoyed it to the extent that I have started on a second one, and now have a third in the stash (the Hobby 2000 Bf110D).
Mistakes were made. Some of my work was down to its usual shonky standard and the camouflage pattern on the port side is just wrong, I made the mistake of thinking it would be possible to fit the wings right at the end and only realised then that I had obviously misplaced some of the camouflage masks. Still, in the end I got it finished and that's a long-awaited one off my 1/32 bucket list.
Paints were Colourcoats ACLW12 - RLM Grau (RLM 02) for the interiors, ACLW03 - Hellblau (RLM 65) for the undersides and the top surface camo was ACLW02 – Schwarzgrun and ACLW11 - Dunkelgrun (RLM71). The blue on the prop spinners was a mix of Citadel acrylic blues mixed as close as I could to the blue on the aircraft code letter.
Oh yes, one more for scale:
Cheers,
Stew
-
17
-
-
On 9/10/2023 at 12:06 AM, trickyrich said:
looks good with the pods fitted, she looks to have an impressive wing span!
Thanks Rich, it is quite a substantial model
I remembered to fit the joystick to the upper wing interior:
... before adding the fuselage to the wings:
It's going to need a smear of filler along the wing-to-fuselage joins as well as the engine nacelles - but nothing too drastic I hope.
Cheers,
Stew
-
6
-


HK 1/32 Halifax and Sunderland?
in The Rumourmonger
Posted
A 1/32 Sunderland - particularly an early one that wouldn't require 5 litres of white paint for the finish - would be lovely to see. I could even be tempted to buy one, I think.
Good point. I was thinking of perhaps displaying it moored in my Dad's pond
Cheers,
Stew