

Jonners
-
Posts
1,462 -
Joined
-
Last visited
Content Type
Events
Profiles
Forums
Media Demo
Everything posted by Jonners
-
Wow, thanks, Mohawk! It now shares pride of place on display in my lounge along with my 1906 Singer 28 sewing machine, picked up in a charity shop and a genuine functional work of art. They are both acceptable as lounge display items to my wife, whereas a plastic aeroplane model wouldn't quite make the cut. 😁 Thanks Pete, I'd really like to have a waggon on display but I know it will take me ages to complete! As well as having collected an extensive reference library on the subject, my vocabulary now has a range of new meanings (hounds, bolsters, pillows, summers, raves, soles, knave) and new words (shutlock, strouter, felloe). My volunteering also allows me the privilege of getting up close to the original items - for example, last year we lifted some wooden-wheeled vehicles onto treated wooden chock blocks to keep them secure and the vulnerable old wheels off the dirt floor: two waggons, two tip carts, a carrier's cart, a rulley (4-wheeled flatbed) and a Marshall threshing machine. It's as good a way as any to really understand the construction Cheers Spiny; it's a fascinating subject when you start to delve into it. As for the deadfall wood, it occurred to me that the amount of waste plastic, especially tiny sandings and shavings, from a standard injection kit is bad enough, but it's no better with a vacform or scratchbuild and it didn't sit comfortably with our (justified) concerns about microplastics and other plastic waste. The only plastic in this model is the square nut and bolt heads, and then only because I haven't (yet) got the skill to make them from brass. As for display, this one is for home. Future models might end up at the museum, but appropriate indoor space is minimal other than in the reception, so we'll see. Thanks, Darwinism; once I started getting into the detail of how the craftsmen made these things, especially the wheels, my respect for their knowledge and ability shot right up. The house next door to mine was originally the premises of an eminent East Riding wheelwright, so there's also a local connection, even though it's an extremely tenuous one! Jon
-
Hi folks, There are a few firsts for me here: my first 'Vehicles' RFI, my first horsedrawn vehicle model and my first ever wooden (mostly) model. Here goes! As a plastic aircraft modeller of over 40 years I wanted to try something different and, frankly, something a little more environmentally friendly. I'm also a folk museum volunteer with a strong interest in the work of the traditional wheelwright, so I decided to try my hand at making a large-scale cart model from commercially-available plans. I suspect like most modellers who have a go at this type of model, I chose to begin with a relatively simple tip cart or Scotch cart, in this case to the 1980 plan drawn by John Voisey assisted greatly by John Thompson's excellent book on building model carts and waggons. Experienced model wheelwrights will doubtless roll their eyes at 'yet another tip cart', and probably groan at my relatively shoddy workmanship, but I've enjoyed the process and learned a huge amount along the way. For the uninitiated, a cart has two wheels whereas a waggon - yes, double 'g' is normal - has four wheels. Wooden wheels were always 'dished', that is to say that the spokes leaned outwards from the hub (called the knave or stock) to form a saucer shape in profile in order to reduce the damaging sideways forces set up by the side-to-side motion of a walking horse. The axles drooped by a similar angle to ensure that the lower spoke was perpendicular to the ground to carry the weight efficiently. Apart from the wheel rims, the sections of which were called felloes but pronounced and sometimes spelt 'fellies', the cart was constructed mostly from deadfall ash collected during dog walks and processed on a vintage Picador Pup hobby lathe system bought specially for the purpose. (The circular saw attachment deserves HUGE respect!) The spokes were hand-carved from deadfall oak, also collected on dog walks. Metal fittings were made from brass sheet and rod and painted gloss black; the full-size fittings would have been of wrought iron, made by a blacksmith, and also painted gloss black to inhibit corrosion. The square nuts were made from plastic card. The impression of nailheads in the boards in the bed of the cart was created by drilling tiny holes and inserting very short lengths of cut fusewire. The wheel rims, or tyres, are of tinplate cut from a large tin, rolled smooth with a rolling pin on a new cutting mat and thin cloth and gently curved to shape. They are, however, simply too shiny; full-size tyres would have been heated in either a ring-shaped fire of wood shavings or a dedicated furnace before being shrunk onto the wheel with copious amounts of cold water. This process would have left them blued rather than shiny, so I have an idea for replicating this on future builds. This style of cart used a tip stick, or sword-and-pin, to set the cart in an appropriate tipped position. The wheels are also removeable in the original manner; sliding the tiny latches out of the even tinier staples on each knave allows the small chocks to be removed, which gives access to linchpins that hold the wheels onto the axles. The tail board is removeable and is normally held in place by a small latch on each side. Finally, the display base was cobbled together (sorry...) from aquarium gravel with some bits of garden moss and tufts of garden twine to give the impression of vegetation. As mentioned earlier, it's unlikely to impress experienced model wheelwrights but, as a first attempt, I'm quite pleased with the result and have thoroughly enjoyed both the experience and education. My next horsedrawn project will probably be a larger Vale of Pickering-style Yorkshire waggon from the John Thompson plans range (there are two at the folk museum at which I volunteer), but I think I'll be heading back to my plastic aircraft comfort zone for a little while first! Thanks for looking (and for making it this far). Jon PS: Here's a selection from my reference library. Anything by J Geraint Jenkins is invariably excellent, the orange Arnold book is a superb construction reference and George Sturt's book is a bible for anyone who is interested in the detail of the wheelwright's trade (Sturt inherited a Farnham wheelwright business from his father in the late 1800's).
- 28 replies
-
- 27
-

-

-

Levasseur Pl.8 L'Oiseau Blanc 1/32 Scratch Build
Jonners replied to RichieW's topic in Work in Progress - Aircraft
This is already looking really good, Richie; it will look awesome when it is completed. Well done so far on walking away from the cigarettes! Keep it up - both the quality modelling and the tobacco abstinence. Both are impressive. Jon- 74 replies
-
- 1
-
-
- Nungesser and Coli
- 1/32 Scratchbuild
- (and 1 more)
-
Nice work, P! Also quite a relief to see that it's not just me who checks, measures, checks again, cuts and glues...and then has to do it all again properly. 🙁 Jon
-
Completed - Eduard 1/48 Albatros DV
Jonners replied to Brad Cancian's topic in Ready for Inspection - Aircraft
Sir, you are a master of the modelling craft. Wonderful result. Jon -
USS Saratoga CV-3 Air Group 1936
Jonners replied to Jeddahbill's topic in Ready for Inspection - Aircraft
Wow! No rigging, then...🤪 Jon -
Just dropped in at the top of page 3 and read this: Huh? "I'll just drop back to page 2 to see what on earth Perdu is doing with tiny garden ornaments on a Wessex build", I thought. Stupid boy. I really must sharpen up this morning. 🥺
-
Nieuport 17 scratchbuild completed
Jonners replied to Putty Animal's topic in Ready for Inspection - Aircraft
Okay, my jaw has dropped. Wow. Jon -
That's a cracker, Russ. The paint finish looks great. I'd love to know what they were like to fly; I imagine that they must have had some fairly unusual handling characteristics. I know I certainly wouldn't want to take one anywhere where people were shooting at me...
-
Nice one, Colin! I built one of these kits as a teenager back in the late '80s, but with hindsight I think the result was pretty ropey. I've often thought that I'd like to have another go, especially as I went on to train on HT2s and HT3s at Shawbury. Sadly I didn't have the sense to use my camera at the time and have only one logbook photo, although I think I still have some FRCs* somewhere if I haven't already given them away. I'll watch your progress with great interest. Jon *Edit: Flight Reference Cards (checklist).
-
Italeri Westland Wessex HU5 as a RN SAR
Jonners replied to mark.au's topic in Ready for Inspection - Aircraft
That looks the absolute business, Mark, and brings back some pleasant memories. I too remember watching RN SAR Wessexes in this colour scheme carrying out lifeboat training, particularly with the St Ives lifeboat during childhood summer holidays. Later I managed a few flights in RAF Wessexes various, both up front and down the back (and even fast roping out of one) in a variety of airframes from 72 Sqn, SARTU and 2FTS, but I missed out on flying the Wessex 'properly' by two Shawbury courses...which didn't really bother me as I got to train on the Bell 412 instead. Happy days. That's a really nice model - great result. Jon- 29 replies
-
- 1
-
-
- Italeri 1/48
- Westland Wessex
- (and 1 more)
-
Airfix A-7 Corsair / Hasegawa S-3 Viking
Jonners replied to Pinback's topic in Ready for Inspection - Aircraft
Very smart! I agree, there's something special about a nostalgia build. My childhood 'go-to' kits were usually Matchbox; as I remember paying 75p from Woolies and even Boots for a 1/72 Gladiator or Sabre, though, nostalgia tends not to persuade me to part with the prices currently asked for them! Jon -
1/48 Italeri ( ex ESCI) Douglas Skyraider AEW.1
Jonners replied to Jonners's topic in Ready for Inspection - Aircraft
Thanks for all the very generous comments; it was quite an enjoyable project, but I was glad to finish it! I promised I'd never touch another one, Noel, but (peversely) I keep wondering about the A-1 boxing, by way of a comparison! The Tamiya kit is a vast improvement, but where's the challenge in that? 🙂 Maybe I'm just finding an excuse for laziness, G-B, but it makes sense to me! I remember the Gannet being parked at the entrance when I last visited as a 'grown up' in the early 1990s, Ian. Thankfully quite a few of the airframes still survive. The Whirlwind HAS1 is on display at Doncaster, the Skyraider is in storage at the FAA museum and I'm pretty sure the Sea Prince and Shackleton T4 cockpit are in other museums. I've no idea where the rest of the airframes ended up, or the little hovercraft that was open for public access. Cheers, folks. Thanks Kev, that's very generous! Wow, times change, CJP! I'm not sure that RN families these days would accept living in a caravan park! Nice memories, though. Thanks Ben; I found it go be a bit like rigging in that it's daunting but, once you get started and proceed methodically, it's fairly straightforward. The big, chunky airframe helped! Thanks Steve. The Italeri boxing also includes decals for a Royal Navy Suez Crisis scheme as depicted on the boxtop artwork, a US Marine Corps AD-4W and a US Navy machine, all in dark blue. I agree, it's very striking. Jon -
Very tidy indeed. I think the name decal has been applied upside down and back-to-front; I'm sure it's really easy to do in 1:144 but very difficult to see!
-
Tarangus Scottish Aviation Bulldog T.1 1/48th
Jonners replied to Samuraiwarrior's topic in Ready for Inspection - Aircraft
What a beauty, Kev! On the table next month, perchance? If so then I'll look forward to inspecting it at first hand...and reminiscing / boring you silly with UAS Bulldog 'dits'! Jon -
1/48 Italeri ( ex ESCI) Douglas Skyraider AEW.1
Jonners replied to Jonners's topic in Ready for Inspection - Aircraft
Fair point, as some did. The ESCI MB326 series of boxings, for example, have really quite superbly executed engraved panels, and I'm pretty sure that the Mirages were also engraved. This kit, however, definitely isn't! Perhaps I should have said that this aspect of the Skyraider kit is typical of its era, rather than typical ESCI, as that would be a fairer comment. -
Hi folks, This is a kit that I've wanted to build for years, probably decades, having been thoroughly impressed by the faded example formerly on display at the Cornwall Aero Park (later Flambards theme park) during family holidays to Cornwall many years ago. I acquired it from a fellow BM'er, @jaw for a very fair price - thanks again, John! The Italeri kit is a straightforward rebox of the original ESCI plastic but with a big, comprehensive sheet of decals that perform beautifully. The plastic in the box is typically ESCI, in that it has overall raised panel lines, a very sparse cockpit, inaccurate seat, poor wheel wells, areas of poor fit and some inaccuracies. My first job was to sand away the raised panel lines and rescribe them; it is the first time that I've done this for a full kit and I'm quite pleased with the result. ESCI boxed both the single-seat A-1 Skyraider, with rear fuselage airbrakes, and the multi-crew AD-4 / AEW.1 with rear fuselage crew doors but used common fuselage parts for both variants. The differences were catered for by supplying inserts for the rear fuselage appropriate to the variant, but there are two snags with this: firstly the fuselage parts have a solid-backed depression rather than a cutout, which would be visible through the bubble windows on the crew doors, and secondly the inserts don't even come close to fitting. So, the second big job was to cut out the blanking pieces and then fill, sand, fill, sand etc until the enormous gaps were eliminated. The next problem was that the kit is moulded with raised panels representing armour plating on either side of the forward fuselage which, while representative of A-1 variants, was not present on the Royal Navy's AEW.1 aircraft. These were laboriously sanded away, which also necessitated removal of the exhaust flame glareshields before reinstating them using plastic card. (There is another armour panel under the fuselage, but I forgot about that one. Don't tell anyone.) In addition, the AEW.1 had a prominent rectangular air duct between the exhausts just aft of the cowling cooling gills which is not included in the kit, so these were plunge-moulded from carved basswood masters. They should really be a bit narrower, but I'm happy. Next up, the cockpit is typically ESCI in that it is spartan, with plain panels and decals, and the seat isn't particularly accurate. I scratchbuilt a basic representation of the side panels, drilled a piece of plastic to make an instrument panel in conjunction with the kit decal and scratched a seat which, while far from perfect, looks a bit more like the real thing than the kit's offering. The undercarriage bays really aren't accurate at all, especially as there is no representation of the pretty obvious wing spar. I boxed the wells in and started to do more scratchbuilding but quickly realised that spar detail would necessitate a full rebuild of the undercarriage legs. As a) I really didn't want to risk losing enthusiasm for the project, b) I don't display my models upside-down and c) life's too short, I left them as they were. The kit was airbrushed, with the assistance of my brand-new airbrush compressor (why oh why did I leave it so long???), using Tamiya acrylics. The kit decals behaved flawlessly with no silvering at all. I very seriously considered the Blackbird Models resin wing fold kit, as the result would be both impressive and reminiscent of how I saw the real machine when I was a youngster, but in the end I decided against the idea simply because it would have cost me rather more than the model did - Yorkshireman, see?! This build was a long way from my preferred subjects in terms of scale, era, operator and number of wings, but it was a fun challenge and, considering the starting materials, I'm quietly pleased with result. Jon
- 15 replies
-
- 45
-
-
-
Sea King HAR 3, it`s yellow and wobbles. Airfix 1/72.
Jonners replied to Spookytooth's topic in Work in Progress - Aircraft
Fair enough! Sooty grubbiness was normal within a couple of days of a good clean, but the state of the cab in the Peak District pic is unusually poor. Cockpit floor and walls: same as the cabin, approx Dark Sea Grey (ish) with matt black instrument panels. Apologies for the naff old pic: Cabin seats: lap straps only. Mid-grey basket stretcher stowed in the roof, olive green dispatcher's harnesses x 2 hanging from roof hardpoints, medical and role equipment bags stowed on the seats opposite the door, yellow multi-seat liferaft pack on a grey frame inside and immediately aft of the door and the red tail rotor gust lock stowed under the seats. Again, apols for old pic quality: The light grey vertical line was the winch cable that had been run out by a few feet. Hope this is useful. Jon -
Sea King HAR 3, it`s yellow and wobbles. Airfix 1/72.
Jonners replied to Spookytooth's topic in Work in Progress - Aircraft
More a case of a variable approach to cleaning...🤔 -
Sea King HAR 3, it`s yellow and wobbles. Airfix 1/72.
Jonners replied to Spookytooth's topic in Work in Progress - Aircraft
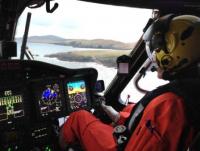
Fair enough. I personally wouldn't bother with the PE as I'm quite sure your wife would be very happy with it made OOB - you can go down too many unnecessary aftermarket rabbitholes. Here's a logbook pic of '596 in the Peak District when based at Leconfield, circa 2003, with yours truly peering out of the cockpit: ...and another aboard RFA Grey Rover in Falkland Sound in mid-2000 with me in the left-hand seat: Jon -
Sea King HAR 3, it`s yellow and wobbles. Airfix 1/72.
Jonners replied to Spookytooth's topic in Work in Progress - Aircraft
No probs. Will you be finishing it as '596 in the kit's anniversary scheme? -
Sea King HAR 3, it`s yellow and wobbles. Airfix 1/72.
Jonners replied to Spookytooth's topic in Work in Progress - Aircraft
Looking good so far! "Radar/sonar room" = 'radshack' in RAF SAR-speak. No sonar in a Mk3 anyway! That's what the big circle on the underside patched over... Somewhere I have some old 'walkaround' photos of a Mk3 which I will have to dig out and digitise as I'm sure they would be useful references for Sea King 3 builds, especially for interior colours. Top tips: interior was generally mid-grey, canvas seats were blue, wet fit floor was mid-green (IIRC), the inboard cover of the stowage rack ('Jock's Box') opposite and just forward of the radshack was orange with green diagonal straps. The seat by the back left bubble window (port beam seat) had orange seat and back cushions, whereas the back right seat (starboard beam) had an orange seat cushion and a dark green backpack dinghy for the winchman. Pilots sat on a yellow Personal Survival Pack (PSP) with a cream sheepskin topper - not terribly effective after being strapped in for a few hours - and, I think, orange back pads with black straps. Don't get too hung up on the correct shade of yellow as they all varied slightly depending on age of paint finish, cleanliness (or otherwise) etc. They did, however, seem to attract engine soot stains, especially on the starboard side. The only completely clean one I ever saw had spent a weekend being fettled prior to a visit by (then) Prince Charles, and it just looked wrong! Anyway, I hope that isn't too much unnecessary waffle. Watching with interest! Jon (2100 hrs Mk3) -
I've got about 10 unbuilt kits in the cupboard, perhaps 4 of which have been started but put aside without much having been done. There are maybe another 5 or 6 other unfinished builds waiting for interest to return. That's it, and that feels like too many. I've never understood the concept of spending a fortune on kits and a bigger fortune on aftermarket parts that are unlikely to be built, only for the majority to perhaps be sold at a loss later. It just seems horrendously wasteful to me, and somewhat obsessive! Mind you, my wife has a horse so I really ought to have learned not to pass any judgement on expensive hobbies...🤕 Jon
-
French nuclear deterrent - Mirage IVA
Jonners replied to CT Modeller's topic in Ready for Inspection - Aircraft
Very smart, Chris. I was looking at Elvington's 1:1 version just a couple of weeks ago and thinking about the Heller kit. The real thing is simply awesome; judging by your superb model, it would have looked doubly so in natural metal. Jon -
I'm not sure which I'm more impressed by: the model or your patience! Superb. Jon
