

Jonners
-
Posts
1,465 -
Joined
-
Last visited
Content Type
Events
Profiles
Forums
Media Demo
Everything posted by Jonners
-

Piaggio P.180 Avanti - Ferrari del Cielo - AModel 1/72
Jonners replied to Dennis_C's topic in Ready for Inspection - Aircraft
Very nicely done - a neat model. I saw one of these 'in the flesh' only a week or so ago. As for "...the quietest...", I thought Piaggio pushers were notorious for the racket that they make! Jon- 18 replies
-
- 2
-

-

-
- Avanti
- Aeronautica Militare
- (and 1 more)
-
What @Giorgio N said! Wow...
-
This is absolutely astonishing - 3D printing is such a game changer for the hobby. As others have already said, thanks for the very thorough and clear explanations of the process, as well as superb photographs to illustrate those explanations. I'm in awe of what you're producing here. Jon
-
Definitely 'Like'!
-
Gordon of… Ramleh – Kora 1/72 - Finished
Jonners replied to Patrik's topic in Work in Progress - Aircraft
I've just caught up with this build, Patrik, and rather than click 'like' for every post I thought I would just post it here: 'Like!' Great subject, constructed with your usual modelling skill and attention to detail. Jon -
Bristol F2B, Roden, Scale 1/48
Jonners replied to JohnHaa's topic in Ready for Inspection - Aircraft
Cheers Paul, that's what I thought, but I've gone to work with my scriber and wet 'n dry paper so I've got it covered...to my satisfaction anyway, even if not to anyone else's! Jon -
Bristol F2B, Roden, Scale 1/48
Jonners replied to JohnHaa's topic in Ready for Inspection - Aircraft
That's very nice, John. I'm building the MkIV version of the Roden kit at the moment and have found it to be more challenging than I expected. There is a lot of flash and very prominent mould seams, so the moulds are obviously getting quite worn, and the fuselage joint lines are very difficult to get rid of on the upper and lower fuselage surfaces. I had to add my own locating tabs to help with alignment. The wing on the MkIV was slatted, and the parts diagram on the instructions shows a slatted wing on the sprue, but the wing included in the kit was the unslatted WW1-type wing sobI've had to sort that out. I've looked at your WIP thread in the link and I also found the engine and cowling to be a problem: the engine is indeed very nice, but I had to remove the rocker covers to get the cowling to fit and, as the engine mounts are really too fragile for the effort required to get the cowling round the engine and (probably my fault) it put the exhaust outlets where they didn't quite line up with the cowling exhaust slot, I mounted the engine to the firewall with plastic card shims instead. I agree with your Modelbrouwers comment that the engine would be a nice model on its own, separate from the aircraft, but I needed it for the exhaust and propeller mounts. Jon -
Thanks, @Camwader, they are very impressive. I think I need a bit more practice!
-
Ah, so those are the lurkers behind the wooden carts and waggon in my RFI thread! Brilliant.
-
Oh, I definitely like those, @Camwader! They all look superb, but the waggon is especially nice. It's nice to see a weathered cart; mine is a bit good shiny! The old harrow and tractors are a nice touch too ( do I see a third tractor behind the waggon?). A lovely group and very nicely photographed. Thanks for showing them. You've made me want to make a start on my own waggon! Jon
-
Coincidentally, just a couple of weeks ago I bought an old copy of Scale Aircraft Modelling Vol 5, Issue 1, October 1982 specifically for the nice 1/72 Belvedere plans that are included as part of a conversion (actually an improvement of the Airfix kit) article. Jon
-
Scratchbuilt 1/72 1916 Bristol TTA
Jonners replied to Jonners's topic in Ready for Inspection - Aircraft
Cheers John, appreciated. I think I'll try either a slow-setting CA or perhaps an epoxy glue, but certainly not polystyrene cement on such thin plastic card. Yes, I have a PDF of Harry Woodman's book, which is where I first read in detail about the balsa core technique. Thanks Bertie, that's very generous of you. Now I need to think of something equally unusual to build next! (I have a few ideas, but the Mann & Grimmer M.1 has caught my eye...) Thanks Kev; I'm flattered that it attracted a bit of interest. Under any other circumstances I would have entered it into the quarterly comp, but as I'd recently finished the big tip cart I went with that one instead and the Bristol became the sidekick. Thanks, but those skills are only mysterious until you give it a go! Cheers HG, that's generous. Err, yes...just a bit different! 🚁 Jon -
Very sorry to hear that, Paul; it doesn't sound like much fun. That said, you're alive and kicking. What other hobbies, interests and pastimes are you able to indulge in to replace fettling bits of plastic? Jon
-
Scratchbuilt 1/72 1916 Bristol TTA
Jonners replied to Jonners's topic in Ready for Inspection - Aircraft
That's the attraction (and challenge) of scratchbuilding, isn't it? 🙂 That's very kind, Toryu, but I'm not sure about being an artist; more of a bodger who occasionally manages to call a model completed! You're welcome, Richie; there are some more BM WiPs and RFIs (1/72 Avro Avenger, 1/144 Handley Page Hyderabad and 1/144 Armstrong Whitworth Wolf, for example), but I thought that posting links to 3 other threads was enough of an imposition! Jon -
Scratchbuilt 1/72 1916 Bristol TTA
Jonners replied to Jonners's topic in Ready for Inspection - Aircraft
On and off over about 4 months, Richie, though with quite a lot of 'off'! As for other scratchbuilds, I'm not particularly productive but here are some of them: Jon -
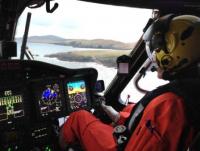
Review Build Airfix Sea King HU.5 1:48 Gets Built
Jonners replied to Mike's topic in Work in Progress - Aircraft
Mike, this is looking fantastic. Where the cabin top seat rails in the Mk3s and 3As passed the push-out cabin windows they were painted with yellow and black stripes and were removable. The individual seat top rails in front of the windows - emergency escape exits - could be pulled out of retaining clips on the cabin wall to allow egress. That may have been a later mod and therefore not applicable to this build, but it was quite evident from the outside. Also, while the backs of the pilots' seats on RAF aircraft were orange, the bases were actually yellow PSP liferaft pack with sheepskin toppers, cunningly designed to provide maximum absence of comfort. Again, this might well not be applicable to this early variant. 🤓 Jon -
Scratchbuilt 1/72 1916 Bristol TTA
Jonners replied to Jonners's topic in Ready for Inspection - Aircraft
Thanks for the generous comment, folks - all appreciated, especially as I'd reached the stage where I was sick of the sight of the darned thing and just wanted it to be finished! Cheers Kev, I'll bring it along on Wednesday evening, but I've something else up my sleeve for the club comp! Jon -
Hi folks, The Bristol TTA (Twin Tractor Type A) was a distinctly mediocre response to the problem posed by the lack of interrupter gear to allow safe forward-firing machine guns to be fitted to fighter aircraft. The designer placed a gunner in the nose to provide a clear forward field of fire, although it seems probable that a gun was never fitted as I haven't yet found a photo showing this, and placed the pilot well aft in line with the trailing edge of the wing...which, of course, would have made communication between the two crew members nigh on impossible. The long wingspan meant that the aircraft was rather less manoeuvrable than any opposition it would be likely to face, and the twin Beardmore engines significantly obstructed the pilot's field of view. The type seems to have failed to make any kind of positive impression and became obsolete almost as soon as it was constructed when the interrupter gear technology was obtained by the British. The model was scratchbuilt using plastic card, aircrew bodged together from various spare figures and Aeroclub metal wheels; all the struts were made from aerofoil-section brass with a bit of delicate soldering thrown in for good measure. Paints used were mainly Vallejo, with Tamiya clear orange (and a dash of red) for the varnished wood struts. Props were hand-carved from ash and the model was rigged with EZ-Line. Roundel decals came from spares, specifically from the Aeroclub Short 184 sheet. The red centres are ever so slightly out of alignment, but as they were part of the single decal (ie not separate) they'll have to do. The code numbers were printed from my home PC. This was an interesting challenge as it's an obscure type (only two TTAs were constructed) and I tried some new techniques, such as folding 10 thou plastic card around a balsa core to make the wings. The jury is still out on this one: 10 thou card is very thin so setting dihedral is tricky and the wings are very prone to dents. I made the mistake of leaving the trailing edge clamps in place too long, resulting in very unwelcome indentations along the trailing edges where the cement had softened the thin plastic. Fill, sand, fill, sand, fill...etc All that aside, I think it looks quite striking and I doubt that there are too many more TTA models out there. Thanks for having a look! Jon
- 32 replies
-
- 61
-
-
-
Wonderful modelling.
-
It would be stunning, but require the patience of a saint! Have a look here: http://www.guildofmodelwheelwrights.org/GOMW_vehicles.htm Go to the Roger Hardy and Frank Rake galleries to see some expertly-made ledge caravans, apparently from the Thompson plans, albeit with rather low-res images. I aspire to have a fraction of their modelling skill! Agreed, and I think that horse-drawn vehicles and implements in general are significantly under-represented by the model industry. A shame really, as they are at least as historically significant as a Spitfire or Sherman (more so, in my view).
-
Yup, that's the one, Noel. It came with a lathe setup, a drill chuck-type lathe attachment, a grinding wheel and a small circular saw table. They're quite difficult to find as complete sets, but I managed to find one on the Bay for around £100 all in including a motor. A new belt, a few minutes sharpening the saw blade with a small triangular file and some cleaning and fettling and it's useable again, if a bit fiddly. A bit like this? https://hobby.uk.com/plans-ledge-caravan-1-12th.html Not a plastic kit, but it would definitely keep you out of trouble for a while! Jon
-
There's a bit more to it now than there was when you last visited! And yes, it's a bit of a drive, but it's worth it.
-
Hawker Demon 608 (North Riding) Squadron
Jonners replied to galgos's topic in Ready for Inspection - Aircraft
Now that's really rather nice. I hope that you're as pleased with the result as your pilot figure looks to be! Jon -
Thanks for all your very generous comments - much appreciated. I think that's a fair point, Steve; I'm definitely no expert but, as I'd already read quite deeply into the subject of the wheelwright's trade, the construction of the model and especially the wheels was logical and clearly understood. Wheels are still tricky to make, though, and I'll need to make 4 on my next project - that's a lot of identical spokes to carve! There is a very comprehensive wheelwright workshop display at the folk museum where I volunteer*, so I have been privileged to be able to get 'up close and personal' with the tools and unfinished components, as well as the finished articles, and even give talks to visitors on the wheelwright's trade -plus a couple of other virtually extinct trades - explaining the bespoke tools and processes used. (In fact, I've just been asked to do exactly that again two weeks from today!) I find the subject fascinating, and making these things in miniature from scratch seems to be the best way for an inexpert layman like me to understand it. Jon PS. No bandsaws used! *Ryedale Folk Museum at Hutton-le-Hole, North Yorks
-
Avro 504К (Sk 3) (model 1914) (Airfix 1:72 old set)
Jonners replied to MicTroy23's topic in Ready for Inspection - Aircraft
Quite amazing. What a fantastic result from such an unpromising start - brilliant modelling. Jon
