


mirageiv
-
Posts
1,913 -
Joined
-
Last visited
-
Days Won
3
Content Type
Events
Profiles
Forums
Media Demo
Posts posted by mirageiv
-
-
Ok I had a bash this morning. I found the Tamiya polish compounds 'rounded off' the orange peel opposed to truly removing it and flattening things out. So I went with 12000 micromesh first lightly, then polished it up with the fine/finish compounds. I did spray a slightly heavier tint than I wanted originally as I knew some material would be removed so the reduction in tint wasn't too bad.

It isn't totally 100% removed however and I think if I keep polishing I'll take too much tint off, so for me I might call it as close enough. Even if I tried instead with acrylic clear tints I still will probs get some surface problems too, might try it on the spare canopy to see the difference though. Another option would be to apply a thicker, heavier initial lacquer tint in the knowledge that I'd polish it plenty to fully remove any orange peel and sacrifice tint density.
Anyhow, thanks for the advice guys!
David
-
 1
1
-
-
18 hours ago, bmwh548 said:
Are you 100% sure it's orange peel? Clear parts and lacquers aren't a good match, the paint can etch the part and make it look weird.
Unless you have a rather thick coat of "paint" on there you're probably going to rub through it pretty quick, I would probably stick to the polishing compounds, no micromesh.
Not 100% but it looks like it in person. Before I sprayed the tint I polished up the canopy a heck of a lot with the Tamiya compounds and got it super clear with no distortions etc...I have heard what you mention with the lacquers and clear parts but then I've seen some builds online doing the same thing and working ok. I have in the past also sprayed a clear part with lacquer tints and got no orange peel, but this was just luck I think in humid/temp and thinning conditions, the exception and not the rule for sure. The levelling thinner doesn't seem in my experience to damage the clear part other than a slight surface fogging that is easily removed with a little polish, I use it the clean failed canopy tints off in fact. However if you use Tamiya lacquer thinners by comparison, they really wreak havoc on a clear part.
18 hours ago, Steve Noble said:However you polish it you're probably going to thin the smoke layer. If you thin it more in one place and less in another it will appear as different shades. Many years ago I tinted a screen on a Tamiya Suzuki Hayabusa kit with Alclad smoke. It laid down perfectly with no orange peel texture and needed no polishing.
Yep I need to watch out for that, I'm gonna try to polish it as evenly as possible and see. There will be another tint going on the inside of the canopy which may help even out any differences, or it could highlight them! I looked at the Alclad clears, they do a nice gold-yellow also, I think they are gloss enamel based, I might look into them if this fails.
18 hours ago, janneman36 said:To be honest I think these on the last pic are tiny fractures that sometimes occurs when handling this sort of laquer Leveling thinner....maybe you should look at it with a magnifying glass...
If you need to remove this smoke clear you can use IPA to remove it!
If not just cleardip it with Microscale gloss..cheers, Jan
I have looked real close up and there are no tiny fractures on the clear part from what I can tell, I still do think it is a mini orange peel but could be wrong of course.
So I guess what you are saying is don't add another clear layer on top to polish, sort out this smoke layer first. I'm going to have a crack at polishing it up with Tamiya fine compound, then finish and see what happens and not even bother with the initial micromesh.
Thanks for the responses/help guys!
David
-
1
-
-
Hi guys
I have a few questions about removing orange peel from a lacquer paint over a clear part, maybe the car guys out there can lend a hand with their finishing methods.
")
I'm building an F-16 that needs an exterior tint to the canopy (gold tint will be on the interior), I used Tamiya lacquer clears instead of the usual clear acrylics as I knew I would need to do some polishing. Thinned with levelling thinner and then spraying a final pure levelling thinner coat helped get something really smooth as a basis.
However, there is a real fine orange peel in places that can be seen when looking through the canopy in some lighting. The orange peel distorts the reflection a little so the canopy does not have absolute clarity.
Even worse when you hold it up to the light at the right angle,
Now my question is, should I just polish up this smoke clear paint to get a non distorted surface? Or, do I need to first apply another lacquer layer of transparent clear ( I have UV cut super gloss) before polishing that up. I'm not sure if applying another layer of paint on top of the smoke and polishing that would solve the orange peel already on the clear part if that makes sense. It would give a smoother outer surface but maybe still these irregularities would be visible? In the past I have sprayed tints with a slight orange peel like this one, then dipped the canopy in Johnson's klear and the distortion caused by the orange peel is still a little visible when looking through, despite the klear layer inside and out.
I have mircromesh up to 12000 and the three Tamiya polishing compounds to work with. For the polishing, what grade should I start at? The painted layer of smoke clear already on the canopy is extremely thin so I'm cautious of using anything more than the polish.
Any advice on how to sort this would be greatly appreciated
Cheers,
David
-
Fantastic build Jon, I love the crisp finish with subtle weathering and the colour selection is just spot on. I'm pondering about getting the Kinetic kit also for the decals to do one of the blue F-16As, the Fightertown and Two Bobs sheets seem impossible to find!
David
-
1
-
-
8 hours ago, Creepy Pete said:
@mirageiv Too bad they put a look down/shoot down radar into the MiG-29 and Su-27, so they don't need to chase a Tornado at low level.
It wasn't that straightforward.
-
I've been told F3's have chased down F-111s and B-1Bs low level over Alaska with missiles (IIRC 2 Skyflash, 2 Aim-9).....they got the kill, needed fuel pretty quick after however. The F3 was very slippery low level from what I know.
High speed at low level is a nice defence, a Tornado IDS isn't gonna mix it with a Su-27 or MIg-29...best to just run in different directions.
The B-1 can shift on the deck for a very long time IIRC, they can run anything out of fuel trying to chase if they can't catch quick enough to get a shot.
-
2
-
-
23 minutes ago, bmwh548 said:
I've had issues twice with Aqueous dry to touch. I masked, painted the second color and when I unmasked the base color was a mess. Learned my lesson the hard way :))
Same. I find pure levelling thinner with Aqueous satin/gloss paints doesn't dry properly even after a week or so. It seems dry to the touch quick but it softens and fingerprints/marks if you tape or hold onto it for a bit even ages after spraying. Instead I mix normal Mr Color thinner with the levelling and it mostly sorts this problem. Learn't the hard way too!
-
1
-
-
Thank you Serge for the post.
I am no Mirage expert whatsoever and initially I did not suspect anything wrong with the wing sweep, but began to suspect something due the the overly extended appearance of the air intake. I still cannot be 100% certain but it is in my opinion only that the wing sweep angle was not quite enough for the first edition, I show my case towards the end of post 25 of my Britmodeller WIP thread here .
The drawings used come from reputedly accurate drawings, I don't believe drawings are gospel truth at all but I assume the wing angle to be correct. The wing angle on the drawings when scaled to 1/48 matched the Heller and Kinetic 1/48 Mirage III kits perfectly, both reportedly to be accurate (especially Heller). Scaling the wing to 1/72 and the Modelsvit kit showed a little lack of sweep. So either the drawings, Heller and Kinetic are wrong, or Modelsvit's initial first Mirage IIIE is. It isn't major at all and I think most wouldn't think twice about it. I mainly model by eye, if it looks good, it is good IMO, but the wing sweep did just seem a little 'off' enough to notice it.
The kit I think is great overall though, can be hardwork in a few places for a NMF but the detail is unreal, on par with my 1/72 Tamiya F-16.
The new kit looks much improved however, especially the new flaps/alierons. I am looking forward to the IIIB!
Cheers,
David
edit...My photo of the problem
Compare the dimensions of panels and the cannon etc...with the photo from airfighters.net: https://www.airfighters.com/photo/71537/M/Switzerland-Air-Force/Dassault-Mirage-IIIS/J-2331/
-
3
-
 3
3
-
-
On 7/18/2020 at 10:18 PM, Murph said:
Those bands might be red, not yellow. I would also be surprised (to put it mildly) if they loaded live weapons at an airshow. This is a live weapon being loaded in the Middle East.
Regards,
Murph
Yep I did think it was odd with a live weapon! Thanks for the pic, that is the definitive answer there.
Cheers guys,
David
-
1
-
-
Fantastic work Anirudh, beautiful finish to the paintwork! Replicating those canopies is very difficult. I prefer the darker tinted one from your options but any combo is right as it can look like any option depending on the light, nothing is wrong here imho and it is down to personal preference. Does the metallic gold reflect under direct light? I've experimented with Alclads (very fine pigment) mixed into clears with this and it works ok but sometimes you still see the tiny metal flakes even when using very small amounts, still not 'the answer'. Also I found in order to reduce the cloudiness of the tint you can thin and spray with Mr Color levelling thinner with a final wet layer (you don't even need to dip the canopy tbh for clarity), the problem is when using the acrylic clears you have to let it cure for a week or so to stop any cracking under the future/klear which got me in the past with only 1-2 days drying. Since then I switched to tinting with Mr.Color clear lacquers which give crystal clear canopy tints and cure within a day or so before dipping them, also you can polish out any little bits of dust or lint that managed to get on there easily.
Anyways, really great work!
David
-
2 hours ago, Red Dot said:
You could always cut away the rear end, paint the rings, and stick it back on again.
No one will see the joint, so far down the pipe.
But then, that is extra work of course!
Andy
Andy stop injecting these complex construction techniques in this thread, at this rate if this kit can't do Mach 2 and shoot something down I'll be wee weed.
-
 2
2
-
-
Cheers guys, glad you are enjoying the thread.
18 hours ago, Shorty84 said:Hi David,
from your photo it really looks to be some kind of clear varnish. The change in colour seem to result from the different sheen of this coating. Maybe it could be replicated the same way on the kit (matt base coat and semi-gloss/gloss for the skid areas, maybe with a slight tinting if the contrast is not high enough)? Anyhow, will be an interesting detail when added.
Cheers
Markus
I agree, I think that will be the best method, matt/satin clear + very thin grey to tint.
12 hours ago, exdraken said:Great wok on the canopy!

Quatari Rafales are supposedly getting the Sniper pod for external differences if I am correct....
Cheers Werner, yep they are getting the full complement of the most up to date kit. I'd like to load some Meteor missiles so I might hold off on the weapons load until I get them, or maybe even add Scalp + Meteor later on, not sure yet. I do like the look of simple load on the Rafale.
On the canopy, I ended up redoing it as the future/klear I dipped it in refused to dry and just left fingerprints even after several weeks. So I got a new bottle which works well but I left off the Alclad copper tint this time. I changed my mind and think maybe it is too much for the Rafale sometimes...mostly it just looks normally tinted, for the F-22 and F-16 however I will use this technique though certainly.
So the new tint with 4 parts smoke:1 part clear orange, this time I made it more subtle also. The black seals and interior were masked and sprayed nato black.
The det cord on the front canopy here,
This was replicated with a very thin bit of light grey stretched sprue. It's so thin, it seems almost slightly translucent so I didn't paint it which looks like the real thing a bit more imho. This had to be bent to conform to the canopy shape and was trapped and glued by the mirror frame insert and central canopy divider (or whatever it is called). I didn't want to get glue anywhere near the actual clear part of the the canopy.
Finally I replaced the HUD projector with a bit of purple-ish film which toned this area down a bit and dry brushed the avionics bay a bit more, the cockpit is glued and finished now so I can put the canopy on and get on with the painting.
Thanks for looking,
David.
-
6
-
-
On 7/7/2020 at 10:20 PM, Shorty84 said:
Hi David,
great work on the Rafale, Quatari colours get my vote too.
Your rework of the surface details makes quite a difference, much more realistic 👍
Are these anti-skid surfaces in the middle of the upper fuselage panels? Never seen that replicated on a kit (maybe using slightly darkened camo gray?) and would look quite interesting if done...hint, hint

Cheers
Markus
Thank you Markus, because I will not weather the jet much at all, maybe the finer surface details will help balance out the realism...IDK, we will see.
Yep anti-skid, the Syhart decals come with some nice masks to replicate these pretty easily fortunately, I wouldn't have looked forward to making those!
I found a Getty image of this exact area of the Qatari Rafale, the actual colours and sheen (matt or satin?) are a little confusing though when comparing the left and right sides, Getty image here.
I'm not sure if the anti-skid material is actually a clear type paint/varnish they apply that subtly changes the underlying colour, not sure but it seems to change with the differing colours on the Qatari grey scheme opposed to the standard French grey Rafale.
On 7/8/2020 at 1:04 AM, SAT69 said:Gorgeous work on the seat. Combined with the fine console and instrument panel detail, you have a world class cockpit built for your Rafale.
Thank you SAT69!
Cheers,
David-
1
-
-
On 7/6/2020 at 11:42 AM, arnobiz said:
Great work, I love the seat and the attention to detail overall. As I have 3 Rafale kits in the stash I've design and printed full length intakes which plug at the back end of the kit parts, let me know if you'd be interested
")
Arnaud
Thanks for the comments guys!
Arnaud, thank you and nice work on the intakes, they will be too late for this build but I'd like to do Rafale B in the future, I'll send a PM.
David
-
Fantastic model Alan, one of the best Hornets I've seen! I think replacing all the mesh was worth the hassle and the cockpit is very convincing, love the HUD. What in the end did you use for the cockpit screens? Excellent job again!
David
-
1
-
-
8 hours ago, exdraken said:
Very nice and appropriate start!
I like what xou did on the seat!

Not so surr about intake coverd in general... are you going to fit RBF tags as well?
Thanks guys for the kind words!
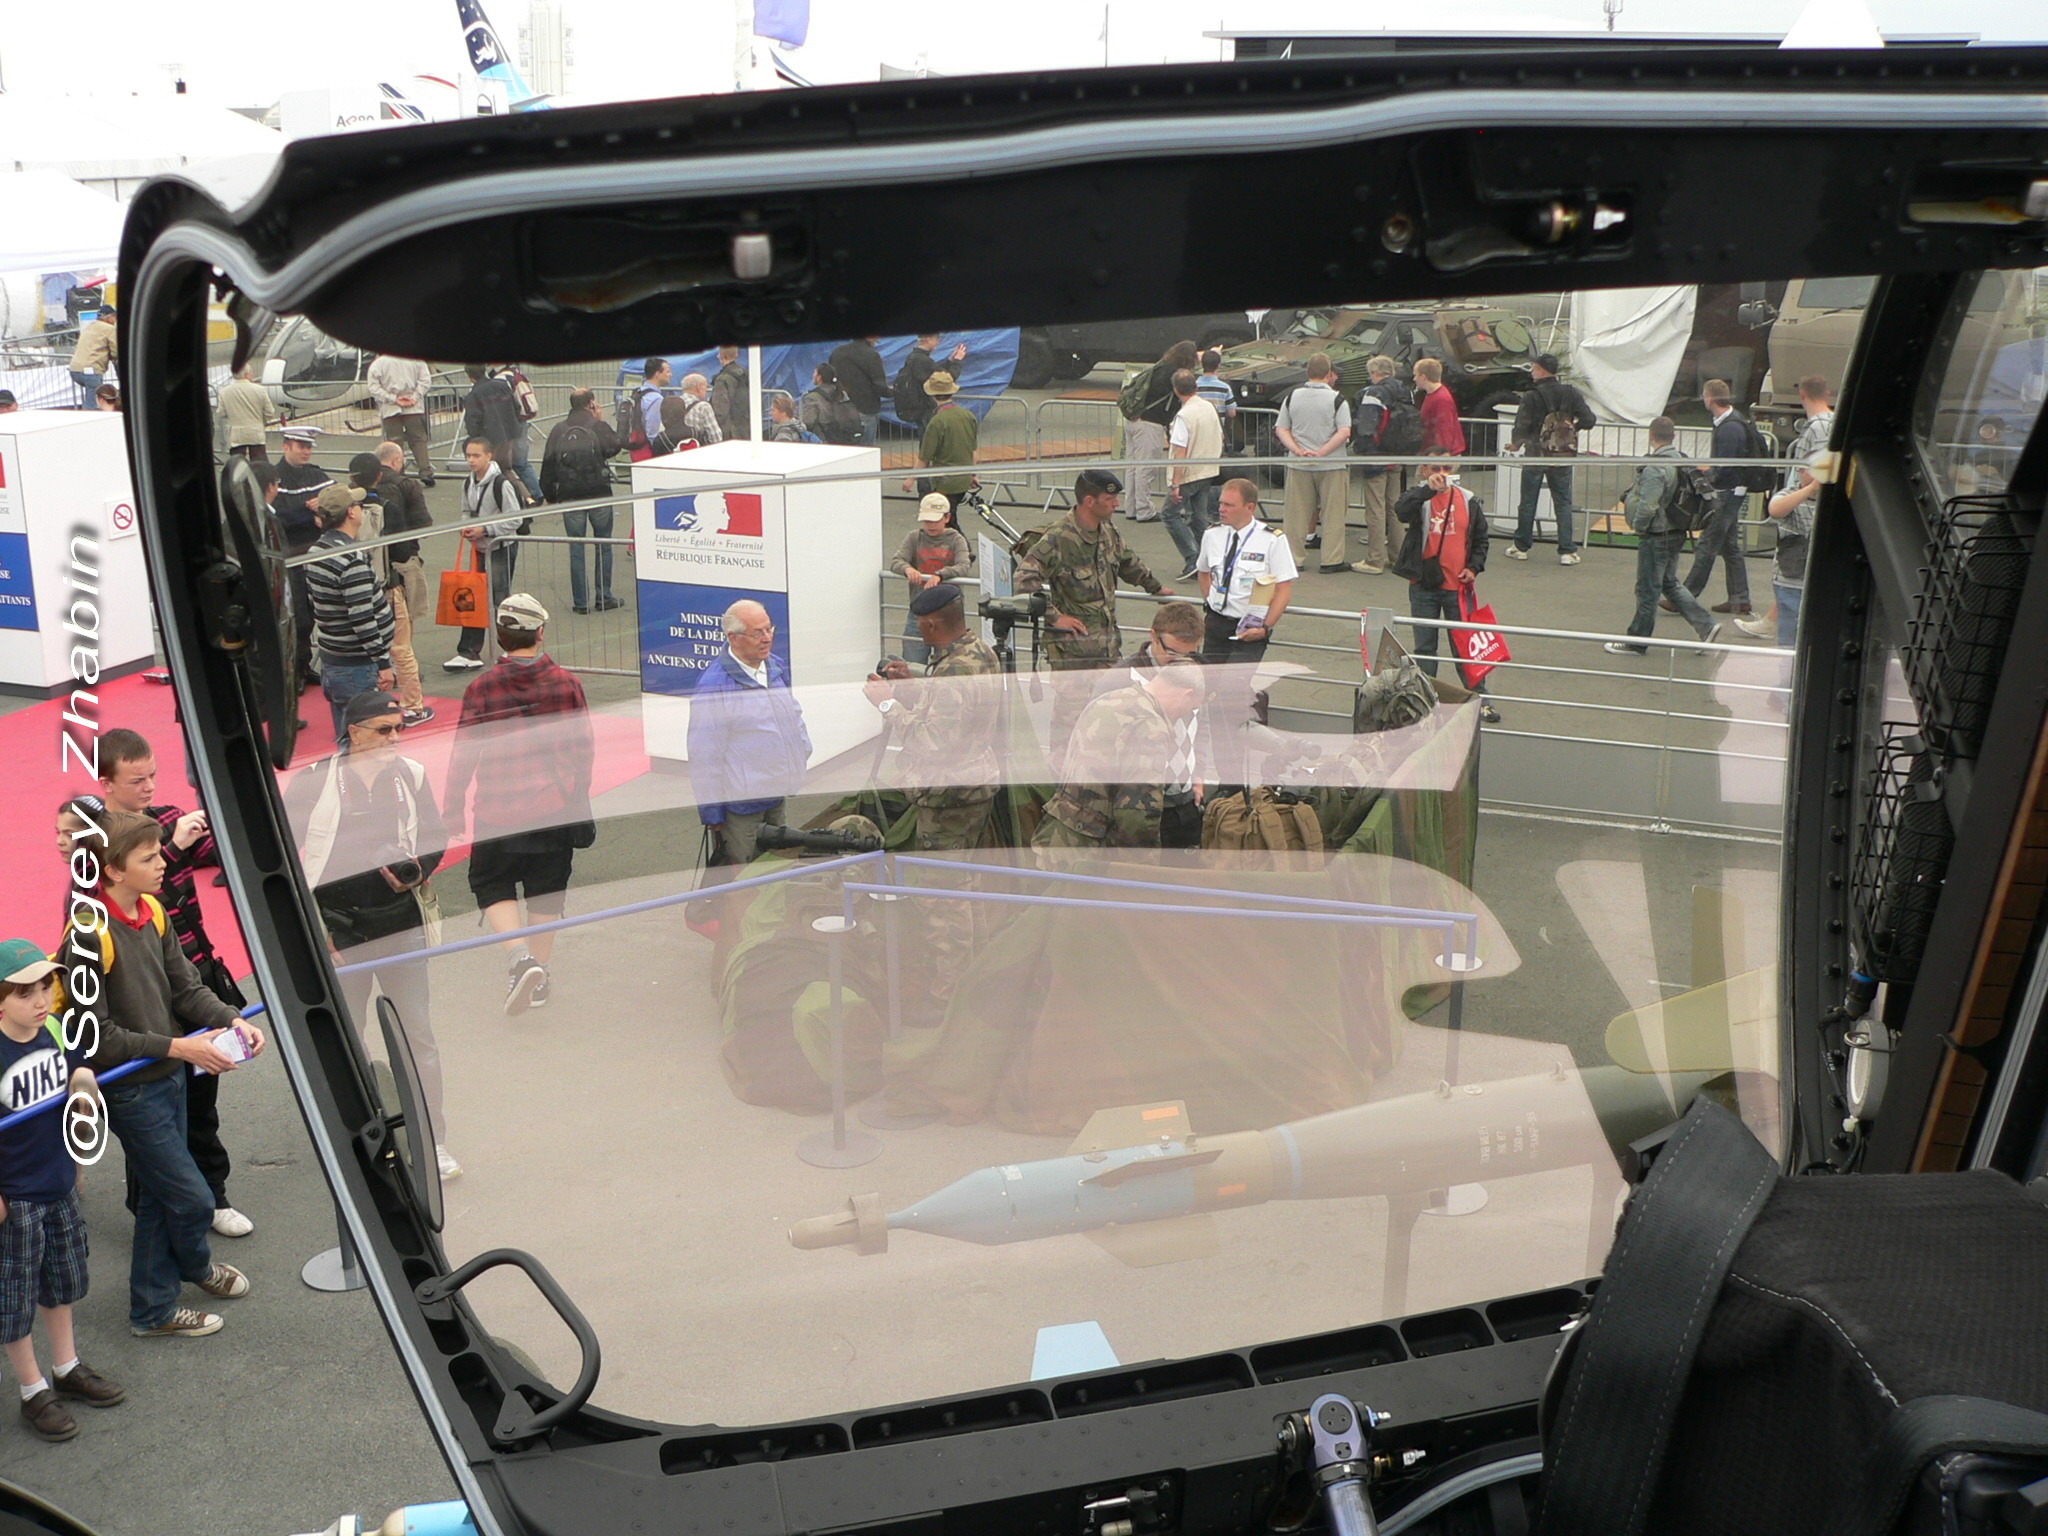
Werner--I think on a QRA fit there should be no intake covers and the canopy should be open ready for the pilot to hop in but I'm going to ignore those two details this time, let's just say 'prepped for QRA' opposed to 'on QRA'. I've not seen any images of operational Qatari Rafales other than ones taken in France and a few general publicity shots over there so I'm not sure what the exact QRA load is, given it is a small place I thought the French load of single tank + 4xMICA looked reasonable.
Rafale on QRA here:
The intakes are ok from most angles other than looking straight ahead due to the main gear bay holes in the fuselage which allow light into the inside, you just see right in there so I'm making them to hide that. RBF tags, maybe just a few but I really don't see many in photos.
Cheers guys,
David
-
3
-
-
On 6/14/2020 at 7:14 AM, exdraken said:
Quatar for the camo gets my vote!!
Nice start!
Rafale EQ it shall be!
Update 2.
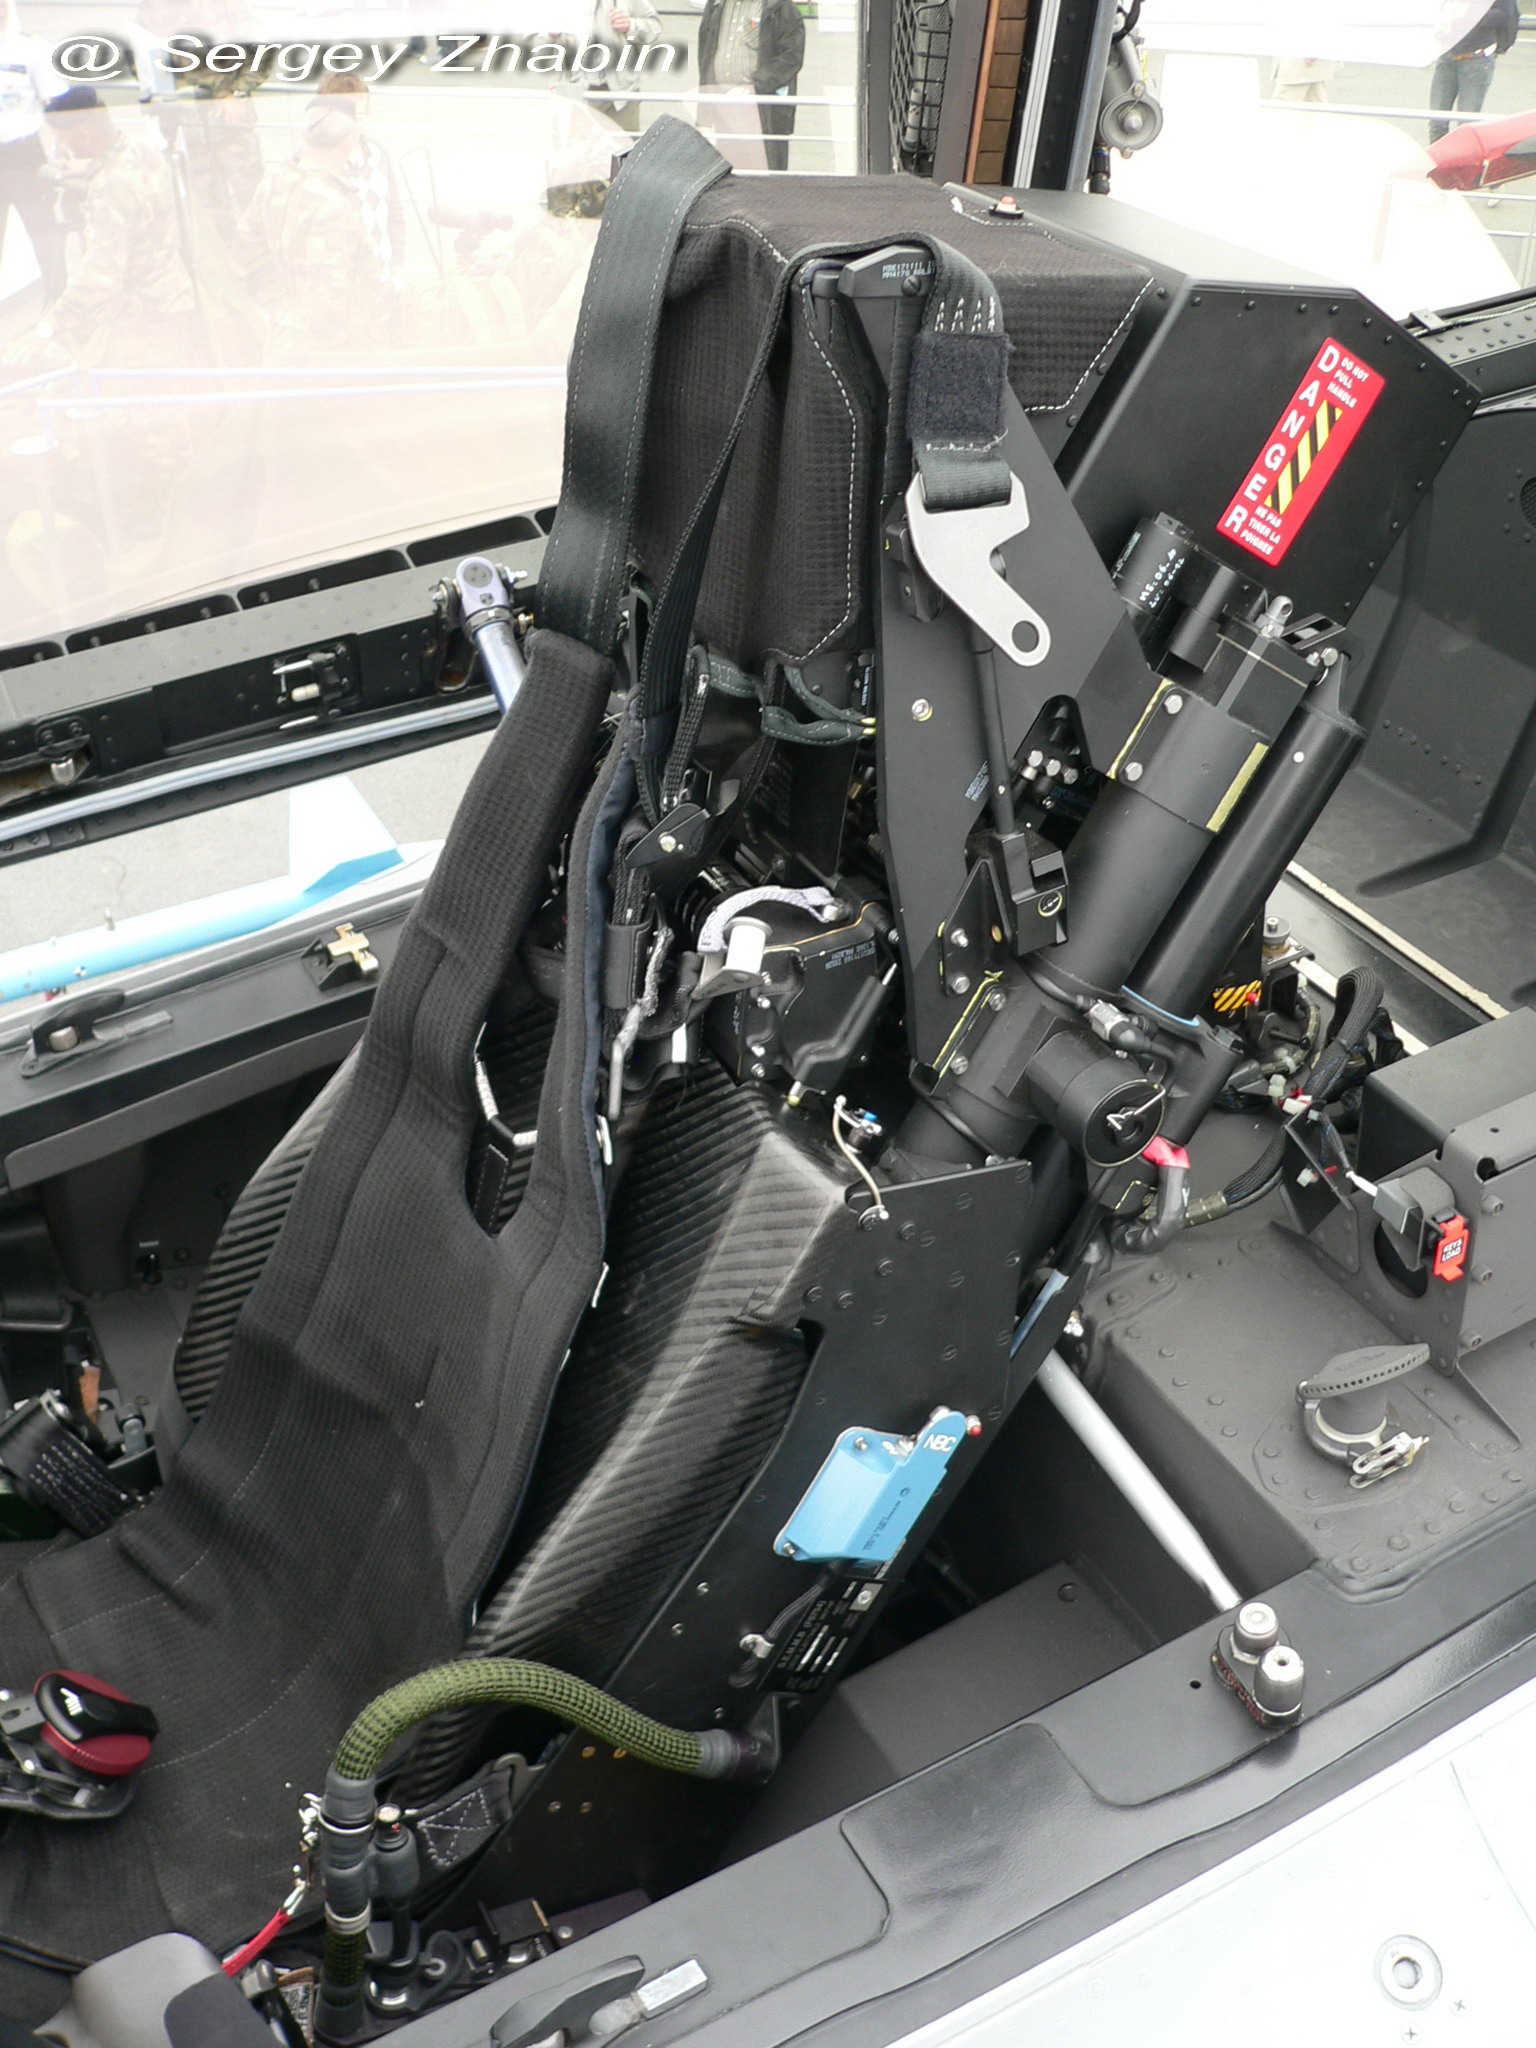
I couldn't find the Wolfpack MK.16 ejection seat when I started this project a few years back and decided to detail up the kit seat instead so most of that was already done when I picked the project back up, fortunately Revell did a very good job over all so not much extra work was done, mainly adding the seat and belt harnesses. The belts are two pieces of Tamiya tape stuck together which I find gives a nice scale thickness, not quite as malleable as foil however but that wasn't needed here.
Mk.16F
The mirrors were done with Alclad airframe aluminium, the pic isn't great but they have a nice reflection in the flesh.
The lap belts will be glued to the side consoles. The pic below in comparison with the kit seat oob, unfortunately during handling the left shoulder strap came loose so I'll have to fix that. The seat backrest is carbon fibre I think and was masked and painted with metallic greys. I made the main buckles around the headrest as nothing in my Eduard spares matched the unique shapes the seat used, my eyes didn't like that at all! I tried to just keep everything crisp and tidy, this is a brand new airframe after all.
The main screen on the centre console was redone with some spare Eduard clear film over sprayed with Tamiya clear blue. The HUD projector was Tamiya clear blue over some holographic film, it's hard to really replicate that part,
A while back I purchased from a gift store some hologprahic decorative material and found some use here for the HUD. Hssegawa makes some special self adhesive holographic film but it would have cost more than the whole kit so I decided to give that a miss and use my cheapo stuff instead. The HUD glass was cut from a curved part of a Volvic water bottle which had some nice clear plastic, I wanted more curvature tbh, a greater bowl shape but I couldn't get my holographic film to conform to anything with more curvature neatly. It was glued with microscale foil glue and applied like foil, fortunately this dries completely clear so you can still see through it well.
If you catch it at the right angle you get this,
It really makes the cockpit pop, love it!
From the other side, not entirely happy with the HUD projector but close enough!
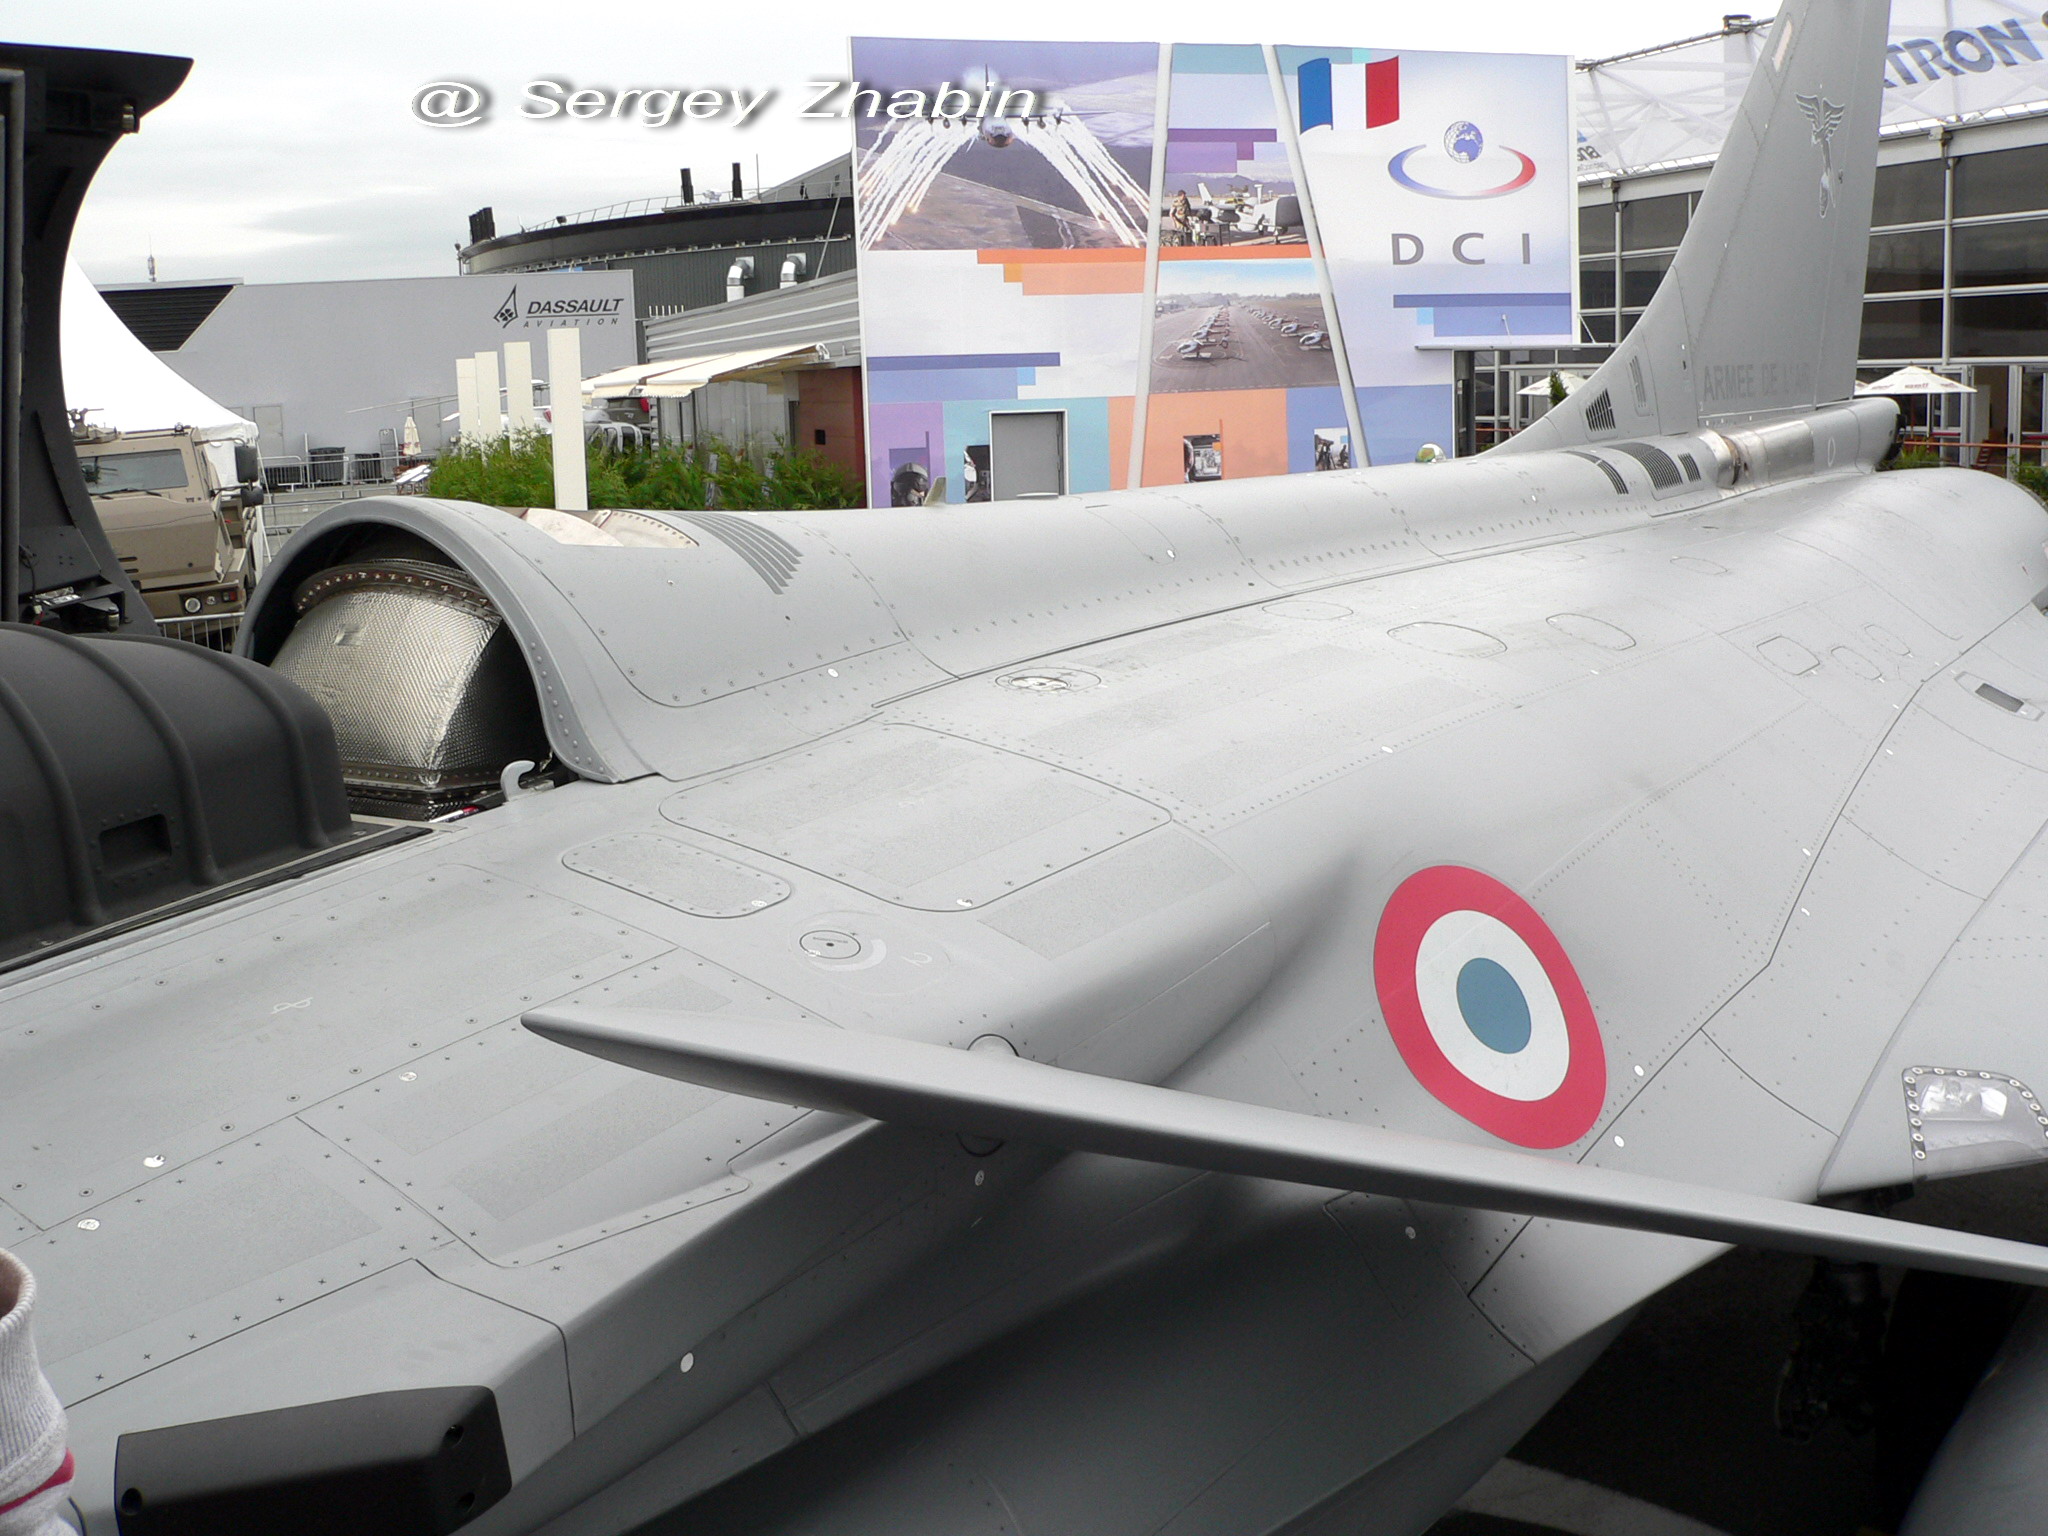
Whilst at the front end, Revell made the demarcation for the nosecone way too far forward (maybe a cm or so), it should extend back to where you actually glue the cone. Also missing is the prominent oblong panel and rivets forward of the OSF so this was scribed in,
Moving to the fuselage, some work I did a few years back but a bit of primer shows it here. The Revell kit was pretty damn good for the time but I think some of the surface details are a little bit heavy now (and not 100% correct), the Rafale seemingly has a smooth composite exterior skin where a lot of the panels are very fine and discrete. I remember spending quite a bit of time filling the main fuselage panels with Zap-a-gap and rescribing them finer, then adding some fine rivets in places. It was a blast.
Another kit's upper fuselage for comparison,
I'm hoping it will give a better scale appearance when the paint it on.
In the same vein of refining parts, all the leading and trailing edges of the control surfaces were thinned, not overly so due to the saw tooth pattern but also they aren't razor sharp in real life either,
The panel lines/details on the canards were filled for a smooth appearance as I didn't see any on the real ones,
So I decided to build the latest Rafale EQ of Qatar and that requires (what I know of) two little exterior mods on top of what I've already done. The first is the enlarged UHF antenna on the spine, luckily in the Syhart decals there is a nice scale drawing to make the part. The corresponding little base plate was also added on the spine,
The second mod is the newer style DDM-NG tail sensor hemispherical ball, for the moment I've just removed the older kit version and scribed the panel to mount it. I'll have to root around the spares to see what can be used for the hemisphere,
Pics of it here: http://www.liakis.com/rafalec/rafalectail.php
I don't know of any more special EQ mods so if anyone has anything to add I'm all ears
Some little details around the exhaust,
I'd like to arm the model in a QRA fit with Meteor and MICA missiles, but I can't find any of the former atm so I'll just go in the meantime with 2x MICA EM, 2x MICA IR, cannon and central supersonic tank which is the same fit the French use IIRC.
This meant going over work already done by removing the cannon cover and opening the ejector with the little vanes,
The tank has some raised weld seams that Revell did very well, the problem being when you sand the tank which wasn't an overly good fit, they all disappear top and bottom. So they were all removed and lines scribed to accept some stretched sprue,
Comparison with a kit oob tank. The tank from the box had some panels and strange holes on the surface which were all filled as I couldn't see them on any reference pics. I think I oversanded the raised sprue welds tbh and made them a bit too subtle but I'm not going to redo them now.
I've seen two types of intake covers, hard flat face and the bag style which are being made like so with intakes from another kit to get the shape. Maybe the biggest downside of the Revell kit.
Besides the decals I haven't purchased any aftermarket for this build which is strange for me, ,so I caved and got some resin wheels from Reskit. I think they are a nice improvement over the kit options which aren't terrible either.
General shot,
Next update it should be in camo!
Thanks for looking,
David
-
10
-
1
-
-
14 hours ago, Leander999 said:
Great closeup, but looks very different. Wrong missile perhaps?
I hope they're helpful in any way!
Thank you chaps for help, very much appreciated!
Hmm the last image shows a MICA EM but a different config of thrust vector vanes, I think it is a live missile (yellow dotted bands) so I guess that is the most correct config of a current live MICA, I'll use this one I think.
Cheers again,
David
-
1
-
-
Hi guys,
Does anybody have a good image (or link to one) of the exhaust of the MICA EM/IR missile? I"m struggling to find any close ups atm online.
Thanks for any help,
David
-
On 7/1/2020 at 9:10 AM, Work In Progress said:
Interesting... looks like you tested one?
Yep, the texture on the decal was very apparent on a painted aluminium surface, also the very matt clear film, probably the worst decal I have seen to be completely honest for a NMF. I've done a little more digging and I have a recent reprint of the sheet which is important. Earlier print runs look to have much better quality from the images I've seen, probably the reason for the positive replies by other people. I also have an earlier Berna 1/72 Mirage IV sheet which is very nicely done, nothing like the Mirage IIIB sheet I have now. I've seen some other recent reprints of the IIIB sheet after inquiring on ebay and they look exactly like mine with the texture and thickness so I'm personally concluding the most recent print run wasn't the best quality, not that Berna is poor quality in general.
edit..If you do end up getting one I'd be keen to know the quality of sheet you have.
-
This is fantastic detail work, I have one of these and the thread will be most helpful when I get to build it. I look forward to how you tackle the paint job!
Cheers,
David
-
I purchased a set of the Berna Mirage IIIB decals recently and tbh they seem awful! Super thick, matt and the carrier film has a strange textured appearance. I don't think they would look good on camo let alone a NMF, really disappointed. Maybe I got a bad print though. Here is a pic to show what I mean of the IIIB sheet,
It's a shame because I wanted to do a Mirage IIIB also using the Heller kit (the kit decals in mine are well past their best) and I can't find any other IIIB decals out there.
David
-
1
-
-
That is fantastic work Christer, thank you and a very welcome missing piece in modelling the Tornado! I have one point though. Have you dawn the CAD for an inert, unloaded MW-1? I think if fully loaded the cylindrical munitions within the dispenser tubes would be flush with the outer faces, therefore the round holes would not be 3D sunken but merely a 2D scribed circles representing the outer face of the munition flush with the sides. I'm not sure how one would paint all those little circles correctly so maybe a wash within the indents of the holes like you have designed is actually a better way to go about it.
David
-
7 hours ago, CJP said:
Fabulous work on the cockpit and canopy tint - this is going to be a really nice model - I've been toying with the thought of buying the Rafale M kit for my Aeronavale collection so after looking at your WIP I think I will
CJP
Thank you, the Revell Rafale is certainly the best out there, head and shoulders above the Hobbyboss offering! The latest Rafale M boxing with bombs also has very good decals.
Thanks guys for the kind words, it may seem a little excessive adding the cockpit detail with a closed canopy but you really do see it all in there so worth the effort imho
Cheers
David
-
1
-


1/48 - McDonnell Douglas F-4B Phantom II by Tamiya - released - Blackdog detailing sets
in The Rumourmonger
Posted
Are there any concrete hints to further F-4 variants as of yet? I ask because we are still waiting more than a decade for the F-16A/B/D which surely would also have solid sales figures, still don't understand that one.