


giemme
-
Posts
13,256 -
Joined
-
Last visited
-
Days Won
7
Content Type
Events
Profiles
Forums
Media Demo
Posts posted by giemme
-
-
Neat job with that stencil, Simon!

Ciao-
 2
2
-
-
On 20/01/2024 at 09:31, Biggles87 said:
Just had a big catch-up starting at your Jan.07 update.
Some great work on the intake ( why are leading edge inserts invariably badly fitting?) and the exhausts. If I remember rightly, on my last Tamiya 1/48 Corsair, before we came to France, I drilled out the exhausts and fitted short lengths of squashed Contrail tubing to the insides to give some depth.
Keep up the good work.
John
Thanks John, much appreciated!
 Contrail tubing sounds like a great idea too!
On 20/01/2024 at 10:41, Terry1954 said:
Contrail tubing sounds like a great idea too!
On 20/01/2024 at 10:41, Terry1954 said:Wow, I've not checked on this one this year so far, so first a very belated Happy New Year Giorgio!
I see much excellent work on this bird, mostly improving on the kit.
Nice job on the U/C bays (great example of hairspray chipping) and the wing root intake issue surprised me for a Tamiya kit, but your fix has been very cleverly implemented.
The work replacing Tamiya's attempt at exhausts under and behind the cowling looks extremely accurate. Very neat use of brass tube.
As usual, a fantastic update.
Terry
Happy New Year to you too, Terry - and thanks for the praise!
On 20/01/2024 at 15:20, Brandy said:Likewise!
Happy New Year to you and yours Giorgio, and I love the improvements to the exhausts.
Ian
Happy New Year to you too, Ian - glad you like the exhausts job
Not much time for modelling lately, but I kept working on the wings. Based on the info I could gather, I blanked out the port wing leading edge window for the approach light, and decided to try and scratch build a gun camera for starboard wing - actually, something that gives a hint of a camera, since very little will be seen but the front part. So, based on a handbook drawing of said camera, I put together this:

using a piece of an old sprue and a plastic rod. The idea is to place it like this:
So I carved out the square window on the wing leading edge
While I was at it, since I wasn't really happy with how the gun ports looked like, I decided to cut some 3 mm discs with my Curio from thin styrene, and glue them in place over the existing holes with TET
I then used a pointy toothpick to pierce their centers and push it in, so as to give some depth to the holes and a better round finish. The outer excess plastic was sanded away
Primer will tell if they need more refining, but form normal viewing distance, the holes look a lot better than before.
Back to the gun camera: how to reproduce its protective glass? I thought of using clear UV resin, by putting some tape on the inside of the wing, pour resin over and set it with a UV torch. We'll call that plan A.
Spoiler alert: Plan A went south.... 💩

I didn't take into account that the surface finish of the tape wasn't smooth enough, so upon removal this was the result:
Foggy, uh?
 I even tried dry fitting the camera, to see the effect:
but all you could see was a darker fog. Not good.
Plan B, then; which consisted in plunge molding some clear plastic on top of the actual wing:
I had copied the window shape beforehand on a piece of tape, which I then stuck on the formed plastic as guidance for cutting it out
Well, Plan B went south too: it was impossible to cut a piece that little precisely enough, so there was no way of fitting it in its aperture. No pics, just frustration....

Plan C, then: I glued a strip of clear acetate inside the wing, like this:
I used Formula 560 Canopy Glue at first, then once set I secured the bond with clear UV resin placed along the edges of the acetate strip, but out of the way of the actual glazing.
Next pic shows some residual glue to be removed from the window area
But the dry fit showed a much better view of the gun camera
Next job will be scratch building the wingtip lights, but next time, though; meanwhile, all comments welcome.
Ciao
-
11
-
-
This is going to look interesting....


Ciao
-
1
-
-
Nice pre-shading, Johnny!
Ciao
-
 1
1
-
-
Shiny beauty!
Too bad you have to cover it up.... 
But the chipping is going to look ace!

Ciao
-
1
-
1
-
-
The wheel masking worked a treat!

Ciao-
1
-
-
18 minutes ago, Spookytooth said:
Simon, a little happier now.
And you should well be, great recovery!
Ciao
-
2
-
-
Well done, Bill
Ciao
-
1
-
-
Another dog, another RC model... boy, you're running down a dangerous slope, I tells ya!

I didn't remember you had the fancy portable spraying booth, BTW
Ciao
-
2
-
-
Nice progress, Johnny - looking forward to the painting stage!
Ciao
-
1
-
1
-
-
Following....

Ciao
-
1
-
-
Worthy addition to your choppers collection, Bill - another little gem!
Ciao
-
1
-
-
Steady going, Simon - so close to painting stage!
Ciao
-
1
-
-
1 hour ago, ICMF said:
Well, yes and no. The actual glazings on the real airplane ARE the same, but the way they're mounted makes them look different, so you need different windscreens on a model kit to reflect this apparent difference.
You are indeed correct, and there is the exact same explanation in the link I posted. Modelling-wise, it translates into a different windshield.
1 hour ago, ICMF said:But the weird thing is - and what I was referring to - they also tooled a different canopy sprue (as in, the actual, moving sections above the crew) - the long nose uses sprue Y, while the short nose uses X1. I can't imagine why they would do that, as those parts should(?) be the same on all the kits. Guess I'll have to dig out my kits to compare.
Ah, that's odd; I'll dig out my J and D kits too

Ciao
-
1
-
-
2 hours ago, Giorgio N said:
Personally I'm at a point where I've decided to use the Revell outer wings on a Fine Mold EJ to build a good slatted wing F-4E...
Agreed, me too. If anyone is interested, here's my WIP on how I did that:
Ciao
-
5
-
-
5 minutes ago, perdu said:
Ordinary Prosecco (can I use that phrase?)
Not really, but I'll let it pass because it's you....
Ciao
-
 3
3
-
-
Nice quilting there, Bill!
But Spanish Prosecco......

Ciao
-
6
-
-
46 minutes ago, ICMF said:
Z and Y are the long-nose clear parts; X1 and X2 are the short nose clear parts (weirdly, they tooled a different canopy for the short nose - shouldn't they be the same?)
I guess you are referring to the windshield, which is shorter for the long nose versions. Actually, Finemolds is the only company that got it right (at least in 1/72); they are in fact different, check this link out for a very exhaustive comparison:
https://soyuyo.main.jp/f4/f4e-2.html
Other than that, your post revived in me the (probably vain) hope that FM will produce slatted wings F-4s at some point.... Thanks!
Ciao
-
5
-
1
-
-
Thanks Dennis @Corsairfoxfouruncle, you are a star!
 12 hours ago, Spookytooth said:
You are doing a great job on those exhaust Giorgio.
By the time you have finished them they will look better the kit ones.
Simon.
Hopefully so, Simon - thanks for the vote of confidence
Ciao
-
2
-
-
On 07/01/2024 at 21:48, The Spadgent said:
Ingenious fix with the plasticard patch. I’ll pop that in the modelling bank.
Beautiful work dear boy.
Johnny
Cheers Johnny, thank you!
On 07/01/2024 at 22:54, VT Red Sox Fan said:Great catch up G, those wheel wells look amazing with YZC showing through the wear and tear areas. The plumbing also pops--with Johnny @The Spadgent on the plastic card trick--useful! Best, Erwin
Thanks Erwin!
Glad if I can be of any help ") On 07/01/2024 at 23:40, hendie said:
On 07/01/2024 at 23:40, hendie said:Meticulous as always, Giorgio
Thank you Alan, much appreciated!
On 07/01/2024 at 23:48, Spookytooth said:As above Giorgio, great idea using a plastic card strip.
She is coming together mate, steadily .
Simon.
Thanks Simon!
I just thought it was the easiest way to fix it
On 07/01/2024 at 23:57, Massimo said:Wow Giorgio!!!
As usual your approach takes everything in consideration and the result is excellent!!!
Splendid interior and I like the landing gears wells' weathering.
Well done !!!
I'll be watching closely!
Grazie Massimo, you are way too kind!
On 08/01/2024 at 00:40, Corsairfoxfouruncle said:Excellent work
Thank you Dennis, glad you like it!
On 08/01/2024 at 01:37, Cookenbacher said:Love those gear bays Giorgio
Thanks Cookie, I'm pretty happy with them too!
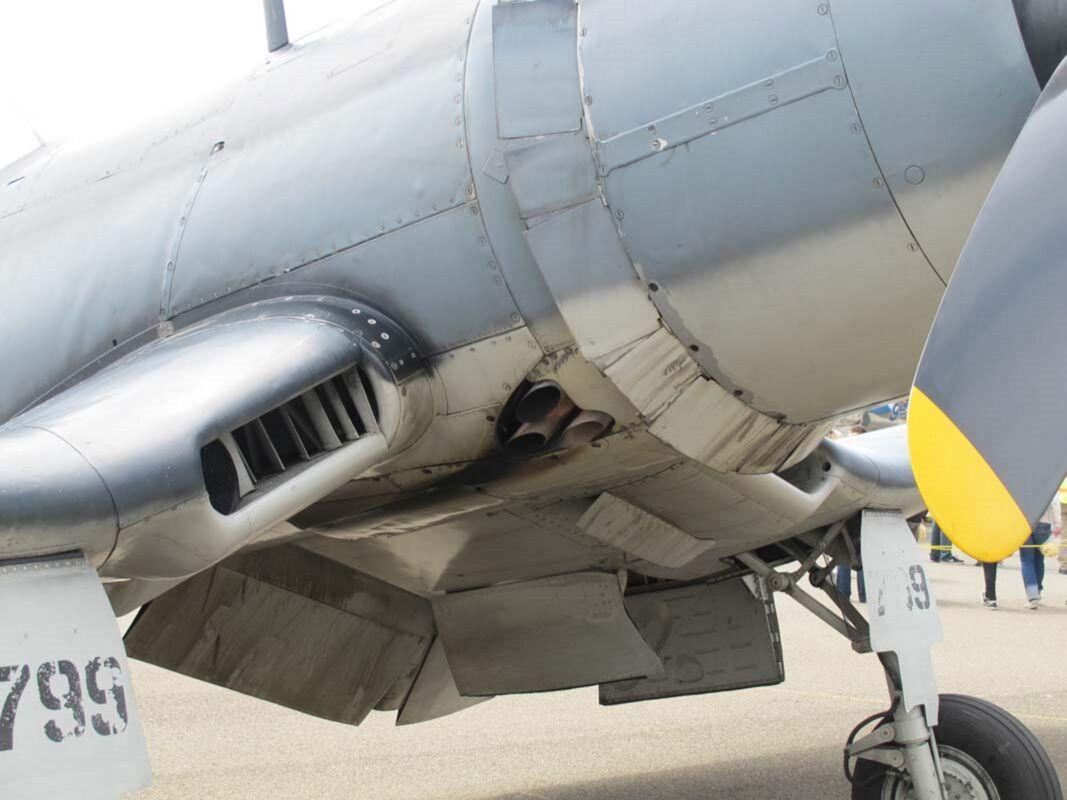
Here's a small update, I only spent a few hours on the WE at the bench. While dealing with the outer wings seam (nothing worth a picture, so far) I started addressing the exhausts; this is what Tamiya supplies:
Forget the placemet, which is quite incorrect, but those pseudo-pipes are way undersized and incorrectly spaced. In no way they are suitable to represent this:
(picture from https://www.net-maquettes.com/pictures/vought-f4u-corsair-walkaround/)
So I hacked some plastic...
and scratch built the terminal part of the exhaust pipes from suitably sized brass pipe, shaping the visible end with a Dremel sanding disc
they are just dry fit in place with some blue tack, so not the correct position nor spacing, but I think you get the gist.
I might just sand them at a slightly sharper angle, I will see before gluing them in. To refine the through and give the idea of some side walls, I glued in two strips of very thin styrene, coming from one of those low-on.plastic yogurt cups
I used TET fast setting glue here, but the styrene strip were so thin that I had to be very careful not to melt them completely.
Once properly cured, I refined them with a razor blade and I sanded the edges:
Now I need to do some more dry fit, involving the fuselage too, to determine the proper placement for the exhausts and to figure out a way to secure them in place...
Next time, though.
Dulcis in fundo, a couple of question for the Corsair experts: I was doing some research about the approach light, and found this build:
https://www.hyperscale.com/features/2001/f4u1arl_1.htm
which contains this comment:
"I took the opportunity to fill in the landing light near the left wing tip,
which was moved to the leading edge of the left wing after BuNo 17930"Again while researching, I found that BIG HOG is BuNo 17640. So, if I'm getting this right, I should fill in the port wing leading edge too; what do we think?
Second question: what is this tear drop shaped dimple on the very outer panel of the wing?
It's on both wings, and top and bottom. Should I fill it in?
Thanks in advance for any help.
All comments welcome
Ciao
-
9
-
-
Another little gem, Bill
Ciao
-
1
-
-
39 minutes ago, mark.au said:
Good to see you back at the bench CC 👍
Agreed 100%! And on a Corsair....
Ciao
-
1
-
-
27 minutes ago, The Spadgent said:
30 years. 😳 Madness.
30 years??? Did you engage as toddlers???

Excellent fix on the canopy, and great progress overall
Ciao
-
1
-
5
-
-
Happy New Year to you, Tony! 🥳
Amazing ypdate, as usual

Ciao
-
1
-
1
-


Solan Goose= Fairey Gannet AS.1/AS.4. Airfix 1/48.
in Work in Progress - Aircraft
Posted
Where's Stills?
The other three look good, though
Ciao