


Breaker
-
Posts
1,402 -
Joined
-
Last visited
-
Days Won
1
Content Type
Events
Profiles
Forums
Media Demo
Posts posted by Breaker
-
-
Thanks guys!
-
Hi guys, haven't been finishing much recently!
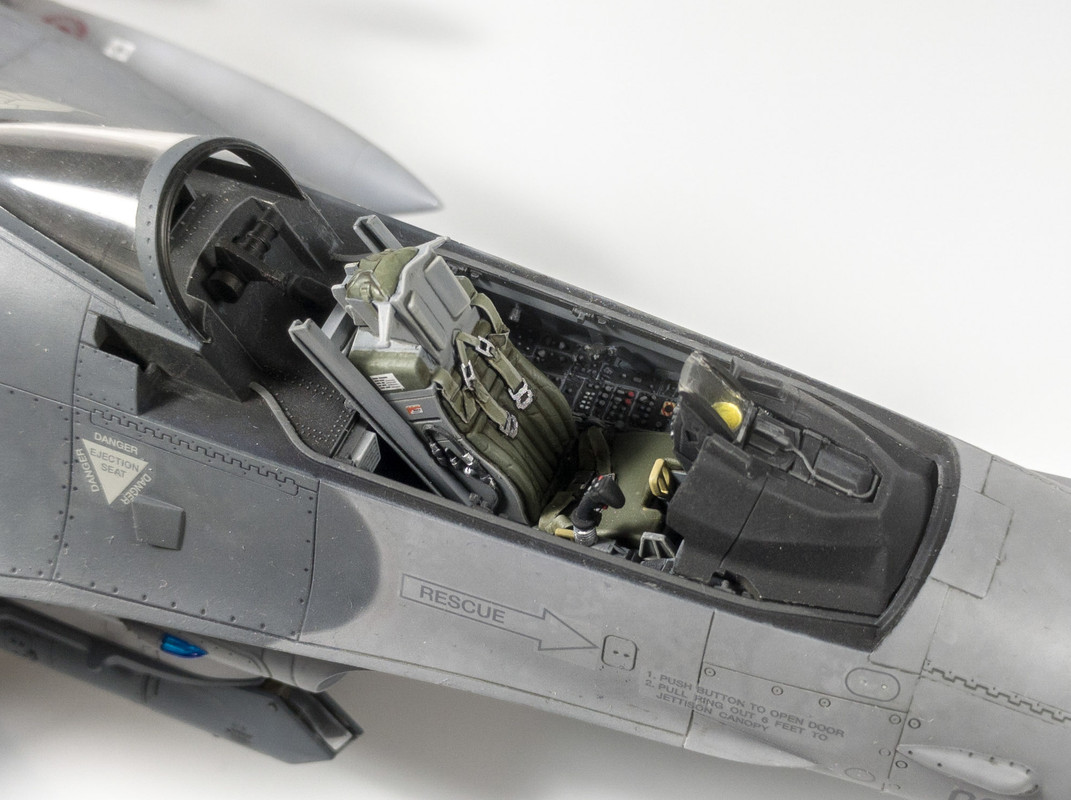
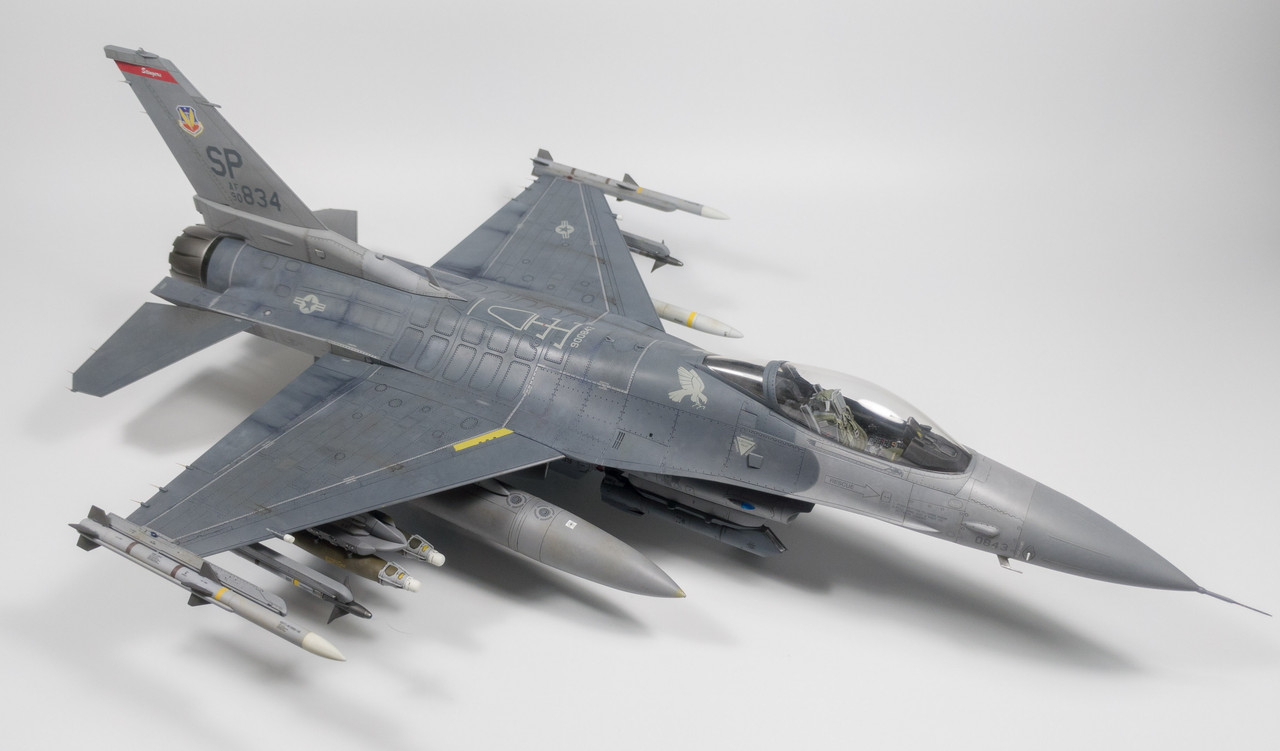
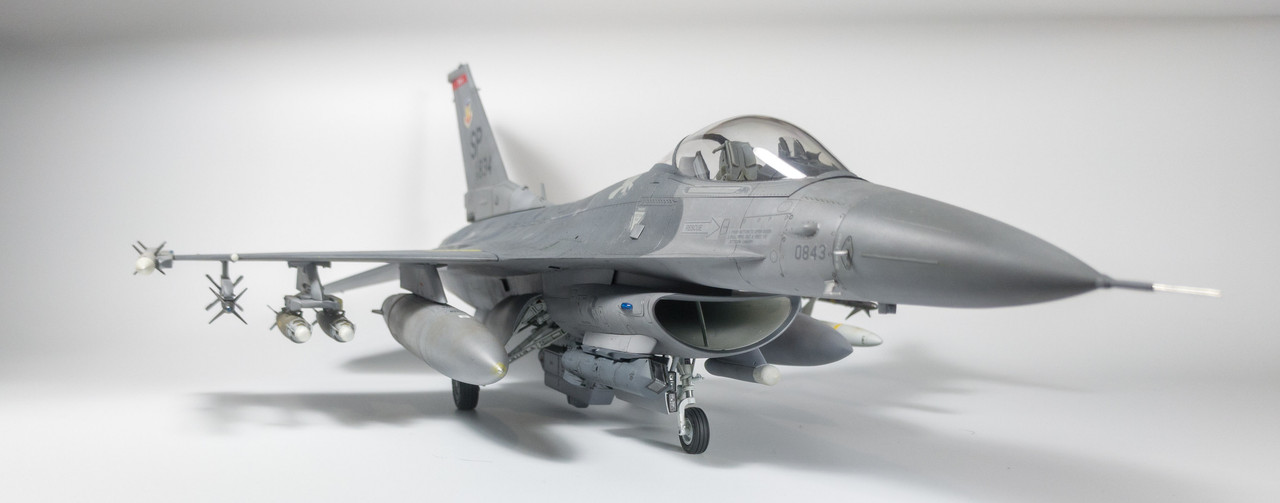
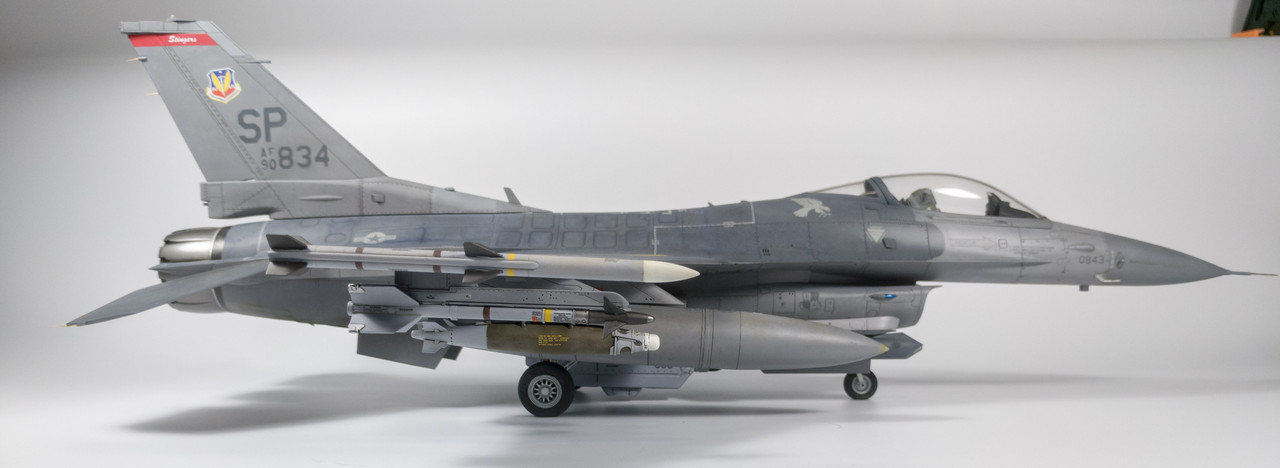
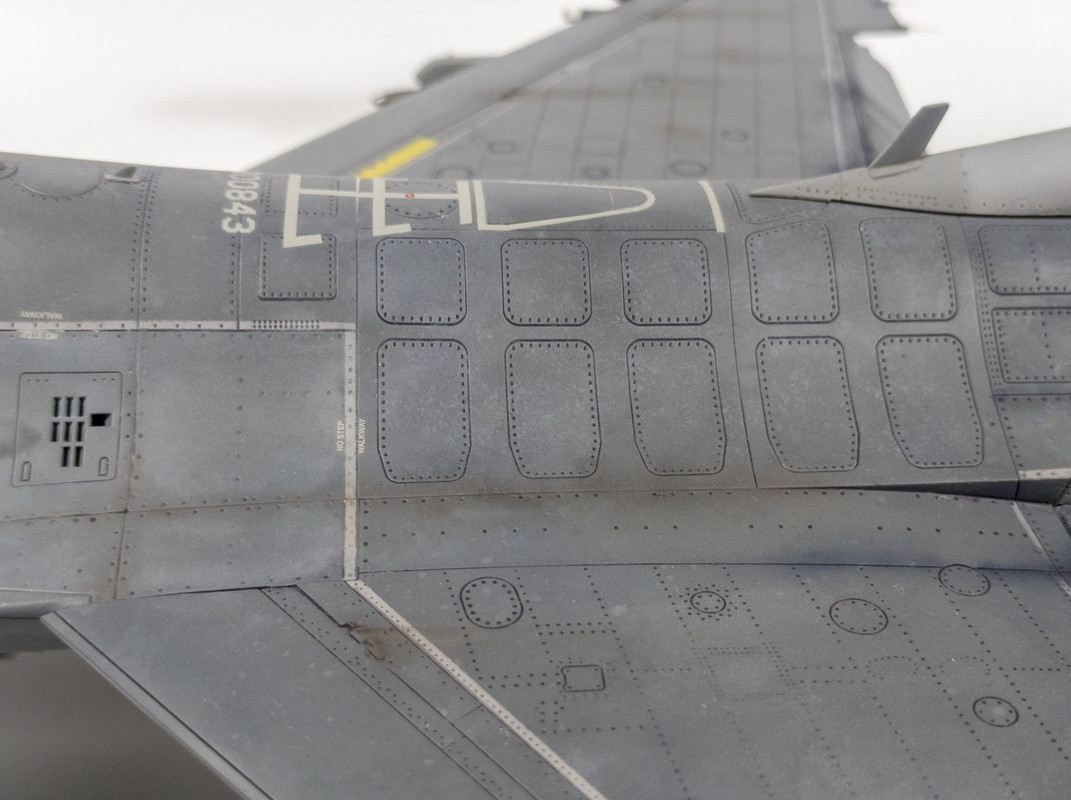
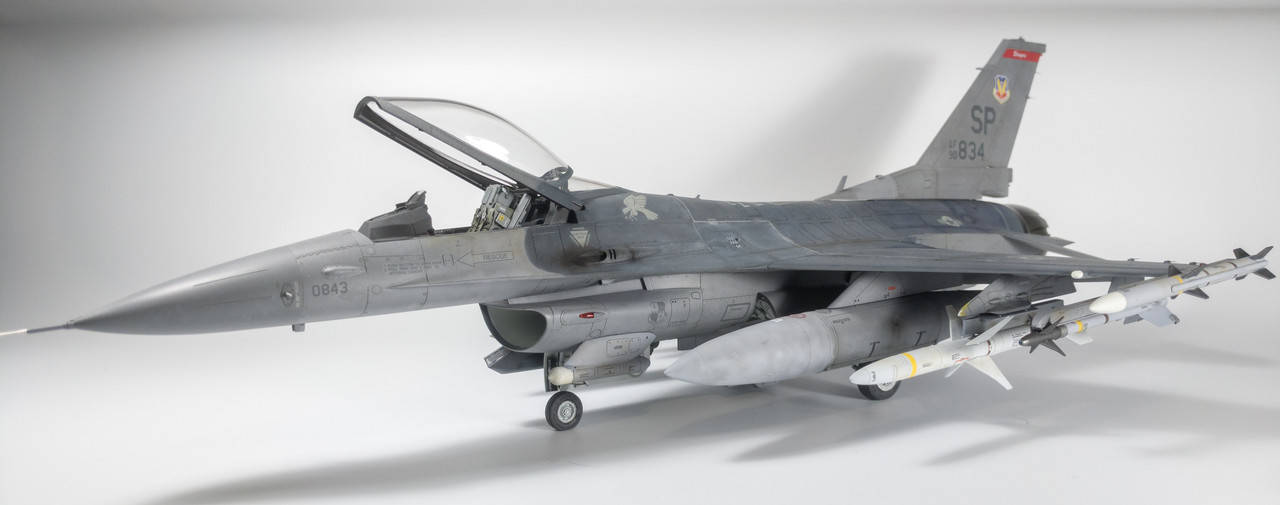
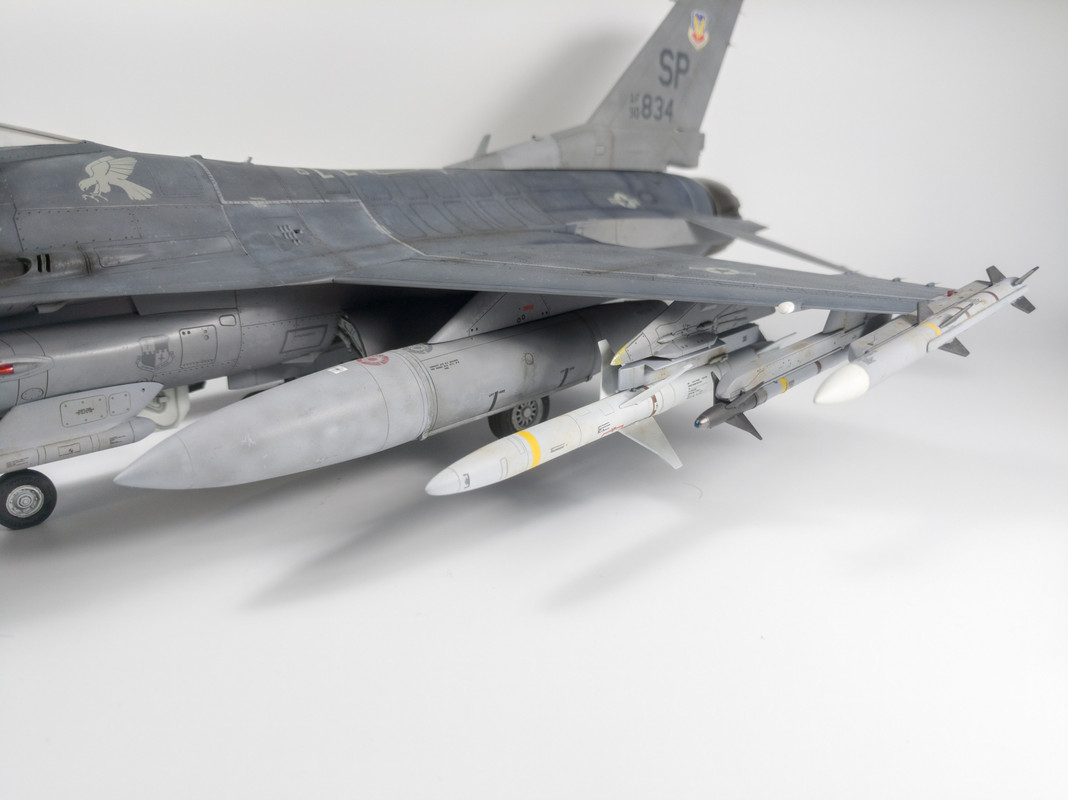
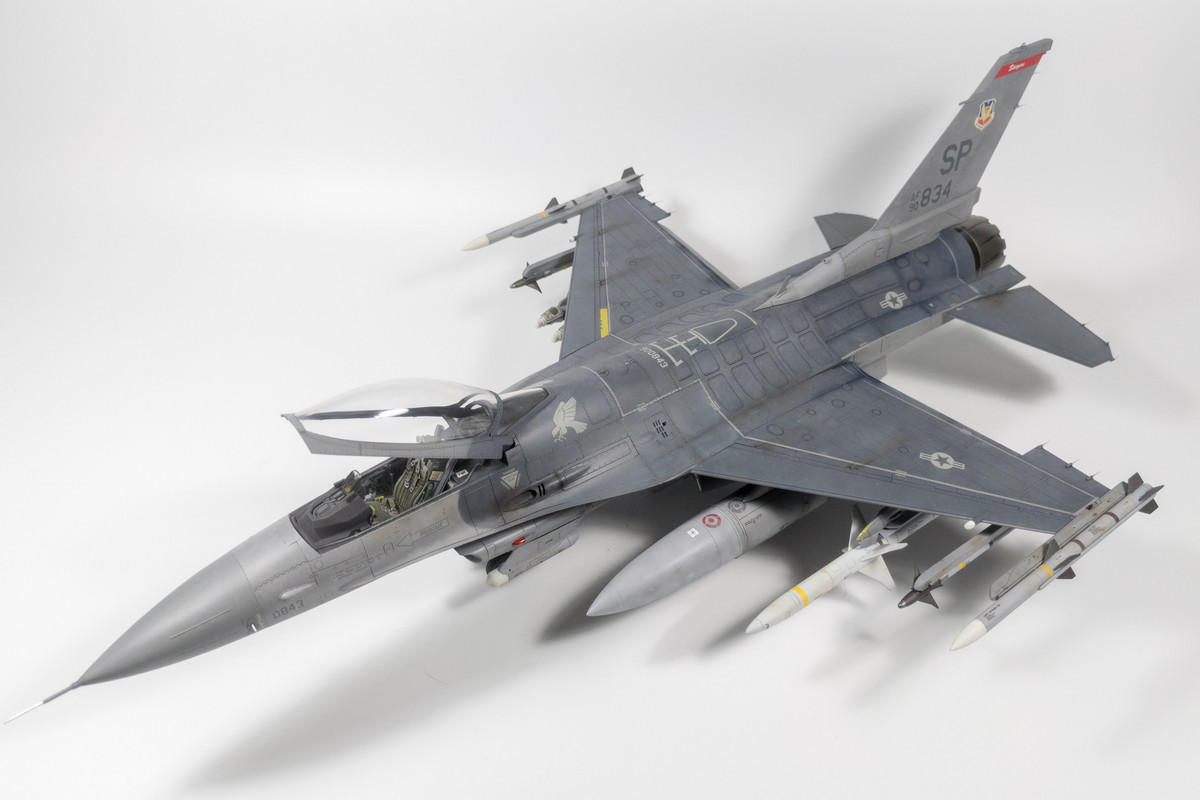
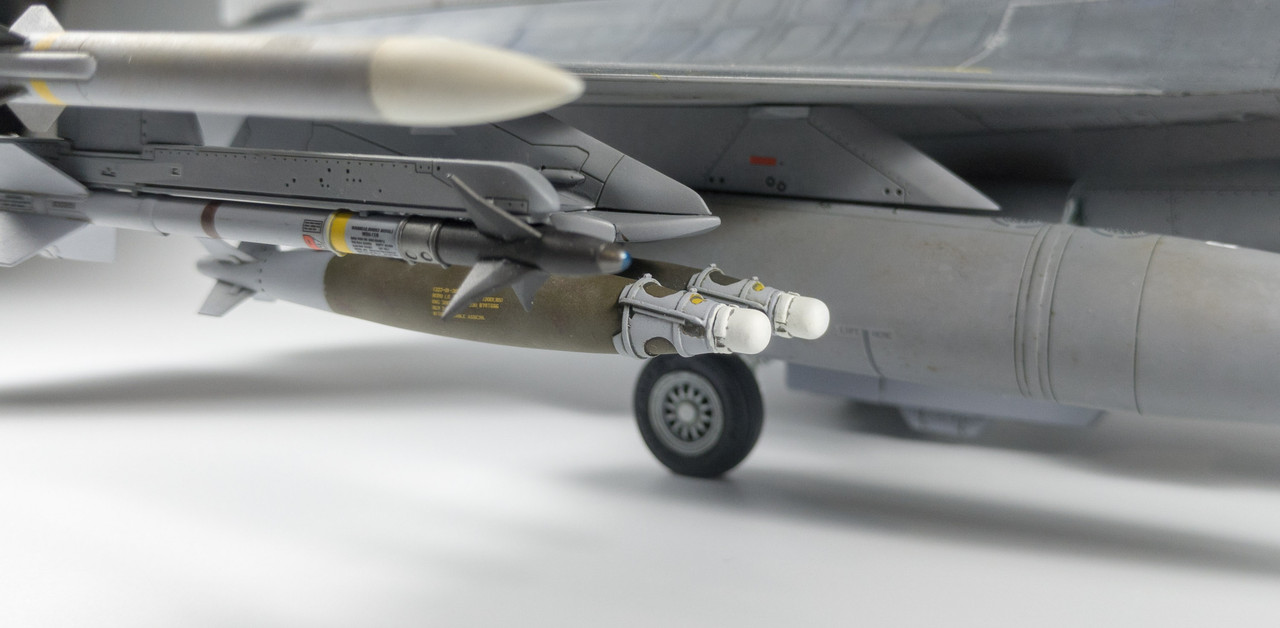
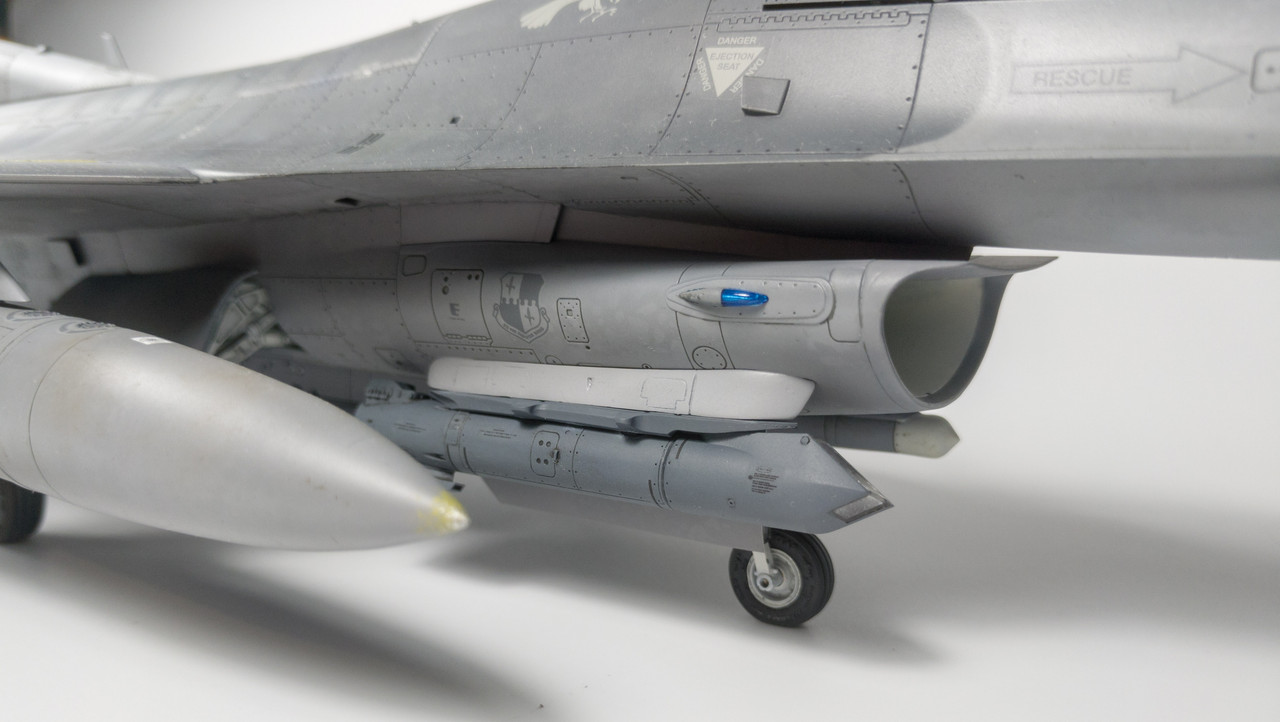
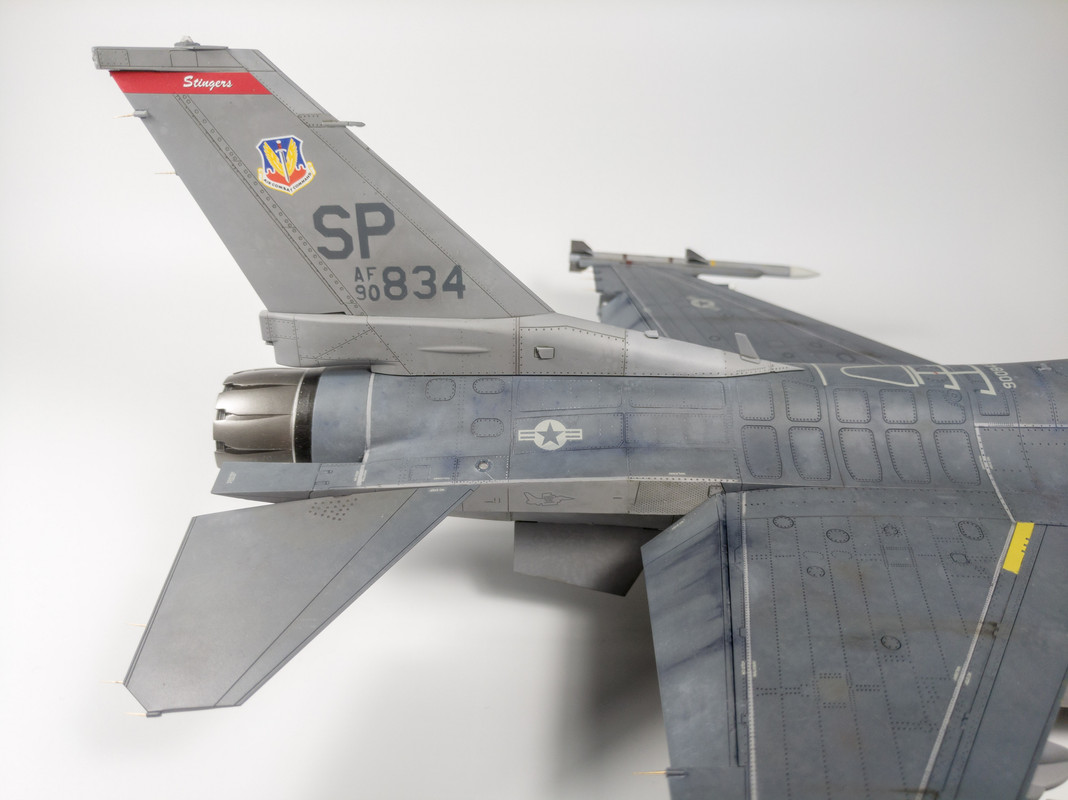
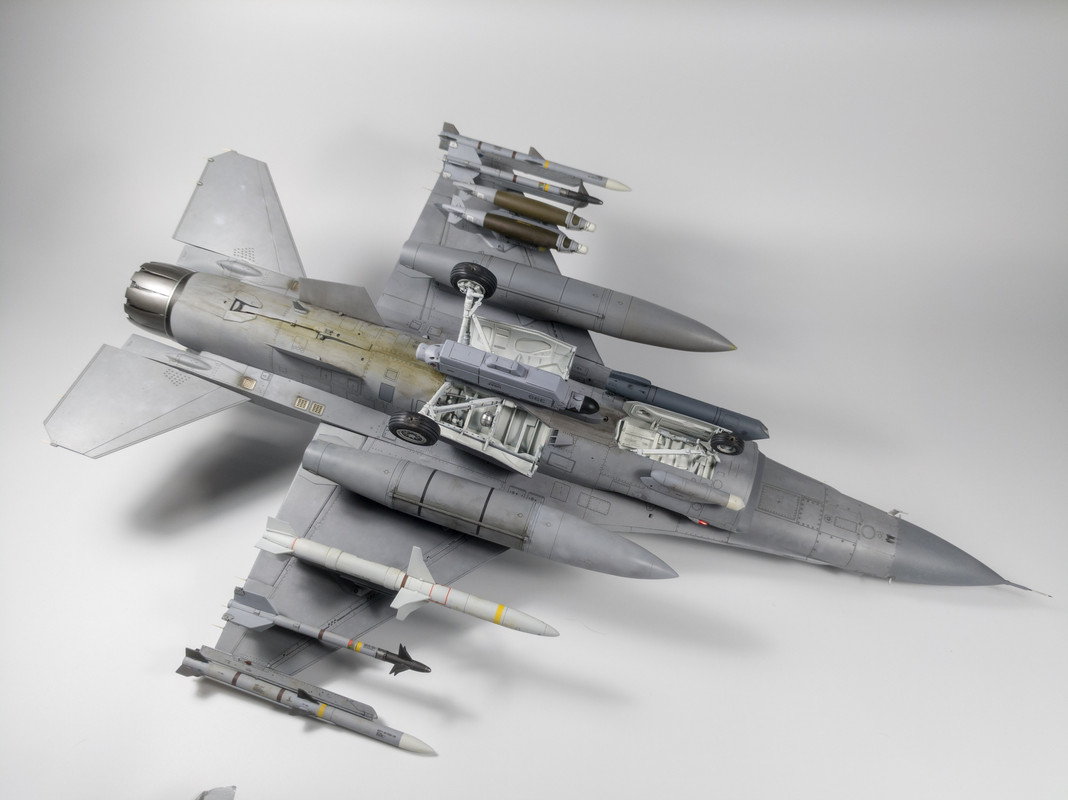
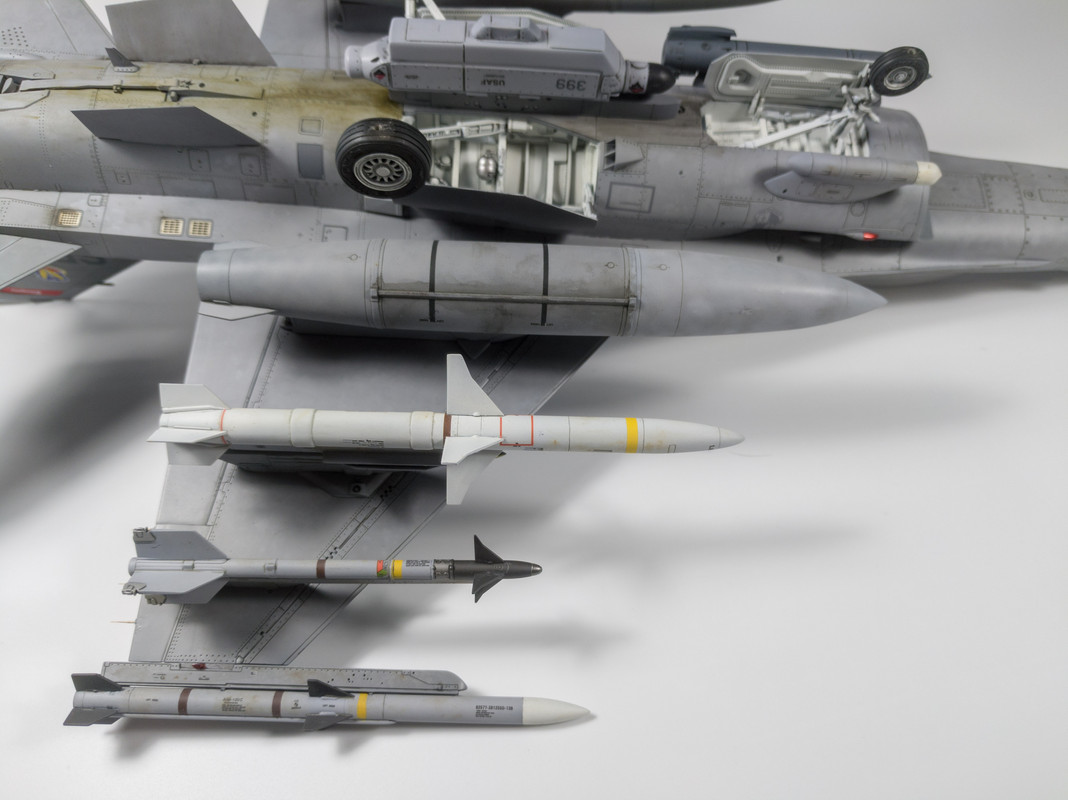
Finished photos of my TAMIYA,Inc. 1/32 F-16CJ.Built with AMS Resin ECM pod and L/h HARM pod, Eduard Model AccessoriesSNIPER pod, MASTER Static Dischargers, AIRES HOBBY MODELS wheels, GT Resin R/h targeting pod pylon and Videoaviation GBU-38s. Decals were a mixture of kit and Astra Decals. Painted with MRP & Mr Hobby.
Seat belts are scratch built, Bomb rack is robbed from the Academy Hornet.
I was planning on using the Quickboost seat and Aires wheel wells but they both were far too small.
Massive thank you for Joe at Yellow Cake Models for sending my a new lower fuselage after I butchered mine and Fanch at Fancherello models & photos for cutting me the stencils for the tail.

-
 44
44
-
 2
2
-
-
Nah, I never bothered with the decal, I didn't want the film showing at all.
-
1
-
-
https://www.largescaleplanes.com/articles/article.php?aid=3105
Built this one recently, I made my own MDC. 0.2mm Kynar Wire with the insulation stripped. I found lead wire to be too soft and deformed too easily, aluminium worked better. Used Aquagloss to secure it in place.
-
4
-
1
-
-
19 minutes ago, F4u said:
Hi Breaker,
I was thinking of the Airscale decals Peter has done a great job on them certainly will make all the difference, was also maybe thinking of the Eduard set and use the belts from that set . Mine will be completed as the 2009 display aircraft.
Guy
I'm not a fan at all of prepainted PE, it never looks right to me. Here's a WIP album on my FB page if your interested - https://www.facebook.com/pg/breakermodels/photos/?tab=album&album_id=2014863875412831
-
1
-
-
3 hours ago, Murrodels said:
Stunning work! Was this OOB? Those seats look incredible. Well in, difficult build for a mere 45 days!
No mate, lots of aftermarket, scratch building and spares in this one.
-
18 hours ago, baldwin8 said:
The finish is real captivating for me. Military aircraft finishes often tend to get a sheen on them from everyday use and maintaining. To me it looks just right.
Yeah, it looked about right to me, it was using Mr Paints Super Clear Flat for the final coat but that was on top of a coat of super shiny to allow the decals and panel line washes to go on first.
16 hours ago, F4u said:Great looking Hawk love the finish , seats also look better than the kit ones I have the same kit so looks like I will try and purchase some aftermarket ones.
Guy
They were really annoying to assemble the belts, especially with there being 2 seats, I lost about 5 hours just to building them up. Airscale decals really make the detail pop if you get the 1/32 modern cockpit placards.
14 hours ago, TheStig said:Awesome! Did you black base? Looks perfect
Yeah, slightly modified. I used a lightened Sea Grey on the wings and centre of the fuselage and Dark Sea Grey to do my mottling coat then the blend coat was thin coats of Medium Sea Grey which was altered by the coats underneath to give the different nose and tail sections which matched my references.
-
2
-
-
Completed within 45 days for a challenge on the Scale Modelers Critique Group on Facebook to start and finish a model in 45 days.
Revell kit with Aires seats, Master pitot, Xtradecal decals for main insignia and also all of the stencils, Airscale cockpit decals, Archer Rivets, CMK Flaps and missiles & launchers from spares. Quite a few extra additions were hand made as well.
Painted with Tamiya, Mr Hobby and MRP paints.
Enjoyable kit, went together very nicely for the price. I'd of liked more surface detail on the lower sides though.
It was interesting building to a deadline so tight, not something I've ever done before but there are some areas that I could of added a lot more little detail that had to be left.
-
42
-
-
Just compared my MrHobby MSG to the Xtracyrlic one and the MRH seems to be considerably darker, so that's not helping.
-
Gents,
I'm working on a big Hawk in the all over grey scheme. My decal sheet is calling for Medium Sea Grey over Barley Grey undersides.
Looking at a lot of references and using Mr Hobby MSG as my standard, it looks too dark. Several other sites refer to the Hawk in all over grey being in Air Defense Grey, which I've taken to mean all over Barley Grey.
Could someone set me right please, what should be the correct paints? If I have to mix some white into my MSG to get it to match, so be it!
Photo I'm working towards, the nose looks MSG but not the rest of the airframe:p
-
Thanks guys, I'm pretty happy with how it turned out
-
1
-
-
My only build for 2016, Trumpeters 1/32 Su-25A. I really struggled to find references for an Afghanistan based aircraft so a lot of it is informed guessing!
Completed using Aires cockpit, Master pitots, Quickboost antenna and airscoops, Armory wheels and some of the Eduard exterior photoetch. Painted with Mr Hobby and Tamiya paints with MRP for the cockpit. Ammo Panel Line wash was used for a lot of the 'grime' effect.
The kit overall is really nice, the fit is excellent although the halves of the fuselage and nacelles bow inwards slightly
I can't comment on the accuracy but there's some bits I wasn't a fan of, I didn't like the fact that the airbrakes, flaps and slats are all molded in the extended position and it was quite a bit of effort to get these all retracted cleanly.
I altered the kit fuel tanks to have the smaller tanks more often seen in combat photos, added the very prominent brake lines to the undercarriage and closed all of the bay doors, which again, the kit gives you as all open and I wanted mine all closed. Brass pipe was used to add several of the pipes and vents on the underside of the engines.
The aftermarket was mostly excellent however I really didn't like the Armory bits. The pitots were soft and bent so I returned them and used the excellent metal and resin Master item. The front wheel was way too big for the kit so I've used the kit item.
https://www.facebook.com/breakermodels
-
48
-
-
Would it be worth painting the cockpit up before a wash? Get all the basic detail in and finished then give it a pin wash?
-
1
-
-
Superglue into the crack and polish it.
http://forum.largescaleplanes.com/index.php?showtopic=58969&page=10#entry740496
-
Nice, this is one of two kits I want by the end of the year. Excited to see it progress.
-
Looking at the staining Crisp, I wonder if it's were the steam from a cat shot has cleaned the underside but the nose wheel door has acted as a shield and left the dirt in it's shadow?
-
Crisp,
two things, Uschi van der Rosten does a chemical for reducing your oil drying time down to about 3 hours if you need a bit more speed.
Second, not sure on the oil staining around the rocket pods/front wheel? Seems a bit heavy for that area unless your working to references.
Cheers,
Simon
-
-
Any more news?
Also - will Eduard be doing the galley and toilet in their Brassin range?
I think this has been disproved as myth.
-
Product Description
R-73 X 8pcs, R-27ER X 8pcs, R-27ET X 8pcs and Pylons X 24pcs -
I really like what you've done so far Karl, it's looking excellent. White is always a hard colour to break up easily. Something about the shape of this plane appeals to me!
-
1
-
-
I've started one of these myself Tom, funny how for a simple kit some of the bits are a pain in the bottom. The big tanks would be nice if they actually both had the same profile!
-
1
-
-
Got a fright there until I scrolled down and saw the 79 Sqn markings on your Hunter :-)
ahhaa, oops! At least I got it right when I googled it!
-
Basically I assumed that Alclad Lacquer was actually Lacquer. Turns out its an enamel.
....aaannndd I used a enamel based wash product. It's eaten straight into the paint and messed it all up down to the primer basically. Almost all of the topside green and some of the grey needs rubbing back and repainting whilst attempting to keep the weathering the same at all points.
I'm not a happy chap, when a bottle says Lacquer on it, I kinda expect it to be Lacquer!


 p
p


1/32 Tamiya F-16CJ
in Ready for Inspection - Aircraft
Posted
Yeah, I got them the wrong way round. If you have a look at the tail numbers, there's a massive error there as well I didn't spot!
All of the weathering was with 502 oils, panel line washes and effects.