

danimalmagic
-
Posts
874 -
Joined
-
Last visited
-
Days Won
6
Content Type
Events
Profiles
Forums
Media Demo
Posts posted by danimalmagic
-
-
Hi all, just finished this Behemoth, hard to get the camera settings right and it was even tougher to find a big enough space with a blank background, old bed sheet had to do so my apologies, model is 26.5" long by 14" wide. I used the Madman lighting BSG card for this as it has the flickering engine effect i wanted and the other lighting requirements are quite basic, bespoke base and machined mounting pole so the model can be separated from the base.
Two working lasers on the nose and just LED effects for the torpedo launchers, all working off an RC fob.
All pipework bespoke using various welding wire.
Please see video at post end for lighting.

Light bleed from the lazers has since been rectified. 🙂
Cockpit and Droid lighting.
Thanks for looking.
Danny
www.modelmasteruk.com
-
 30
30
-
 4
4
-
-
Great work, where did you get the Death Star base from, hoping that is will be ok for my Fine Molds kit?
-
1
-
-
Hi all, started this November 22 and got stuck back into it a few weeks ago.
Firstly the kit is fantastic, absolute genius design and at over 800 parts it is not a 5 minute job, especially if you are going to paint it. I have built a few Metal Gear Solid kits from Kotobukiya before and i am pretty sure this is from the same stable of cleverness as they where amazingly well thought out and engineered. Overall the finished model stands at just over 12 inches high.
You can build straight from the box but the self coloured plastic just does not pop and the Chrome is never quite Chrome in reality. So first job was to remove all parts from there sprues one body section at a time, remove all sprue nubs, separate to each colour then bag, this was a week just on its own. Never seen the point of painting on the sprue, the marks always show up and you then only have to remove the nub and re paint.
Next job was the colours, i chose Createx Pearl Red and Pearl Blue for the main colours with Createx Gloss Coat, never used this stuff before, it does give a nice paint finish but it is a pig to get through your airbrush and even worse to clean after, yes i did have the correct psi and needle size.😀
All the Metallic parts are done with Alclad, Chrome, Gloss Aluminium, Burnt Metal, Pale Burnt Metal, Tamiya Titanium Gold, Tamiya Metallic Grey and AK Gunmetal. Any fine finishing of minor pipes and fitting was done with a Molotow Chrome Pen, make sure this has plenty of time to dry.
If you are going to paint this kit or any of the modern Kotobukiya kits you have to make sure you remove any paint from the snap fit pins and holes and more importantly any moveable joint or sliding fit part. If you don't you will have a lot of problems later connecting parts together and probably end up breaking small parts. It takes time but it is necessary. Another good tip is to use a very small amount of Silicon Grease on the joints, i learned a painful lesson on a Kotobukiya Metal Gear Rex a few years back so a little grease is a must.
The plan is to build two, one as per this post and another weathered and battle damaged, i chose the pristine version first to iron out and issues and get familiar with the kit, glad i did as building a battle damaged version will be quite a challenge, needs a lot of thought.
I have built a lot of models but i have to see this is by far the most detailed and well designed, enjoyed every minute, will be centre place in my cabinet.
Lighting added to the Head and the Matrix in the chest.
Hope you enjoyed the finished model.
Thanks for looking.
Danny
www.modelmasteruk.com
-
10
-
-
Hi all, a lovely kit with some bespoke decals and a Alclad Aluminium finish, no weathering.
Regards
Danny
www.modelmasteruk.com
-
25
-
1
-
-
On 9/29/2023 at 2:49 AM, kapam said:
Superb modelling on the aircraft and all accessories!
As others have said, you represented the black finish ultra-realistically. 👏👏👏👏
Definitely an inspiration, should I aim to do anything with an all black or mostly black scheme.
Thanks, I have had a few tries before and it's always a learning curve, good accurate reference material helps.
Danny
www.modelmasteruk.com
-
On 9/29/2023 at 3:53 AM, Nachtwulf said:
Now that makes me want to build this kit! Very nice!
It's a nice kit and I am sure you will enjoy it, so much better than the old testors kit.
Regards
Danny
www.modelmasteruk.com
-
1
-
-
Thanks guys, it's been a long whole since I had time to post.
Special thanks to Robert Gilliland JR, he has helped me with some details and images of the prototype that his farther flew.
Regards
Danny
www.modelmasteruk.com
-
- Popular Post
Hi all, i think the last update was back in February, for the most part the hard work was done, well the most part. Loads of distractions since and time has been fleeting so i had one last push to get back up to speed and finish her off.
Here was the WIP Thread
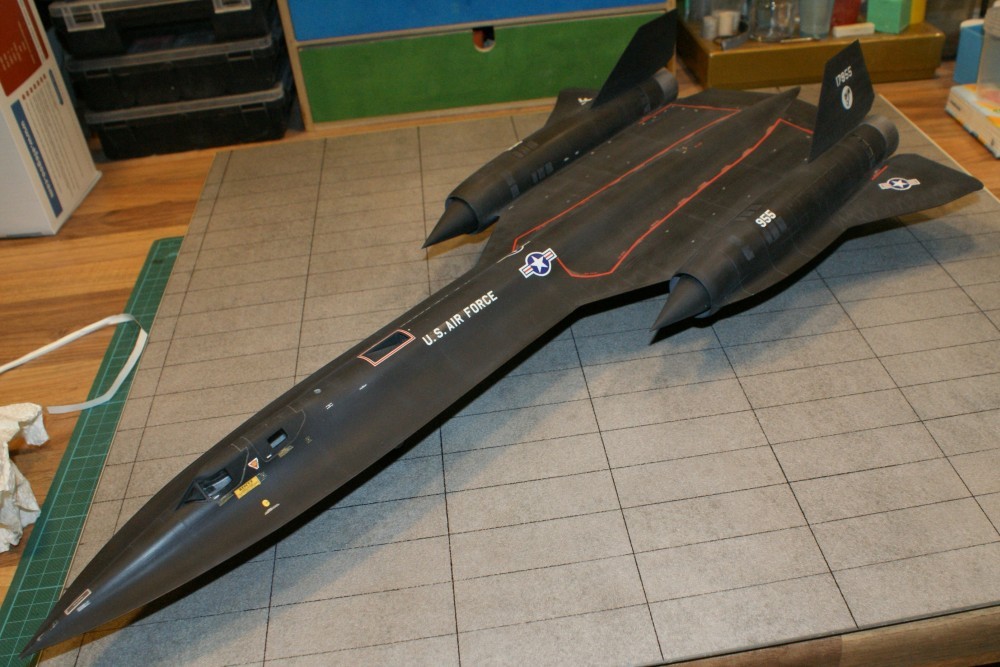
For those who's memory is worse than my own this is the Prototype 017950 SR-71 as flown by Robert Gilliland, all decals represented as per the prototype so no red walkway demarcations and a few subtle specifics here and there.
Top Man. Robert Gilliland Sr.
Done
Regards
Danny
www.modelmasteruk.com-
85
-
4
-
Number stencils arrived today so applied and then a dry brush to finish up, next job is the finish weathering for the prototype SR-71.
Thanks for looking.
Danny
-
4
-
-
Hi all, engine cart 1 moving to a close, its not perfect but perfectly good enough for me.
Another good picture, i have seen a few variations in design but i will stick with this one.
The cross bracing in place and instead of messing around with filler i have used some UV reactive glue, i love this stuff, falls into the gaps nicely and can be set in seconds with a UV light, someone introduced me to this stuff earlier in the build and i have found it useful for any number of things.
Move UV Glue used to set the lifting eye in place, imitates a weld nicely.
Ready for paint.
Paint on.
Engine fits nice and snug, the lifting eye on the upper brace holds it all firmly.
I was hoping to have some suitable white number decals/stencils in the spares box but no luck, a minor thing at the moment and can be added along with the reflective stripes a bit late, that should finish it off nicely.
Thanks for Looking.
Danny
-
5
-
-
22 minutes ago, Serkan Sen said:
The engine dollies look great Danny! This is definitely a nice addon to your wonderful build. I will add the 3D dolly modelling to my "to do list".
Serkan
Good man👍
-
Hi all, managed to get a bit more done on the 2 x engine transport dollies, i have used a couple of left over engine carts from the 1/32 Tamiya F-16CJ kit, yes bigger scale but the J58 Engine is a much bigger engine so i am hoping with a little surgery i can get something close.
I have lots of images of the cart but something along the following line will be what i am aiming for, its an A-12 engine but the cart is the same.
Ist step was to cut the frame rails to length and get an idea of where i want the axle frames.
I also need to remove the angled section that covers where the axle mounts to the frame rail.
Then use come card stock each side to better replicate the real thing.
This the needs to be filed out with a radius, all very rough at the moment.
The axle frames are to wide so they need a section cut out from the middle to bring the width in, i just laid the completed engine in situ so i could gauge how much to remove then fettled from there. I have also added the 2 x hand brakes, steering yoke and tow bar, the steering yoke needed its width equally reduced as well.
Coming together.
Next up is the cradle, this is detachable from the looks of it so i have used some card stock channel as a base, this clips nicely to the frame rail.
With that done i could use some old sprue to from the cradle hoops.
Little test with the engine roughly in situ, happy enough.
Once the glue had set i could remove the cradle and cut the middle out of the channel for the cradle base as per the real one and also start to add the bracing, lots more work to do here.
Between the two frame hoops there is a lifting eye which i would imagine allows for the installation and removal of the cradle, basically and eyebolt attached to the frame, i will need to make up some bits to set it in place on the cradle but leave enough room for me to get the engine in and out.
I still have the other cart to do yet but once the basics are done i can neaten up and fill gaps in the cradle tubing.
That is about it for now, hopefully by next post they will be all neatened up and painted.
Thanks for looking.
Danny
-
7
-
1
-
-
On 2/13/2023 at 11:06 PM, AlxBNE said:
I repeat "wow!"
I love the effect you have achieved with the subtle differences between the panels in the black.
Already stunning before you have finished the decals and weathering.
Had to pause last week but will be getting back on the case this week, might even have enough for an update🤣
-
50 minutes ago, Keeff said:
Wow! First, that looks like a huge kit ..... that or you have an enormous workbench! Second, the build and attention to detail is superb ..... 👌
Keith 😁
Both 🤣👍
-
 1
1
-
-
1 hour ago, Keith T said:
I will want one of each conversion once adjusted to fit Revell 👍🏼👍🏼
Me too👍
-
1
-
-
5 hours ago, Serkan Sen said:
I have already modeled A-12 Oxcart, A-12B Titanium Goose and M-21 Mother Ship sets and did some fit tests on 1:72 and 1:48 Italeri, and 1:72 Revell kits. I will do the same on Revell 1:48 kit very soon.
Will look forward to ordering one ir two for the revell kit, keep us up to date.
-
1
-
-
1 hour ago, europapete said:
Lovely model, and this thread will be printed out and saved for future reference. I have two questions though. First off, how are you going to incorporate Optimus Prime into a diorama with this? and second, I remember reading somewhere about another planned new SR-71. Was it by Gaspatch or someone else? Regards, Pete in RI
Optimus is just hogging the back ground🤣 Not sure of any other releases, I think everyone is waiting on a decent A-12 conversion. That is a proper Blackbird.
-
Another quick update now that the decals for the prototype SR-71 are on, a long way to go yet as i need to do a fair bit of weathering, not too much as the airframe had a fairly short life. Note no red demarcation walkway lines on the upper fuselage and what markings there there are are very minimal. Lots of Microset to get the Stars and Bars to conform to the corrugation on the wings.
#
Thanks for looking.
-
11
-
2
-
-
Hi all, its been a while, been frozen out of my workshop largely because the cost to heating it at the moment is staggering, things starting to get a bit easier now and i am doing some work from indoors though that is far from ideal.
Just been finishing up the engines with some more detailing, washes/dry brushing etc, hard to get the light right indoors.
Next job is building the two transport dollies for the engines.
Hope to make some greater strides now.
Thanks for looking
Danny-
10
-
-
4 hours ago, Serkan Sen said:
Your build skills and speed are really impressive Danny. All I have to do to finish my ongoing Blackbird build is to paint seats and take some pictures but I couldn't have done yet since months. 🙃
Serkan
She is looking good my friend👍
-
1
-
-
Hi all, another busy week or so, lets start with the Burner Cans, the simple option would be just matt black but I wanted them a little more realistic so we get the best from the resin/3d parts. This would be a bit of trial and error but I had a plan.
This is quite a clean example and as with most other images the lighter titanium is visible between each of the nozzle feathers.
Next the Nozzles were painted AK Titanium and over coated with Alclad Hot Metal Carbon, it’s a bit glossy as it is but early days.
Next up the lighter Titanium was masked back in, this was believe it or not the easier way of doing it.
Next to darken the lighter Titanium with some weathering pencils then some dry brushing to age and matt the finish a bit, probably could have just painted matt black, that was the trial and error part. 🙂
A test to see if it looks ok.
This is the sort of look I want for the inside.
So lastly I washed and dry brushed the interior a light sand.
Next up is the more arduous bit and that is painting the fuselage, I want to be quite specific to the following image of 17950 so I planned to build the paint up in layers to hopefully get the right result.
The prototype 17950 is quite striking in its finish and obviously quite clean too in this image.
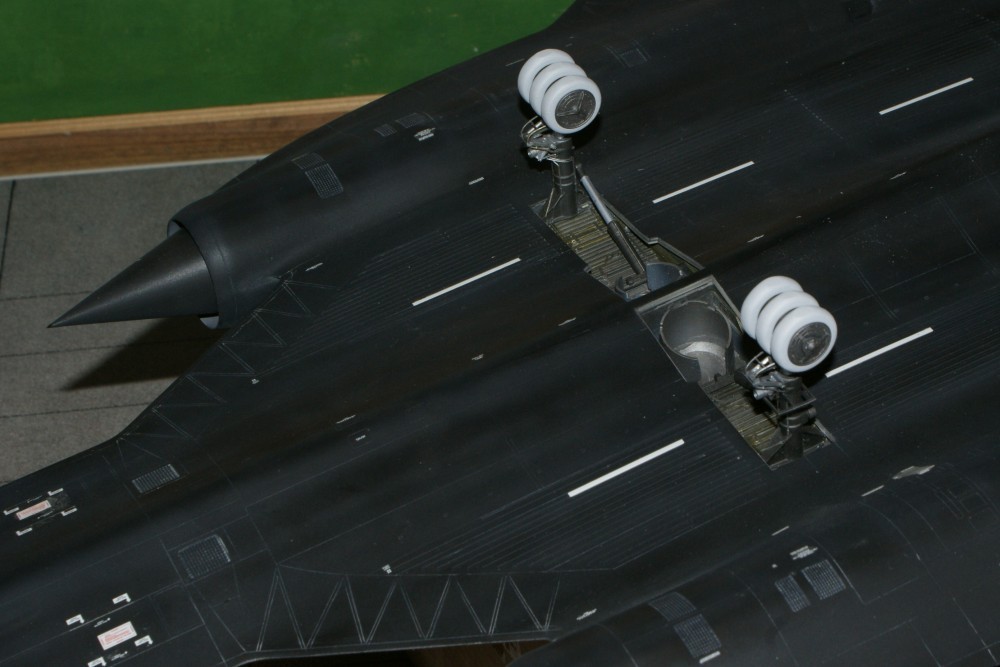
So, 1st job is the matt black, after drying the surface is sealed with light misty coats of future, "gloss you say", well you need to protect the matt black surface as there is a long way to go and Matt Black marks so easily. Lights misty coats of Future actually keep the matt finish while protecting it.
Tape off as I don’t need that anymore and I wanted to see the contrast of the gear bays etc.
Next up my old favourite and that is masking, screaming de ja vu here but there is no other way. The first step is some dissimilar panel colours, I want these on first, they will be quite bold at first but that’s intentional as I will be toning/blending them back down later with a matt black filter.
I have used Tyre Black, Nato Black and German Grey, same process for the Vertical Stabilisers too.
The next step is to level the colours out as I just want slight variations in tone, you can see these variations everywhere on the Blackbirds. For me it is easier to do it this way rather than try to mix subtle variation of black by eye to which you will never know if they work until you take the tape off.
So I made a batch of heavily thinned matt black and began applying light coats to slowly bring the shades closer. Fist couple of passes with the filter just on one side to show the difference, using a filter gives you so much control of how you build the paint up as you are applying very little.
Same for the Stabs.
Slowly getting there.
This is my stopping point, I can carefully apply more filter later but I am quite happy plus I need to allow for the matt lacquer as that will tone things down a bit more. It is a lot of steps but i have found through doing this a number of times that is is the better option.
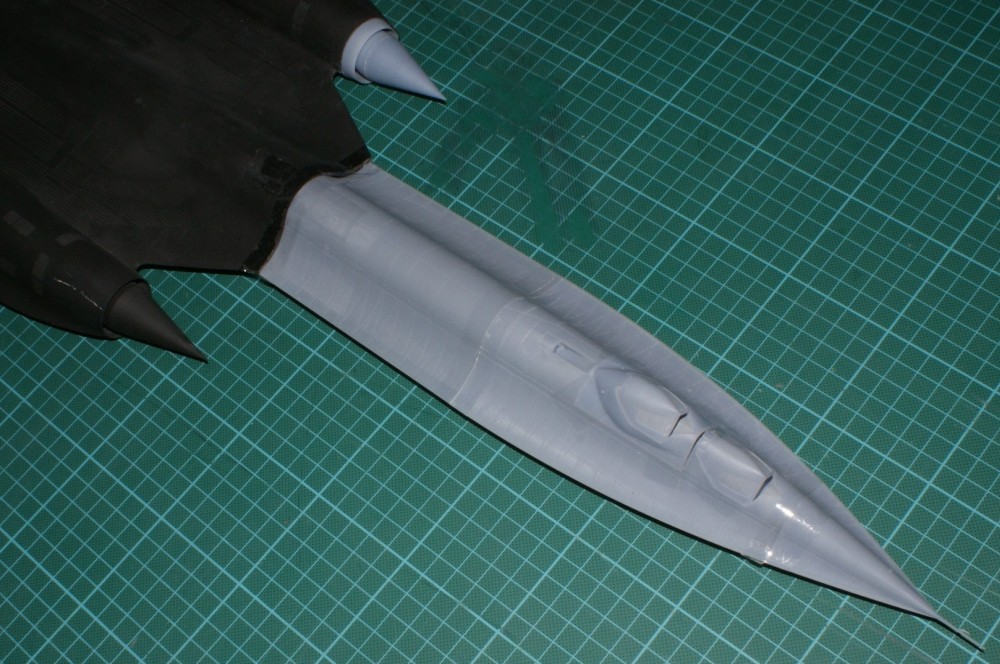
So that is that step out of the way, I wanted that done first as I want the chine and triangles to stand out as per the prototype so they needed to go on afterwards, the next step was masking the chine on the forward fuselage and the nacelles.
I will not be filtering these so Tyre Black was the choice.
Next up all the triangles, this as ever entails yet more masking, really took my time here as I want everything crisp and clean.
Before the tape came of I applied a couple of misty passes of future to seal the colour as before.
Difficult to get the light perfect for the camera.
The Target.
Well, that’s it for now, i will begin the underside of the fuselage tomorrow, some nice panel variations again, the white details along the centreline match up with the kit engravings, the white semicircle shrouds the kit Antenna.
Big thanks to Robert Gilliland JR for the images.
Thanks for looking.
Danny
www.modelmasteruk.com-
11
-
1
-
-
6 hours ago, Retired Bob said:
I have to agree with the other comments on how good your build is going, with some superb photos to show the colour and detail that you are aiming for. Like you I bought the kit and waited for AM detailing parts to come along, so far I have the Metallic Details 3D printed cockpit/ejection seats, Eduard resin wheels and cockpit/seat p/e parts, the superb ResKit engine exhaust set, and finally the Caracal SR-71 decal sheet No 2. Your build should hopefully get my build started once I have cleared the worktop.

Thanks Bob, I think you will enjoy it. I have built a few of the old testors kits and though this kit has a few gremlins as ever it is miles ahead of the Testors kit, it's not banana shaped for a start and that always helps😁👍
-
1
-
-
19 hours ago, JohnT said:
Fantastic detailing. I am glad you get your fingers in shot at times. Helps me work out what’s the model and what’s the real thing
Not too professional I know but sometimes it's the only way 😄👍
-
1
-
-
2 hours ago, DaveJL said:
Lovely work mate, I'm almost embarrassed to start mine now when looking at the detail you've added! I'll use this as reference if you don't mind 😇
No problem. It's why we post WIP threads👍
Must admit I have probably only used 10% of the kit parts, got loads of spares that's for sure😄
-
1
-


 #
#


1/24 Y-Wing Completed
in Ready for Inspection - SF & RealSpace
Posted · Edited by danimalmagic
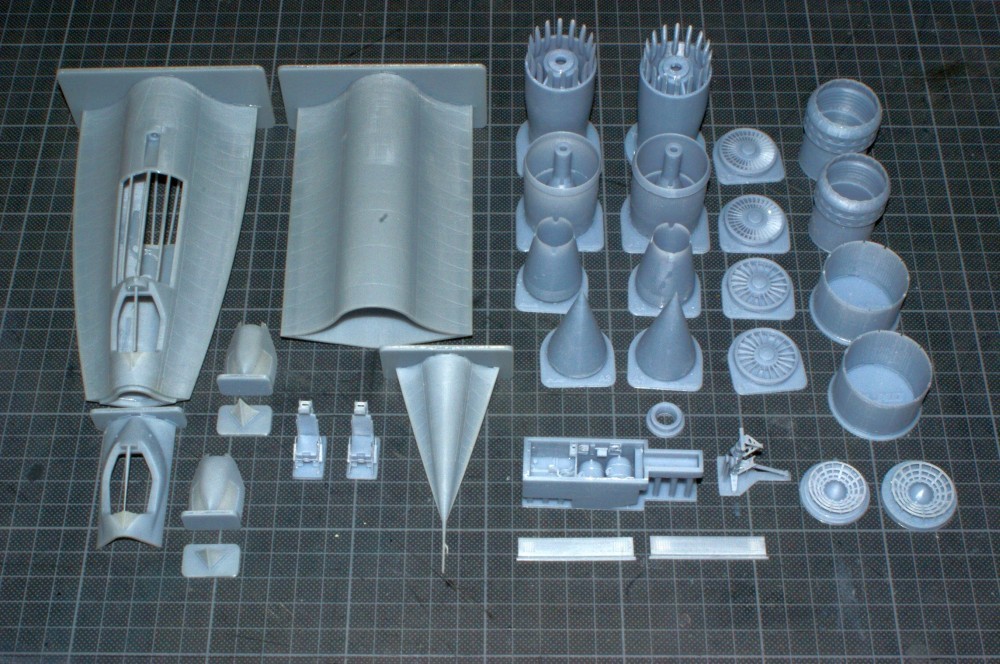
It's a combination or resin and 3D printed parts