


72linerlover
-
Posts
81 -
Joined
-
Last visited
Content Type
Events
Profiles
Forums
Media Demo
Everything posted by 72linerlover
-
Oh God! So much expensive are 1/144 injected kits here in Europe? I build in 1/72 and had no idea about. The site asked for less than 20$. Anyway, also on another forum, the Minicraft JT3Ds aren't considered good and many suggest Revell. Good luck for your projects. Euge
-
Hi, Björn. The Minicraft website lists an E-3 NATO Standard and a C-18A USAF NATO. They have both JT3D engines and cost less than aftermarket engines sets. Also Authentic Airliners offers JT3Ds, but it is the long "hush kit" version, not suitable for the 720B. Another way could be to ask Roden if they want to sell you the JT3Ds of their 720B. They are just two little sprues. Best regards Eugenio
-
The emitted light has to be green. If the outer lens seems to be blue, it may be due to a choice to mitigate the yellow effect of the filament bulbs, thus making a green emission in combination with blue. Regards Eugenio
-
Hi, Whirly. I have some factory drawing. They aren't with full dimensions, but quite useful for you pourpose. P.M. me your email and I'll send them. Ciao Eugenio
-
 OK, Giorgio "keine Gulaschsuppe" for dinner. Looking at the profile you posted, I see that the nose seems to be pointed downwards. That makes me doubt about, since from the photos I see it is not. I hope that the kit parts are OK. May be is worth checking. (Just had a sandwich for lunch) Bye Eugenio
 -
I had a premonitory dream last night: I saw you scratchbuilding the intake ducts for the Skyray, as your daughter was sleeping. When she asked you what were those things, you told her they were hidden in the box and not seen before. Enjoy your build, Giorgio Eugenio
-
Hi Rob, Take a look to this picture too. The whole flap at the root is totally under the wing fairing and moves sliding back and down, perpendicular to the trailing edge. Here some pages you may find interesting. Bye Euge
-
Hi, Paul. You are going to do something very special. I'll follow with interest your job, as I am an enthusiast of those old Aurora kits. I don't have anyone, though. 😪 There is a hope about an Aero Commander 520 due to come in this year by Croco Model, according to scalemates.com. Awaiting for updates. Bye Eugenio
-
Douglas DC 7C Revel + corrections
72linerlover replied to rob Lyttle's topic in Work in Progress - Aircraft
Ah yeah Jan, you're right! I forgot I had to build up the part sitting on the flap. Age acts as a memory rubber. Eugenio -
Douglas DC 7C Revel + corrections
72linerlover replied to rob Lyttle's topic in Work in Progress - Aircraft
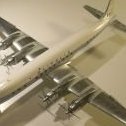
I saw this thread some days ago, so I think I can be of some help, since I built a 1/72 DC-7C back in 2011. (Converted fron two Heller DC-6s and lot of scratchbuilt) Unfortunately due to Photobucket issues I have no more pics on line, but from the back up I upload one photo of the finished model where you can see how the flaps system is. In this link, you find some interesting details. Some further notes: - the fairing you see under the wing are not the actuators: they cover the hinges and the actuators are inside the wing - there is a little flap over and rigidly linked to the main one that disappears into the wing at "zero flap". Here how it works - as you see in the drawing posted by Space Ranger, the flap sections are 4, and those short in the constant-chord-section partially retract under the wing-to body-fairing Something more to note: both in the Alitalia DC-7C and in the Airliners.net photos, is visible that the outer engine nacelle protrudes a litlle over the flap, but it doesn't move with it. It seems that Revell overdid this detail, and in the real thing, this protrusion in far shorter. So that's it. If you need some further information, please ask and I'll rummage in the backup photos. Regards Eugenio PS. Sorry if my technical english is not so correct. Hope you have got the point. -
To find two 3 blades propellers of the proper size, you can look for a Revell (ex Matchbox) 1/72 DO 28 Skyservant. Both propellers are by Hartzell. DOVE: HC-3MVK-2A DO 28: HC-3MVK-2C; no size difference. It sholud easy to find a cheap second (or third) hand DO 28, not really a best seller. Anyway I seem to recall that there is also a full resin Dove Riley kit, perhaps by Magna, but have no idea of its quality. At this point I don't know if our friend Tony is still interested in this topic, since more than two months are gone, but perhaps for general knowledge... Best regards Eugenio
-
Hi, W.i.P. I'm afraid things are just opposite. Take a look to this pics. Just wanted to prevent possible mistakes. Best regards Converted Dove - Original Dove (don't know why, but you need to right click and open in another window, by me at least) Eugenio
-
You are Welcome, Giorgio. Perhaps I had to be more specific. The mass balances, fixed to the trim tab, make easier to move the tab itself. The tab movement generate the aerodynamic force that move the aileron, so for example: - the control bar moves the trim tab (say) upwards and the trim tab moves the aileron downwards. The tabs act as servo-actuator for the ailerons. Those tabs are present only on the upper part of the aileron and iirc the Manual says that the airbrake function of the split ailerons is deactivated in “manual reversion”. Bye Eugenio
-
Great progress there Giorgio. Always following with much interest, even if not much posting. Those mass balances are actually connected with the trim tabs. In the "manual reversion" (hydraulic failure) they are a big help to move the aileron. Bye Eugenio
-
Great, Giorgio! What can I add to all the good comments you have already got? The quality of your models is not a surprise. If my count is correct in the photo n. 15 there is the signature of an artist: the control bar is slightly deflectet to the left, according with the movable parts position. Happy new modeling year. Eugenio
- 38 replies
-
- 1
-

-
- WWII
- Italian Fighter
- (and 1 more)
-
You are welcome, Giorgio. It's a pleasure to be of any help in this magnificent build and thanks to you for having quoted me. But more than this, as many other, I'm very grateful to you for the nice work you are showing us and for taking time to post it. Bye Euge
-
Sorry, Giorgio, for having been away for so long - some health and job problems, but it is all sorted now. First of all, my congratulation for the progress on the 205. As regards the ailerons, I'd pin them on the wing, without glueing them. So you'll have the parts in place for painting and at the end you'll assemble the painted parts together. I'll stay tuned, of course. Best regards Eugenio
-
Giorgio, I run out my Thesaurus to comment your build. I'm experimenting a miniaturized transponder to put on every kit part . The finish you got simply makes justice to the camouflage. Bye Eugenio
-
Hi Admiral. I tried to investigate the problem of the extended wing on the 700 series Viscounts. If you look to this picture (right klick - open in new tab), you can see that the leading edge (or its ideal prolongement) hits the fuselage approx at the axis of a window and the trailing edge prolongement on the axis of the further fifth window (being the third absent). In this other one (right klick - open in new tab) the prolongements of the leading and trailing edges intersect the fuselage in a way that the 5 windows are widely contained. So my guess is that the 2,5 feet per side are added at the root. The book you reported (that I have) also states that the nacelles were slimmer, the main weehl legs were centered on the nacelle and also some modification was made to the cockpit windows. So, not an easy task, but it could be done. You can also enter in touch with the vickersviscount.net website and get some interesting news. Good luck. Best regards Eugenio
-
Ummm! Most bookmakers say there is a new kit approaching your workbench. Welcome back, Giorgio. Bye Euge
-
Sure you can't skip decals for the red alignment arrows near the leading edge of the tailplanes. Don't want to annoy anyone, but your work looks better and better. Have a nice vacation. (We'll miss you) Bye Euge
-
Yes, Giorgio, it is exactly as you have described. Unfortunately I have no schematics, but from the pics you have shown is quite clear, so you have only to copy, reduce by 1/48 and past on your model. Just a walk for you. Eugenio
-
Wait a minute, Giorgio. The gear doors are 3 each side. One is hinged to the wing, the other two are those (a single piece of Hasegawa plastic) in your pics. Those two are: the shorter fixed to the upper part of the leg, the larger to the wheel fork (uhm, wheel fork? perhaps they are different called in english). Eugenio edit: Of course, we are speaking about the only doors along the gear leg. Nothing to do with the other one in the center fuselage.
-
Giorgio, that's the difference between a scale model and a work of art. As regards the landing gear, I'd separate the two parts of the doors that move with the gear leg. Bye Eugenio
-
Giorgio, great painting! If Caravaggio had had an airbrush in his hands, he wouldn't have been be so clever. Next task tricky? No, very very tricky. So, send your family to Oriocenter with your credit card, switch off your phone and start up your compressor. And good luck2. Eugenio

