

brodiebear
-
Posts
357 -
Joined
-
Last visited
Content Type
Events
Profiles
Forums
Media Demo
Everything posted by brodiebear
-
very nice
-

1/10th Douglas Bader and Spitfire Cockpit
brodiebear replied to brodiebear's topic in Figure Work In Progress
True to his word, parcel arrived from Hugo in Portugal yesterday morning. Top class customer support -
1/10th Douglas Bader and Spitfire Cockpit
brodiebear replied to brodiebear's topic in Figure Work In Progress
Bit of a biggish post, Got the black preshade on, followed by the interior green, misted on over the black to give an irregular coverage; Next up was the RBP (Synthetic Resin-Bonded Paper) seat. All painted and weathered, which maybe a bit of overkill as once the pilot is in the seat you wont see much, least i know its all there. Instrument panel was next, and if i am been honest the bit i wasn't looking forward to. The decals were the first ones that the guys at RP models had tried to create, and been on a continuous carrier, i wasn't looking forward to cutting out. I had visions of them tearing, folding back, disintegrating. So the first one i tried was the smallest and i needn't have worried, they worked a treat. so once dry a drop of white glue was added to glaze them. A few parts dry fitted; Now i thought i would be clever and drop a drop of vallejo water onto them to create a bit of a dome on the bezels - Disaster as youi can see; The Vallejo water reacted with the white glue and things just misted up, thought for a moment it may come good, but it didnt, so i had to try and peel the resin away. Some dials were okay, others were destroyed. A quic plea to Huo at RP and he has put me some new decals in the post free of charge. This weekend got the major body parts, undercoated with Tamiya fine white primer. More soon ....... -
1/10th Douglas Bader and Spitfire Cockpit
brodiebear replied to brodiebear's topic in Figure Work In Progress
He has been sculpted wearing Silcott suit; this is the image the team used to base the sculpt on; These are the promotion shots and yes the belts are included. No Oxygen mask though, rumours abound of him smoking his pipe while in combat !! Steve -
Spinosaurus - Pegasus Hobbies 1/24 Diorama set
brodiebear replied to Gimme Shelter's topic in Figure Work In Progress
some stunning paint work on that fish and spino (thingy) 😁😁 -
looking very nice
-
1/10th Douglas Bader and Spitfire Cockpit
brodiebear replied to brodiebear's topic in Figure Work In Progress
glad to have you on board. -
1/10th Douglas Bader and Spitfire Cockpit
brodiebear replied to brodiebear's topic in Figure Work In Progress
Got the big chunks washed and into the spray room (Utility !) and got a black primer coat on; Followed by varying depths of cockpit green; Next is to paint the composite seat and the instrument panel. -
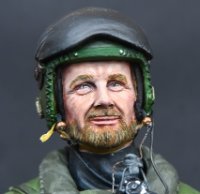
Next up for me is the 1/10th model of Douglas Bader sitting in a spitfire cockpit, released as a limited edition run by RP Models, I wont go into the full details as their is a lot of fantastic resin,but suffice to say even in dry fit without any trimming/ sanding it goes together like a dream, only small fit issue i have noticed is the googles, not matching up to the straps, but once sanded and cleaned the resin inside the googles may be a perfect fit, few photos of how it looks, its a chunky and not a light piece of resin. I will build the cockpit first then the great man himself. So, with the Christmas and New Year Festivities out of the way, I started cleaning up the major cockpit components, just the usual seam line here and there, opening up some of the holes. The hardest part was where the compass slots onto the instrument fascia, the slot is too small to get a file in so it’s a case of scrapping away the inside with a sharp blade. It is apparent that there is a bit of warpage on the main structural items, including the ‘keel’. Think it’s going to take some careful reshaping in boiling water. I did notice that if I was to glue the seat structure to the rear bulkhead and then glue this to the keel it should pull that part into alignment to attach the instrument panel bulkhead. ‘Douglas’ just required some scrapping and sanding of a few mould lines on his arms and back of his one leg, the googles required some time in cleaning out the back of the left lens, a bit of resin was lodged in here, again tricky to get rid of, but perseverance paid off, along with removing some of the resin on his helmet so the lens sat better. Will just need a smidgen of filler to join the googles to the strap.
- 41 replies
-
- 16
-

-
Good call He is wearing some, will dig out a closer photo of his head and post Thankyou, quote easy to do if you work methodically from sand, to green, brown then the black
-
Thanks very much, I thought that to, about the water bottle top, but could only find photos of it been a green colour on the web ?
- 9 replies
-
- 1
-
-
- falklands war
- SBS
- (and 1 more)
-
1/10th Mookies miniatures bust of a RM SBS Commando during the Fanning head raid on the Falklands in 1982. Painted with acrylics - Vallejo, Tamiya, Andrea;
- 9 replies
-
- 19
-
-
- falklands war
- SBS
- (and 1 more)
-
Yep Decals come with the Bust, loads left over for other projects, Good brushes those Winsor & Newton Series 7, maybe pricey but worth it. Martina by Nuts Planet
-
Completed Nuts planet 'Martina' Bust. painted with Andrea, Vallejo and Tamiya Acrylics using Winsor & Newton Series 7 Brushes;
- 5 replies
-
- 14
-
-
1/10 SBS Fanning Head, Falklands War 82
brodiebear replied to brodiebear's topic in Figure Work In Progress
Thankyou and yep, thirsty work -
gonna have to try that Vegemite masking, assume the same for marmite ? (just branding)
-
A crucial phase of the British campaign to retake the Falkland Islands from their Argentinean invaders was about to get under way. An amphibious landing force was preparing to deliver troops into San Carlos Bay, which would become the bridgehead via which the Islands would be retaken. Of concern to the British planners was an Argentine position placed atop Fanning Head, a high ridge that overlooked San Carlos Waters. Radio transmissions had been detected, from an Argentine call sign of 'EC Hermes'. Believed to be half-company sized and covering the approaches to the landing areas with heavy weapons, the Argentine presence was a significant threat to the landings. The task of clearing Fanning Head fell to 3 SBS, supported by HMS Antrim. The Argentine position was located by using a thermal imaging device attached to Antrim's Wessex helicopter. An SBS assault force of some 25 men, many armed with GPMGs, was delivered into the vicinity, piecemeal, by Wessex helicopter. Full Article can be seen here I have been working on this 1/10 bust from Mookies Miniatures for a couple of months, now on the home straight. All painting has been done with Acrlyics - Mainly Vallejo and a few tamiya ones thrown in for good measure. Flesh tones by Andrea; Dry Fit Hands painted Head As it was a night raid i decided to camo up his face Pouches - all same 'base colour' some lightened and some darkened Bergan - The SBS self sourced their bergan / backpacks - this is a norway version Webbing and backpack straps 58 Pattern webbing belt 58 DPM painted - Head blue tacked
- 2 replies
-
- 9
-

-
-
- resin bust
- falklands
- (and 1 more)
-
Ridiculous Fitting Tamiya 1:48 F-14A Tomcat !
brodiebear replied to Tiger331's topic in Aircraft Modern
I hear ya brother 🙂 -
1:48 Lockheed Martin F35 -B 617Sqn RAF
brodiebear replied to RMCS's topic in Ready for Inspection - Aircraft
Stunning work.- 40 replies
-
- 1
-
-
- Kittyhawk
- KASL resin
- (and 1 more)
-
VERY NICE
-
This is my completed Pegaso bust of a Kamikaze pilot during World War II, he has been expertly sculpted in his final dive, The determined but frightened (?) expression on his face has been superbly captured. the clothing detail is very sharp, overall a very enjoyable couple of months spent getting him from a few pieces of grey resin to this final point. Face was painted with Andrea flesh set and the rest with various Tamiya, Mig, AK and vallejo colours, on with the photos;
-
Thanks .Its a kit by MAIM, will try and upload some bigger versions of the photos this weekend I know, very star wars / speeder bike'ish Thanks, it does doesnt it, sort of steam punk/if the germans won the war collaboration Thanks for all the kind comments
-
its 1/35.
-
Completed this model a couple of weeks ago, just got round to finishing the simple base and getting some photos done; Overall Views A few closer shots
- 12 replies
-
- 14
-
