

brodiebear
-
Posts
357 -
Joined
-
Last visited
Content Type
Events
Profiles
Forums
Media Demo
Everything posted by brodiebear
-
Mae west painted up last night. Also added a satin varnish to his Irvin Jacket, which was a bit worrying at first as it seemed very dark ,but over night the jacket has gone back to its original shades - phew; Palette; Mixes; Mae West;
-
looking better now has face has 'flattened' down 👆
-
Elan13's superb 75mm resin figure of a WWII RAF pilot, with his obligatory dog; Box art; Superb casting; First up was his Irvin leather flying jacket, painted with a mix of various highlight and shadow washes from the AK leather set; Next up was his RAF uniform, again painted in its base colour then washes of highlights and shadows, with a finishing glaze/wash of the original colour and a final coat of Ak interactive ultra matt varnish;
- 11 replies
-
- 14
-

-

1/10th Douglas Bader and Spitfire Cockpit
brodiebear replied to brodiebear's topic in Figure Work In Progress
Finished here -
Well I have finally completed the RP Models resin kit of Douglas Bader sitting in his Spitfire cockpit. Quite a lot of parts go to make up this model and a bit of working out what can go where before gluing anything into place. The cockpit is a hefty piece of resin when completed and the addition of Bader makes it quite weighty. It has taken 5 months in total to get from opening the box to mounting the completed item onto a plinth, obviously i haven't been at it every day for five months, just a leisurely pace. I am sure i spent to much time painting and detailing pieces that once in the cockpit will be never seen again, parachute pack, control column, compass, etc. But its all part of the fun I suppose.
- 2 replies
-
- 15
-
-
1/10th Douglas Bader and Spitfire Cockpit
brodiebear replied to brodiebear's topic in Figure Work In Progress
Nearly there , just got t to fit his arms into the sockets, may need a bit of push/pull trimming / filling and into the cockpit he can go. Will spray the cockpit side with brown to complete the camouflage this weekend, Green is already down and that will complete the whole project, so hopefully be finished this weekend/ early next week. -
1/10th Douglas Bader and Spitfire Cockpit
brodiebear replied to brodiebear's topic in Figure Work In Progress
Control column painted; its another piece of finely detailed sculpting and moulding,its a shame but wont be seen once installed into the cockpit; Boots painted and lightly weathered, just a bit of mud from running to his Spitfire. -
1/10th Douglas Bader and Spitfire Cockpit
brodiebear replied to brodiebear's topic in Figure Work In Progress
Yep, all painted with acrylics, using layers - Mr Colour Paints. -
1/10th Douglas Bader and Spitfire Cockpit
brodiebear replied to brodiebear's topic in Figure Work In Progress
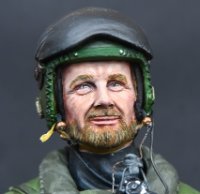
Got some paint on his leather helmet; -
1/10th Douglas Bader and Spitfire Cockpit
brodiebear replied to brodiebear's topic in Figure Work In Progress
Got some paint on Baders face whilst on Holiday last week in sunny Milford on sea; -
1/10th Douglas Bader and Spitfire Cockpit
brodiebear replied to brodiebear's topic in Figure Work In Progress
Thanks -
1/10th Douglas Bader and Spitfire Cockpit
brodiebear replied to brodiebear's topic in Figure Work In Progress
Got his leather gauntlets painted up last night, they need a very translucent coat of Tamiya smoke then a semi gloss coat to give them some shine. -
1/10th Douglas Bader and Spitfire Cockpit
brodiebear replied to brodiebear's topic in Figure Work In Progress
Duplicate post removed. -
1/10th Douglas Bader and Spitfire Cockpit
brodiebear replied to brodiebear's topic in Figure Work In Progress
Got his sidcot suit painted, highlights and shadows added, ‘stitched’ his harness and attached his parachute pack. Flat varnished with AK ultra Matt; -
1/10th Douglas Bader and Spitfire Cockpit
brodiebear replied to brodiebear's topic in Figure Work In Progress
More superb sculpting and casting on the parachute. I spent far to long (again) on something that will never be seen once the cockpit is completed, but an enjoyable hour or so anyway. -
1/10th Douglas Bader and Spitfire Cockpit
brodiebear replied to brodiebear's topic in Figure Work In Progress
Last night I joined the upper and lower body parts and this only needed a 'smidge' of Mr liquid filler then got the brushes out and painted up his scarf and the fur collar, Not as shiny as it looks, but everything needs a good coat of AK's ultra matt varnish; Needs a bit of 'tidying' up where everything meets 🙂 -
Girl sitting on a Votoms Scopedog 1/24
brodiebear replied to rockpopandchips's topic in Figure Work In Progress
thats looking very nice -
1/10th Douglas Bader and Spitfire Cockpit
brodiebear replied to brodiebear's topic in Figure Work In Progress
After some advice on th PF forum I decided to revisit the shadows and highlights, so this is where I got to; Then I noticed this piece of resin sticking out on the right side of the life jacket So a quick look on the internet and I found this image on Alamys website showing the correct colours, so will have to paint these details, even though the right arm will probably obsucre the detail. -
1/10th Douglas Bader and Spitfire Cockpit
brodiebear replied to brodiebear's topic in Figure Work In Progress
So got to work on the life jacket last night, in hindsight I should have coated the jacket in white first before adding the fist coat of yellow, but hey ho. Shaded and highlighted with various wash mixes to give it a faded/worn look , didnt want it to look like a 'toy' version, plus references i have found shows them to be faded than overtly bright This probably a more accurate rendition of the colour Palette used to paint the jacket, along with the paints. -
1/10th Douglas Bader and Spitfire Cockpit
brodiebear replied to brodiebear's topic in Figure Work In Progress
Calling the cockpit finished, all items painted from reference photos found on the web, main source was 'Anatomy of a spitfire' website. Next up the great man himself. Dry Fitted his lower torso, with parachute pack to make sure everything lines up - which it does so thats a testament to the model with all those pieces of resin.I think (after the photos were taken i knocked off the left rudder pedal stem) i will also remove the right pedal and set at a more vertical angle. -
1/10th Douglas Bader and Spitfire Cockpit
brodiebear replied to brodiebear's topic in Figure Work In Progress
Calling the Instrument panel done, painted in the last few bits, gear up / down indicator, switch and a couple of dial setting knobs. Glued on the Gun sight and compass. Throttle quadrant, IFF panel and undercarriage control lever -
1/10th Douglas Bader and Spitfire Cockpit
brodiebear replied to brodiebear's topic in Figure Work In Progress
Compass Painted up last night, cockpit green for the metal work, attached to back of IP, then a medium grey for the compass housing and gloss black for the compass dial. I acually painted the dial white and when dry over painted with the black, when that was dry i used one of my 'testing' needles (Diabetic Type 2), to scratch the black paint away to mark some sort of points on the compass. Then a blob of red for 'North' and sealed in with some vallejo water resin. The stick its on is a standard coffee stirrer (5mm wide); -
1/10th Douglas Bader and Spitfire Cockpit
brodiebear replied to brodiebear's topic in Figure Work In Progress
Spent a good hour or so last night working on the Gun sight. Had to file out the back of the lens holder and side frames. Did start to score away the top 'glass' but one of the side supports started to come away, so have abandoned that idea. In hindsight I should have cut that piece away first and then sorted the side frames, not sure if they would have survived though as the 'resin webbing' is quite thick, someone needs to devise a 'hot wire' for resin Lol. Anyway dry fitted the gunsight to the instrument panel and took a few photos; -
1/10th Douglas Bader and Spitfire Cockpit
brodiebear replied to brodiebear's topic in Figure Work In Progress
Got the replacement decals on last night; Still one that is on wrong, so will rectify (lucky i have a second decal sheet) and then onto the gun sight and compass -
1/10th Douglas Bader and Spitfire Cockpit
brodiebear replied to brodiebear's topic in Figure Work In Progress
Thanks, I Just went off their instructions for decal placement. Looking on the web their seems to be a myriad of different layouts for Spitfires, Mk1's early, Mk1 Lates Mk1a , so without knowing the spitfire they used for reference i cant say if it is correct. Dare i say it looks like a spitfire and the cockpit is a place for the main 'attraction' of the piece to sit. You could go totally mad and add in all the control linkages, cables, etc.