

brodiebear
-
Posts
357 -
Joined
-
Last visited
Content Type
Events
Profiles
Forums
Media Demo
Everything posted by brodiebear
-

Mitches Military Models 120mm US Airborne Normandy 1944
brodiebear replied to brodiebear's topic in Figure Work In Progress
Got the C-47's fuselage complete, after a gloss coat, Tamiya black liner was used around the door and internal structures, then using the oil dot technique, subtle shades were added to the external skin, then a coat of matt varnish and finally dust and dark mud pigments were added; Now the simple job is over, its on to the jumper; -
Leslie Nielsen as Dracula - FDM 3D Print.
brodiebear replied to BrianI's topic in Figure Work In Progress
looking good, amazing how the details pop after a coat of primer -
thats very nice
-
Pegaso 54mm 2nd Coldstream Guards private, 1815
brodiebear replied to Shotandshell's topic in Figure Ready for Inspection
superb work -
German officer with doberman 1/16
brodiebear replied to The Great Escape's topic in Figure Ready for Inspection
Very nice work, may have lost a bit of paint on the tip of his nose - photo 5 ? -
very cool
-
Picked up this set from DF Military Figures stand at SMW last weekend, there models are, in my view, superb and well worth the money charged. Royal Horse Artillery at waterloo. Kit is available here - https://www.dfmilitaryfigures.co.uk/shop/?store-page=Royal-Horse-Artillery-Gun-Crew-Set-p543910601 There is also a mounted figure of Alexander Mercer giving the order to fire the cannons, Alexander Mercer was commander of G Troop Royal Horse Artillery in the thick of the fighting at the Battle of Waterloo. His six-gun horse artillery troop arrived too late for the Battle of Quatre Bras, but it fought with the cavalry rearguard covering the army's retreat to Waterloo. I think i will be purchasing him to add to the scene at a later date. He can be purchased here - https://www.dfmilitaryfigures.co.uk/shop?store-page=Mounted-Mercer-p551376442 Anyway the kit is made of metal parts, for the cannon, limber and some body parts and the figures in resin; This is a built up version on the DF web page; So far i have just got a few bits of the cannon put together;
-
Picked up this chap from SMW at the weekend, MMM 120mm Drop Order - Available here https://www.mitchesmilitarymodels.co.uk/product-page/120mm-us-airborne-normandy-1944 Comes well packed in the trademark black cardboard box with a print of the item on the front; I have removed all the pour stubs and cleaned all the parts; You have the choice of two sets of arms with different badges for the left arm and a 'flagged' or non 'flagged right arm. Here he is put together; He has a very determined look on his face, not sure if the lump over his left eye is supposed to be there or not; Helmet strap is nicely produced as well; The big part of the kit the door and bit of fuselage, floor and internal beams for the floor; The floor, side and beams glued together and the soldier just put in place; fuselage section is now off for a bath and then primer and colours to be added
-
Scale Collectables 1/5th Gustavo Fring
brodiebear replied to brodiebear's topic in Figure Ready for Inspection
Ta- 4 replies
-
- 1
-

-
- Gustavo Fring
- Tv
- (and 1 more)
-
Scale Collectables 1/5th Gustavo Fring
brodiebear replied to brodiebear's topic in Figure Ready for Inspection
Thankyou -
Finished this excellent bust of Gustavo Fring, just after he was blown up by his rival Don Hector Salamanca, who not surprisingly also died in the explosion. Painted in Oils A couple of reference shots;
- 4 replies
-
- 9
-
-
- Gustavo Fring
- Tv
- (and 1 more)
-
superb
-
Started on the dappling (right side), not sure if to go all over the throat though, got the left side to do. Some white spots are still drying out
-
Got some oils on the horse, just a pallette mix of Mars black, Titanium White and Yellow Ochre. Lows and mids painted, so need to add some white highlights probably in a couple of days but going to leave this one as a grey though. While he is drying i will get 'Burthes' mount painted.
-
I have had the Colonel Burthe 4th Hussars bust for a while and picked up the Hussar Trumpeter recently at SMW2021, just need the Eagle Bearer to complete the trio and mount them all together. Think this will be a long project, so may intersperse with other projects. Burthe's horse was painted with the airbrush using Vallejo Air acrlyics, Trumpeters horse has had the basic areas defined, also witht the airbrush - this is because i will finish him using oils, and will do the same with Burthe's steed. Both faces have had a base colour airbrushed with Tamiya Flesh/flat brown and highlights with white added;
-
Not entirely sure, think its rubber of some sort looking at the museum items
-
I approached this one with quite a bit of trepidation, never painted female flesh before, and the box art is quite amazing. So i have gone for a more suntan/olive skin approach, thinking she has been out in the open for a fair amount of time. All painted with oils over an acrylic base. Its amazing to see how 'off' the standard 'flesh' colour on her right arm ( Scalecolor artist acrylics) is. Need to tidy up her eyes and obviously paint her right arm, but pretty happy with were we are at the moment.
-
Virtually every figure on Aliexpress is a pirate copy. Thats why they are so cheap.
-
Finished this superb bust of Yuri Gagarin from 2Dreamers All painted with Scalecolor artist tube acrlyics.
- 1 reply
-
- 8
-
-
Finally got a bit of dry weather , overcast to get some outside shots of my finished RP models 1/9th Herbert Hassler; Compass bevel was made with about 6 layers of vallejo still water Water was made with 'Wilko' ready mixed filler, coated with various ScaleColor Artist Blues, Greens and grays, sealed with Vallejo water effects.
- 5 replies
-
- 22
-
-
Finally got a bit of dry weather , overcast to get some outside shots of my finished RP models 1/9th Herbert Hassler; Compass bevel was made with about 6 layers of vallejo still water Water was made with 'Wilko' ready mixed filler, coated with various ScaleColor Artist Blues, Greens and grays, sealed with Vallejo water effects.
- 1 reply
-
- 4
-
-
1/16 US Navy carrier deck crewman
brodiebear replied to James G's topic in Figure Ready for Inspection
Superb work all round. -
looking simply superb
- 26 replies
-
- 1
-

-
- Tamiya
- scratchbuild
- (and 1 more)
-
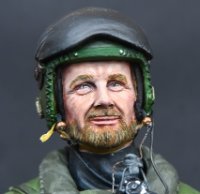
Started work on this excellent 1/9th bust by 2dreamers. A review is here After some very quick cleanup work, the torso was sprayed with Halfords Grey Primer, which goes on very well and for the size of the can its a lot lot cheaper than Tamiya's, which i have noticed when using the latest can, the coverage isnt that great. Then a coat of Vallejo Grey was sprayed onto the Helmet areas, and also from below at an angle to put some shadows onto the flight suit. Then Vallejo White grey, again sprayed onto the helmet structure picking up the raised details and filling in some of the shadows. This was also sprayed at an angle from above to pick up the raised surfaces on the flight suit. Next a pre made mixture of Tamiya Flat Red and Flat Yellow was sprayed gently over the whole suit, trying to keep some highlight and shadow details visible. Once dry lighter and darker shades of the orange were sprayed in accordingly. Few more highlights and shadows added to the suit. Pipes have been picked out as has the zip. Will add a few more highlights to the white helmet. and a few touch ups, then it will be onto the face and head. Pipe on his right shoulder needs repainting in brown.
-
superb
- 26 replies
-
- 1
-
-
- Tamiya
- scratchbuild
- (and 1 more)