


Mach82
-
Posts
371 -
Joined
-
Last visited
Recent Profile Visitors
2,495 profile views


Mach82's Achievements
")
Established Member (3/9)
571
Reputation
-
Hi Col. If it is not too late can you count me in on this one .... I have a choice of RhAF Hunter, AF of Zimbabwe SF-260 Genet, or RhAF Canberra. Having retired at the beginning of last year and following the move back to the UK, I am now in a position to get back into the hobby 😁 Best regards Mark
-
Thanks for bringing this to my attention Adam 👍. I am sure this has something to do with the Photobucket nause. I will try to put a few photos of XH562 model on this post.
-
Immaculate job there Gazza. I see the bug for building Vulcans is very catching. The extra's that you worked on have taken this kit to a whole new level. Superb
-

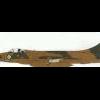
Hasegawa 1:72 F14A TOMCAT....flying blind!
Mach82 replied to Fozzy's topic in Ready for Inspection - Aircraft
It looks like an F-14 from all angles to me.... and beautifully built too. Great job Fozzy -
***Finished*** Airfix Vulcan Black Buck 1
Mach82 replied to PhantomBigStu's topic in Made In Britain II GB
Great job Stu ..... Good to see another Vulcan over the finishing line. It sounds like you are going to put the tubing to good use. -
Hi Chris. First of all thanks for you kind comments . Regarding my sanding technique ... once I have completed the painting stage, I run over the exposed surfaces (the ones that normally get sun bleached) very gently with a 1200 grit sanding sponge ... and I mean very lightly - just enough to start to see a lighter shade in the colour. I do this in random patterns all over the the surface. I follow this up with an all over buffing using the two sides of a polishing sponge (you know the ones that ladies use on their finger nails - they are designed for acrylic varnish and work perfectly with model paints). My particular go to sanding sponges and polishing sticks are in the Flory range and I find work perfectly for the effect that I go for. If you find that you have over done it, its a case of respray and do it again. I try to create the effect that you see on real aircraft where although matt, from certain angles they do have a gloss/satin effect. Here you can see it on a F-100D I made a few years back. If you want any further details drop me a pm and will explain further. Best regards Mark
-
Thanks Stu Keep at it... it would be great to see the second one in the gallery.
-
I have just completed this Airfix, scale, 1/72 Avro Vulcan Mk.B.2 for the "Made in Britain II" Group Build and decided to post the surplus completed photos in this RFI section. The build was mainly out of the box with the exception of a few extra after market goodies (A new set of jet pipes and air to air refuelling probe) and some decals provided by airdecal. I also did a little scratch building around the crew access hatch to enhance the looks of the rather clunky ladder area. It goes without saying there was the usual, filling, sanding and polishing expected with a kit of this era, but with a fine glass of wine, a good TV program in the back ground, it went by painlessly.... This particular kit is of Vulcan XH562, of 9 Sqn, RAF Waddington, 1978. Coming from Lincoln and having lived in a small village just outside Waddington I became fond of the Vulcan and loved every minute of this build. In fact a second one will be shortly underway.... XM575 of 44 Sqn (Wrap around camo scheme). I hope you enjoy the photos. WIP thread can be found here: Thanks for stopping by and taking the time to look.
- 21 replies
-
- 39
-

-

-
Airfix 1/72 Avro Vulcan B.k.2 XH562, 9 Sqn, RAF Waddington 1978 Here is my completed build of the Airfix, 1/72 Scale Avro Vulcan. The build was mostly out of the box with a few after market items being some resin jet pipes, and a metal air to air refuelling probe. There was also some scratch building work around the crew access hatch using some styrene rod and brass tube. For a quick build, I really had some fun and very happy with the end result. I hope you enjoy. Build Thread:
- 51 replies
-
- 22
-
-
-
Thanks John. I am glad you enjoyed the build and the weathering. Thats the joy with the clay washes. If it starts to look over done, then its out with a wet tissue and off it all comes and redo it. The oils and more permanent washes, I use sparingly afterwards to enhance the effect. Little is more I tend to find, but you are so right as it is very easy to overdo things and knowing when to stop is the key. With regard to the ladder, I found that the small effort in the crew entrance hatch area really gave this kit that added something special. The kit part as is,just spoiled the whole look of the open hatch and worth the effort. Best regards
-
Go ahead Mike ... you know you want to Its not that bad a kit ... I have come across a lot worse. I guess that all the bad publicity made me wary but once I got my teeth into it, I quite enjoyed it. Besides, how can one NOT love a Vulcan. In fact the Vulcan bug has bitten me in the backside .... hard!!! .... I want to build another one too .... This time XM607, but I will first be gathering some of the aftermarket parts as I want to super detail the bomb bay and wheel wells. I have a kit back home in the UK calling me .... glutton for punishment I guess Thanks for your support Mike ... it really spurred me on on this one
-
Update 06 She is now up on her legs! A fiddly task, but now complete and worth the effort. I know... the wheel wells look as plain as hell and time permitting, I might just put in some scratch built detail, but we will see how things go. Whilst on the underside, I did some work on the crew entrance door and steps. The moulded in steps needed to be removed and the interior of the door painted a matt black. NATO Black was used and created a good contrast with the yellow steps made earlier. The hydraulic door actuators were made using some styrene rod, painted chrome and fitted to the door entrance. I used white tack at the front edge of the door frame to assist positioning the jacks and holding the door in the correct position whilst the glue was drying. Having finished work fitting the crew entrance door, I fit the ECM plate under the right wing. And there she stands for the first time...... and not tail sitting. The inflight refuelling probe was a quick cut and splice job... and certainly improves the look. I will leave the fitting of this part towards the end of the build as it is certain to be knocked off with my clumsy fingers whilst manoeuvring .. The nav lights and beacons were made using and undercoat of polished chrome and then covered with clear red/blue. Some weathering to the crew access ladder, gear doors and aerials attached, and finally the crew windows completed using a dab of micro crystal clear.... she is just about ready save for the refuelling probe and a touch more weathering on the undersurfaces with some oils and pigments. I made a small jig to hold the air to air refuelling probe on position whilst the glue dried. The cutting mat lines were used to help align the probe. So there she is .... I am calling this one finished now. I will be taking some photos in the next day or two and pop them up on the completed area. Thanks for all your support and kind comment during this rather frantic build. Sometime, once I have had a breather, I will add some scratch built detail to the wheel wells to finally complete this lovely aircraft to my satisfaction. Cheers and thanks guys
-
Update 05 The day was spent applying and removing a clay wash. For this I used the Flory Dark Dirt wash - This is my go to product for this type of camo. The colour seems to work all round and bring out the panel lines without them being too strong. An added bonus is that the clay has a slight buffing effect which tends to blend in and soften the colour boundaries and 'wear' in the decals. So here goes. Always a little hesitant before dirtying up a pristine surface .... The clay wash thoroughly scrubbed in making sure that no part is left uncovered. Then it is a waiting game for the wash to fully dry ... about 1 hour guarantees a fully dry surface for the next phase. Armed with a kitchen roll (slightly dampened) and some cotton buds the clay is slowly removed leaving some good panel lines and shadowing effects. Undersurfaces complete and now ready to repeat for the upper surface. Its never failed yet, but always a relief when the clay comes off ... As I was saying earlier, the clay wash filters and blends in the decals. You can see what I mean from the before/after photos that follow: Before... After... And the tailplane.... Before... After... I intend to keep this one relatively clean and not over weathered so a few touch ups to do and then a little oil weathering and that should be about it before moving on to the undercarriage. Thanks for looking in
-
Kit-Starter - Beagle Basset 206 - FINISHED
Mach82 replied to nimrod54's topic in Made In Britain II GB
Superb build John. The attention to the details really do make this a special kit. It has been a pleasure following along. -
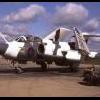
Cessna A-37 Dragonfly, Bien Hoa AB, South Vietnam
Mach82 replied to russ c's topic in Ready for Inspection - Aircraft
Great job on the Dragonfly there Russ. I like the unusual camo scheme and subtle weathering.