


Matt182
-
Posts
416 -
Joined
-
Last visited
Content Type
Events
Profiles
Forums
Media Demo
Posts posted by Matt182
-
-
Cheers guys, just got a small update today - the dark yellow base coat has been applied. I started with Vallejo 70.604 German dark yellow surface primer which goes on very smoothly and acts as a primer and base coat in one. It's quite a dark colour though so I went over it with AK Interactive 753 Dunkelgelb. I tried to lighten panel centres and give it a slightly uneven application to break up the solid slab of dark yellow. Pretty happy with it so for, hopefully will get the camo on tonight.

-
 3
3
-
-
Hi All,
I hope everyone is keeping safe and well. It's been a while since I have posted here, mainly due to losing all my motivation for modelling after finishing my King Tiger a few years ago. So, as I sure it has for many, the lock down has proved a good time to get a build or two completed. I started building this kit around 5 weeks ago and it is now pretty much ready to paint. I thought I run through notable points of the build but I'll say now that I didn't bother with the interior. If you want for see more on the that you will have to look elsewhere!
I purchased this kit as to me it seemed to be the best value 1/35 early Tiger you can buy. In the box you get:
- Fully workable individual track links
- A near full interior
- Photo etch / metal tow cables and clear parts
- Plenty of options
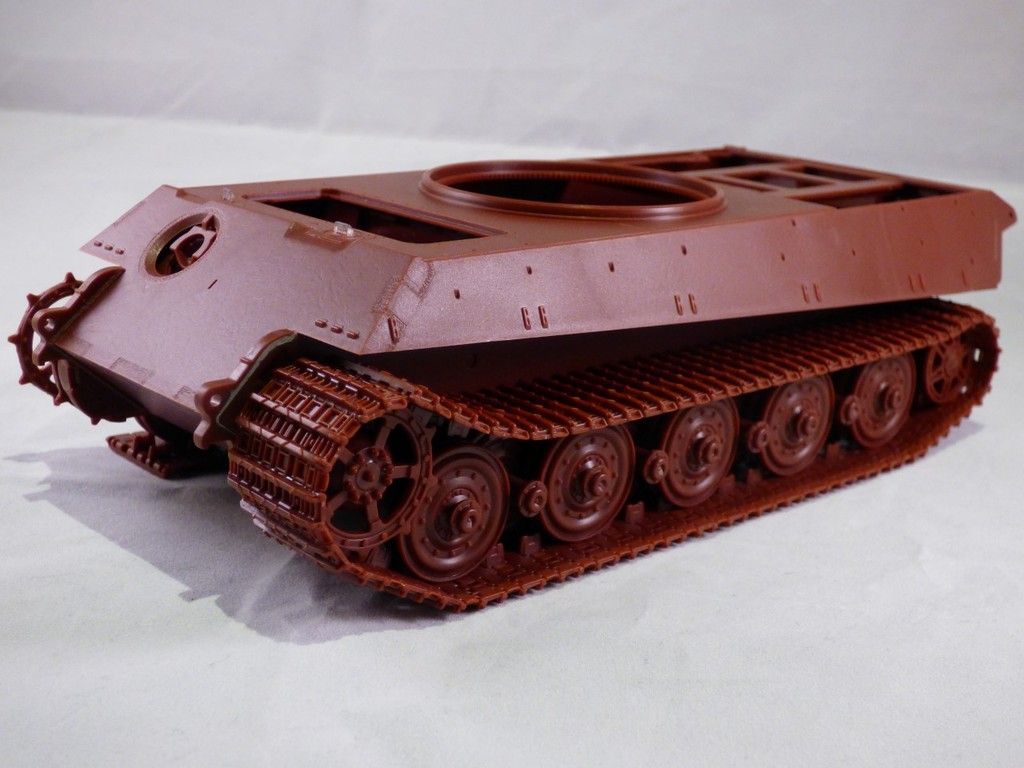
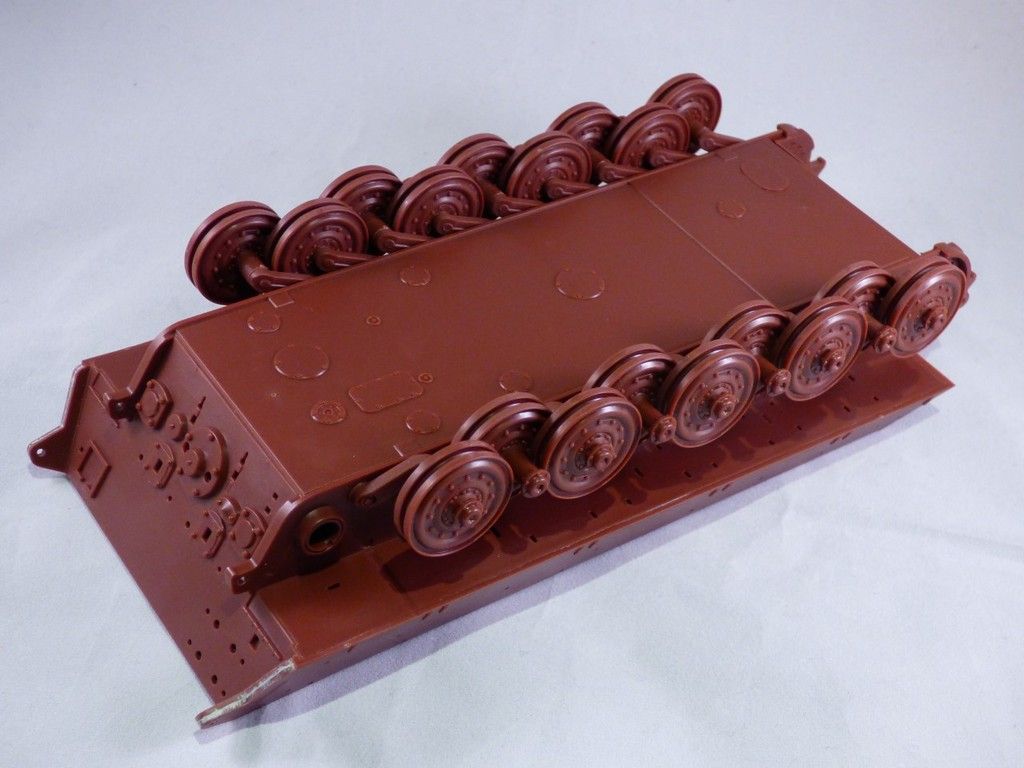
Although the instructions are aimed at building specific eastern front Tigers, there are enough optional parts in the box to build just about any external configuration for an early Tiger. I decided to build a more generic configuration and while I did try to follow references, I wasn't too bothered amount absolute accuracy. Here's the completed build, running gear is just dry fitted for now.
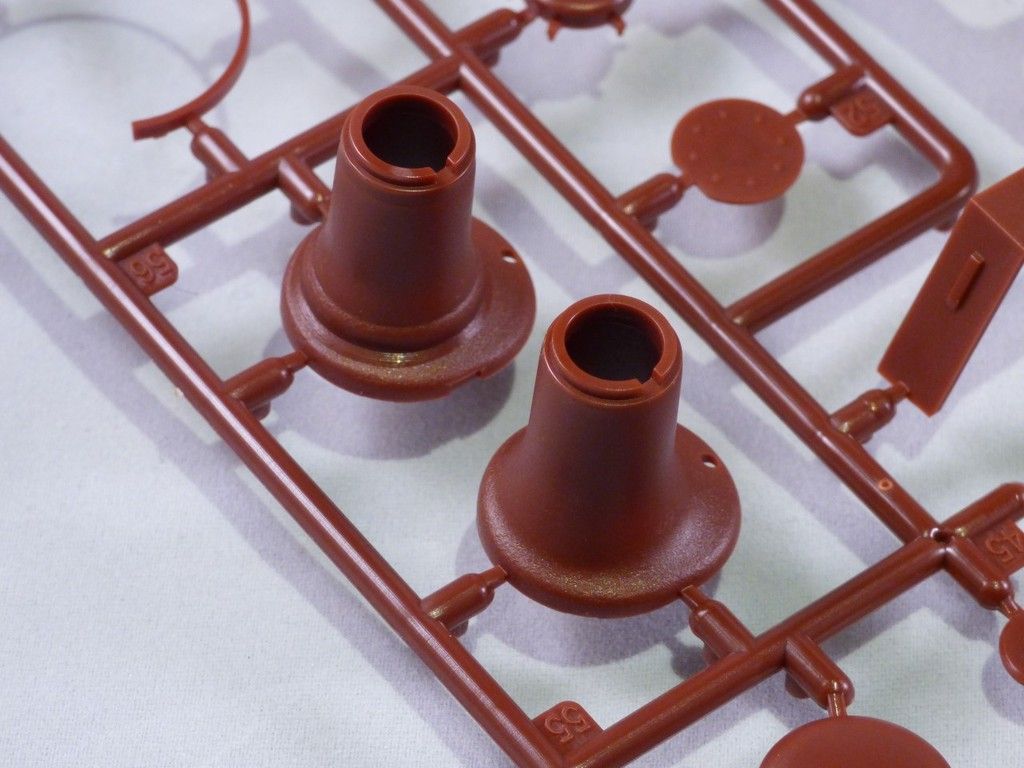
While I think the end results are good, there are a few issues with this kit worth mentioning. Firstly, almost all the parts were miss-moulded to some degree resulting in some parts being thicker than they should be, while others had huge mold seams. I managed to clean up most of it with the fire extinguisher being the only part I had to replace. I'm not convinced by the gun barrel either and will see what it looks like under paint before deciding whether to replace it. I'm not sure if this is a common issue with this kit or whether I got a Friday afternoon job but it is worth noting due to the fit issues this created. The build took substantially longer than expected.
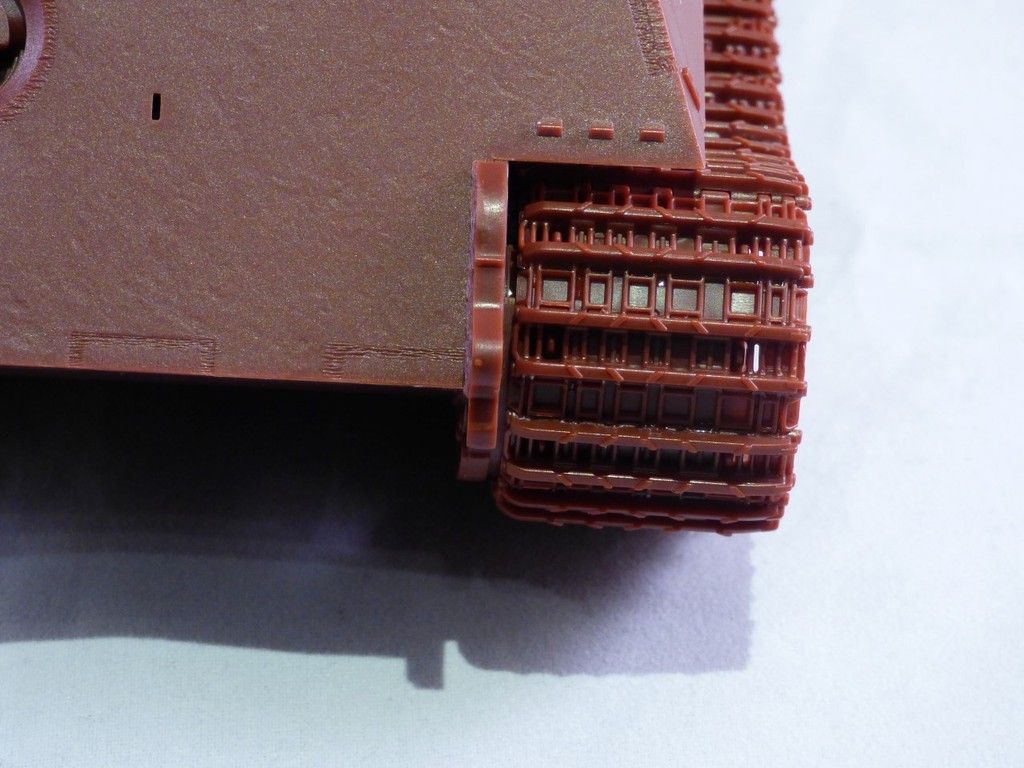
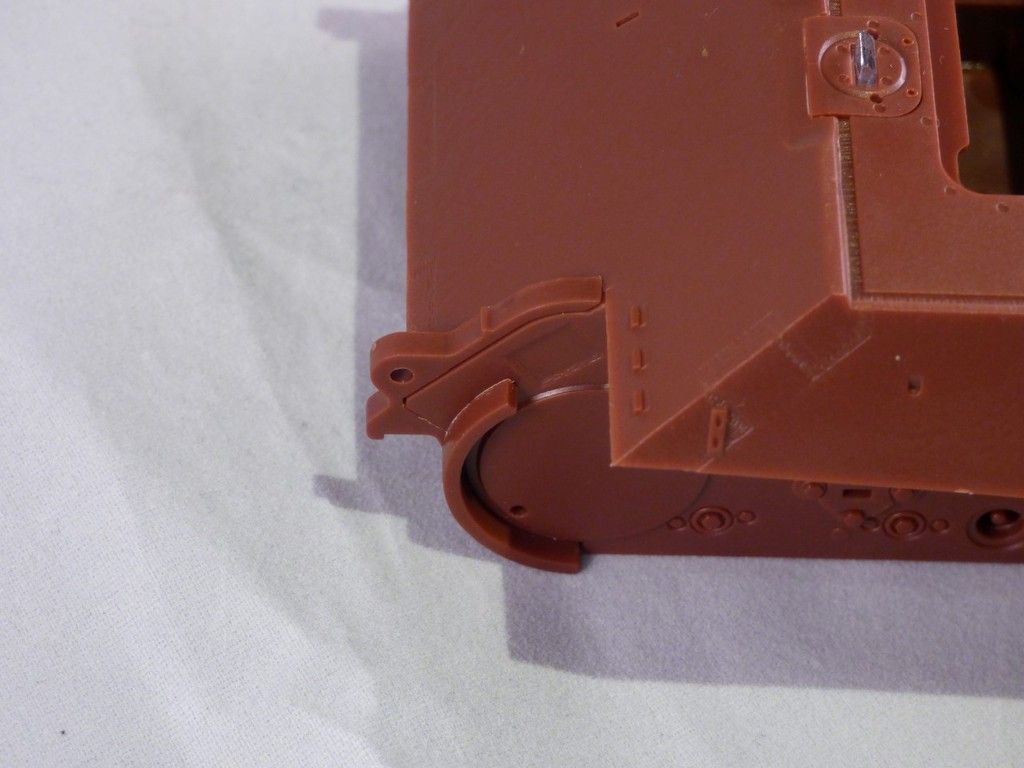
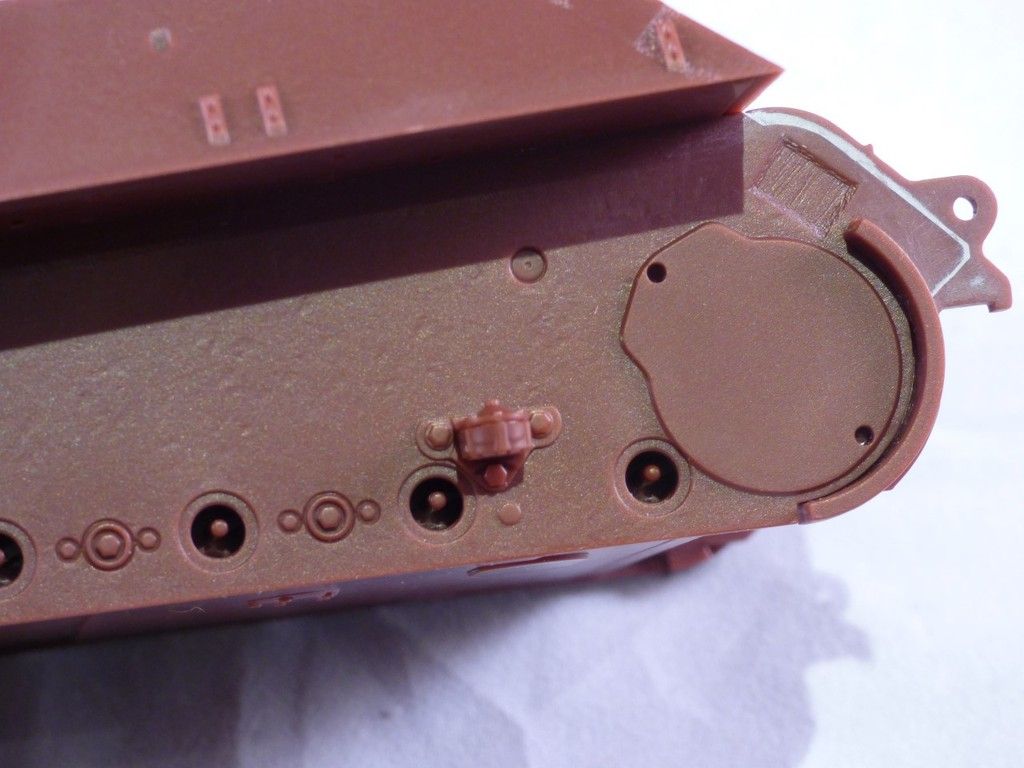
Also of note is that there are a design mistakes to the front of the hull resulting in mis-sized parts. First is the final drive housings. These are a different shape to the recess in the hull side and won't fit without trimming them in places. The gap that results is only noticeable when the drive sprocket is removed so not a big issue but you will have to modify the housing to get them to fit.
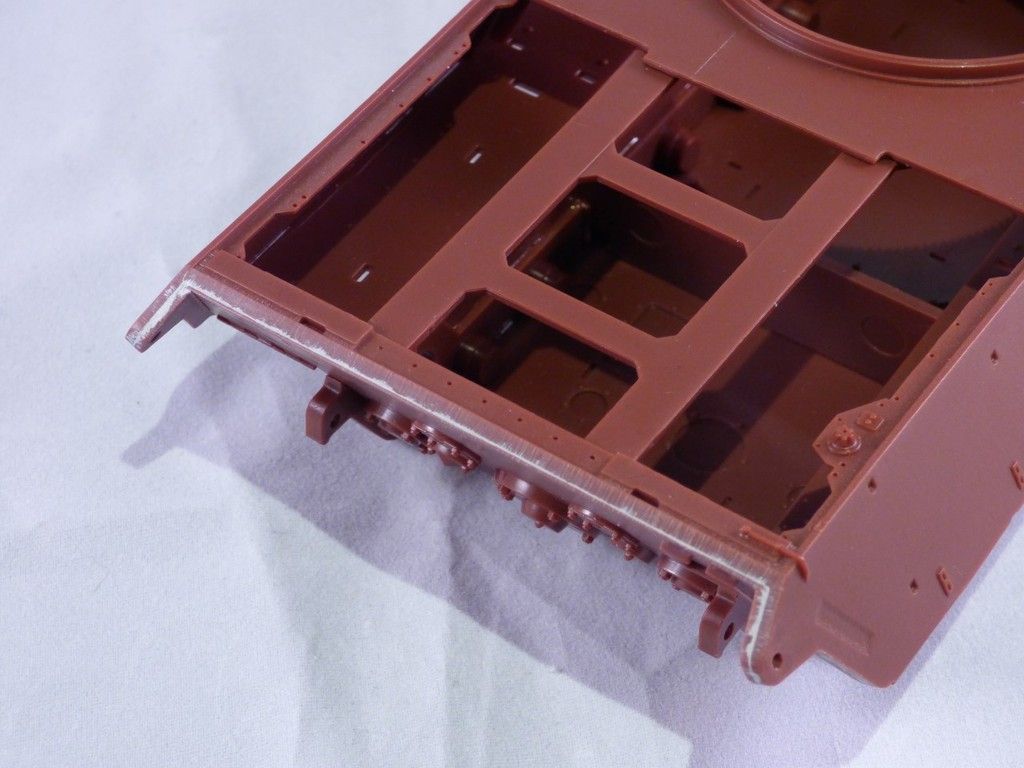
The other issues are to do with the front plate and upper nose plate. Both are slightly too small which results in the rest of the hull being slightly wider than the front and creates gap between the front plate and the side skirts. I fixed the front plate by adding extensions to the sides and blending them in.
I haven't bothered fixing the width of upper nose plate but l did have to fill the large gap at the front of the hull.
Fit issues aside, I enjoyed building this one. I plan to dust off the airbrush this weekend and get some paint on
")
Cheers
Matt
-
6
-
For the drivers foot plate and turret floor Plastruct #91681 is a good match. http://www.hattons.co.uk/46142/Plastruct_PS_148_91681_HO_Scale_Tread_Plate_x_2/StockDetail.aspx
 61 by Matt Tullier, on Flickr
The turret basket floor was a simple anti-slip plating, not the diamond style. Aber provide a good match but you will likely need two sets. http://www.aber.net.pl/detal,30.html
172 by Matt Tullier, on Flickr
-
Step 5 - Hull sides
I've now finished the hull sides. It's pretty much plain sailing with the shovel, pry bar and crank all very nicely done.
The main tow cables on the other hand are a little disappointing. They are molded separately from the gun cleaning rods but the large clamps for the cable 'eyes' are very simplified. They are just large lumps of plastic that look nothing like the real thing. In fairness they are no worse than in any other 1/35 KT kit but I can't help but feel that Meng could of made more of an effort here.
The track pulling cable on the right side of the hull is nicely detailed but is far too neat for my liking.
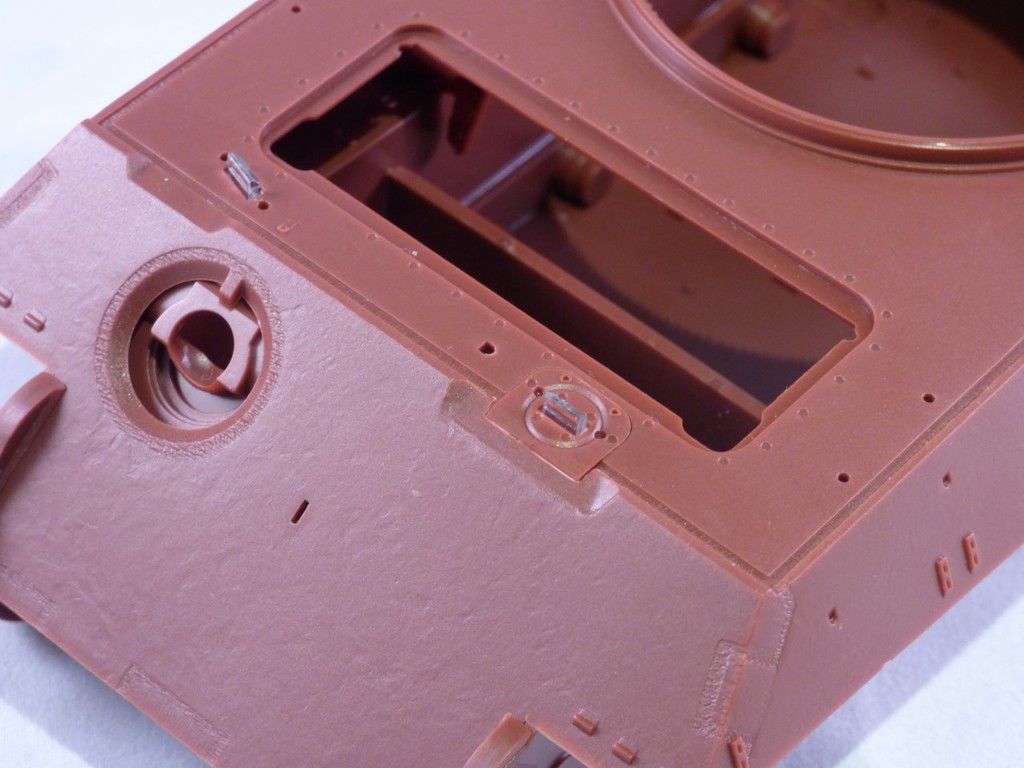
I've also noticed a mistake by Meng. The rear-most mounting point for the fenders is missing on both sides of the hull (circled).
I've started work on the rear plate so that will be the next update.
Cheers
Matt
-
5
-
-
4 hours ago, Tony Oliver said:
Bit late but those mould seams down the centre of the swing arms are weld seams if I remember correctly.
Not that they would be seen but saves people the work or thinking bad of the kit.
You are quite right that the large seam should be there, which is why I haven't removed them. I was talking about mold seams on the top and bottom of the arms that need to removed. Sorry if that wasn't clear.
-
1
-
-
Step 4 - Hull roof & engine deck
The hull roof is nicely detailed and goes together well. I added some small welds to the periscope covers and filled in around the lifting hooks. Meng have done a great job with the tools, they are just as good as the best from Dragon. You get a choice of covers for the hull ventilator. F49 has the cut down edge which was common on most vehicles but you have to add the cutting marks yourself.
The engine deck is again straight forward and well detailed. The deck comes in 3 separate sections which fit perfectly. The rectangular grills have the bolt holes cut out and fit perfectly over the bolts on the engine deck. The fit is so precise that you do not need any glue. Again you are given a choice for the intake covers, this time for the engine hatch. B17 is the correct part to use here as a 'flatter' version was fitted to aid clearance with the turret. You are also given the option to add a latch to the engine hatch but this is only applicable for late production vehicles and should be left off in most cases.
Meng also include a jig to help form the larger raised grills. You simply put the grill inside the jig.
Then push the two halves of the jig together.
The grills are shaped to fit the frames. It's not perfect but it's helpful
It's worth noting that the instructions point out quite a few optional parts but do not explain what they are or why they are optional. It's worth having some references handy.
Just to follow up on the issue with the decal zimmerit. I've tried to get a good photo of how flat it is but this is the best I can do at the moment.
Cheers
Matt
-
7
-
-
On 2/12/2017 at 6:23 AM, Gremlin56 said:
I don't think the high contrast between the red plastic and the light grey decal is helping it's appearance much here Matt, Have you tried giving a section a light spray of sandgelb to check it's looks with a single color? If that improves the looks you could do te smaller pieces like the forward MG dome with "home-grown" zimm
Julian
The high contrast probably doesn't help with making a judgment on it. My main issue with it is that when looking at it from tighter angles it looks like a flat surface that's been carved out, rather than a surface covered in raised ridges. I will post up some more photos of it in the next update which should show this better. I will try and do a painted example on some plastic card too.
On 2/13/2017 at 0:13 AM, sonofjim said:Build is progressing nicely , The zimm decal does look kind of like I thought it would ,there's really no substitute for putty or resin zimm . As you say it lacks depth .
All that nice detail is begging to be left visible mate , but if you do the zimm go the putty route pending a resin set .
I was hoping it would be an easy way to a decent zimmerit coat but it's just not right to my eye. I've decided to go with a clean build instead, it will be interesting to see how that surface texture appears under a coat of paint.
13 hours ago, PlaStix said:Hi Matt. Great progress on your part but I am surprised by how many issues there are with such a new kit. And I'm not sure about the look of the Zimmerit either. As Julian says it may look okay under paint but there are still going to be places like the MG mount where you have to make your own to match. Good luck with what ever you decide to do!
Kind regards,
Stix
Thanks Stix. Don't get me wrong, this is a great kit. Some of my gripes are quite minor to be fair. I really should be mentioning the pluses more as there are plenty of them!
Cheers
Matt
-
1
-
-
So I've had a go with the Meng zimmerit. Before I started I built up the bow MG. This is very nicely done with the ball trapped in place between the mount and the upper hull. The MG barrel is well done with a drilled out muzzle.
The zimmert decals behave like any other decal, they just need a longer soaking time. I added the decal for the upper front plate first.
And this is where I stopped. As you can see it looks very flat, lacking the ridges of the real stuff. I had a go at adding the decal for the MG mount which ended up being a disaster. It's too thick in the center to conform to the shape and the thinner parts just kept rolling up on themselves. Eventually the decal began to fall apart.
Honestly, I would of peeled it off anyway even if the MG mount decal had gone on properly. It's not worth covering up all that excellent detail with something that just doesn't look right.
Deciding now whether to add my own zimmerit or go with a 'clean' build.
-
5
-
-
looking very nice so far, good job
-
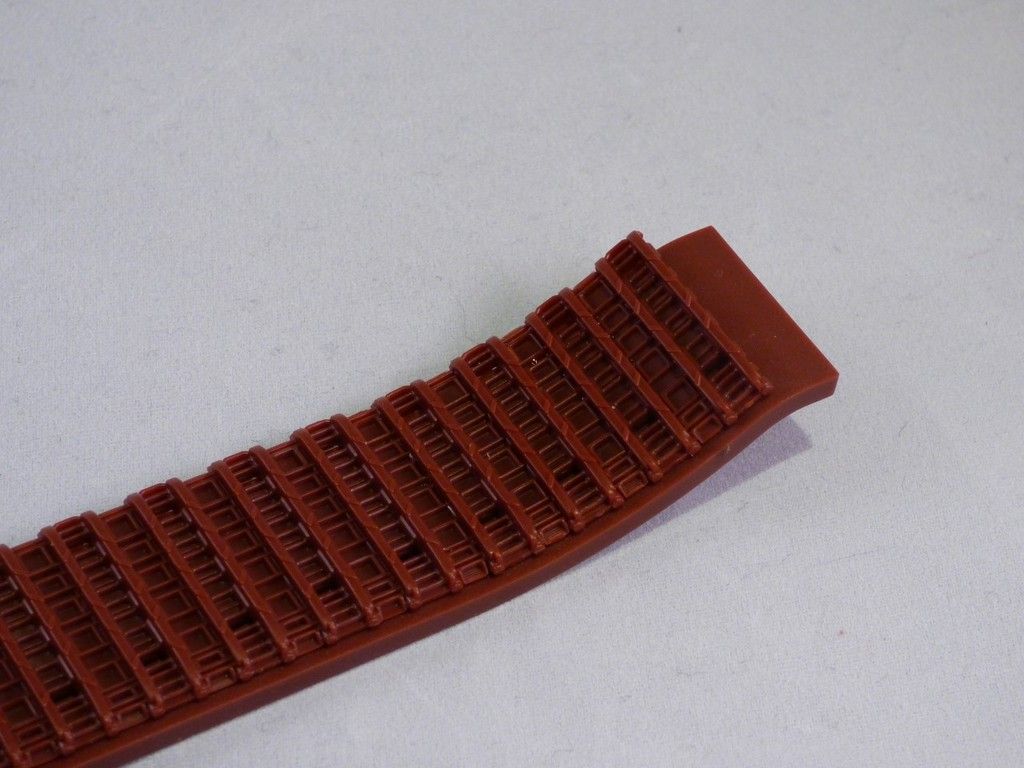
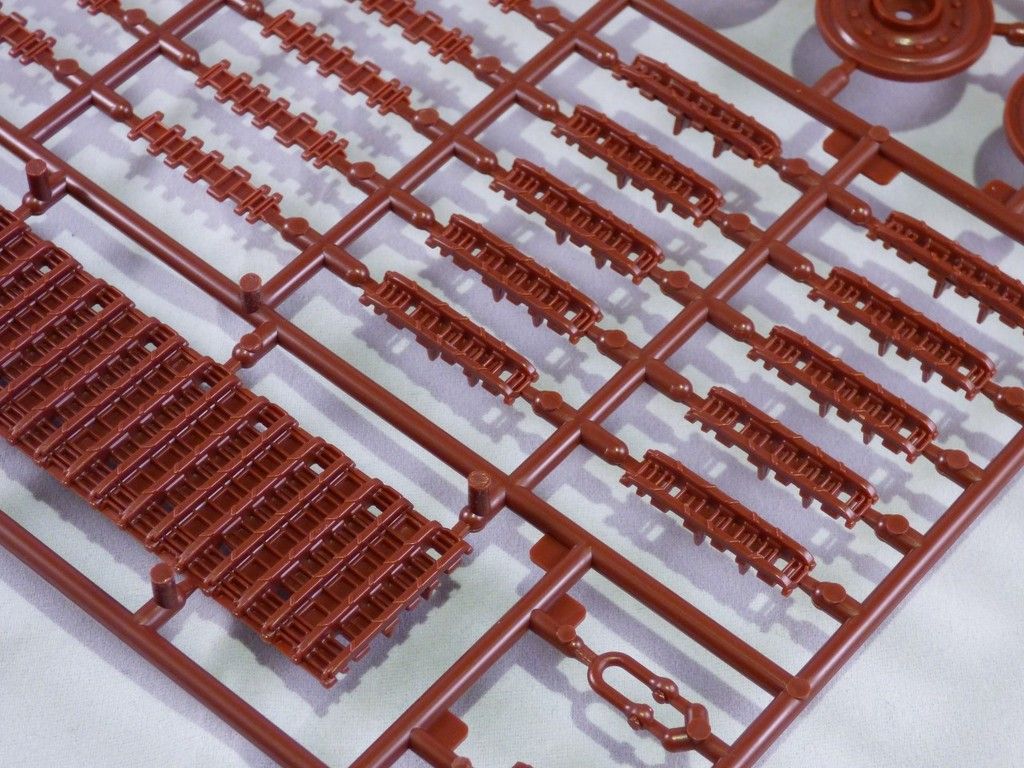
Step 3 - Tracks
I've now started work on the link and length tracks. Meng provide you with a jig for the upper track run to get the sag just right.
I built up the rest of the left track pretty quickly. I think the link and length system works quite well and should look good under a coat of paint.
I would suggest gluing the running gear in place once painted. Despite the ploy caps there is a bit play in the wheels, sprocket and idler which allows the tracks to sit at a angle. I'm certain that some of the blame lies with the swing arm issues I had but the sprocket and idler are particularly loose. The tracks tend to bow inwards.
The zimmerit decals have now arrived so I will be adding them to the hull next
Cheers
Matt
-
2
-
-
Great work on that PE zimmerit Ozzy, looks great with a coat of paint on
-
1
-
-
Hull - Continued
The hull roof has now been fitted, along with the front periscopes. The fit is very precise.
The front hull extensions are now on. Strangely fit is quite poor. After some sanding and scraping they still would not fit flush. Some filling to be done here.
The rear hull extensions have also been fitted. This creates more seams to fill
I tackled this now, also adding the flame cut texture that has been sanded off.
Next I cleaned up all the swing arms. There is an annoying attachment point that will interfere with the fit to hull which needs to be carefully removed. There are also some quite thick mold seams that should be removed.
As all of the swing arms are the same, Meng have you add spacers to ten of the arms. This creates the spacing for the outer wheels.
So now onto the first issue I have had with the kit. I've mentioned that some of the kit is precision fit and it turns out this is true for the suspension. When I fitted the two inserts inside the hull for the swing arms (C3/4) I was certain they were properly in position. It turns out they are are not! The holes in the hull do not fully line up with with the inserts. It doesn't look like much but the precise fit of the parts means most of the swing arms will not fit
The solution was to cut off most of the locating pin on the swing arms and glue them in place by eye. I'm quite happy with the result considering the issues.
I really can't say if this is an issue with the kit or one of my own doing. One thing that is for sure is Meng leave you with no room for error here. Double check the alignment of the inserts before gluing them!
Cheers
Matt
-
1
-
-
Stix, Bernd, got to agree that it is not something you would expect in a new kit. The join seam I can understand considering the design of the kit but the attachment points is a strange one. Some of them are perfectly placed while others appear to have had no thought put in to them at all. It's not a huge issue by any means but when the rest of the kit is such high quality, it stands out.
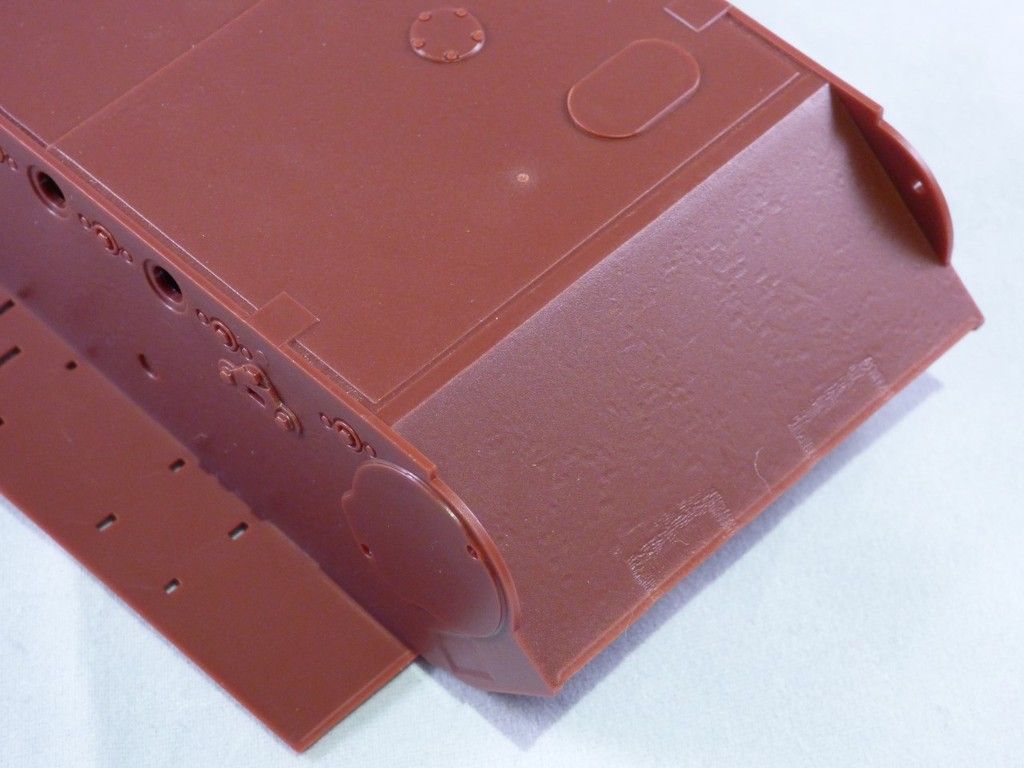
4 hours ago, Gremlin56 said:Just how rough was the hull in reality? I see Meng has added a "rough texture"to the outer hull plates is it rough enough or does it warrant breaking out the Dremel and dental burs?
This little problem has me wondering about the JT too......................................
I think Meng have hit a good balance between realism and aesthetics. It looks quite pronounced in the photos but it is actually quite smooth. The hull / turret roofs are a little overdone in my opinion but a light sanding will sort that. I think the effect will be very subtle under a coat of paint. In reality, at 1/35 scale this detail wouldn't be visible. The real armoured plates were much smoother than some would have you believe. I wouldn't take the Dremel to your JT unless you are adding battle damage. Maybe instead try to add some of the fine pitting seen on some of the late war armour. I followed a little guide when I added the texture to my KT. It's a subtle finish but I think it looks about right once painted. Check out this link: Rolled steel
Planning to get a bit more done this afternoon so may have an update later
Cheers
Matt
-
2
-
-
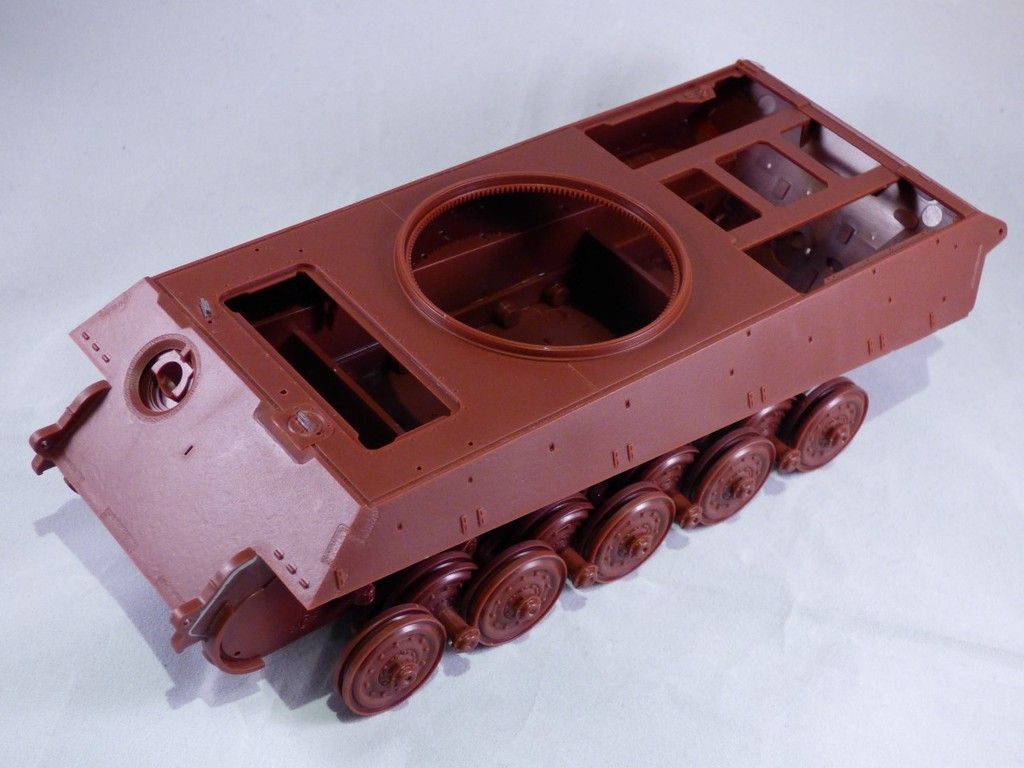
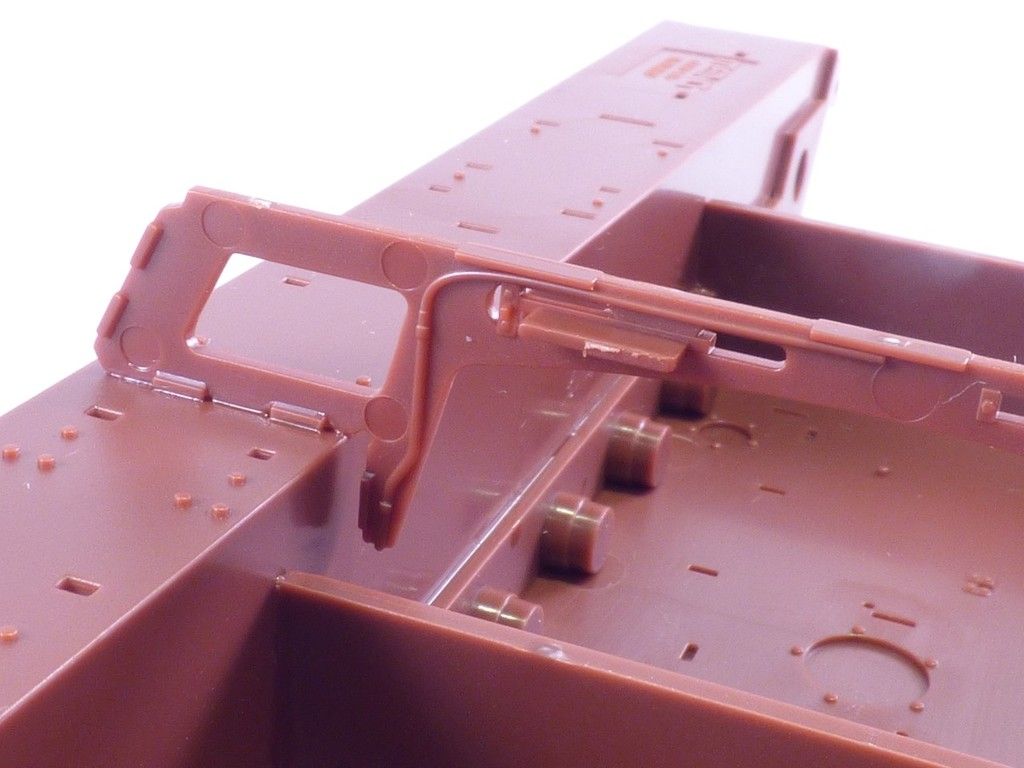
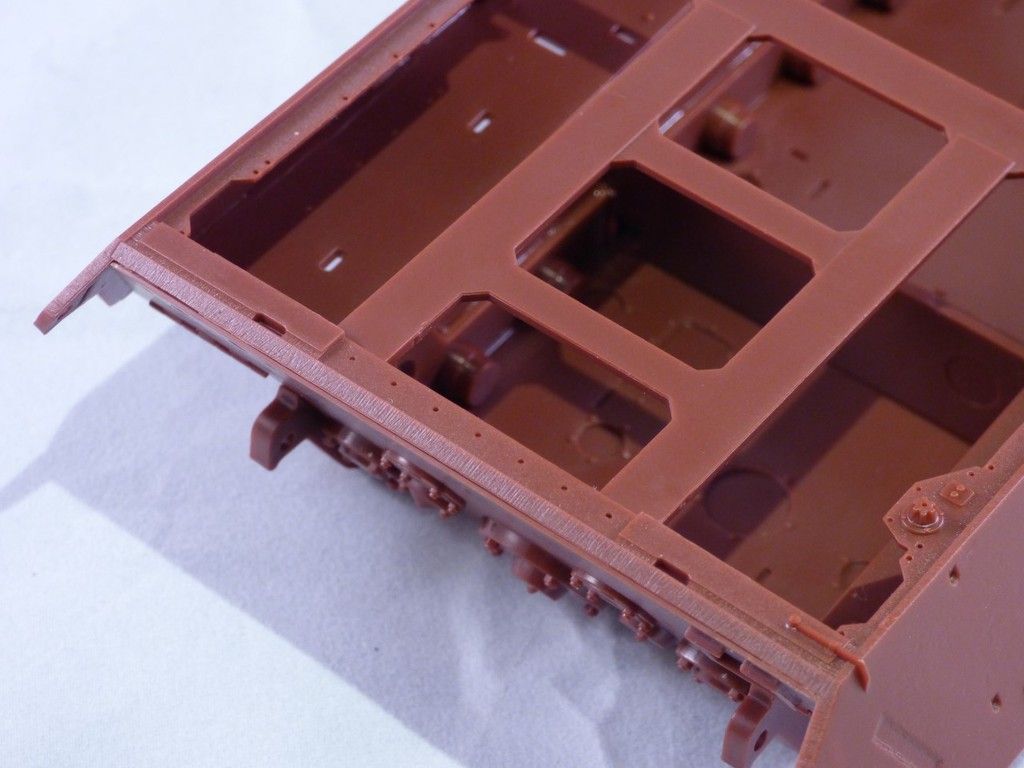
Step 2 - Hull
The lower hull has been designed to accept workable torsion bar suspension but this is not included in the base kit. Instead, Meng have you fit inserts into the hull to act as anchor points for the non workable swing arms. There are also 2 inserts that act as bracing for the hull as the main firewall is also not included. I also decided to add the forward hull brace at this point.
Meng would also have you attach the the front hull extensions in step 2. I would advise against this as you would then have to slide the upper hull underneath them. It's much easier to drop the hull in place and then attach them, especially if you are adding the interior. Just a note on the hull brace for those adding the interior. The detail is great but there are some considerable pin marks which may be a bit of a pig to fill. They will be very noticeable with the hull roof removed.
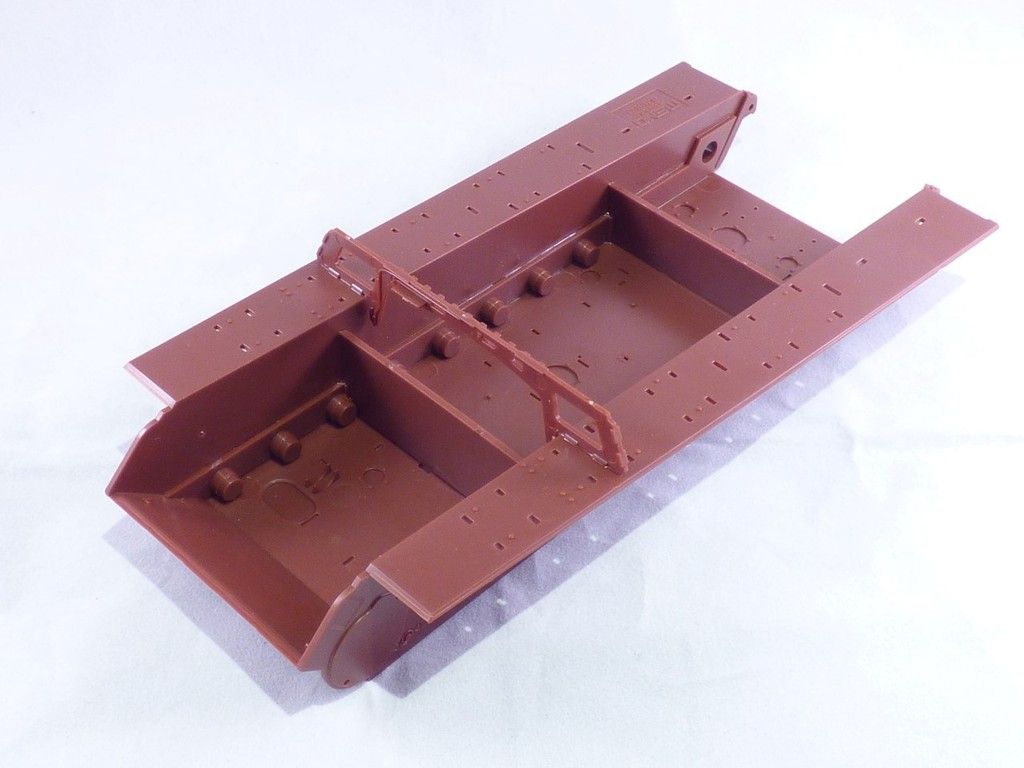
At this point I decided to stop following the instructions and get the hull together. Meng would have you build and detail the upper and lower hulls separately and then joint them together at the end. I prefer to build the main components first before adding the smaller details to avoid breakages.
First up to add was the rear plate. Strangely the sprue attachments are on the detailed side of the part. You will have to be careful cleaning them up and some the surface texture will be lost.
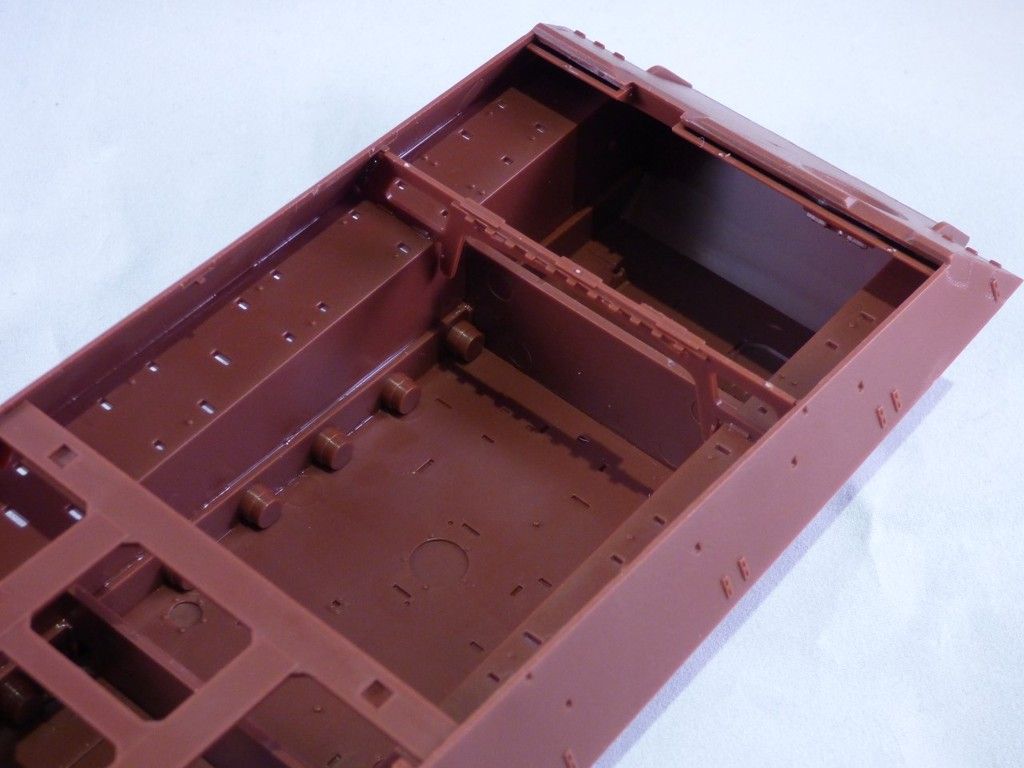
Once the rear plate had been fitted the upper hull was cleaned up. There are some large pin marks on the inside of the upper hull which may need to be cleaned up. For the exterior version there is a large brace to be added to the upper hull which provides more rigidity and also provides a mount for the engine deck plates.
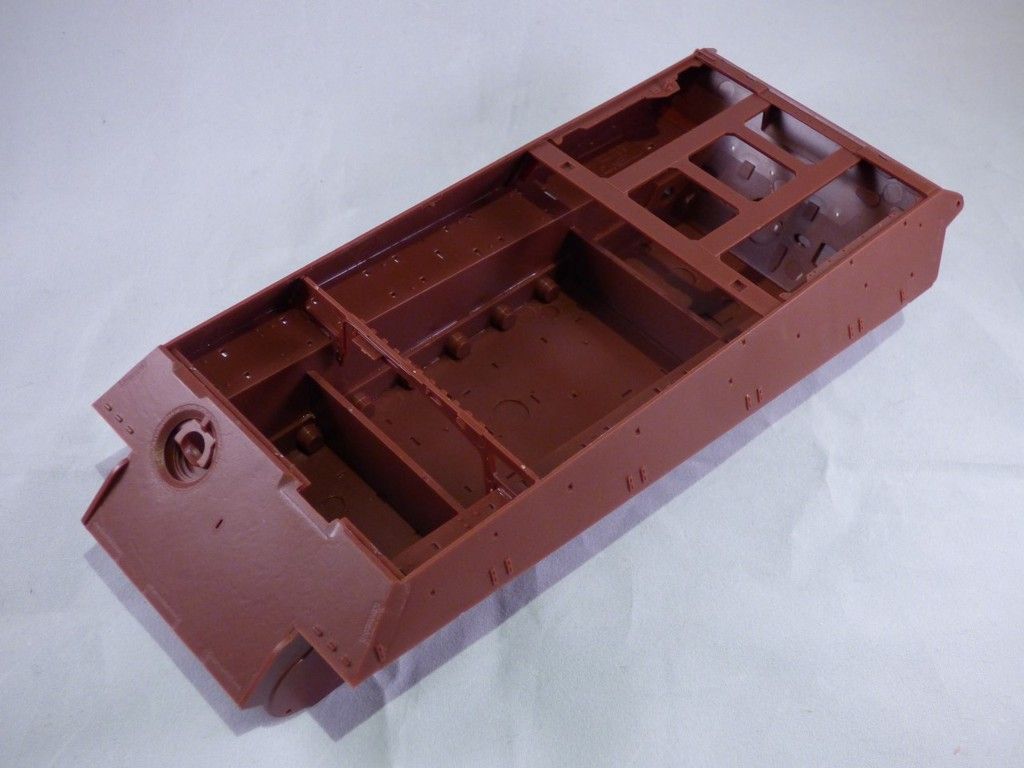
This is the hull glued together. With the roof plate left off you can glue it all together from the inside.
Here you can get an idea of just how much of the interior will be view-able with the roof plate removed. Certainly a good solution if you don't fancy doing cutouts.
My only gripe with the exterior detailing is how the upper hull attaches to the rear plate. There is a noticeable join which will need to be filled. A shame really as some of the nice flame cut texture will be lost
Cheers
Matt
-
5
-
-
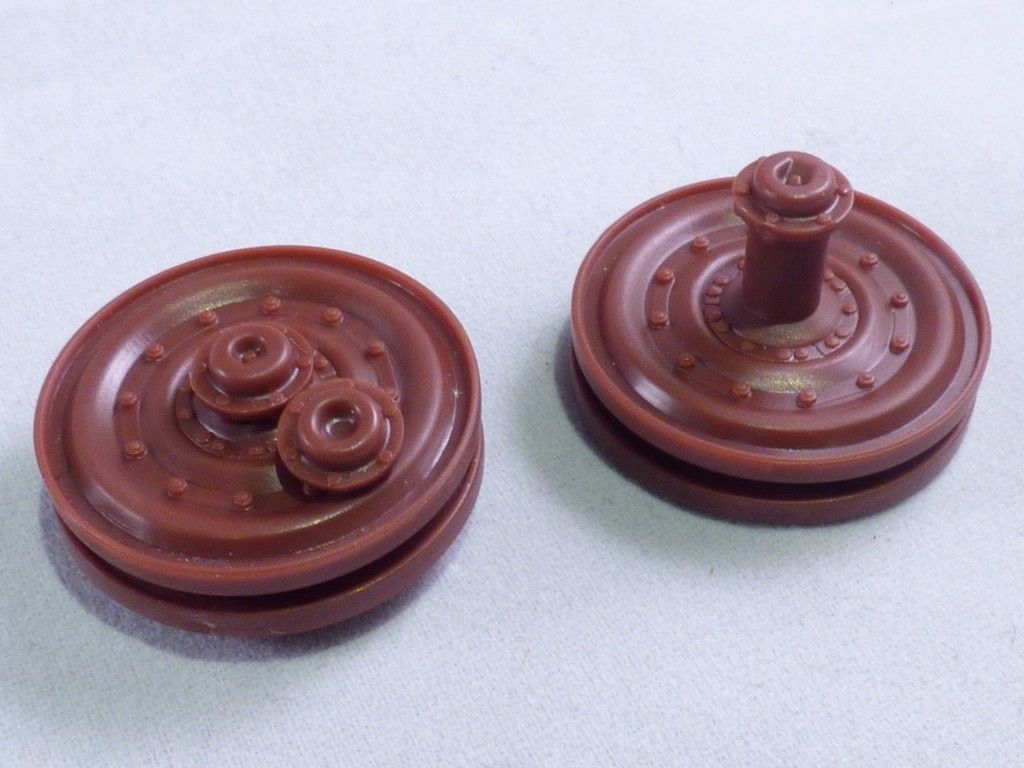
Step 1 - Wheels and sprockets
As with most armour kits the instructions begin with the wheels and sprockets. Always good to get them done and out the way early on.
The breakdown is the same as most KT kits so nothing new here. They are very nicely detailed with only a very fine mold seam to remove. Here you need to chose which hubs you want to use but Meng doesn't explain the difference. Parts B13/14 represent the common hubs with the D shaped depression whereas B11/12 represent the late circular hubs. Unless you are building a late version use B13/14. A small poly cap is sandwiched in the middle of each wheel which will help with building the tracks and painting.
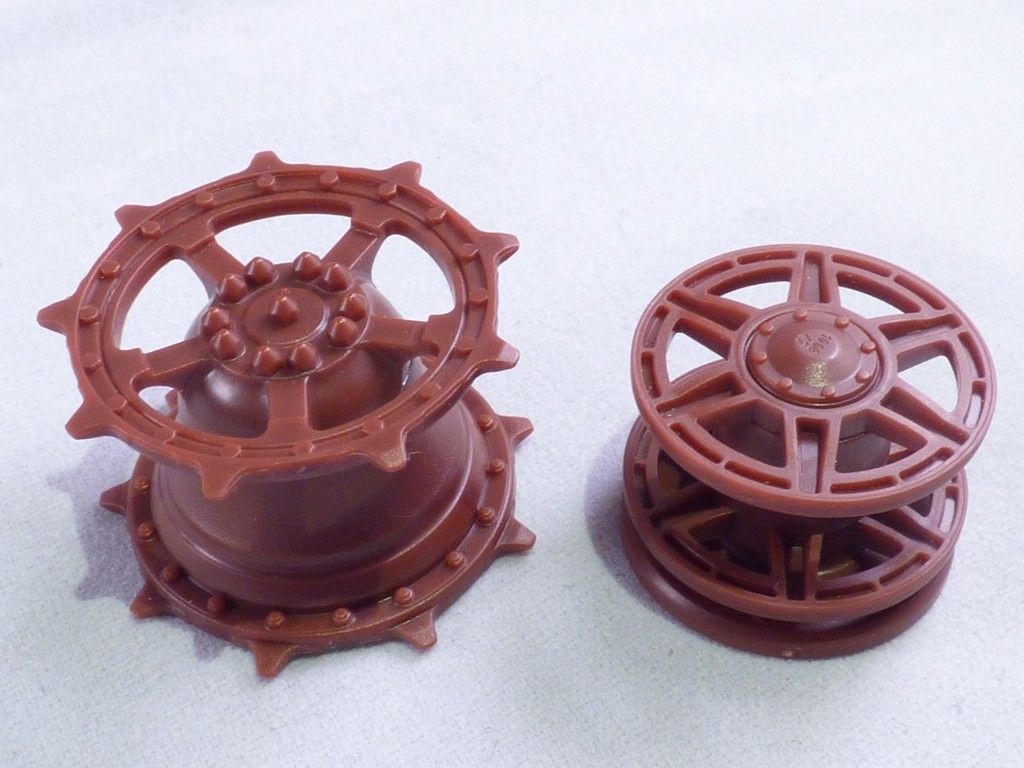
The sprocket and idlers are also very nicely done. Note the fine casting number on the hub of the idler wheel. The fit of the idler parts is very tight, you could probably not bother gluing it together.
Not the most interesting start but cleaning up a load of wheels never is.
Cheers
Matt
-
2
-
-
8 hours ago, Gremlin56 said:
You have me wondering why you are building another KT in 1/35th after the mind boggling 1/16th KT you just finished
Please don't tell me you have decided to scratch build the entire interior for this KT
nope, no scratch building or interior for that matter. Just something to getting me going again after other projects have stalled. It will be pretty much oob, bar a couple of extras 4 hours ago, sonofjim said:I'll be watching with interest Matt , it'll be quite sometime until I get mine out of the box and onto the bench .
I think I'll be going for a bulge KT with no zimm and jiggling details around to better represent the period production etc...
I'm not really sold on Zimm decals
so I will be interested to see those in action too .I'm sure you'll do a stunning job as you did with your big KT !
Thankfully not too much to change for a bulge KT, nothing more than on any other kit anyway. The surface details on this kit should look great under a coat of paint. I'm on the fence about the decal zimmerit so it should be interesting to see how it works out.
-
7 hours ago, BlackMax12 said:
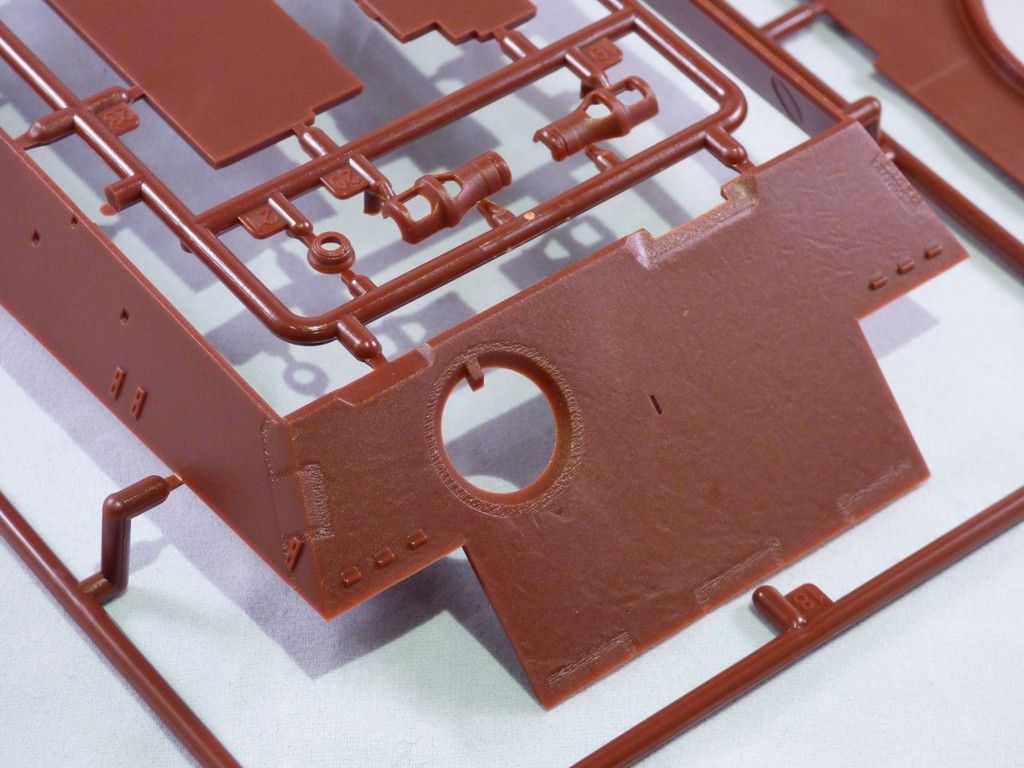
Looks pretty good and nice to see Meng uses the sprue gates on the edges of the part rather than on the detail sides like others. Too bad they ran out of the typical Meng dark yellow plastic though, haha.
Is this a little brother to your 1/16 KT?
Take care
Lloyd
The red plastic is a little odd. I would of preferred a lighter colour if I'm honest. I think it's an attempt at a red oxide base colour which I guess may come in handy for those hard to reach areas in the interior. Not much use for an exterior model though. It may end up with its big brother in one display, haven't decided yet.
3 hours ago, BerndM said:Looks very nice, thats the basic kit and Meng is selling detail sets for the interior separately, including Zimmet as decals ?
Interior, workable tracks and zimmerit are all optional extras. I guess the total cost will roughly be the same as the Takom kits if you buy everything. I'm going to add the zimmerit decals once they are more readily available
Cheers
Matt
-
1
-
-
Beautiful work Stix, the running gear looks fantastic. Very envious of your brush painting skills!
Cheers
Matt
-
Hi Guys,
I've been struggling for motivation lately but seeing that this kit is finally on sale, I couldn't resist!
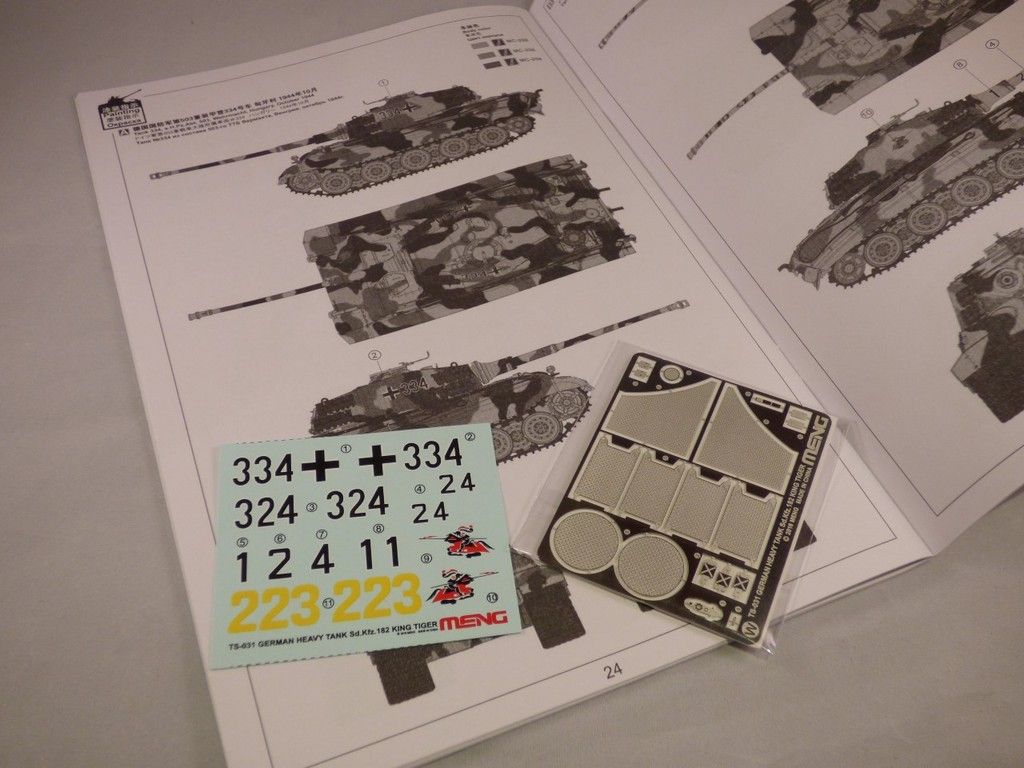
First impressions are very good. Surface detail is excellent, particularly the welds and rolled steel texture. Tracks are link and length which I think is the best compromise between indy links and belt type tracks. The kit comes with a few PE parts, metal barrel (first batch only), two figures and 4 decal options. At £30 for the exterior kit, only Dragon comes close to matching this. Tamyia's offering is now well and truly redundant!
I'm going to be building this OOB for the most part. I have a very nice Aber barrel in the stash which needs to be used.
So, a few photos before I get started
Turret roof with nice weld detail. Designed to left unglued if adding the interior.
Both types of mantlet included.
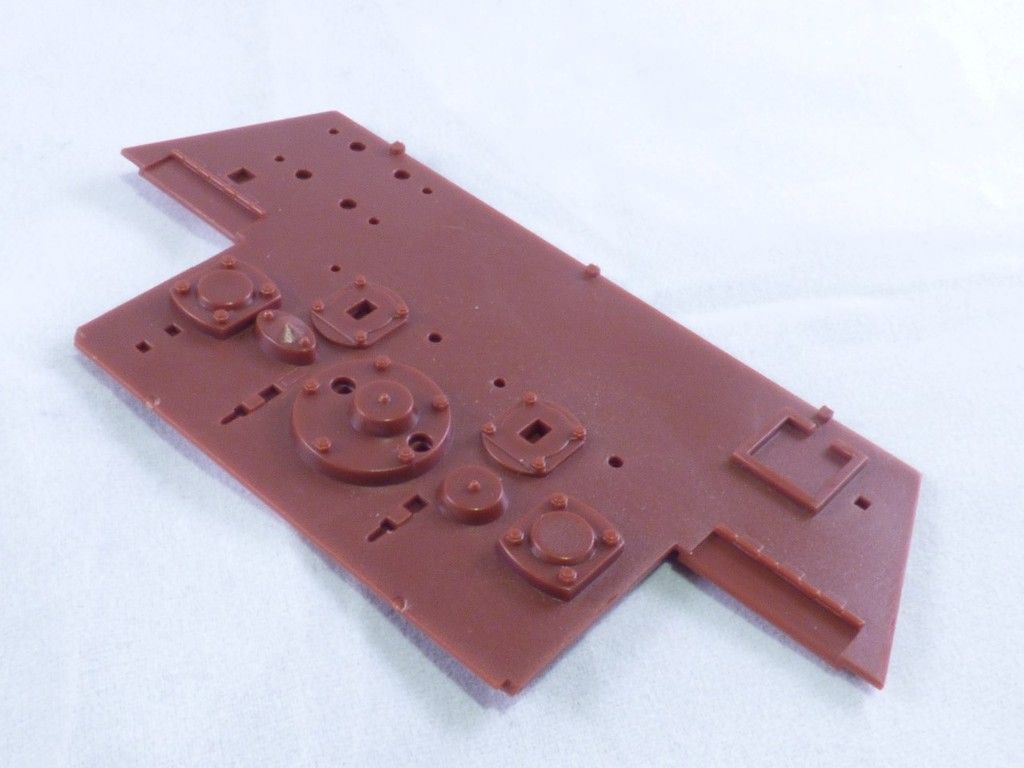
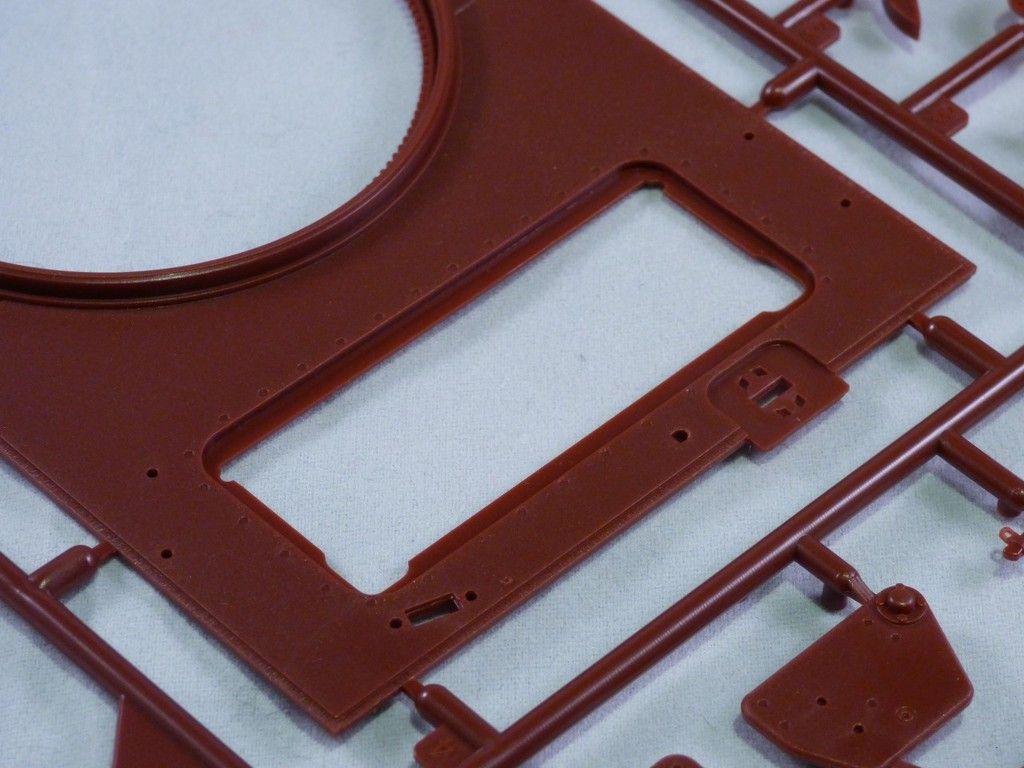
Lower hull tub. Note that there are a lot of locating holes for the interior that will need to be filled if leaving the fenders off.
Hull roof is also separate for easy viewing of the interior.
Link and length tracks very nicely detailed. Not a pin mark in sight
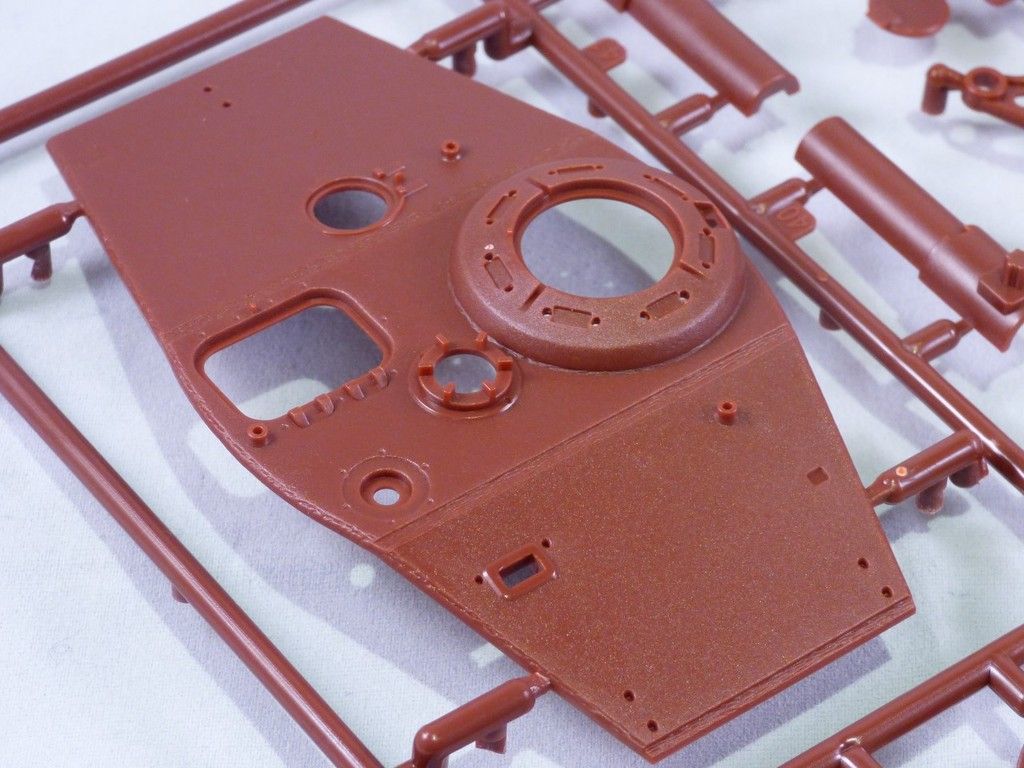
Upper hull with excellent detail
PE, decals and Instructions showing some of the 5-view painting guide. Nice to see all 4 decal options having a full painting guide too.
So, on to the rivet counting part (sorry
).
Accuracy wise, there is very little to comment on. The only 'issue' being the the turret ring is molded to the hull roof. This should be part of the turret but it's not really an issue and it was likely done this way to keep everything lined up. The kit best represents a vehicle built between June and mid / late August 1944 and would be better off having zimmerit applied. Of the 4 decal choices, the 2 with zimmerit are closest to the details provided but '124' of Pz Abt 505 will require a few parts to be left off. The 2 options without zimmerit will require a few more changes to be 100% accurate. Most of these details are minor in reality so unless you are wanting to be as accurate as possible, it's a non issue. My only other comment would be that I have doubts about the painting guide for option 4, '324' Pz Abt 509. I'm yet to see a photo of a partial whitewash over ambush camo as depicted but would be happy to see one
So rivet counter hat off, I will hopefully starting the build tomorrow. First step is the wheels. More to follow soon hopefully
Cheers
Matt
-
10
-
-
Coming along nicely now Julian. Nice work with those vinyl hoses, such a daft idea by Trumpeter! On the real tracks the guide horns were slightly shorter on the inside. I just trimmed them down around the sprocket and left the rest, saved messing with the sprocket. I took the same approach with the pin marks on the tracks too, no point filling what wont be seen!
Keep up the good work!
-
1
-
-
Great to see this one getting started Julian, it's certainly going to keep you busy! Will certainly be following your progress
I saw you question some parts in your photos and your right on both counts. Trumpeter made a mess of the brackets for the spare periscopes though. They should look more like this when empty.
That transformer may actually be a fuse box, not 100% sure. The transformers for the radios were stored in the box that attaches below it. Power cables for the radios went into the opening in that box to the transformers.
-
1
-
-
Great work Kev, certainly building up well
-
1
-
-
Great work Phil, looking good.
-
1
-
-
Hi guys,
A little more progress on this one. I've almost finished building the figures, just the heads and helmets to go. They are from Dragon's 'British infantry Normandy 1944' set. They are showing their age a little and the fit isn't great on some parts but they are still decent figures. Hoping to start painting them tomorrow. Here's a couple of photos to show my plan for the scene.
Cheers
Matt
-
3
-


 Honestly, I would of peeled it off anyway even if the MG mount decal had gone on properly. It's not worth covering up all that excellent detail with something that just doesn't look right.

")


Lock Down Project - RMF 5003 Tiger 1 Early
in Work in Progress - Armour
Posted
Hi guys, a change of plan with this one. Being honest, I made quite a mess of the camo so instead of starting again I have decided to do a white wash. As I wanted to make it look like it was applied by hand the first coat has been brushed on with heavily thinned Tamiya flat white. It's looking pretty rough at the moment but the next go other with the airbrush will hopefully tidy it up substantially! Lesson learned, practice first!
Cheers,
Matt