

TimV1969
-
Posts
82 -
Joined
-
Last visited
Content Type
Events
Profiles
Forums
Media Demo
Posts posted by TimV1969
-
-
The half-price revell kits are still available, albeit not necessarily priced-down in store - I picked up one of the German SAR boats plus Sea King combination kits in the Bath branch at the weekend for £24.50 which isn’t a bad price for the Sea King alone! Incidentally the Sea King in that set comes with the runner that has the 6-blade tail rotor, larger radome etc so is suitable for RN subjects as well.
-
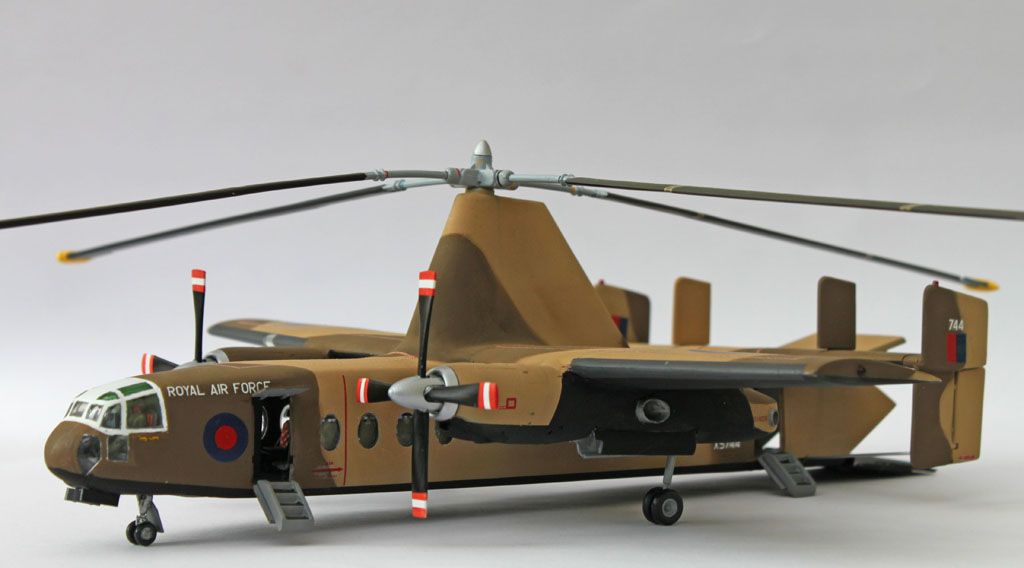
The prototype (which the Airfix kit depicts, obviously, as the only that was built and flew) was the Rotodyne Y. There was a proposed larger Rolls-Royce Tyne-engined variant, known as the Rotodyne Z or FA-1, which is what what was ordered by New York Airways (possibly licence-built by Kaman) and BEA. That also would have had longer wings with swept-back leading edges, and a 'beaver-tail' arrangement at the rear. I built one a few years ago, using one-and-a-bit Airfix Rotodynes, and a Revell Transall C-160 which contributed the engines and part of the wings:
I'd happily buy a 'new' one though - although I have bits left over to build a prototype, it would require splicing parts from two kits (I also later bought an incomplete kit off eBay) and, newly-created decals would be welcome!
Tim

-
 16
16
-
-
Thanks for your welcome, guys, and yes, it is a good kit for its age, comparable to Airfix's Lynx or Puma of the same era, although maybe not as nice as their Sea Sprite. Thanks for the reminder about weighting the nose, zebra, that does ring a vague bell from the previous one I built, several years ago. I think on that occasion I only noticed after assembly and had to drill a hole in the bottom of the fuselage to get some weight into it! This time I'll try to remember to put some Liquid Gravity in before I glue the floor in place. At least, unlike Airfix's Gazelle(*), there is a suitable cavity under the floor to hide it.
So, a slow start so far on this, but I have completed the basic fuselage assembly, and completed and painted the interior. The seats look pretty good as they are in the kit, but I have added masking-tape seat belts, and a couple of strips of half-round plastic strip on the back to better represent the framework visible in reference photos. I also cut away the 'step' from the floor, which, as far as I can see, folds down when the winch is in use, as I want to make this model look as different as possible from my previous, Naval variant, and that means modelling it with the winch fitted, and the door open. This meant cutting the rear door out of the port-side glazing, which didn't go that well as I cracked the corner of the door glass. Fortunately I found I could cut out a similarly-profiled window from a left-over piece from an S&M Models Sycamore (knew I kept it in my spares box for a reason!) so hopefully that will come together later. For now though, the interior, placed (but not glued!) in the fuselage just to check that it fits:
Those photos remind me that I need to scratch build some rudder pedals!
Tim
(*) built two gazelles as an adult, and one a long time ago, all of them tail-sitters!
-
5
-
-
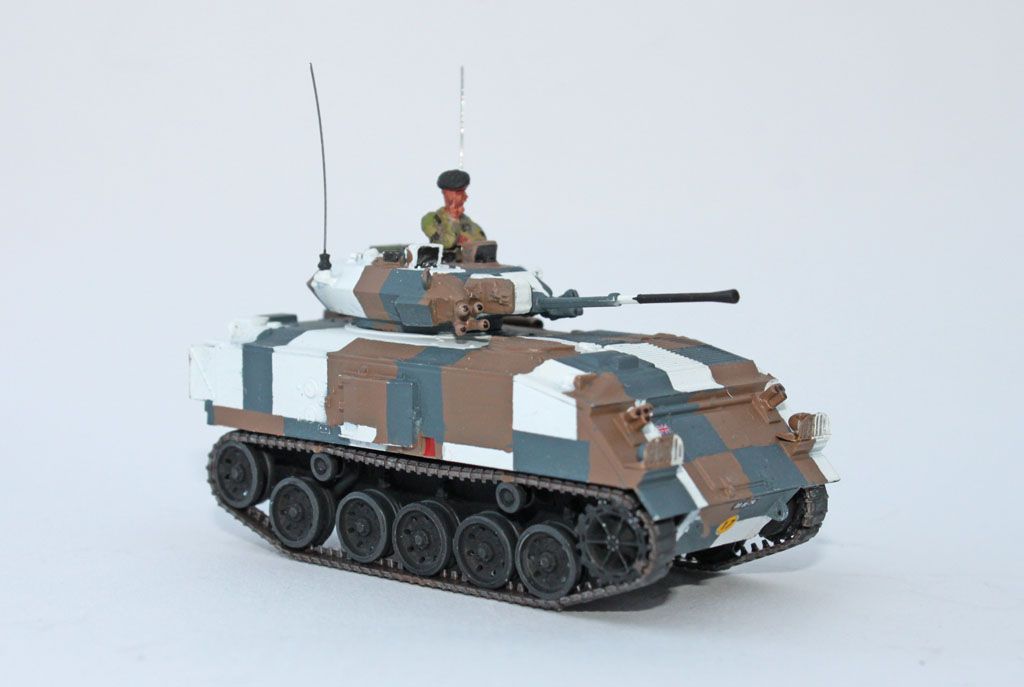
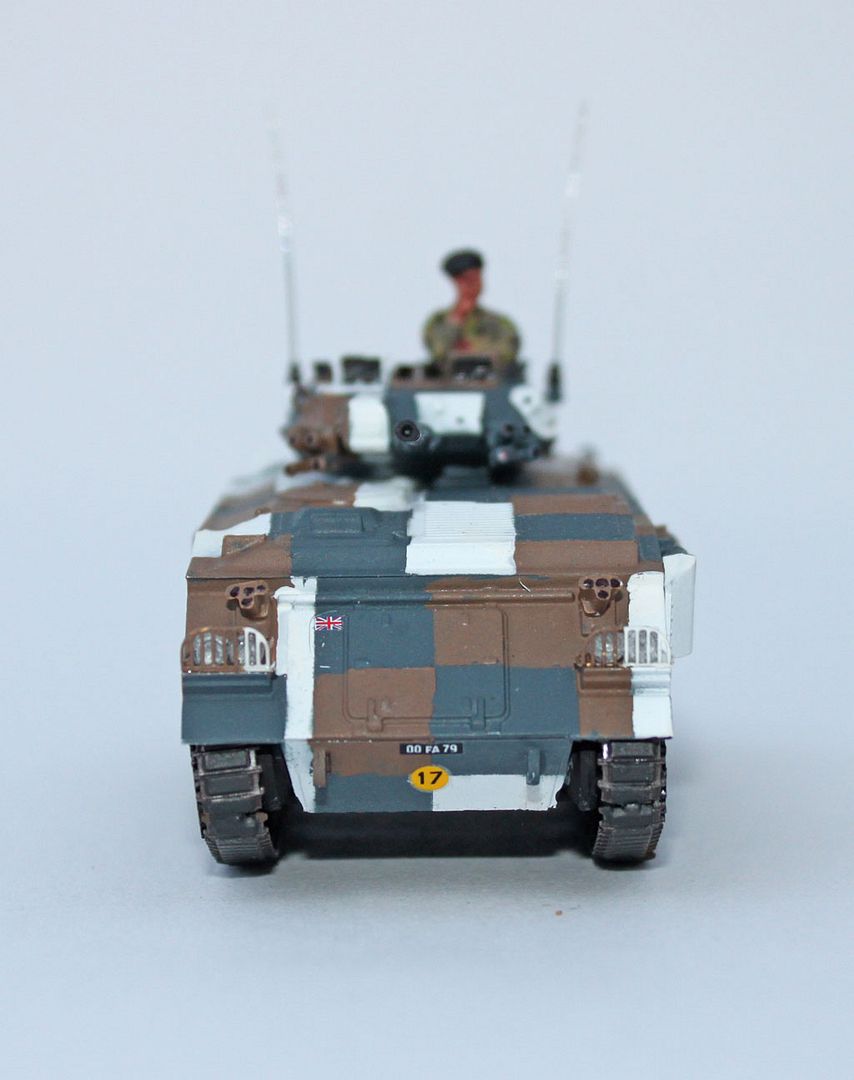
Made from the S&M Models FV432 Mk2/1, with a Friendship Models Fox Turret and, for these photos at least, an S&S models British tank crew figure. Painted in the Berlin Brigade Urban camouflage, using a matt white enamel base coat, Revell 79 for the Grey (representing RAL7031) and Revell 381 for the Brown (RAL8025), which to my understanding were the specified colours. Decals from the kit (which means the number plates are slightly wrong but hardly noticeable in this scale) and then all matted down with Humbrol matte enamel varnish - as the Brown is a satin paint.
and some more photos 1/72 FV432-30 Photogallery
Very enjoyable model to build, probably would have built it straight from the box if I hadn't found the Fox turret on the Friendship Model's stall at Telford last year...
Tim
-
16
-
-
I'd like to enter this group build with the 1/72 Sud Aviation/Alouette Alouette III, which I notice no one else has picked yet, and I think is eligible as according to Scalemates it was first released in 1980 so is a Classic? Looks like new parts were added for the civilian versions in 1989 but I won't be using them anyway. I've just bought a recent re-boxing of this (from Creative Model's bargain 'damaged box' category on eBay):
but perversely, even though it comes with a nice-looking modern decal sheet for the Gendarmerie (much the best I've seen in a Heller kit), I intending building it as a SA319 from the Armée de l'Air, using earlier Heller decals and/or yellow numbers/letters from ModelDecal 50 (intended for the Puma):
Should be fun to build, I don't remember any major problems with the previous one I built (as a Naval SA-316B - hence my desire to build a contrasting Armée de l'Air version with the Astazou engine)
Tim
-
8
-
-
On 8/8/2020 at 4:46 PM, Silver Fox said:
Is there anything in Weston Super Mare?
There's MD Hobbies and Leisure, fairly close to the railway station - reasonable range of Airfix and Revell last time I visited, last year. They seem to be having problems with their shop website at the moment though!
-
1
-
-
S&M Models have already done an FV432 in 1/72 scale, and I'm sure at Telford last year they were talking about doing an Abbot based on the common parts, but no sign of it yet...
-
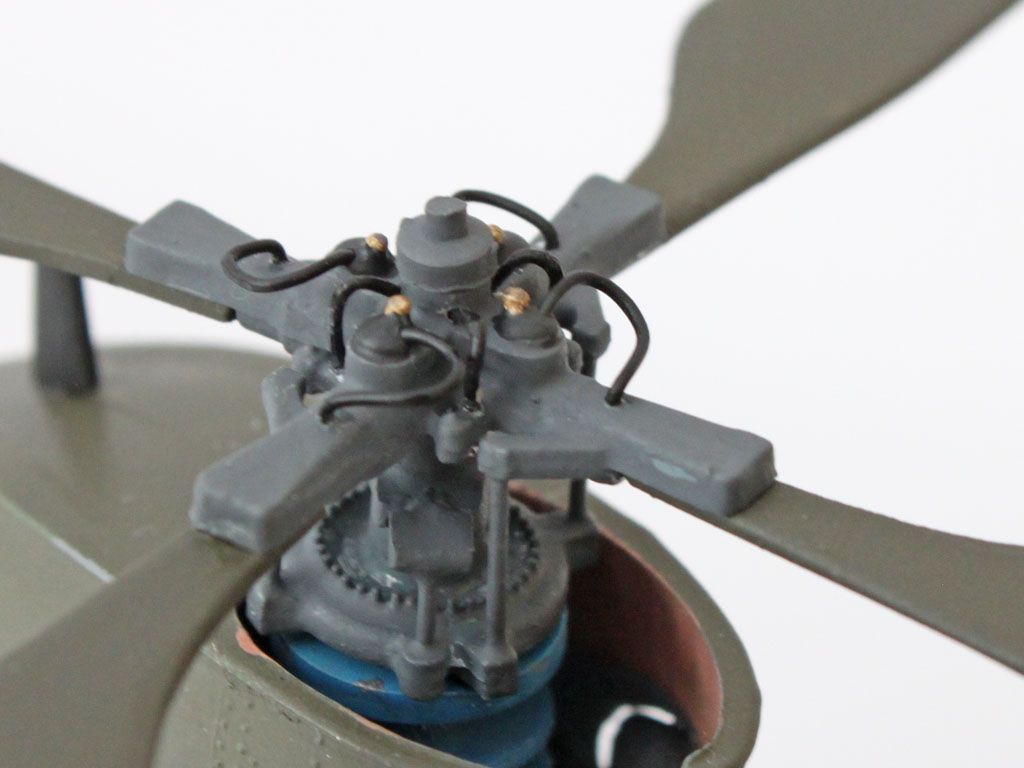
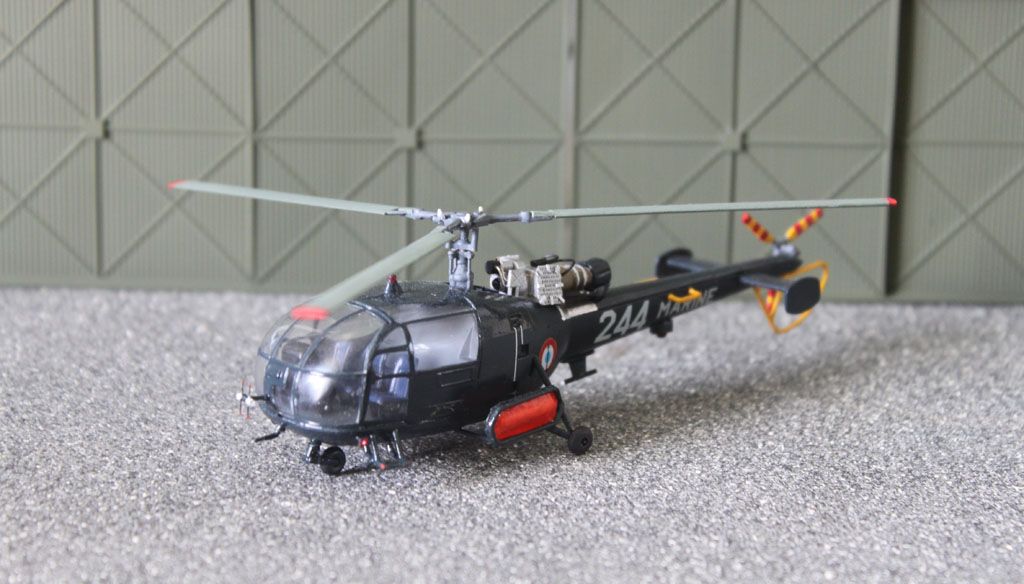
Phew! finished in the nick of time. The matt varnish did its job and was dry and ready for working on this morning. I finished spraying the rotor blades with Humbrol 163, and once that was dried, fitted them to the rotorhead (to which I'd added a few pipes from reference photos:)

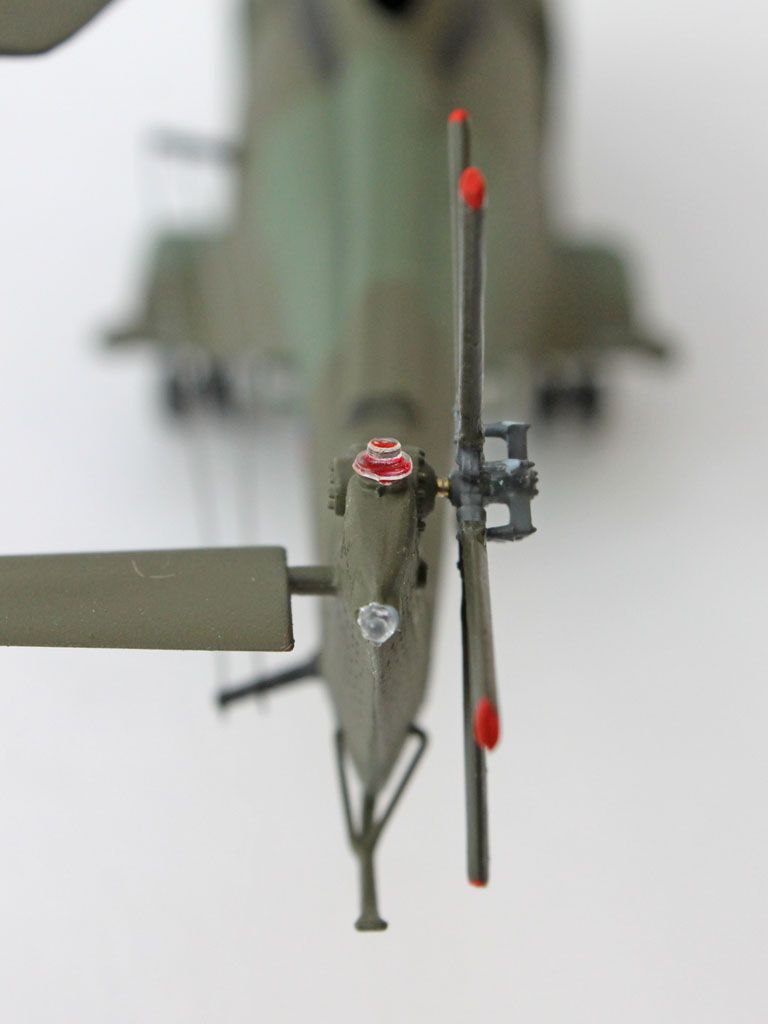
painted the inside of the tail position light with Tamiya translucent red (as reference photos showed it was a red bulb not a red light), put a dash of Molotow Chrome on the tail where that and the rear-most clear light were to be fitted, and mounted those:
masked and painted the black area behind the exhausts, painted the port and starboard position lights with Molotow Chrome before adding the relevant shade of Tamiya Translucent paint:
painted the various aerials and the windscreen-wipers Satin Black, added the wheels, and a left-over light from the Airfix Sea King HC.4:
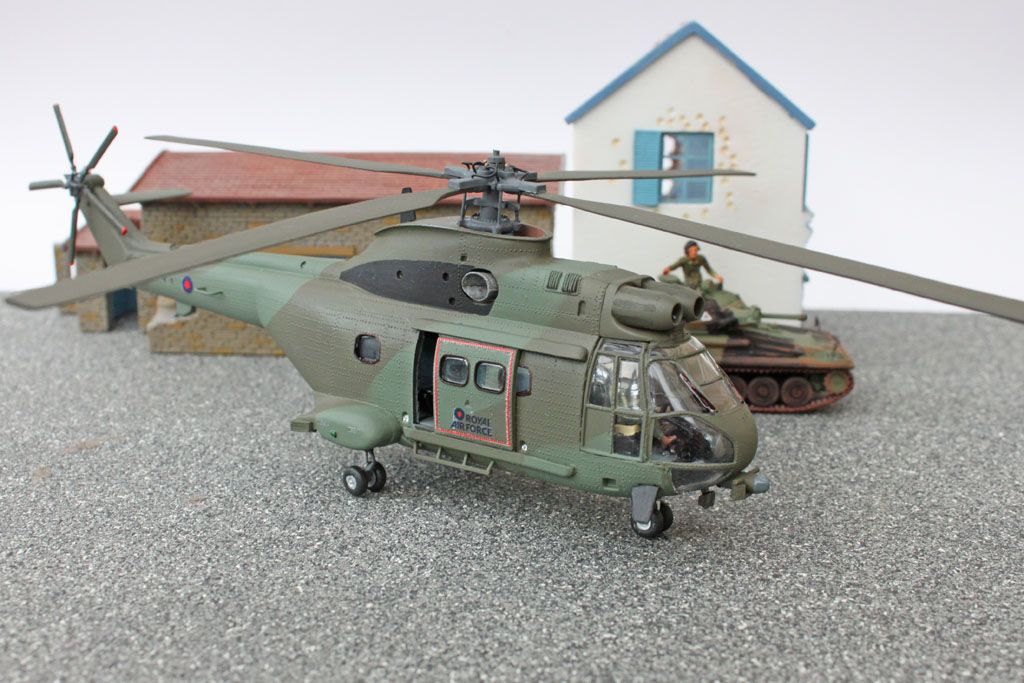
And finally, posing with the Scorpion in the background (and a couple of the WW2 ruined buildings for scale perspective)
All-in-all, a very enjoyable build - Airfix could easily have re-released it with a new sprue with composite rotors and the various bits to bring it up to late-HC1 or HC2 standard, a la the Lynx HMA8 upgrade, but I don't suppose they will now - I'd happily build another one, which is just as well as I have a Heller boxing of it which I had to rob a couple of aerials from for this build. You could argue that the rivets are over-done, and the opening doors are a bit toy-like, but I don't mind that at all!
Tim
(hmmm, I tried to post this last night but it disappeared! it has now reappeared in my browser so hopefully it will post this time...)
-
12
-
-
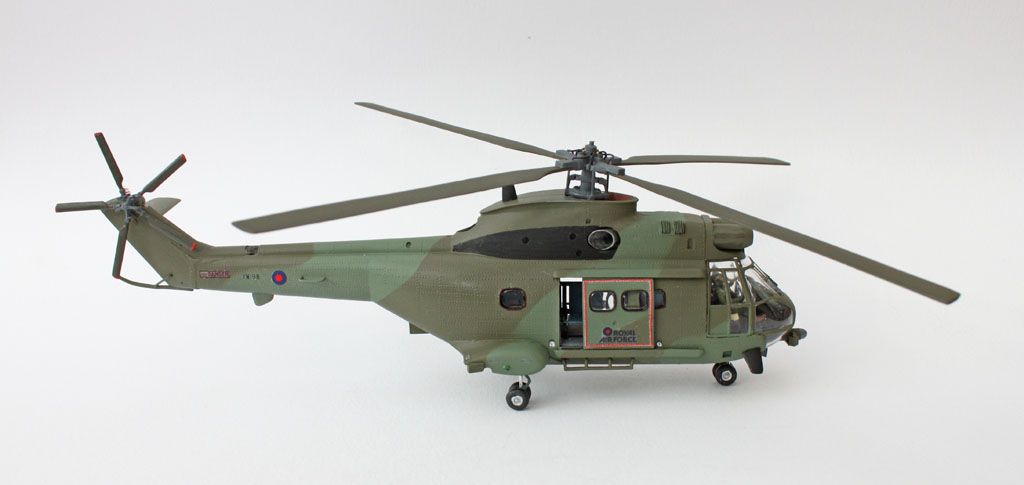
Whew! Finished, in the nick of time...
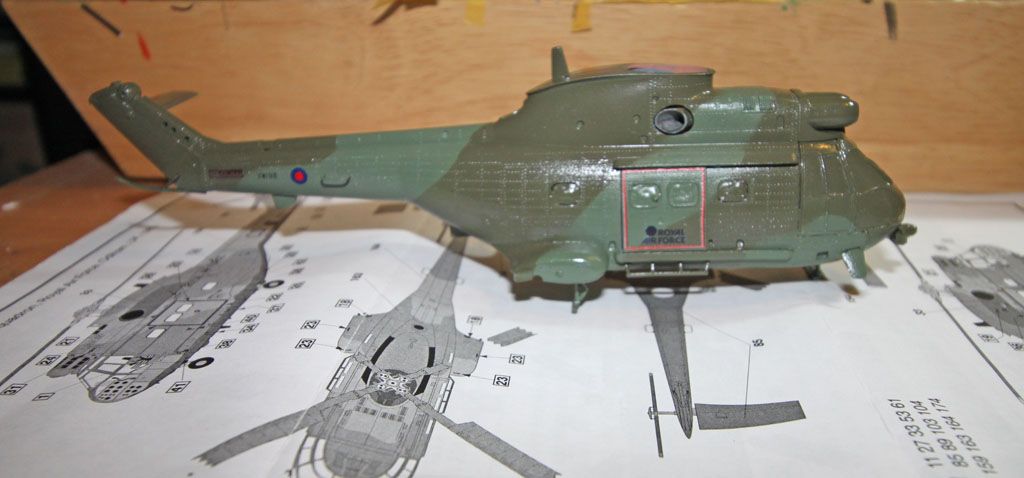
Airfix 03021 SA330 Puma, with Rotor Craft composite rotors, a light/lantern from an Airfix Sea King HC4 and a few scratch-built 'lumps and bumps. Main colours are Xtracolor RAF Dark Green and Lichen Green overcoated with Humbrol Matt Varnish, various other Humbrol and Revell enamels used for other details (Humbrol 163 for the Rotor blades to give some contrast with the Xtracolor shade, for instance). The only decals I used from the kit were the red lines around the door, home-made decals for the 'Danger' markings on the tale and the RAF logo on the doors, generic RAF lettering for the tail code, and small roundels from a Revell Tornado GR1.-
27
-
-
Lots of catching up to do here! Thought I'd posted at least one update after I assembled the fuselage, but apparently not. So, here goes:
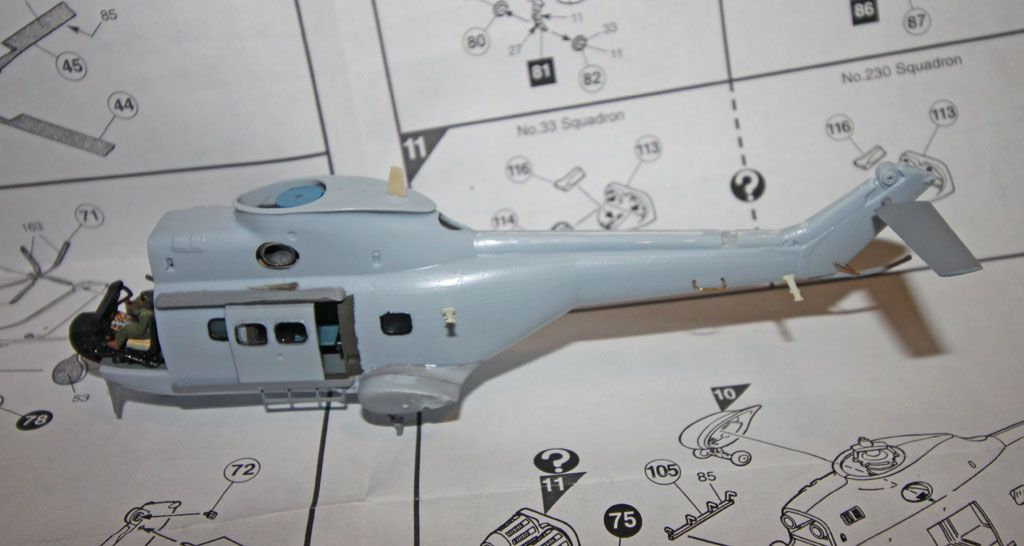
Fuselage assembled, HF aerials added on port side (borrowed from a Matchbox Wessex), and the 'handle' type aerials replaced with brass wire (but before I realised these were in the right position for a French Puma, or an HC2, but too far back for an HC1...):
Then various late-HC1 'lumps and bumps' (to use the technical term) added, the glazing masked and added, and everything in Halfords grey primer:
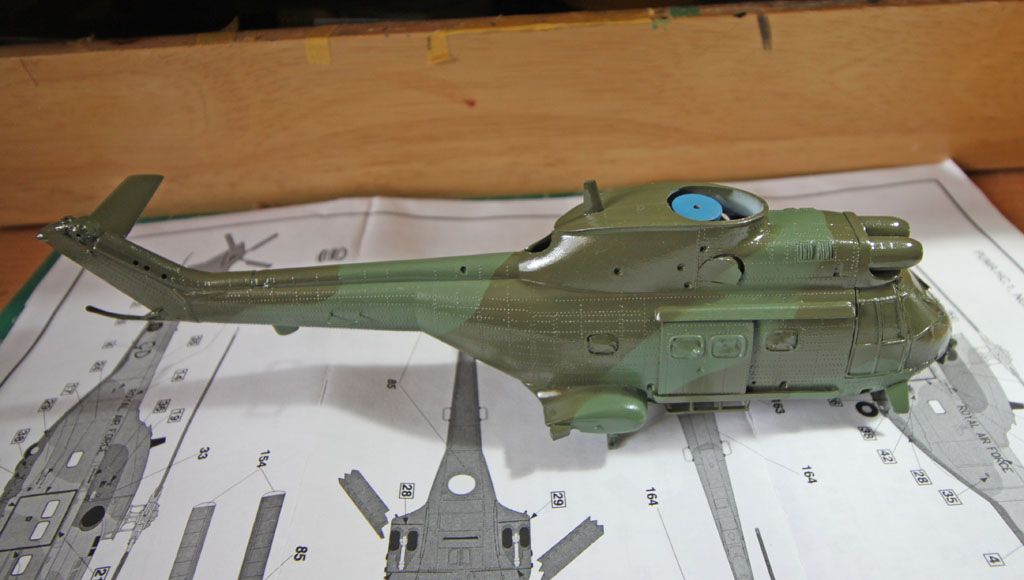
Then Xtracolor Lichen Green and Dark Green airbrushed:
and then (as of last night, which I would have posted then if Photobucket hadn't been down)
So today I have sprayed Humbrol Matt Varnish over the above (after I painted the centre of the roundels on the door - I printed those and the 'Danger' tail markings on clear decal paper, but the red obviously wasn't dense enough so I put a dob of Humbrol 153 on both doors which roughly matched the roundel on the tail - which was taken from a Revell Tornado), which should give me tomorrow to finish off, assemble the rotorhead and hopefully hit the 7th of October deadline!
Tim
-
9
-
-
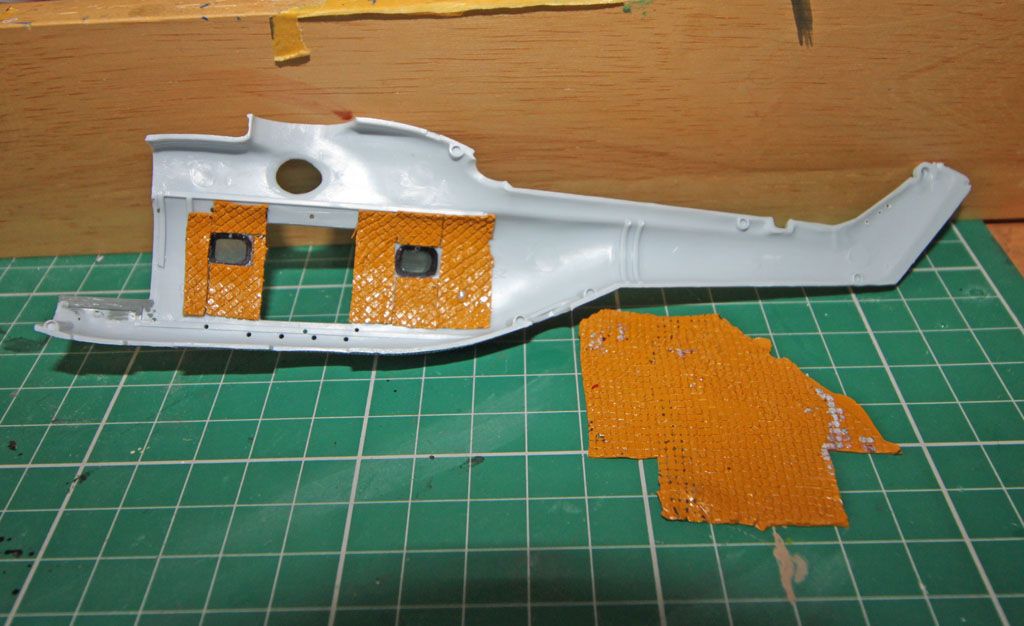
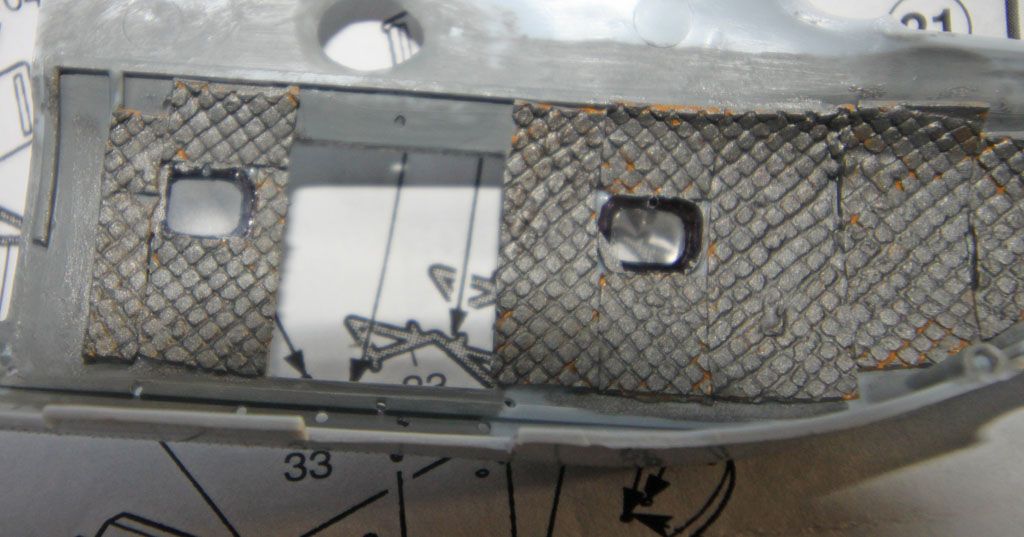
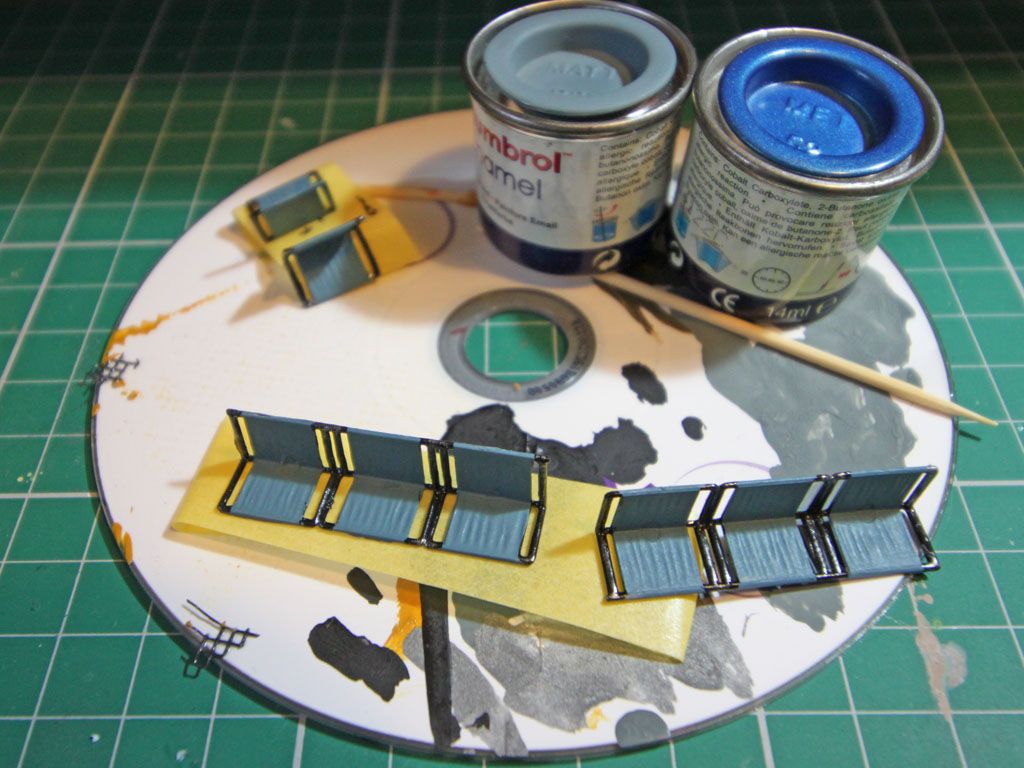
... so, onto the cabin interior. I sanded down the outside of the cabin windows, to eliminate the sunken hole, then polished them back to a shiny surface, and went round the edges with a Sharpie before fitting them into the fuselage. To represent the cabin insulation, I first stuck some plastic mesh to a flat surface (an old CD) to make a mould for it. Then, I just painted on some acrylic craft paint, waited for it to dry, peeled it off, and had an imprint of the mesh pattern in the still-pliable paint. This I could then cut into strips and shapes, and use to form the cabin insulation: (photo below also shows a piece of the dried acrylic paint ready to be cut to shape for the other side).
If I'd thought ahead I'd have mixed some grey and silver acrylic paint and had a ready-coloured surface, but as it was I painted it with Humbrol 53, which doesn't look much like gun-metal to me but does look like a silvery-grey nylon-ish insulation material:
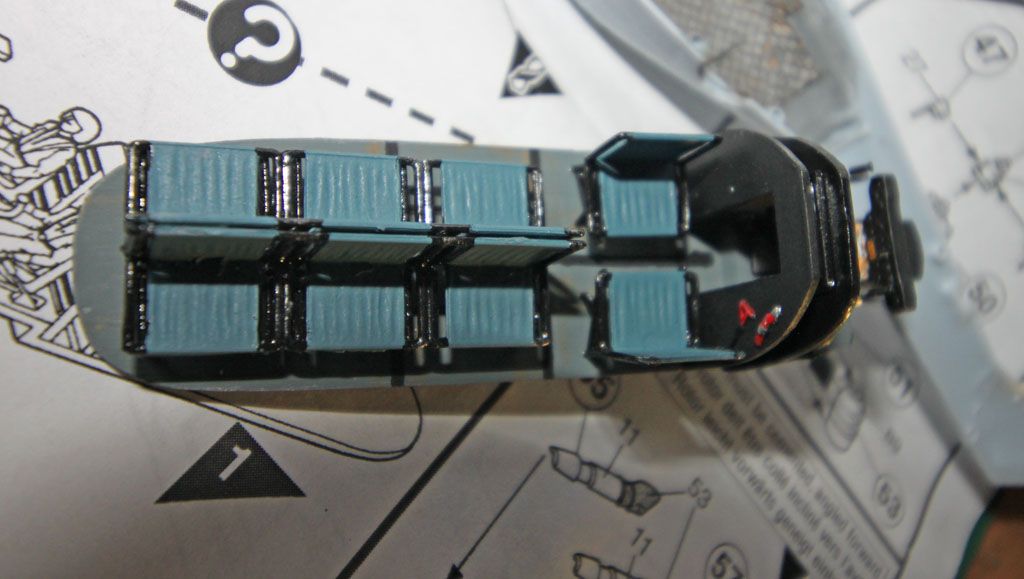
and then assembled the cabin seats, cockpit (including using a spare decal from a Super Puma sheet for the central console) and cabin/cockpit floor:
Next steps - fitting the interior parts to the fuselage side and gluing the fuselage halves together!
-
13
-
-
Catching up from the last couple of weeks, have had enough spare time to work on the kit but never quite enough each evening to do any updates here, so here goes:
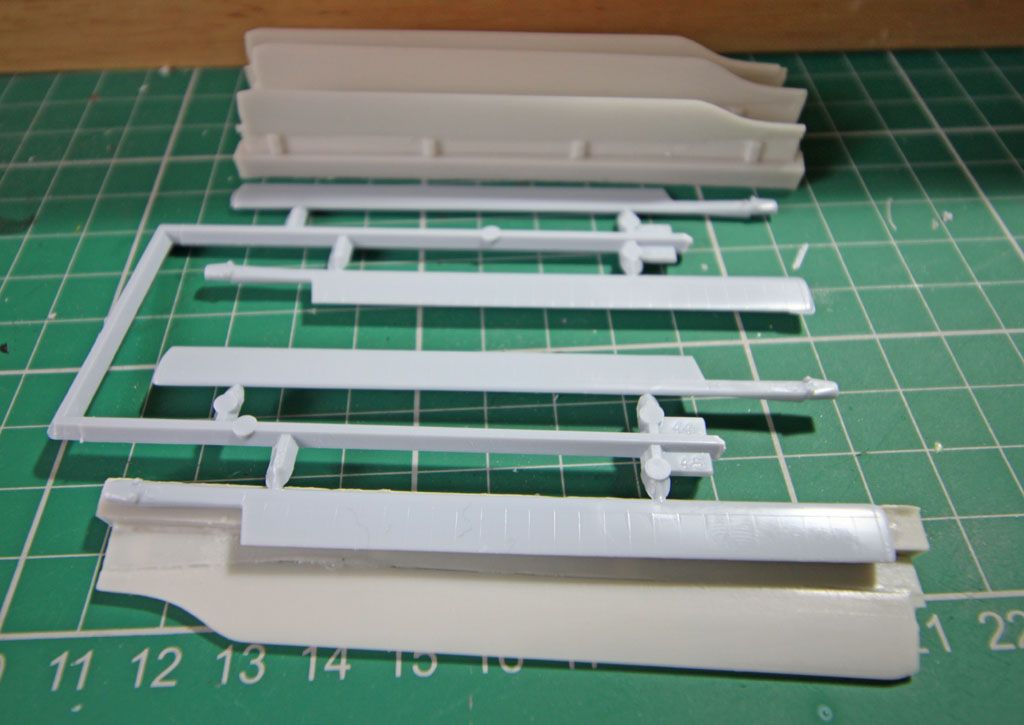
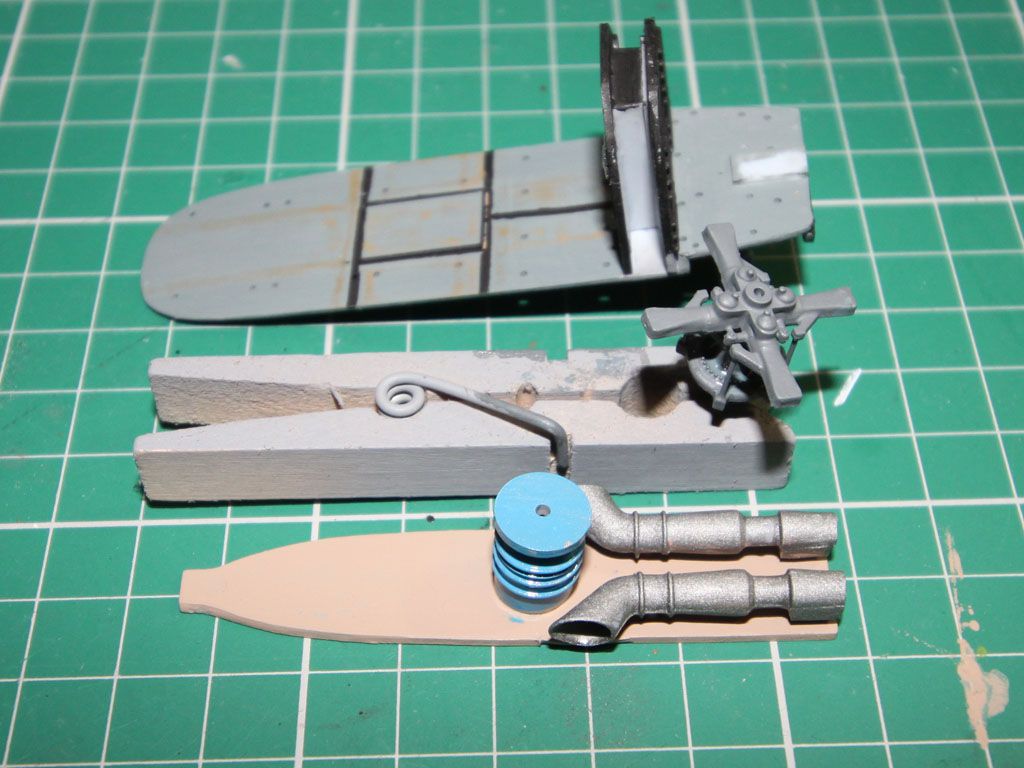
A comparison of the wider-chord composite blades with the metal original - unlike the Sea King, you can't easily convert between one and the other!
Initial painting of the cabin seats - I used Humbrol 230 with a dash of 52 to give a metallic-y effect to try to replicate the nylon(?) originals:
assembly and painting of the cabin and cockpit floors, the bulkhead between, assembly (including substitution of brass rod for various plastic bits) of the rotor-head, and assembly and painting of the main gearbox (may have the colour slightly wrong?) engines and cabin roof:
more follows in the next post!
-
6
-
-
On 8/24/2018 at 3:44 PM, Lawzer said:
a steal at £2.50!
From the pic it doesn't look too bad a kit - looks pretty flash free?
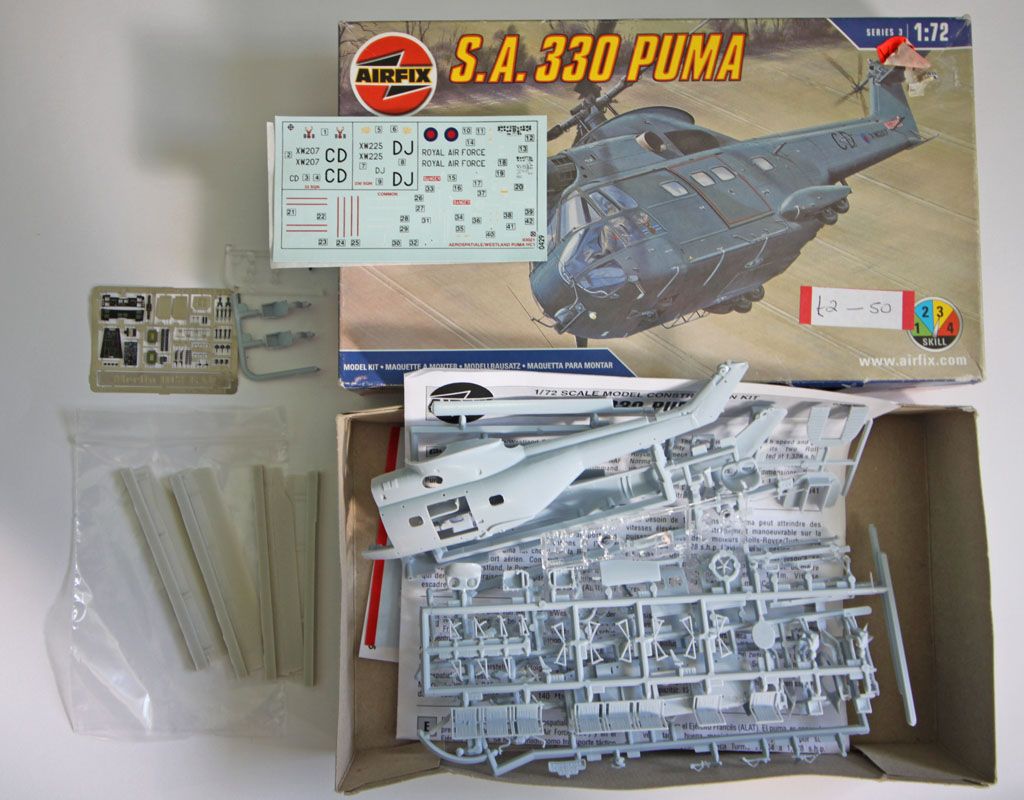
Absolute bargain, I felt a bit guilty about it when I got it home and saw how good it was. Still, the two RAF museums have done alright from me money-wise over the years, even with free entrance... And yep, pretty flash-free, only real flaws are sunken holes in the cabin windows (something my Kamov Ka-25 also suffered from, and now I check, my Heller boxing of the Puma too, so that must have been a common fault in the 80s.
-
1
-
-
Hopefully I will have time for a second entry in this group build - and it's a kit I picked up for all of £2.50 in the RAF Museum at Cosford's shop last year. For that money I wasn't even expecting it to be complete, but it was, so with my notional savings I splashed out on the Rotor Craft composite rotors for it, and I'll be adding those for this build. I also have some spare Merlin HC3 photoetch, which will probably contribute at least the cockpit seatbelts, and some left-over Sea King HC4 bits (if I decide to do an HC2 the armoured seats might be right? need to check that). I will be building either a late HC1 or an HC2 - I really want to do it in the Dark Green/Lichen Green colour scheme, and it looks like all the in-service HC2s are in overall dark green which isn't as interesting. So, for now, the box and bits:
Next steps: clean up the resin rotor blades and start assembly - with the interior, and main rotor gearbox/rotor head, including seeing which rods need replacing with brass or nickel wire, and where any additional pipes are obvious...
Tim
-
8
-
-
Scorpion Light Armoured Reconnaisance Vehicle (1975)
Finished mostly in humbrol paints (102 and 33 for the camouflage), and Pan Pastels for the weathering. Decals from the kit, plus aftermarket Union Flags. Commander figure is from the Matchbox LRDG set with different legs, and added headphones. A relatively painless build, except for having to scratchbuild an extra track tread each side, and super-glue them in place...
-
28
-
-
A bit of weathering - mostly pan pastels - over the tracks and lower surfaces, and a wash over the commander's DPM to tone it down a bit, and I'm calling it done. It's been a fun build (and reminds me of building one when I was a kid, I think I might have won second prize in a model-making competition at our local department store for that one!), so much so that I bought another one on ebay while I was building it, for a future project - maybe converted into a Striker or Samson? Anyway, for now:
And, because I haven't got a suitable 1970s diorama or backdrop for photography, a side view of an otherwise-ruined Cafe...
"Over there!"
-
7
-
-
Made a bit of progress last weekend - aided by the miserable weather outside! - and fitted the tracks, eventually (I'm not the first person to find out they're not long enough, and I ended up scratch-building an extra link each side, and supergluing everything in place, to get them to fit. I also had to mostly repaint the tracks after fitting them, my plan of using Halfords Plastic Primer didn't make the paint stick at all. I then added a random black pattern:
I then picked out the metal parts of the moulded-on tools in satin black, scratch-built some wing mirrors, added some headlamps, added decals (from the kit, plus small union flags from an aftermarket sheet) and test-fitted my commander figure (from the waist-up, he's actually from the Matchbox LRDG set, with added headphones!):
next steps: lots of weathering!
-
8
-
-
Quick update before disappearing for a long weekend (Cambridge Folk Festival!);
sub-assemblies primed:
and then body airbrushed with Humbrol 102 (my favoured approximate match for IRR green) and tracks brush-painted Humbrol 53 as a basis for further washes and painting:
(apologies for picture quality on that one - combination of a camera phone and low sun...) so those base coats will have plenty of time to dry before further painting, etc.
-
2
-
-
Didn't have time to do anything during the week but then a wet weekend gave me loads of opportunity so I:
Considered whether I needed any internal detail and decided that all that might be visible was the inside of the turret if I left a hatch open with a crewman in it. Obviously to do that properly would mean opening up an actual turret ring, mounting the turret differently, etc, so I decided the easy route was an optical illusion. So I painted the turret interior white, then masked a hole in the centre and painted that dark grey, to give the illusion of the shadow of an actual interior:
(in fact test-fitting my possible figure, in the commanders' hatch, indicates you can't even see that, but it was worth trying I think. Then I got a bit carried away just building it as per instructions - except I added a bit of detail to the rear-turret storage, drilled out the gun barrel and some towing and other rings, drilled out the rear exhaust and fitted a 1mm aluminum tube:
Keeping the superstructure and lower hull separate at this point so I can paint them separately before fitting the tracks. Just as well as I then realised, looking at reference photographs, that the front mudguards were rarely fitted (if indeed they survived the prototype/acceptance phase) so I removed them:
Next steps: I think I just need to scratchbuild a fire extinguisher to mount on the left/front upper turret panel, and then I can start priming. I will fit the early headlights that hang down from the 'waistline' - I've read that these were originally 5" sealed-beam units that were later upgraded to 7" ones. No wonder they were later improved on - I don't remember 7" sealed-beams being that effective on a classic Mini, let alone on something somewhat bigger and only slightly slower...
-
5
-
-
Just a bit of progress this weekend - a trip to the Silverstone Classic on Friday meant I've spent a lot of time editing photographs, and it's too hot to do much anyway! So, wheels assembled and mounted:
and then added to the lower hull - I also removed the integral 4 headlights which must have been a feature of the prototype but don't appear on any photograph that I've seen:
I also filled in the sinkholes in the lower hull sides, which seem to be the only visible sinkholes in the kit, which seems pretty good to me. Next steps - wondering what to do about the headlights - early ones appear to hang down from the waistline, later ones are above the waistline and mounted in boxes? Also deciding whether to keep the flotation screens - I suspect I will as an early one will be in keeping with the nostalgic theme of this group build.
Tim
-
6
-
-
On 7/21/2018 at 11:55 AM, BIG X said:
This has suddenly brought back an old childhood memory...
...hands up if you had one of these.
I always wanted one but never had one! Now I've done a bit of research I see that like Airfix, Action Man also copied the 4 headlights of the prototype, it's just a bit more obvious in 1/6 scale...
-
1
-
-
Just for a change, I thought I wouldn't do a helicopter for a group build (although there's a Puma waiting in the stash that I might start next!) - so my pick will be the Scorpion which I've had for quite a while without quite finding the inspiration to build. As far as I can see it dates back to 1975 (hence the 1973 decal options) so should be quite eligible. So, obligatory box and sprue shots:
I probably won't do too much extra to it for this build, and I'll probably represent a fairly early Scorpion, and I have the Osprey book for reference, and photos of a few real ones, including the one at Cosford. One thing that is clear to me that I'll need to scratch-build some additional storage bins, at least! But first, I'll follow the instructions and start with the running gear. More to follow...
-
6
-
-
PK-38 Aerospatiale AS-365N Dauphin 2 - from the Revell re-boxing.
Built as the helicopter from the 1989 Bond Film 'Licence to Kill', with home-printed decals for the Coastguard lettering and logo, tail code and Aerospatiale logo, other decals from the kit except the 'Rescue' arrows from my spares folder. The white is Halfords 'FIAT white 210' (Aerosol spray) and the red/orange is airbrushed Model Master International Orange.
-
21
-
-
Apologies, left this far too long without updates - only in part caused by the lack of sunny days for taking decent photos... So, just about finished now, I assembled and fitted the undercarriage, scratch-built the winch - the bullet-shaped body is a combination of a 70mm rocket pod and filler, the arm is a section from a 1/25 wheel rim, and applied decals - mostly home-printed apart from the 'stars and bars', the smaller markings around the tail, and the rescue arrows:
I think pretty much all I need to do now is re-paint the door handles a deeper shade of yellow - to match the rescue markings - and I'll call it done. A couple of things I notice from the photos: the 'aerospatiale' markings were I presume product-placement in the film, and not carried by the service aircraft (I found a suitable corporate logo online and re-formatted it to print the decal); and the door handles were all outlined in black, presumably to make them standout - I replicated this with a fine-tipped marker pen.
-
5
-


.jpg)
.jpg)


Defence Discount Service
in Bargains
Posted
Even better, I used my Defence Discount card when purchasing ‘a couple’ of items in the Winter outlet sale and it actually took 15% off! Not sure if that’s a permanent thing but worth checking, if you have one.
Tim