


starfighter84
-
Posts
63 -
Joined
-
Last visited
Content Type
Events
Profiles
Forums
Media Demo
Posts posted by starfighter84
-
-
Thank you all for your kindly comments!
On 3/4/2024 at 9:38 AM, TheyJammedKenny! said:I've always had trouble with white paint, because it requires layering to overcome its lack of opacity. How did you paint this without causing excessive buildup near the windshield and other clear parts? What kind of paint did you use?
For all white surfaces I used the Mr.Finishing Surfacer 1500 White Gunze... it's a very good product, opaque and it can ben sanded to obtain a nice smooth surfaces. On the down side, it cause excessive buildup (as you said) around the frames of clears parts... so, on that zones, I used the Tamiya LP-2 lacquer that, in my opinion, has a fine pigment. I thinnered it with nitrocellulose thinner and worked perfectly.
") 23 hours ago, kev67 said:
23 hours ago, kev67 said:must of cost a small fortune in rivets
Indeed. I spent more or less 60€ of rivets on a kit that worth 20€... but the most important thing was the final result!
-
 2
2
-
 1
1
-
-
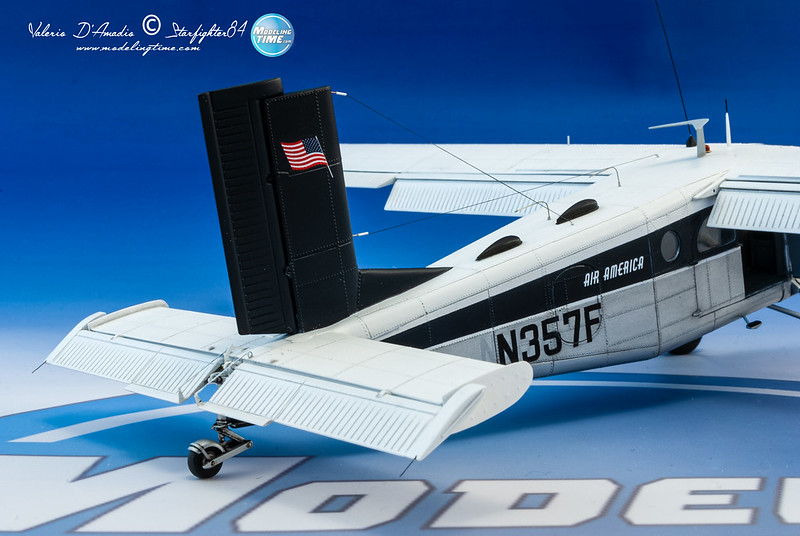
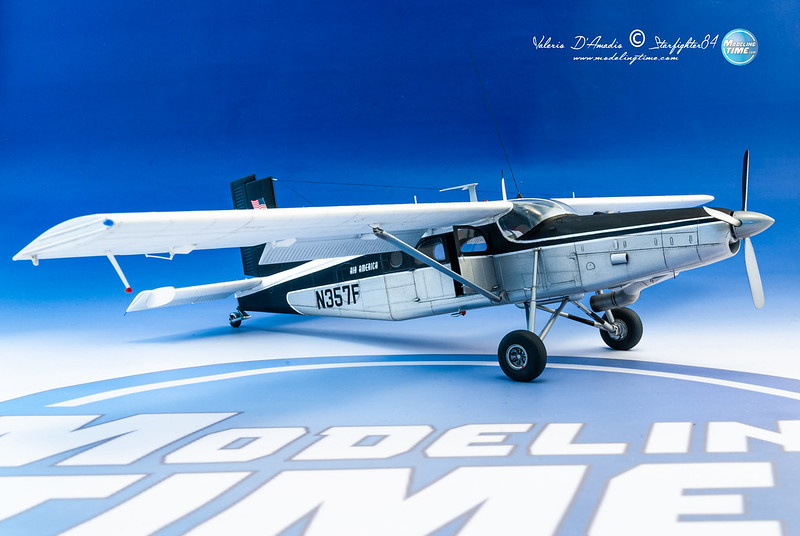
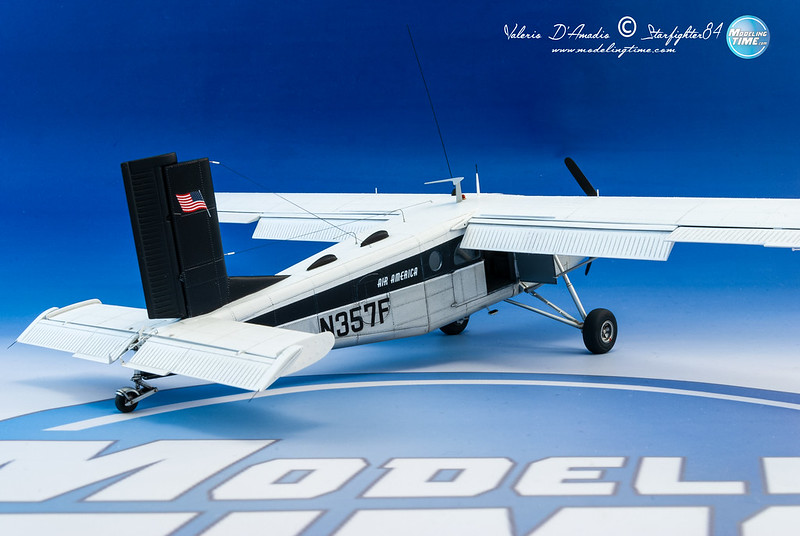
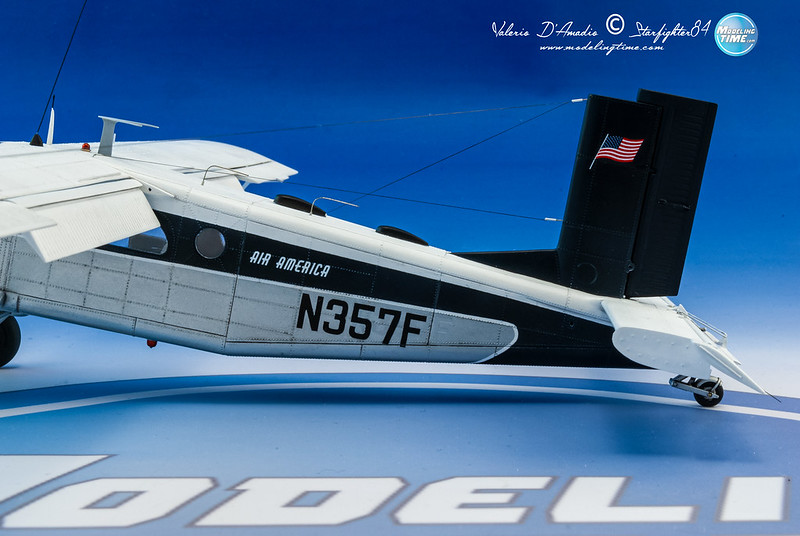
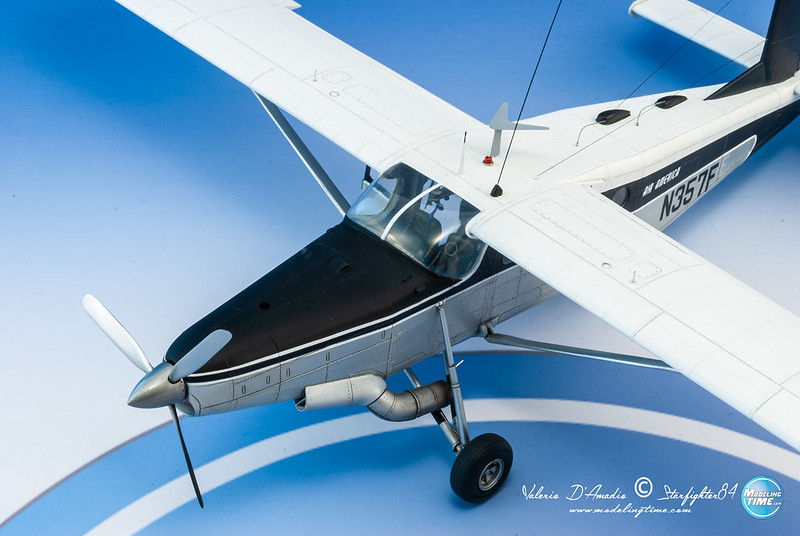
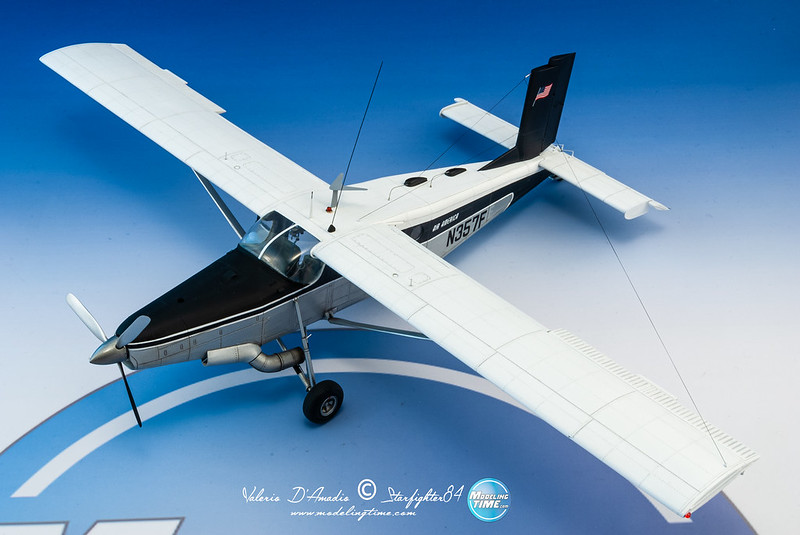
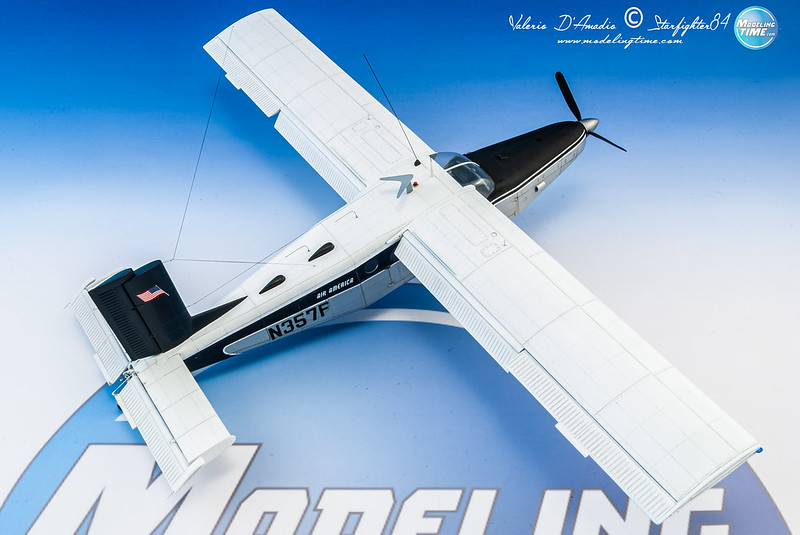
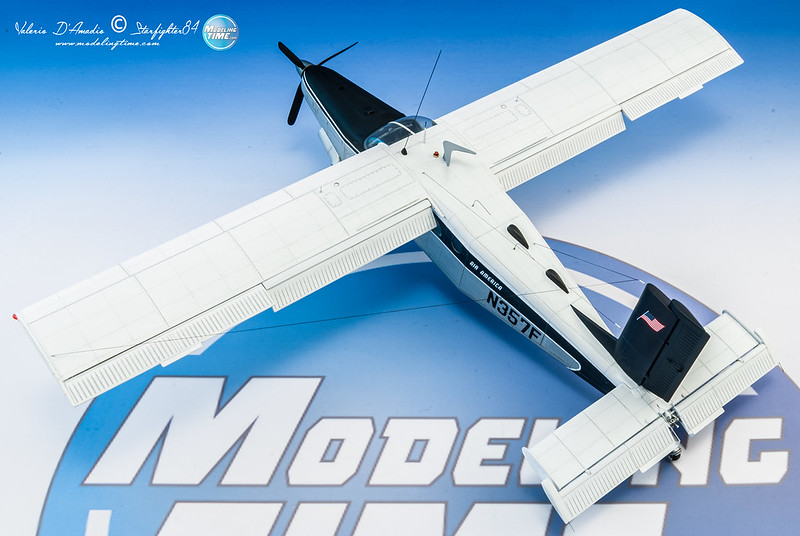
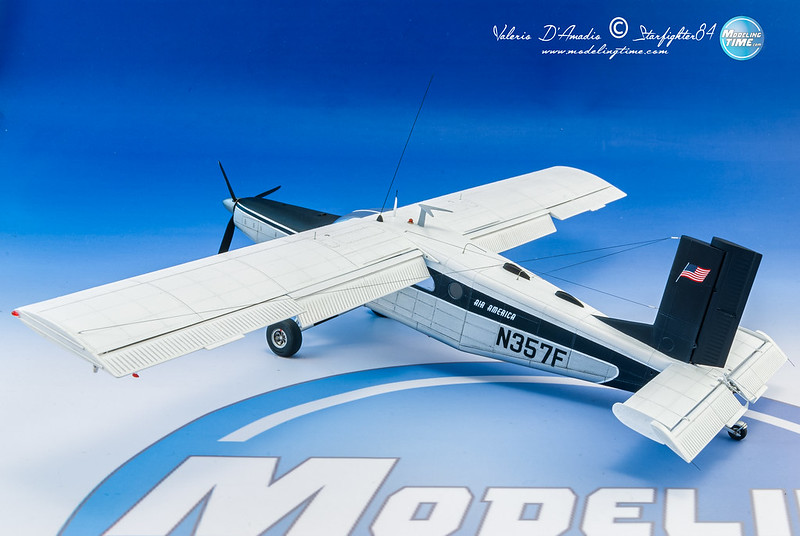
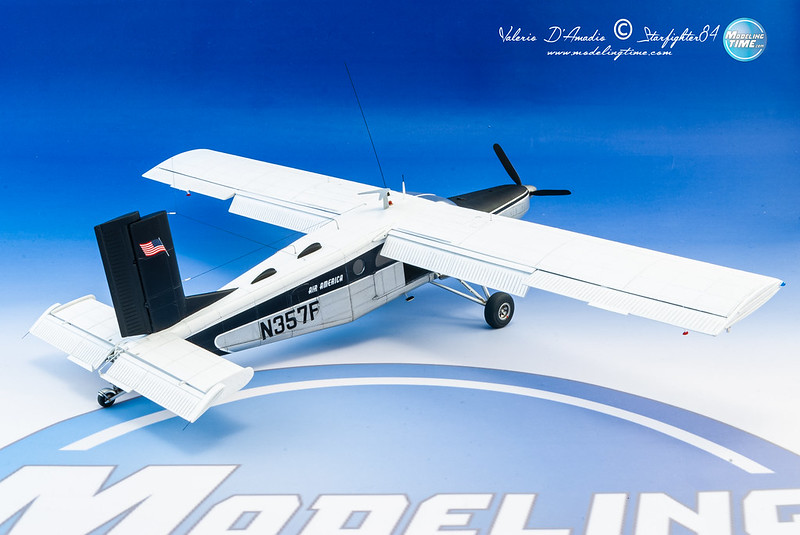
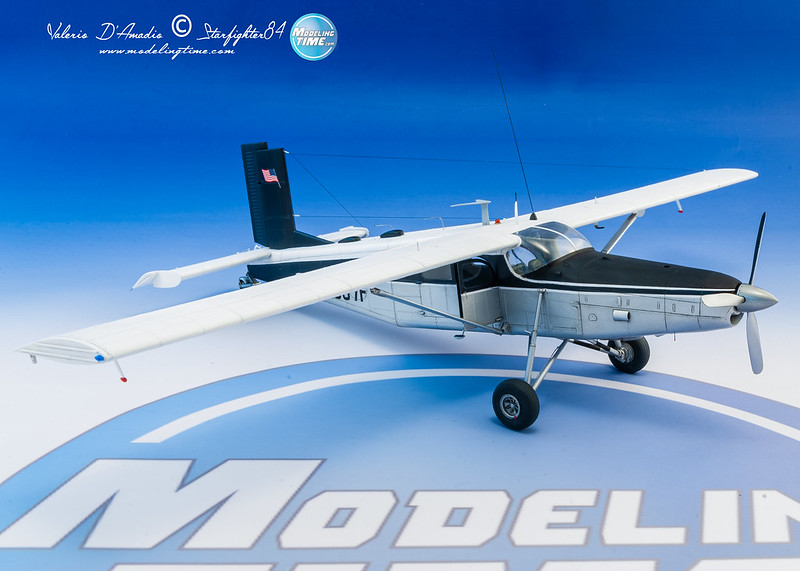
Hello to all!
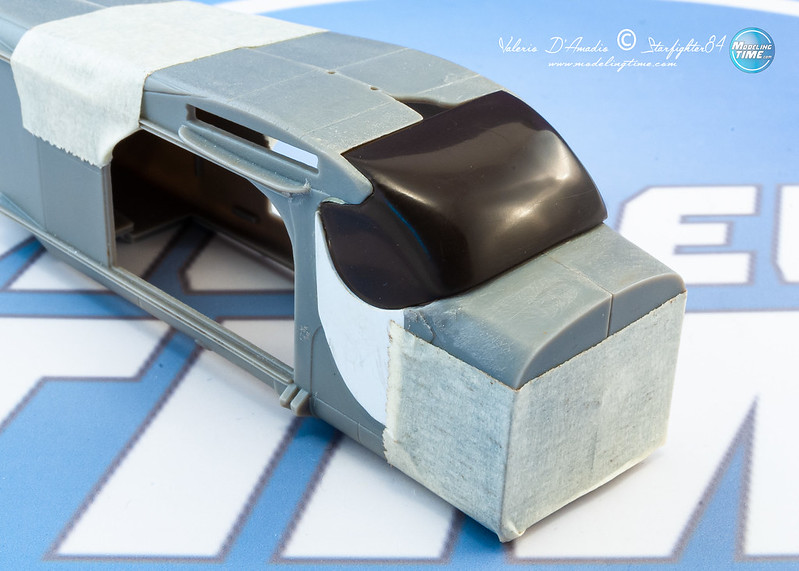
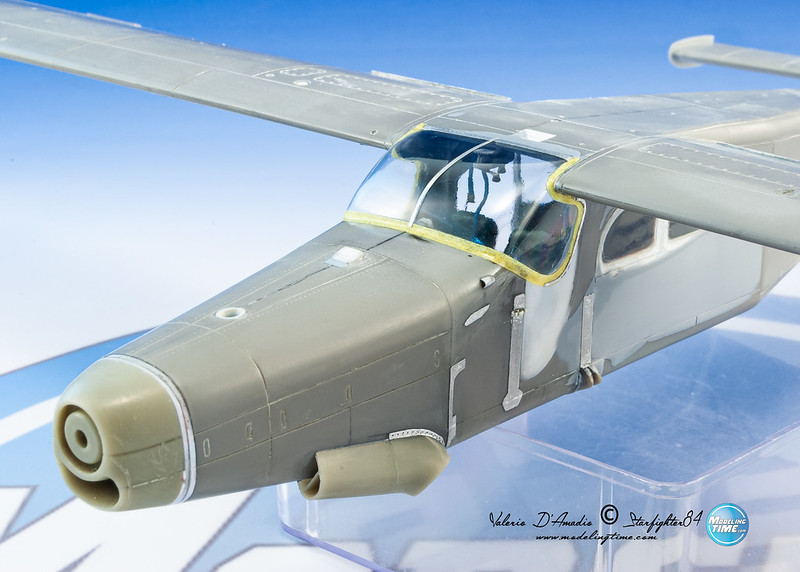
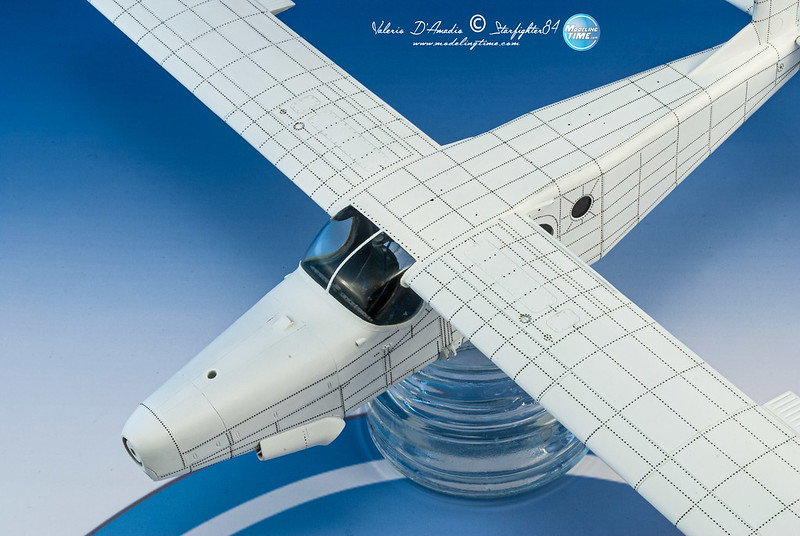
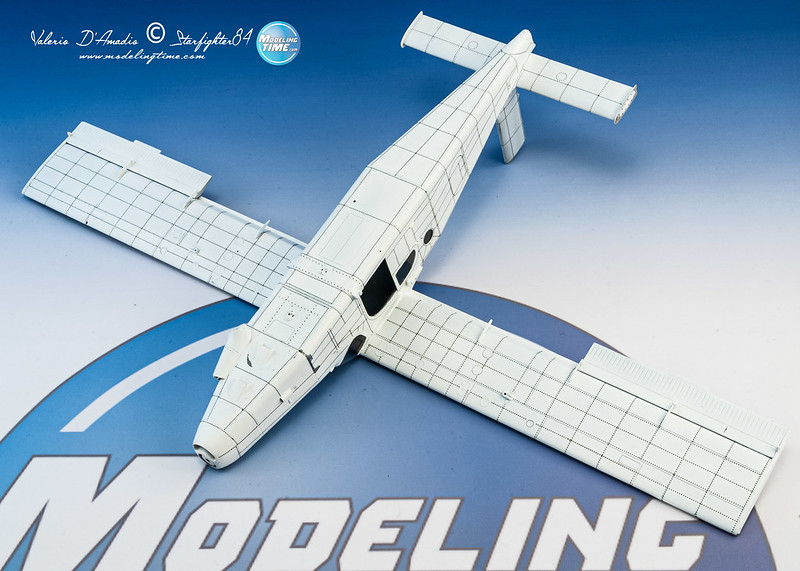
here my last work... an Air America PC-6 C/H2 from Roden (one of the most challenging kit that I ever faced).
I converted the base kit to a "no car doors version" adding a new and corrected vacuformed windshield.
 Pilatus_15 by Valerio, su Flickr
Pilatus_100 by Valerio, su Flickr
Pilatus_15 by Valerio, su Flickr
Pilatus_100 by Valerio, su Flickr
I also used some aftermarkets like Quickboost propeller, corrected nose and exhaust, Eduard photoetched set and Wolf3Dresin.com main wheels and tail wheel 3D resin parts. Many other parts has been scratchbuilt or made by turned brass.
The model has been completely riveted with Archer positive rivets.
Pilatus_130 by Valerio, su Flickr
Pilatus_132 by Valerio, su Flickr
Decals from Mike Grant's, except for the registration marks painted using home made plottered masks.
Hope you'll enjoy!
Pilatus_END 1 by Valerio, su Flickr
Pilatus_END 19 by Valerio, su Flickr
Pilatus_END 18 by Valerio, su Flickr
Pilatus_END 6 by Valerio, su Flickr
Pilatus_END 4 by Valerio, su Flickr
Pilatus_END 17 by Valerio, su Flickr
Pilatus_END 20 by Valerio, su Flickr
Pilatus_END 5 by Valerio, su Flickr
Pilatus_END 16 by Valerio, su Flickr
Pilatus_END 14 by Valerio, su Flickr
Pilatus_END 15 by Valerio, su Flickr
Pilatus_END 13 by Valerio, su Flickr
Pilatus_END 12 by Valerio, su Flickr
Pilatus_END 11 by Valerio, su Flickr
Pilatus_END 10 by Valerio, su Flickr
Pilatus_END 9 by Valerio, su Flickr
Pilatus_END 8 by Valerio, su Flickr
Pilatus_END 7 by Valerio, su Flickr
Cheers from Rome!

-
65
-
3
-
-
20 minutes ago, whiskey said:
Do you have more in-progress photos?
You can find all the WIP here (sorry, only in italian language but you can use Google Translator): CLICK HERE.
20 minutes ago, whiskey said:any chance of sharing the suppressor for other Cobra modelers?
I could have something interesting for you... text me in PM.
-
1
-
-
8 hours ago, whiskey said:
Wow! Just wow.
Thank you.
8 hours ago, whiskey said:You rescribed this no?
Yes, it is completely rescribed.
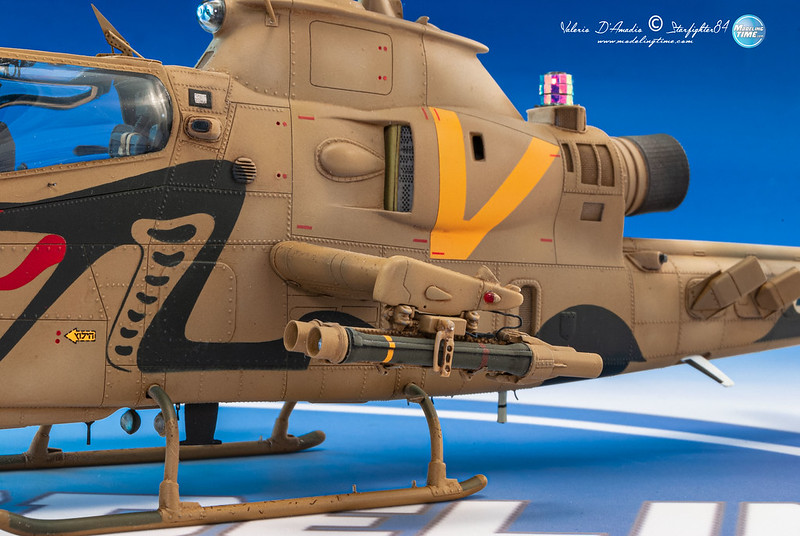
8 hours ago, whiskey said:What did you do to change the exhaust suppressor?
The exhaust is a "multimedia" home made set. The suppressor and part of the exhaust housing on fuselage are 3D printed, the cover is a piece of turned brass round.
Cobra_3D_3 by Valerio, su Flickr
Cobra_3D_2 by Valerio, su Flickr
-
4
-
1
-
-
Eyecatching... but watching better the model, so many panels are missing or not rescribed.
The ailerons are not in the proper position, are you able to fix it?
Transparent parts are dirty... but, partly, it depends on the not perfect Roden's mould. -
1 hour ago, Linus said:
Ciao Valerio, meraviglioso lavoro di costruzione e colorazione, i miei complimenti.
Saluti Linus
Thank you..!
Hai trovato la foto di Bellgambi seduto nel cockpit dove si vede il "francobollo" verniciato al contrario? è a pagina 164 del libro "Caomouflage and Markings of ANR" di D'Amico e Valentini.
-
On 11/10/2021 at 10:08 AM, dov said:
Hallo
To apply the mottels, I got it.
But the camo outline on the wing: How did you achieve this soft outline?
Freehand or vertical distance of mask?
Happy modelling
Sorry for the delayed answer!
On the wings I used the Patafix (or UHU Tac) technique... no freehand or cardboard masks.
-
1
-
-
17 minutes ago, dov said:
Hallo
To apply the mottels, I got it.
But the camo outline on the wing: How did you achieve this soft outline?
Freehand or vertical distance of mask?
Happy modelling
I've made some masks with my cutting plotter, one of this for the wings leading edge. I've applied it on the model using two or three little "balls" of Patafix.
-
1
-
2
-
-
10 hours ago, dov said:
Hallo
You got it perfect!
The camo is sprayed as it should, with a soft edge, not pin sharp.
How did you achieve it?
Happy modelling
Thank you for the appreciations Dov.
To apply the mottles I thinned the Gunze Sangyo (the acrylic version) paints at 80% with nitrocellulose thinner (I use a normal nitro thinner for the bricolage works, I buy it in my local hardware store), but if you have the Mr.Color Thinner you can use it. I setted the air pressure to 0,5/0.6 bar. The airbrush that I normally use is an Iwata HP-CH with 0.3 needle.
If you have any other questions... I'm here!
-
1
-
-
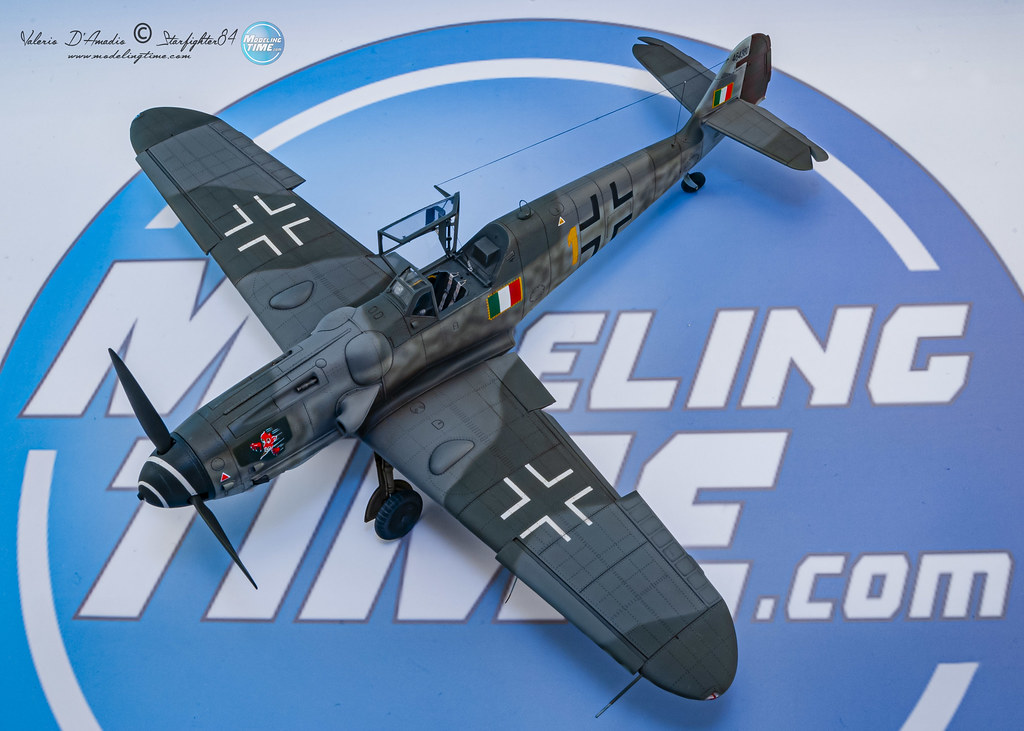
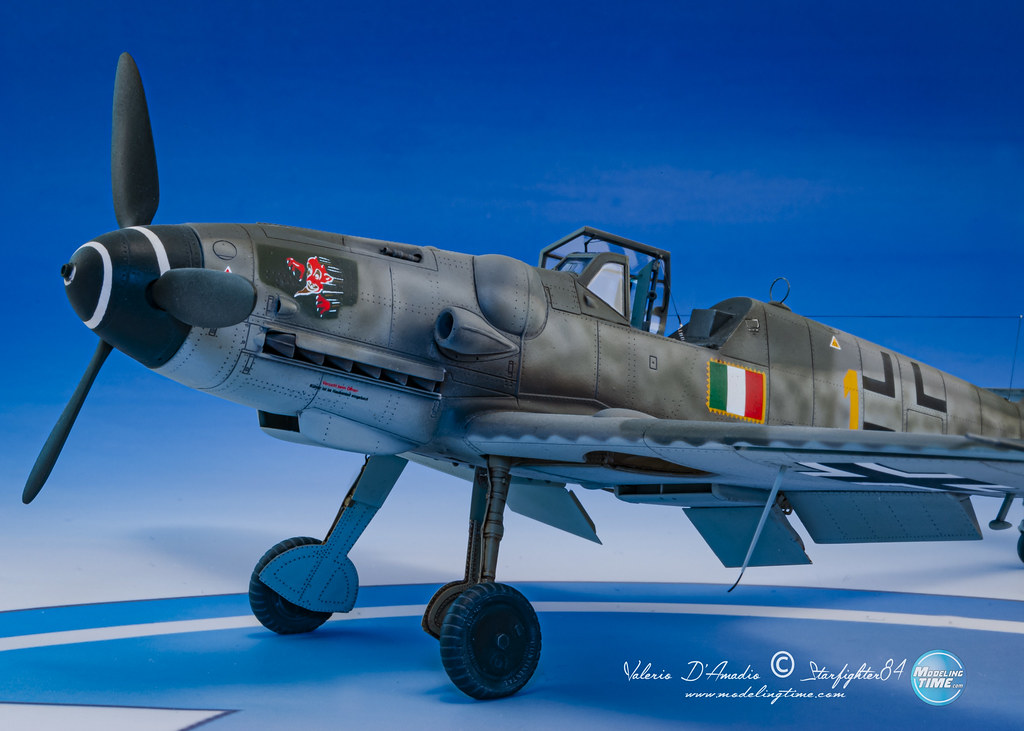
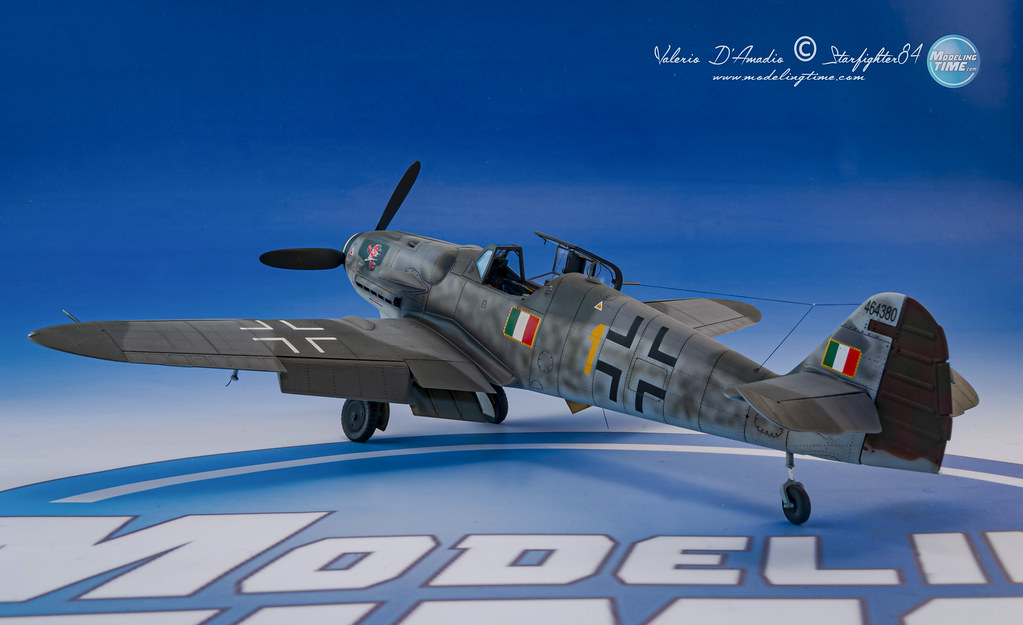
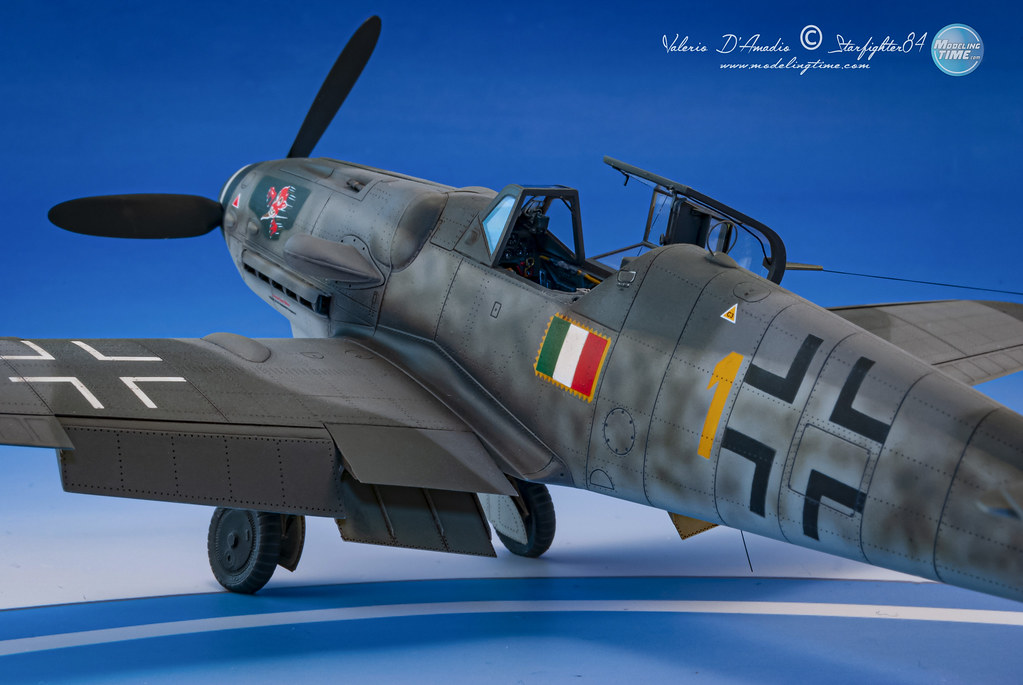
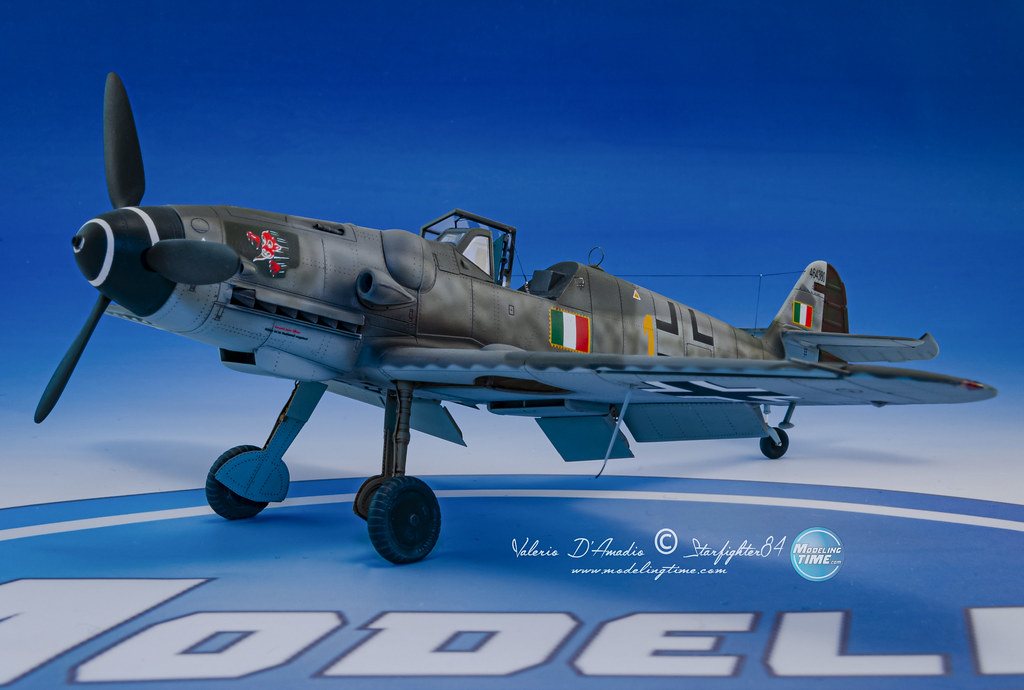
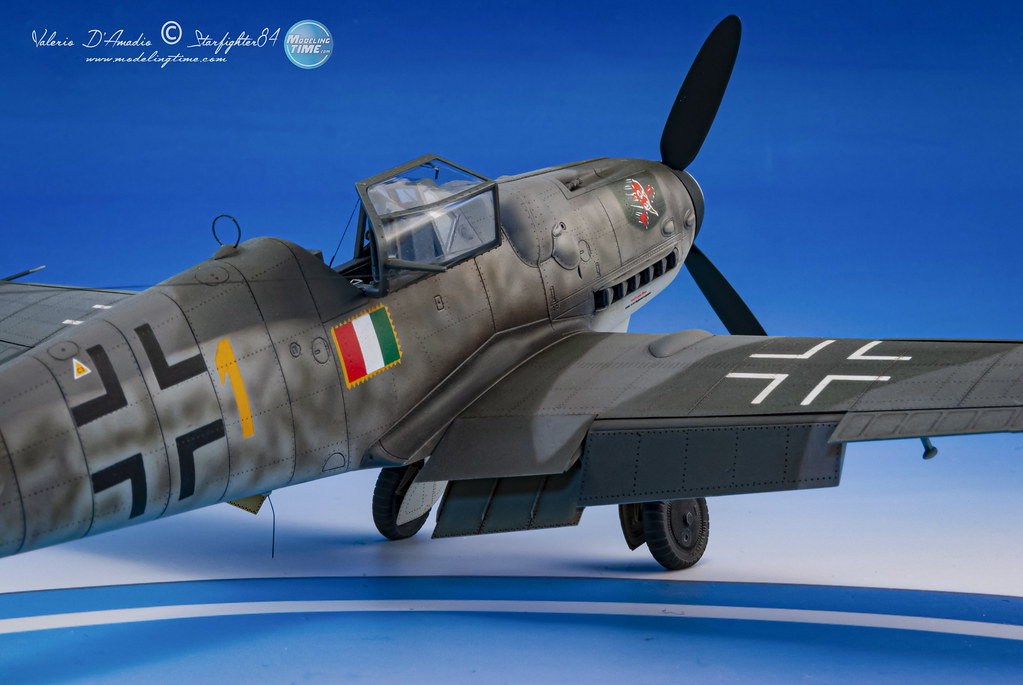
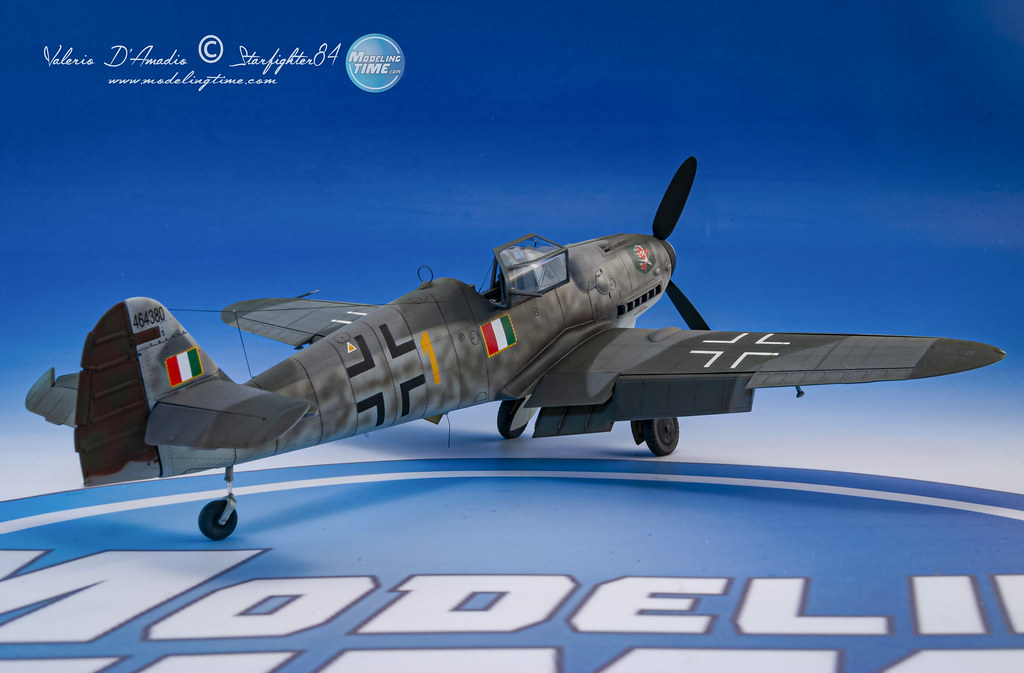
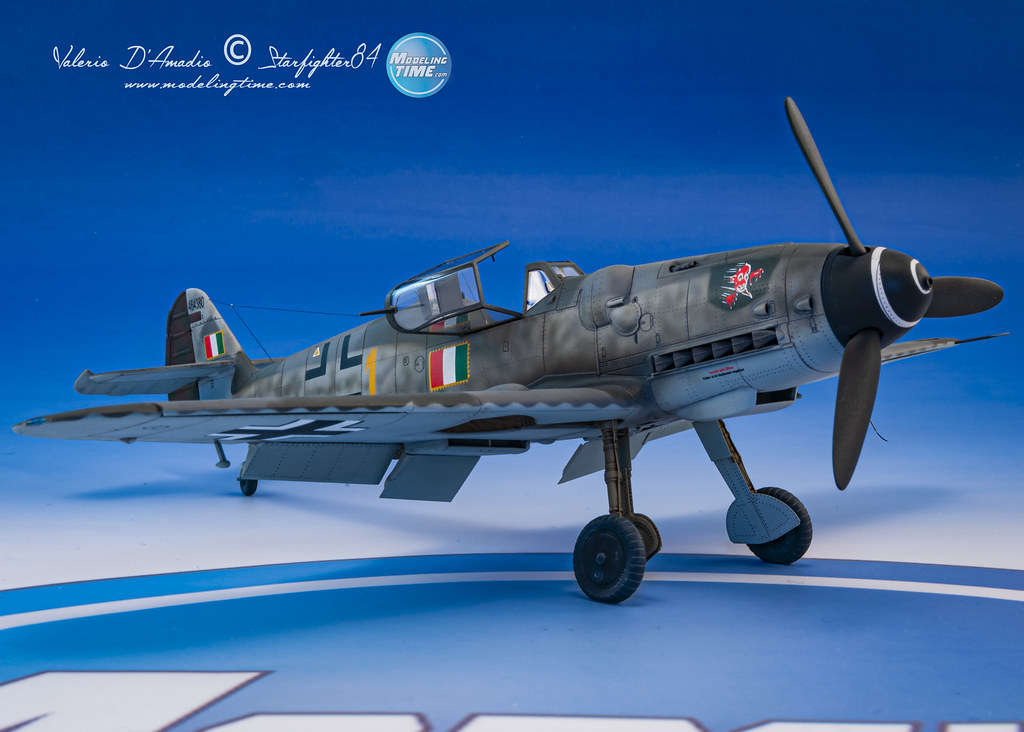
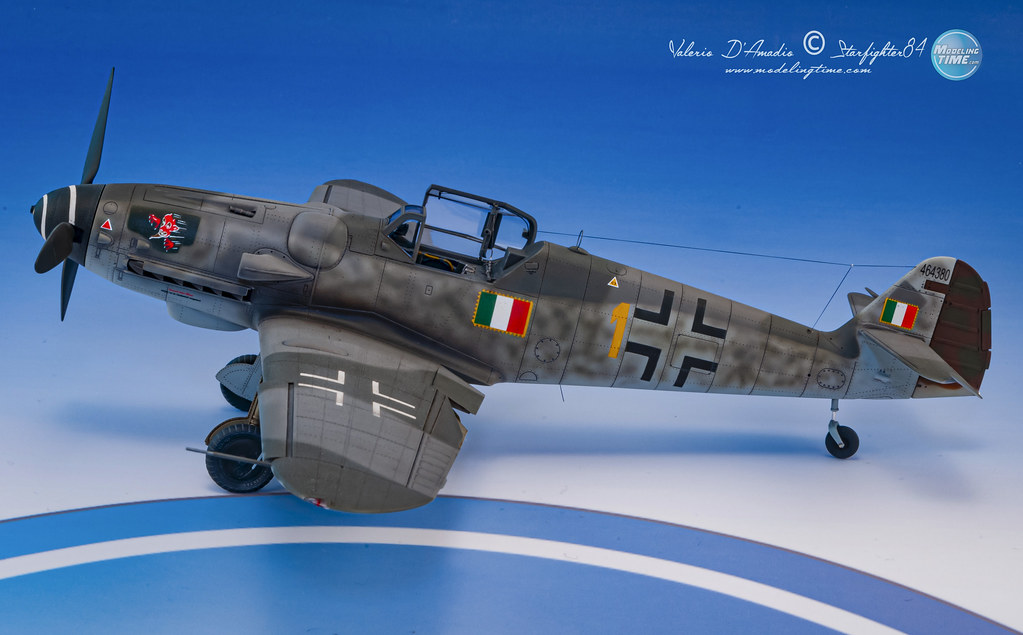
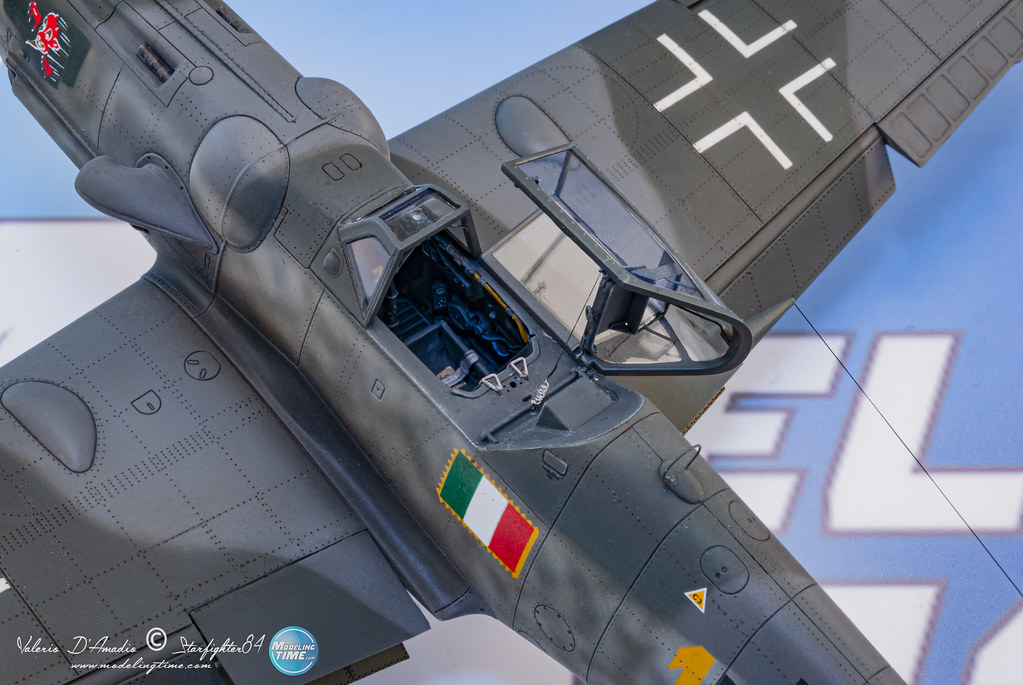
Good evening to all!
this is my last work from the Eduard's Bf.109 G-6 kit (converted to G-14 standard - all the parts you need are already in the box). This particular Gustav was the personal aircraft of Maj. Mario Bellagambi of the Aeronautica Nazionale Repubblicana, during march 1945.
Aftermarkets used:
- Brassin cockpit and wheels.
- Eduard PE set.
- Quickboost propeller and corrected spinner.
- STORMO! decals.
- Master guns & pitot.
Fuselage/upper wings balkenkreuz and yellow 1 masked and painted with self made mask, camo painted with Gunze Sangyo paints.
Hope you'll enjoy. Cheers from Rome! 🤙
Valerio.
BF.109 END_28 by Valerio, su Flickr
BF.109 END_24 by Valerio, su Flickr
BF.109 END_20 by Valerio, su Flickr
BF.109 END_18 by Valerio, su Flickr
BF.109 END_17 by Valerio, su Flickr
BF.109 END_19 by Valerio, su Flickr
BF.109 END_16 by Valerio, su Flickr
BF.109 END_15 by Valerio, su Flickr
BF.109 END_14 by Valerio, su Flickr
BF.109 END_13 by Valerio, su Flickr
BF.109 END_12 by Valerio, su Flickr
BF.109 END_11 by Valerio, su Flickr
BF.109 END_8 by Valerio, su Flickr
BF.109 END_26 by Valerio, su Flickr
-
57
-
4
-
Thank you all for the appreciations! 😀
On 3/9/2021 at 5:57 PM, albymoore said:That is gorgeous Israeli Cobra. 😱 Nicely done!
Cheers,
Albert
Thank you Albert! I've seen many time your Tzefa, searching for infos and food for thought.
Some others pics of the finished model. Thanks all again!
Tzefa_end-20 by Valerio, su Flickr
Tzefa_end-21 by Valerio, su Flickr
Tzefa_end-22 by Valerio, su Flickr
Tzefa_end-23 by Valerio, su Flickr
Tzefa_end-24 by Valerio, su Flickr
Tzefa_end-25 by Valerio, su Flickr
Tzefa_end-26 by Valerio, su Flickr
Tzefa_end-27 by Valerio, su Flickr
Tzefa_end-28 by Valerio, su Flickr
Tzefa_end-29 by Valerio, su Flickr
Tzefa_end-30 by Valerio, su Flickr
Tzefa_end-31 by Valerio, su Flickr
Tzefa_end-32 by Valerio, su Flickr
Tzefa_end-33 by Valerio, su Flickr
Tzefa_end-34 by Valerio, su Flickr
-
6
-
1
-
-
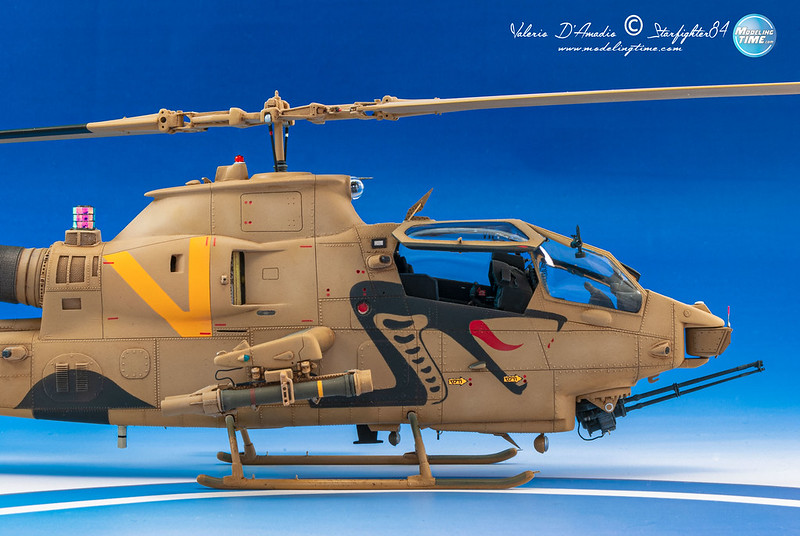
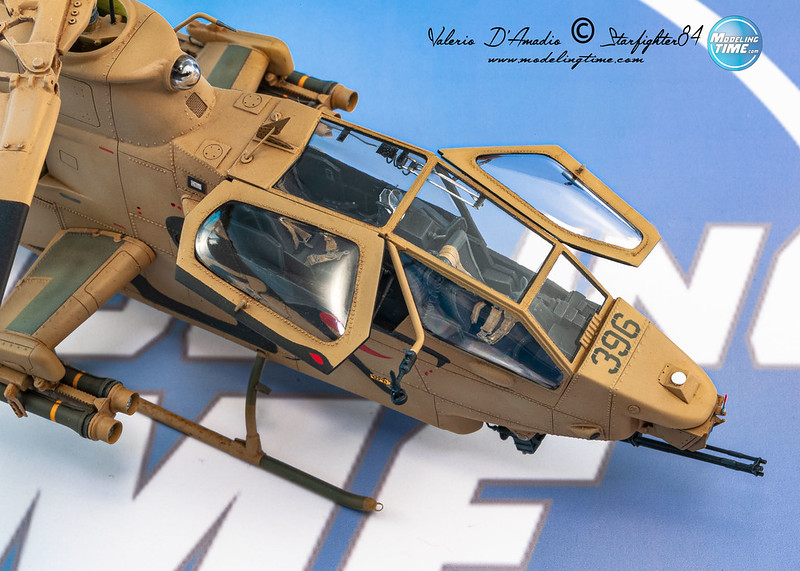
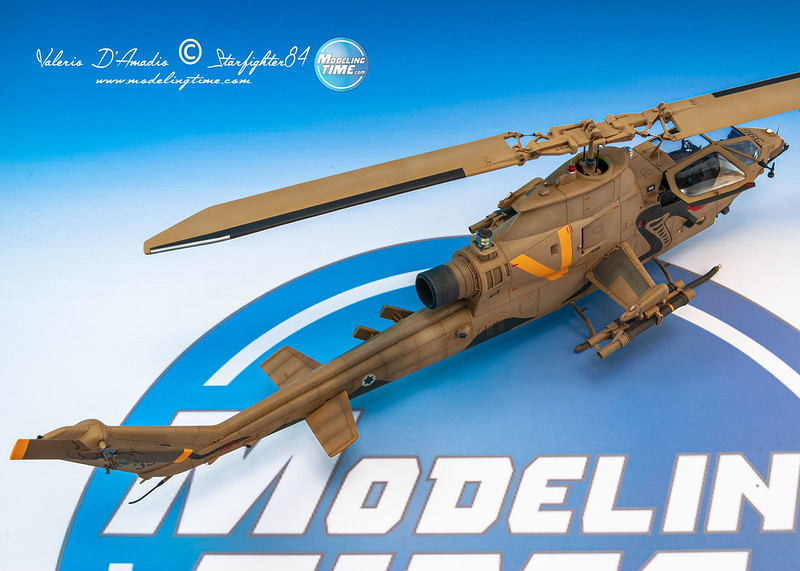
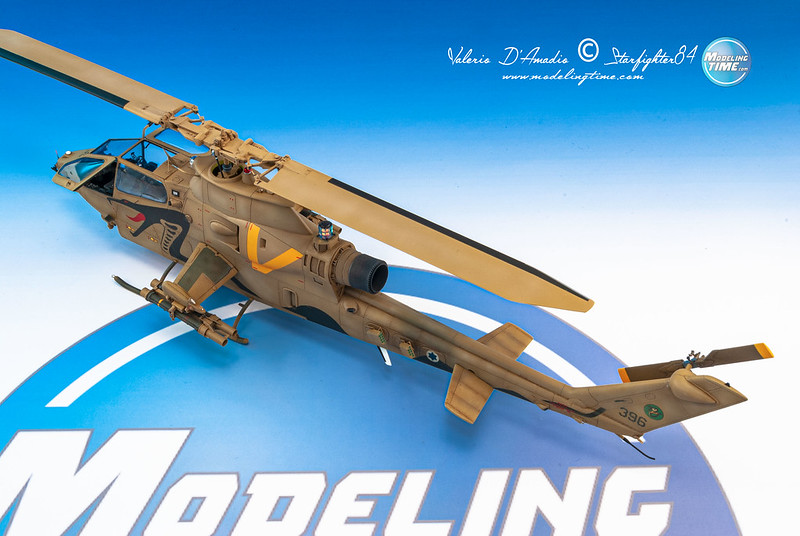
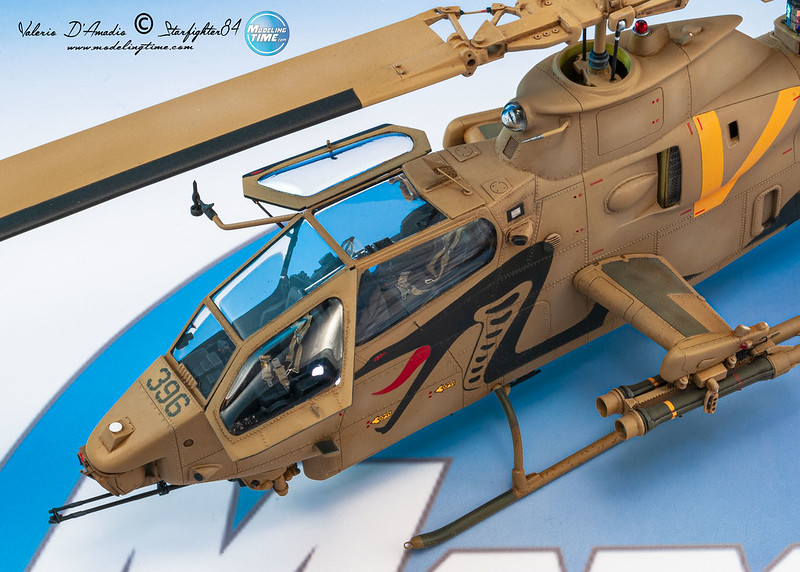
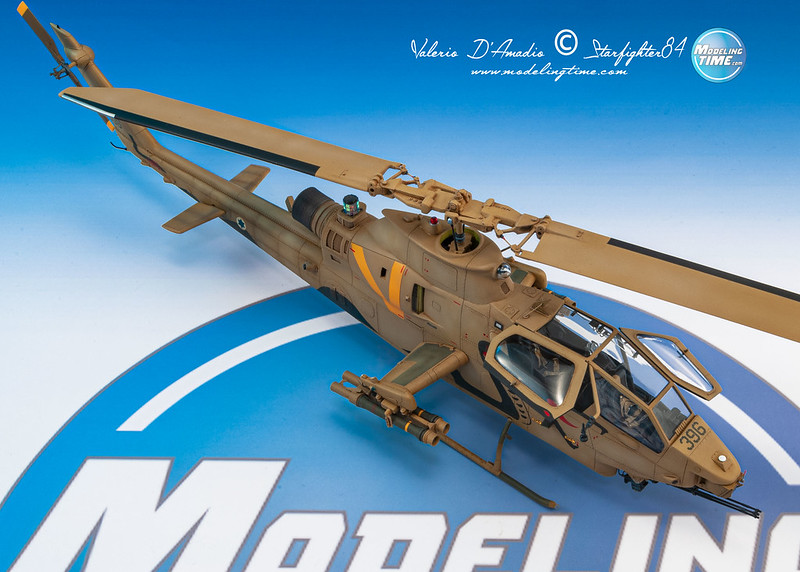
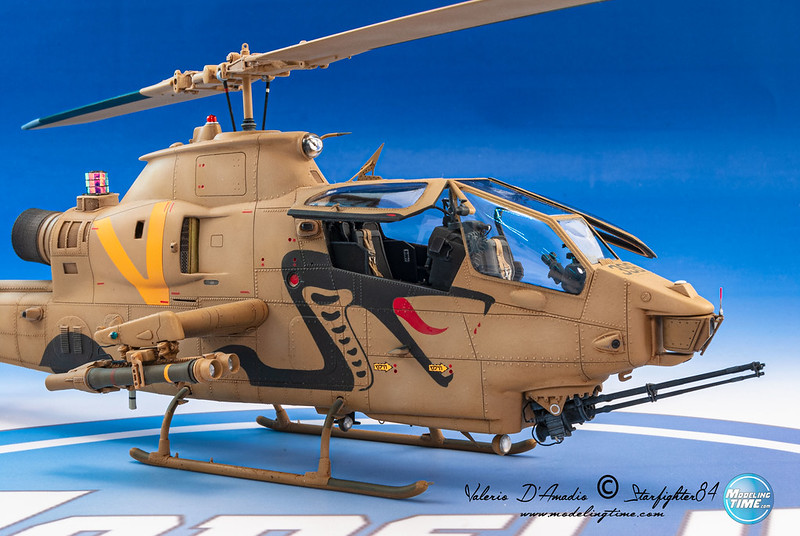
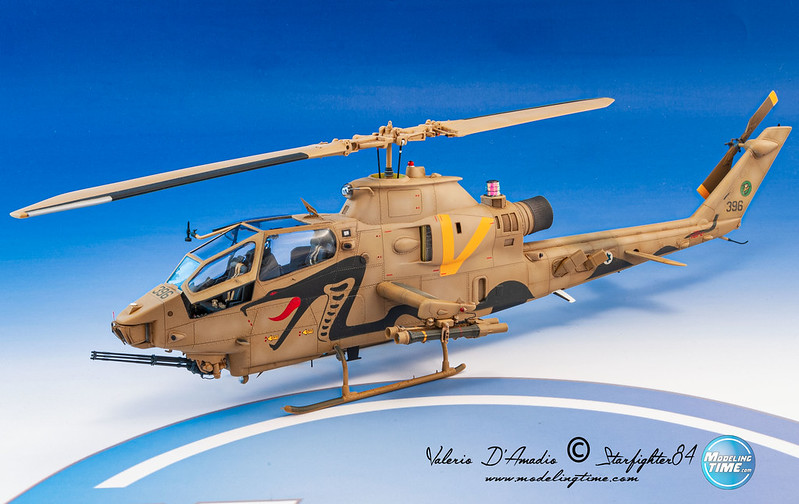
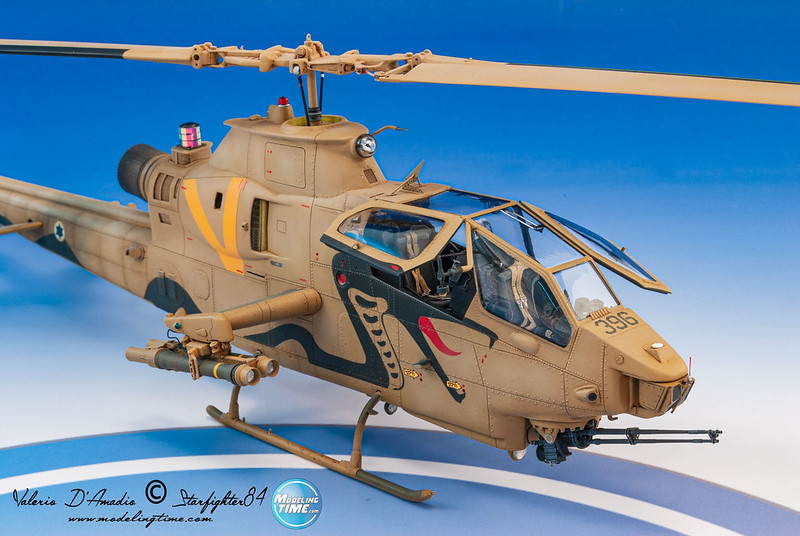
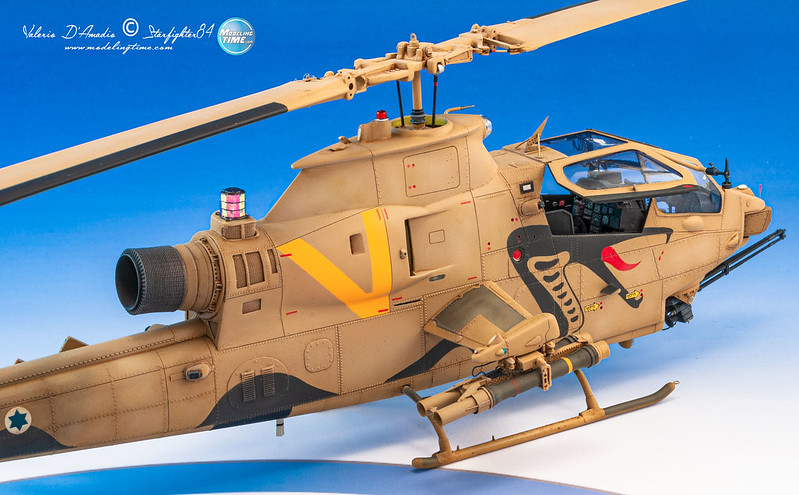
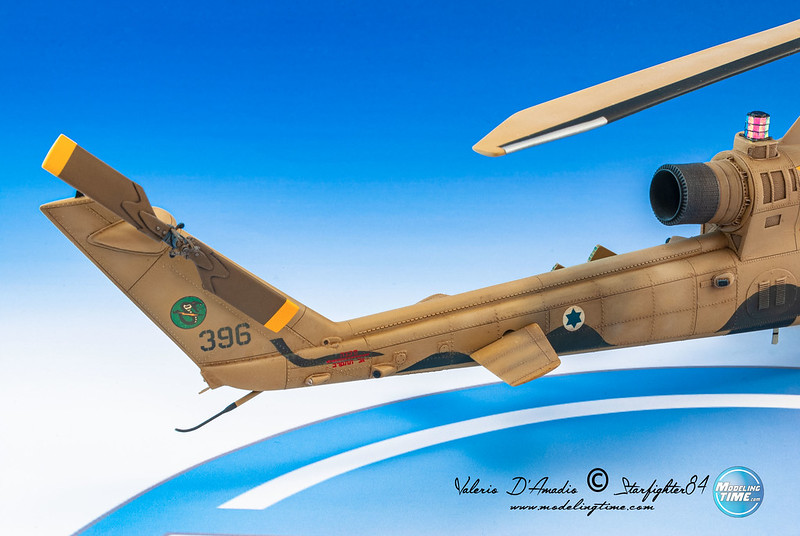
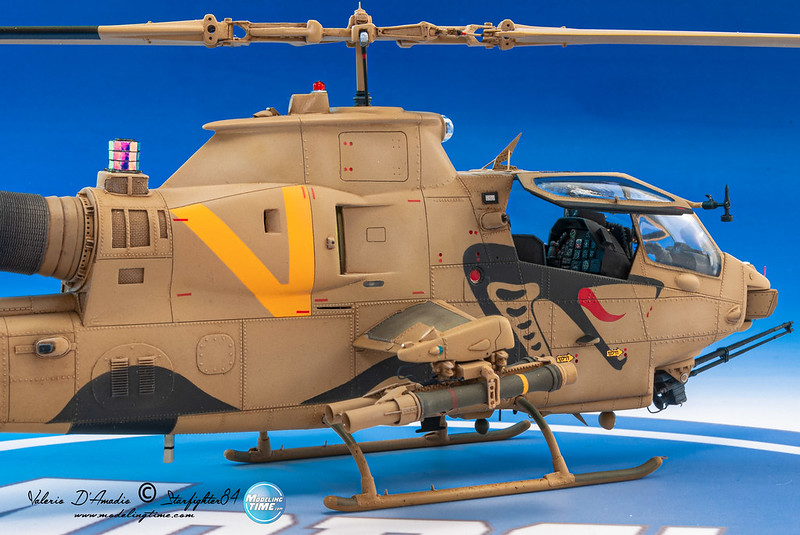
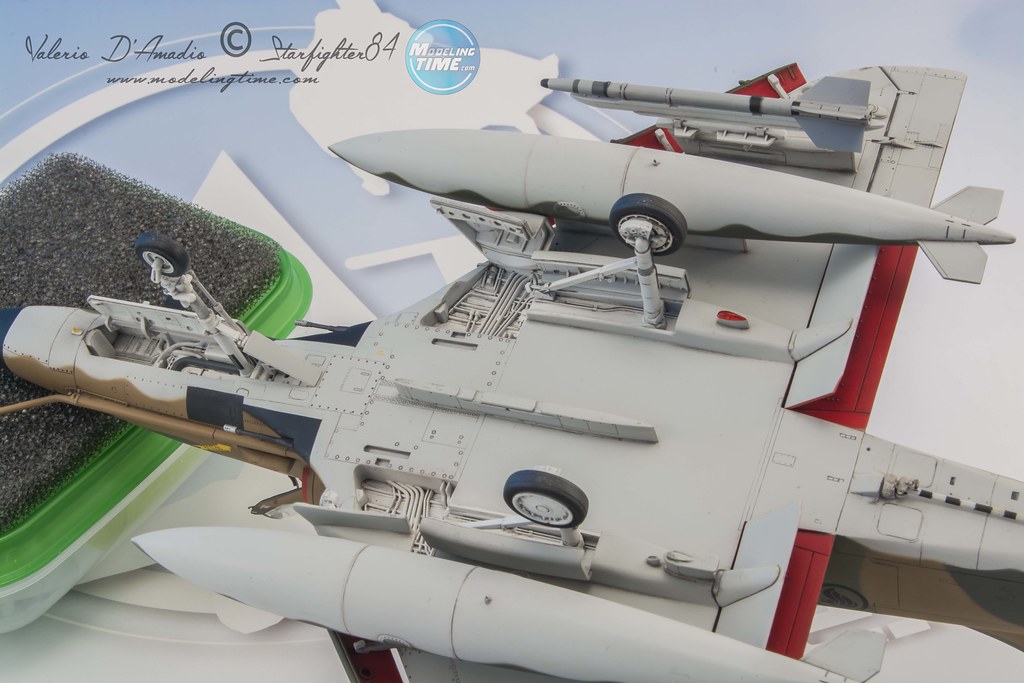
Hello to all!
After 11 months of work I can finally declared ended my last project: an israeli AH-1 Cobra (Tzefa).
This is the old Revell/Monogram kit dated 1986 with a lot of scratchbuilt details. Some parts are made by 3D printing, others are home made turned brass (like the cannon's drum, the M-197 barrels are from Master). I also used the Isradecal conversion and decal set.
The viper on both side of the model is painted, like the stars of David. The positive rivets come from the Archer transfer sets, the disco ball IR jammer from Fireball Modelworks.
Painted with Tamiya, Gunze and AK Real color, washing made by oil colors.
Hope you'll enjoy. Cheers from Rome!
Valerio.Tzefa_end-1 by Valerio, su Flickr
Tzefa_end-2 by Valerio, su Flickr
Tzefa_end-3 by Valerio, su Flickr
Tzefa_end-4 by Valerio, su Flickr
Tzefa_end-5 by Valerio, su Flickr
Tzefa_end-6 by Valerio, su Flickr
Tzefa_end-7 by Valerio, su Flickr
Tzefa_end-8 by Valerio, su Flickr
Tzefa_end-9 by Valerio, su Flickr
Tzefa_end-10 by Valerio, su Flickr
Tzefa_end-11 by Valerio, su Flickr
Tzefa_end-12 by Valerio, su Flickr
Tzefa_end-13 by Valerio, su Flickr
Tzefa_end-14 by Valerio, su Flickr
Tzefa_end-15 by Valerio, su Flickr
Tzefa_end-16 by Valerio, su Flickr
Tzefa_end-17 by Valerio, su Flickr
Tzefa_end-18 by Valerio, su Flickr
Tzefa_end-19 by Valerio, su Flickr
-
65
-
6
-
-
5 minutes ago, markmcguire25 said:
Nice job on of my favorite aircraft.
A couple questions, if I can;
1. What paint/finish did you use for the overall main white color, as it seems to be my kryptonite and yours looks very nice.
2. How much post-editing do you perform on the pics, and what do you use? The photos are fantastic, and very lifelike, but I noticed the pitot disappeared in the last pic, and wonder what you use to "clean up" the background.
Just curious at I'm still a newbie on posting (but getting better, I hope), and yours has a very polished look.
Thanks,
Hi Mark...!
1) I've used a primer.. the Mr. Finishing Primer 1500 White Gunze. This is not the first time that I used it and I fell good with this product. I add Levelling Thinner Gunze at 80% so I can obtain an homogeneous surface... moreover this primer can be sanded with 1500/2000/3000 and 4000 grit papers to reach a very smooth finish.
2) The last pic is referred to the model still in construction (at that time I hadn't added the tailerons yet). Unfortunately that was the only moment where I could take a picture of the under surfaces... with canopies and VHF antenna on the top of vertical stabilizer it's impossible to turn the model. 😉
-
Good night to all,
I'm glad to present my last work, a T-38 A Talon from Wolpack. I've built the kit OOB except for some scratchbuilt addictions in the cockpit (i.e. the separation glass of the central frame) and in the wheels/airbrakes bay. I also added the positive rivets from Archer on the exhausts zone. Pilot's name decal on the rear canopy taken from the Fundekals sheet.
Hope you'll enjoy... take care and stay safe in this difficult moments.
Cheers frome Rome.Valerio.
Talon END 3 by Valerio, su Flickr
Talon END 4 by Valerio, su Flickr
Talon END 5 by Valerio, su Flickr
Talon END 6 by Valerio, su Flickr
Talon END 7 by Valerio, su Flickr
Talon END 8 by Valerio, su Flickr
Talon END 9 by Valerio, su Flickr
Talon END 10 by Valerio, su Flickr
Talon END 11 by Valerio, su Flickr
Talon END 12 by Valerio, su Flickr
Talon END 13 by Valerio, su Flickr
Talon END 14 by Valerio, su Flickr
Talon END 15 by Valerio, su Flickr
Talon END 16 by Valerio, su Flickr
Talon END 17 by Valerio, su Flickr
Talon END 2 by Valerio, su Flickr
Talon END 1 by Valerio, su Flickr
-
62
-
6
-
-
I would thank you all for the appreciations guys....! see you at the next gallery. 😉
-
8 minutes ago, basket said:
Was the Aires cockpit designed for that kit ?
The cockpit is based on the previous set for Hasegawa "adjusted" for Tamiya kit. It need a lot of work to fit inside the fuselage... 😉
-
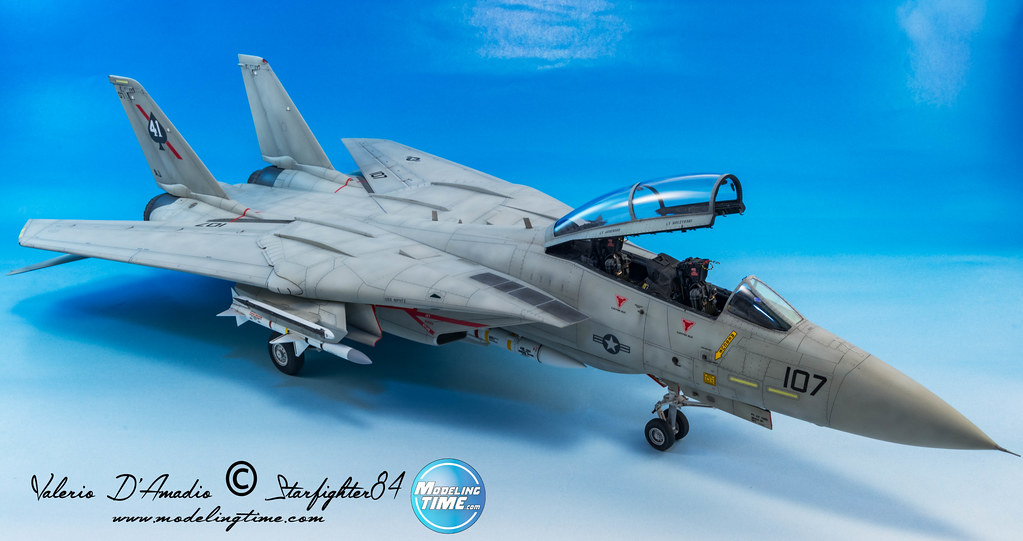
Good evening to all!
I'm glad to present my last work, the F-14 A Bu.No. 160390 that killed a Sukhoi-22 during the Gulf of Sidra incident of 1981.
Tamiya kit with Aires cockpit (the best cockpit I've ever used as quality of details, the worst as difficulty to put it inside the fuselage) and exhausts, Brassin wheels, Kokopelli ladder, and Furball decals. Finished with Gunze and Alclad paints.
Hope you enjoy.... cheers! 👋
Valerio from Rome, Italy.
Tomcat END 10 by Valerio, su Flickr
Tomcat END 1 by Valerio, su Flickr
Tomcat END 18 by Valerio, su Flickr
Tomcat END 17 by Valerio, su Flickr
Tomcat END 16 by Valerio, su Flickr
Tomcat END 15 by Valerio, su Flickr
Tomcat END 14 by Valerio, su Flickr
Tomcat END 13 by Valerio, su Flickr
Tomcat END 12 by Valerio, su Flickr
Tomcat END 11 by Valerio, su Flickr
Tomcat END 8 by Valerio, su Flickr
Tomcat END 7 by Valerio, su Flickr
Tomcat END 6 by Valerio, su Flickr
Tomcat END 4 by Valerio, su Flickr
Tomcat END 3 by Valerio, su Flickr
Tomcat END 2 by Valerio, su Flickr
Tomcat END 5 by Valerio, su Flickr
Tomcat END 20 by Valerio, su Flickr
Tomcat END 21 by Valerio, su Flickr
Tomcat END 19 by Valerio, su Flickr
-
68
-
2
-
-
28 minutes ago, loloskymaster said:
Excellent work on this MB-326, Valerio!
I really love this scheme that I didn't know till now. I did a Ghana air force MB-326 and your's makes me having a new project!
Is there a page where we can follow your model works?
Congrats,
Lolo
Thank you Lolo!
Hoping to not break the forum rules, this is the link to the complete WIP of my 326 - CLICK!
You can find all of my works here! or on our FORUM (sorry but Modeling Time is in italian language). Hope you will enjoy! 😉
-
1
-
-
1 hour ago, Bell209 said:
Red Roo make a number of AM bits for this kit
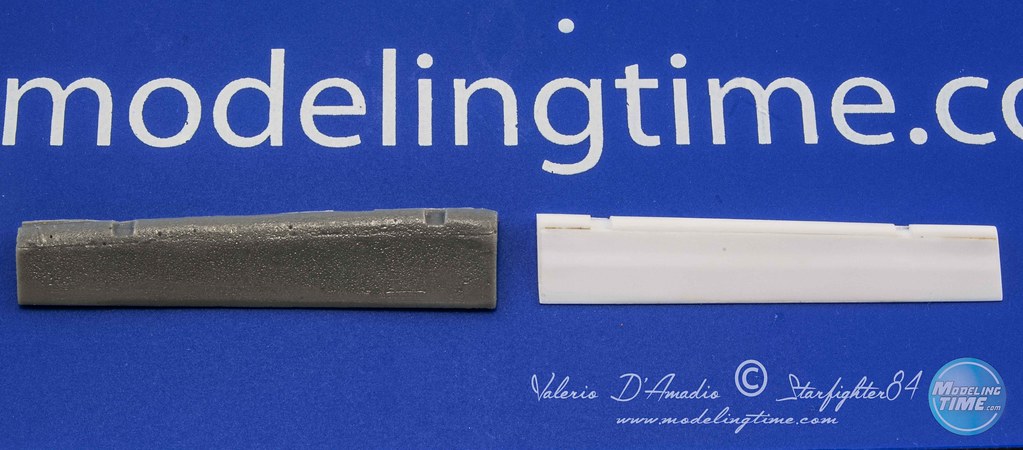
I didn't know that Red Roo makes aftermarket for the 326.... maybe OzMods? I purchased the wing flaps from OzMods... and the quality is very poor. For this reason I choosen to made it from scratch...
 MB.326-22 by Valerio, su Flickr
1 hour ago, Terry1954 said:
MB.326-22 by Valerio, su Flickr
1 hour ago, Terry1954 said:I had planned an overall orange one to go with my SF-360 (see below).
Beautiful aircraft the SF-260... the Ferrari of General Aviation! Is this the Planet Model kit?
-
Thank you so much for you kindly comments!!
10 hours ago, bedford said:I'm particularly interested to know how you did the exhaust pipe and the intake tubes
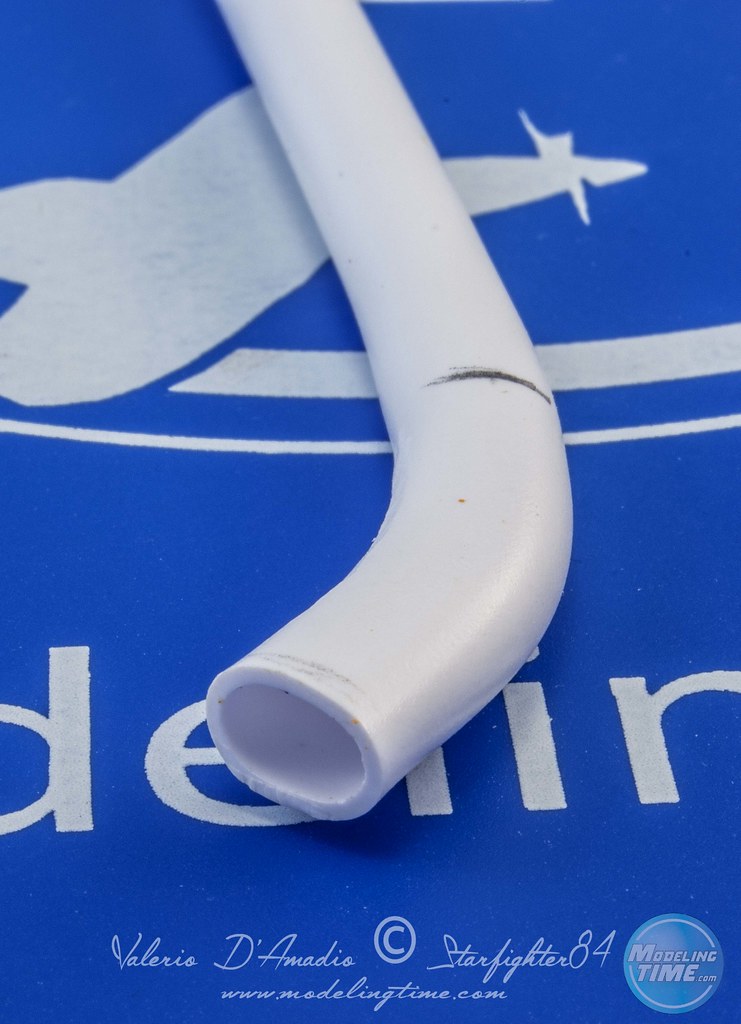
The jet pipe is an Evergreen Tube (item #230) that has 7,9 mm of diameter. Inside the pipe I added the four thermocouples (made with copper wire) and the exhaust trimmers (made with plasticard).
Inside an half of fuselage I added two main ribs: the left serves to block the long jet pipe.
MB.326-51 by Valerio, su Flickr
MB.326-50 by Valerio, su Flickr
To reproduce the conical fuselage fairing of the exhaust I used a complex process: I cut a piece of plasticard sheet of 0,2 mm thickness and I've "crumpled up"it to obtain a conical shape. Then I fixed it onto the second rib using so much cicyanoacryliclic glue... outside the cone I added a palsticard stripe to reinforce the structure. At this point I glued the fuselage together with the new "plasticard cone".... and I used sandpaper 600, 800, 1000 and 1500 to obtain a "perfect" conical shape of the piece. Also cyano glue and Milliput were needed to complete the work!
MB.326-56 by Valerio, su Flickr
MB.326-57 by Valerio, su Flickr
MB.326-64 by Valerio, su Flickr
MB.326-65 by Valerio, su Flickr
MB.326-63 by Valerio, su Flickr
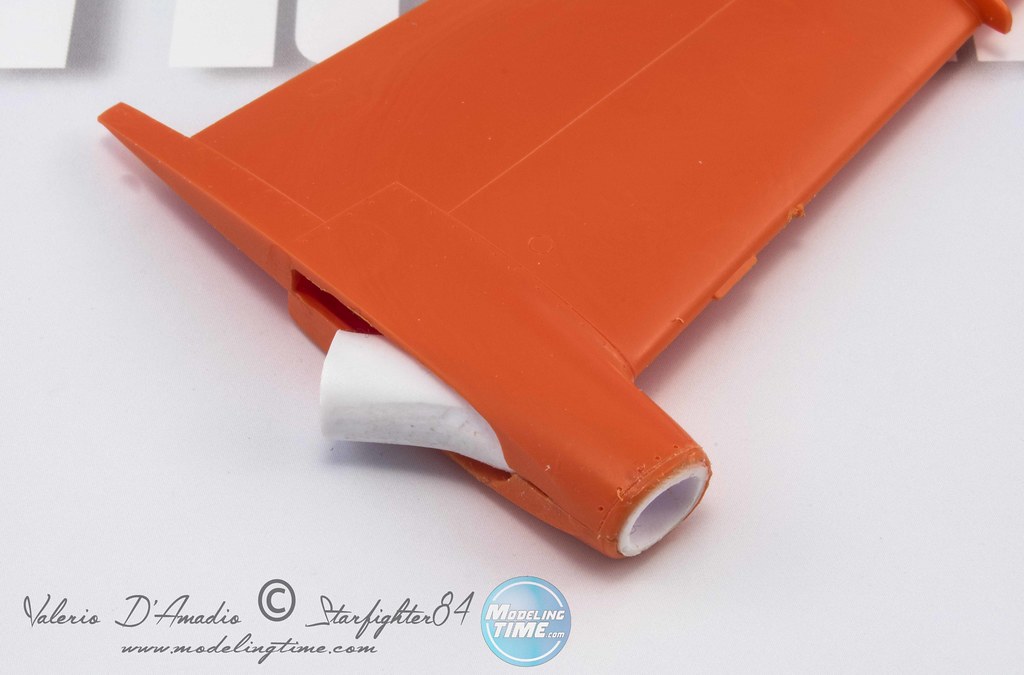
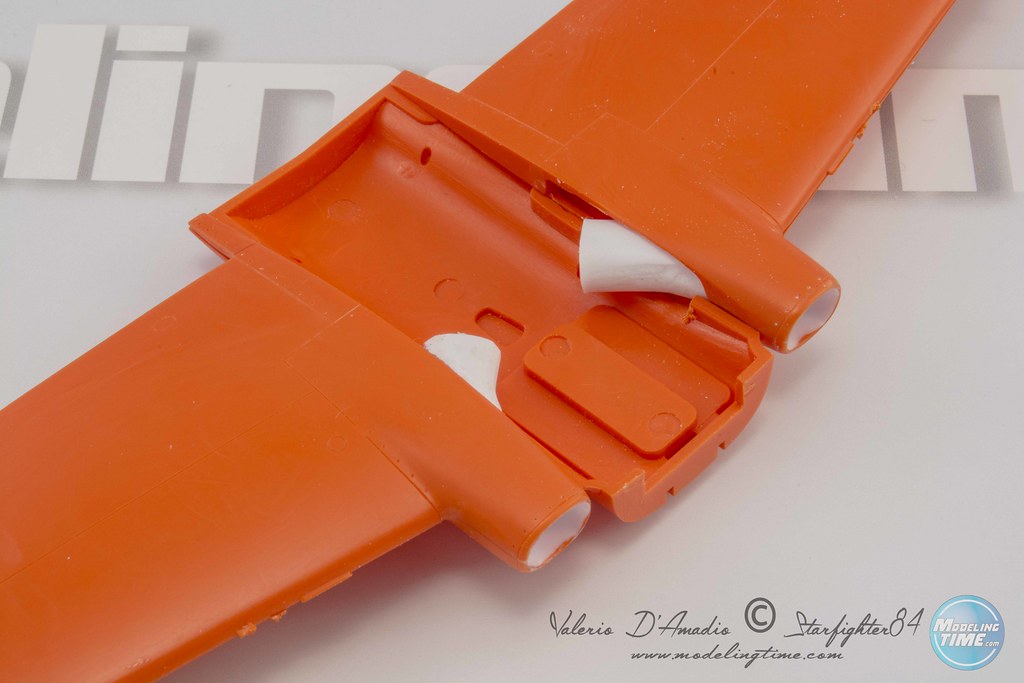
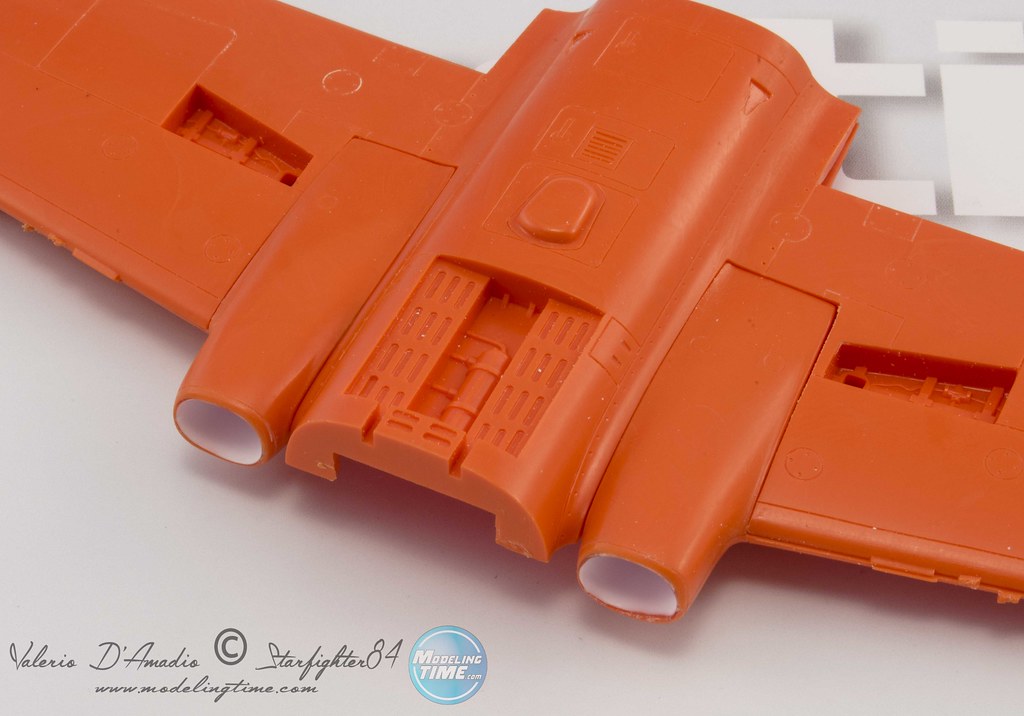
For the intakes I choosen again an Evergreen tube that has 6,3mm of diameter (item #228). Using a thermic gun I flattened the intake duct leading edge to obtain an "oval" shape... then, with the same gun, I curved the piece. The new ducts has been glued into the wings with cyanoacrylic glue.... and grinded with an electric mini drill to reach the right thickness of leading edges.
MB.326-23 by Valerio, su Flickr
MB.326-24 by Valerio, su Flickr
MB.326-25 by Valerio, su Flickr
MB.326-27 by Valerio, su Flickr
MB.326-29 by Valerio, su Flickr
MB.326-32 by Valerio, su Flickr
MB.326-33 by Valerio, su Flickr
-
2
-
-
Good night to all!
I'm back with my last work, an Aermacchi MB-326 G from the old ESCI (now Italeri) kit in 1/48 scale. The only two aftermarkets that I used are the Neomega cockpit (very poor and inaccurate)... and the 300 litres fuel tanks from SkyModels.
MB.326-53 by Valerio, su Flickr
MB.326-62 by Valerio, su Flickr
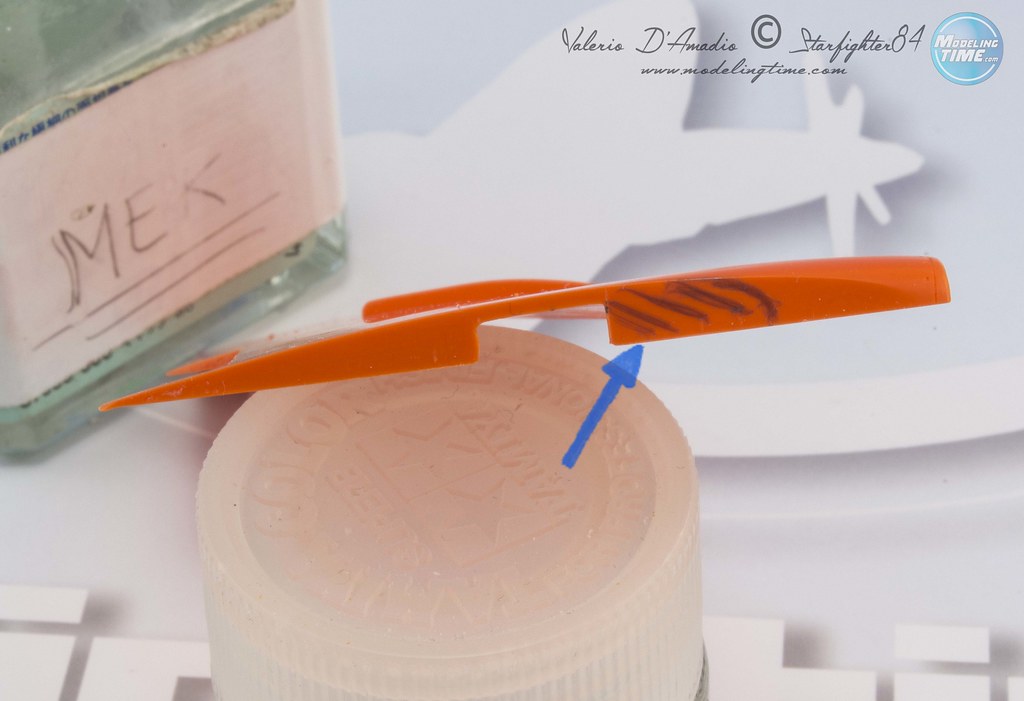
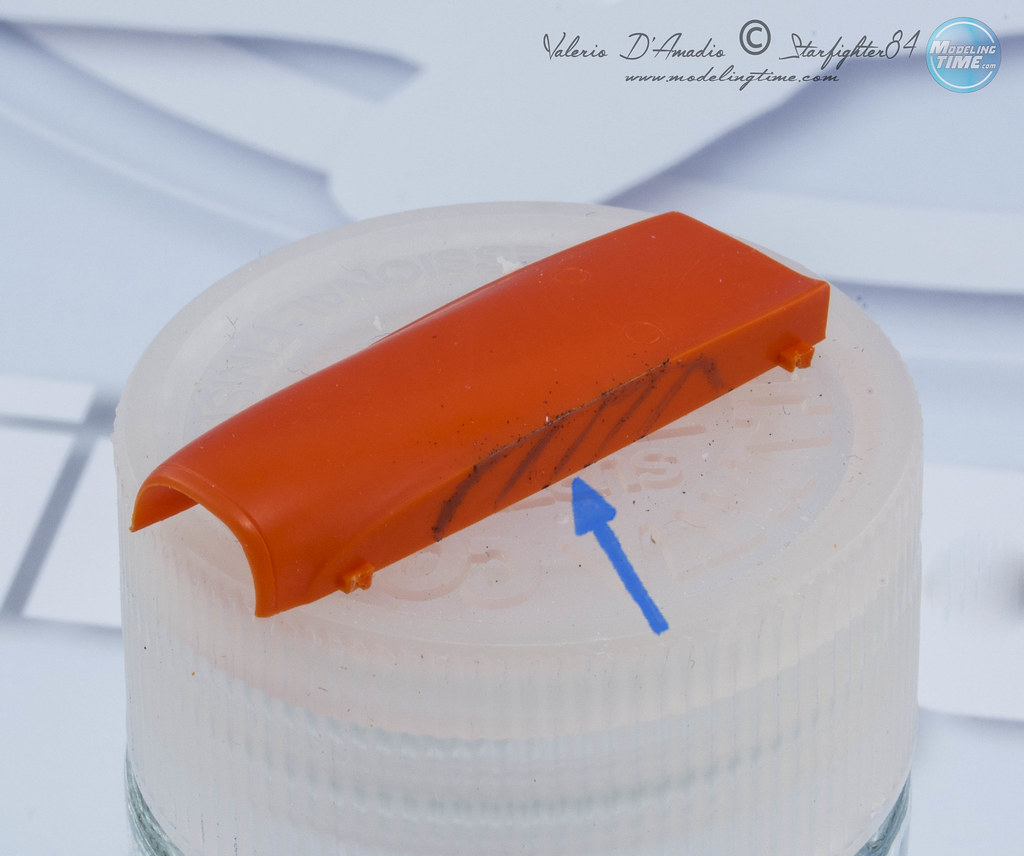
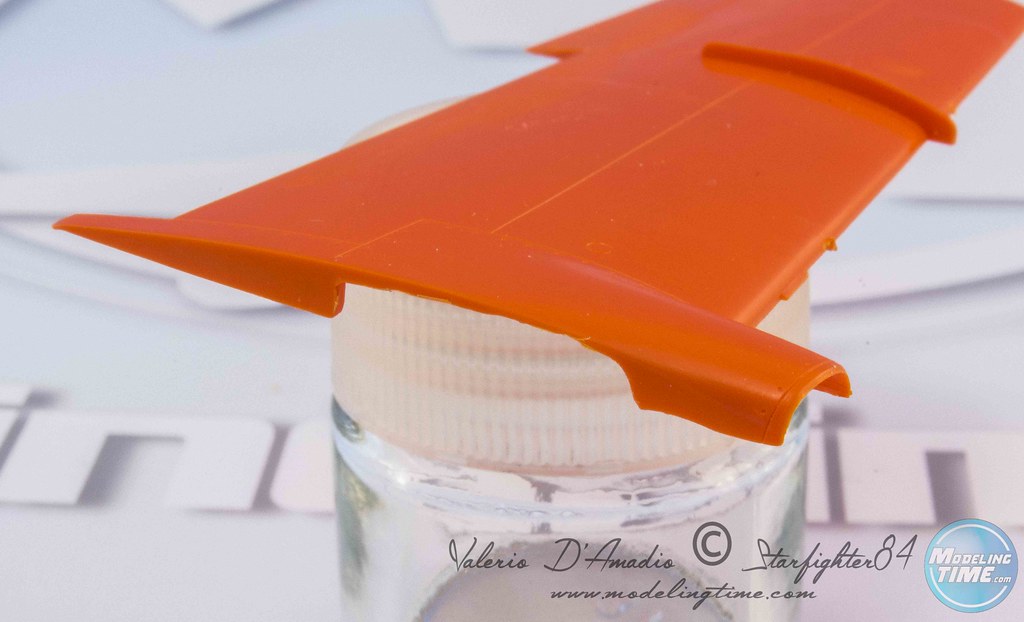
I built from scratch the following elements:
Flaps
MB.326-14 by Valerio, su Flickr
MB.326-21 by Valerio, su Flickr
Exhaust
MB.326-52 by Valerio, su Flickr
MB.326-57 by Valerio, su Flickr
MB.326-64 by Valerio, su Flickr
Intakes
MB.326-28 by Valerio, su Flickr
MB.326-31 by Valerio, su Flickr
MB.326-34 by Valerio, su Flickr
MB.326-35 by Valerio, su Flickr
Wing Fences
MB.326-68 by Valerio, su Flickr
MB.326-70 by Valerio, su Flickr
MB.326-69 by Valerio, su Flickr
Canopy structure
MB.326-83 by Valerio, su Flickr
MB.326-100 by Valerio, su Flickr
Gun Sight
MB.326-97 by Valerio, su Flickr
MB.326-104 by Valerio, su Flickr
This is the real one....! the Italian Air Force owned only two MB-326 G in the 70 years (RS-19 Matricola Militare 54289 & RS-20 Matricola Militare 54290), assigned to Reparto Sperimentale Volo to test & evaluate the new variant of the aircraft.
11998908_442586189260246_7379382820028146589_n by Valerio, su Flickr
And this is the final result! painted with Alclad White Aluminium and Xtracolor X-104 International Orange. Finished with Mr.Paint Satin Varnish. Decals is a mix of Italeri, Small World Accessories & Tauromodel sheets.
MB.326 end-14 by Valerio, su Flickr
MB.326 end-11 by Valerio, su Flickr
MB.326 end-13 by Valerio, su Flickr
MB.326 end-10 by Valerio, su Flickr
MB.326 end-12 by Valerio, su Flickr
MB.326 end-9 by Valerio, su Flickr
MB.326 end-6 by Valerio, su Flickr
MB.326 end-16 by Valerio, su Flickr
MB.326 end-15 by Valerio, su Flickr
MB.326 end-1 by Valerio, su Flickr
MB.326 end-2 by Valerio, su Flickr
MB.326 end-3 by Valerio, su Flickr
MB.326 end-4 by Valerio, su Flickr
MB.326 end-7 by Valerio, su Flickr
MB.326 end-8 by Valerio, su Flickr
Hope you'll enjoy!
Thank you! cheers!
Valerio, Rome - Italy.
-
57
-
6
-
-
Thank you all for the appreciations!
On 5/2/2018 at 11:23 AM, aidy said:Any chance I can get a copy of the drawing you used to cut the UHF hump, please?
Sure! I can send you the cutting file. Send me a PM!
-
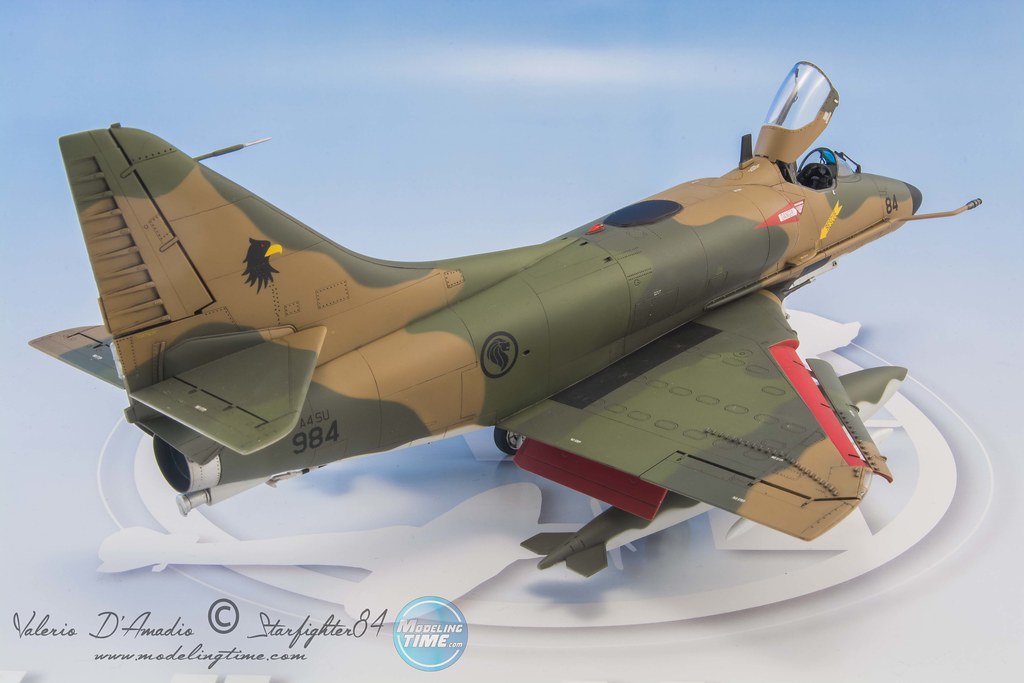
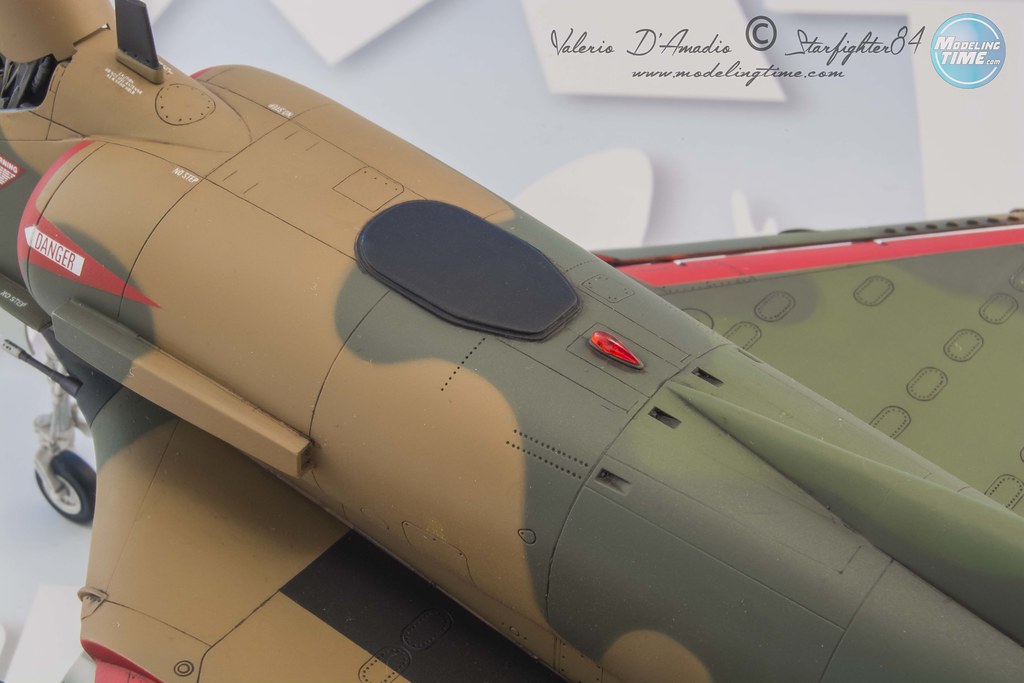
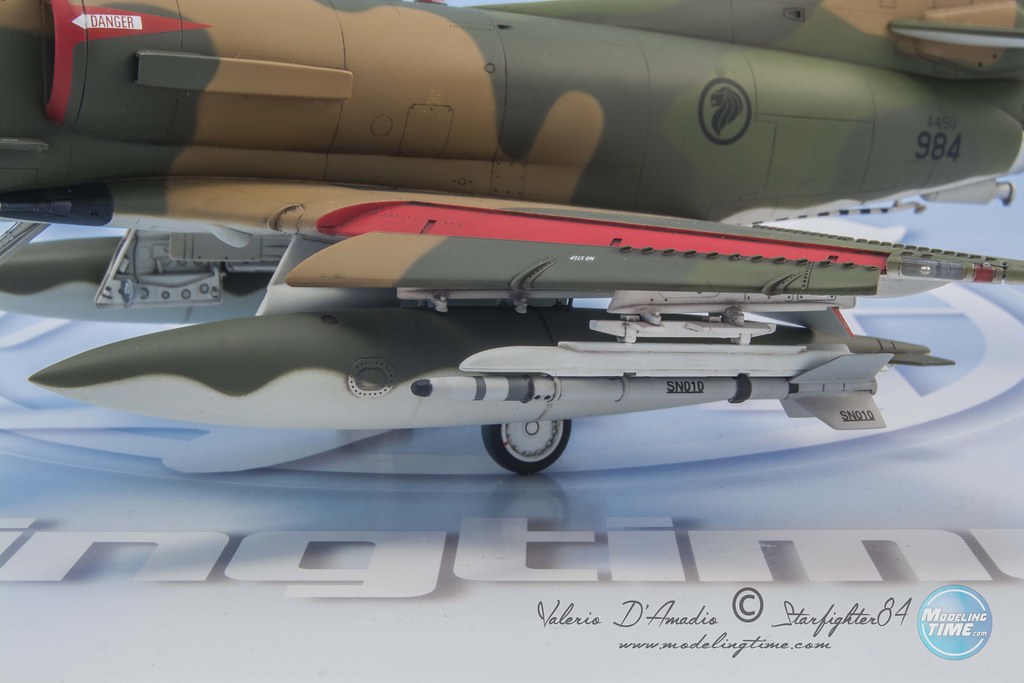
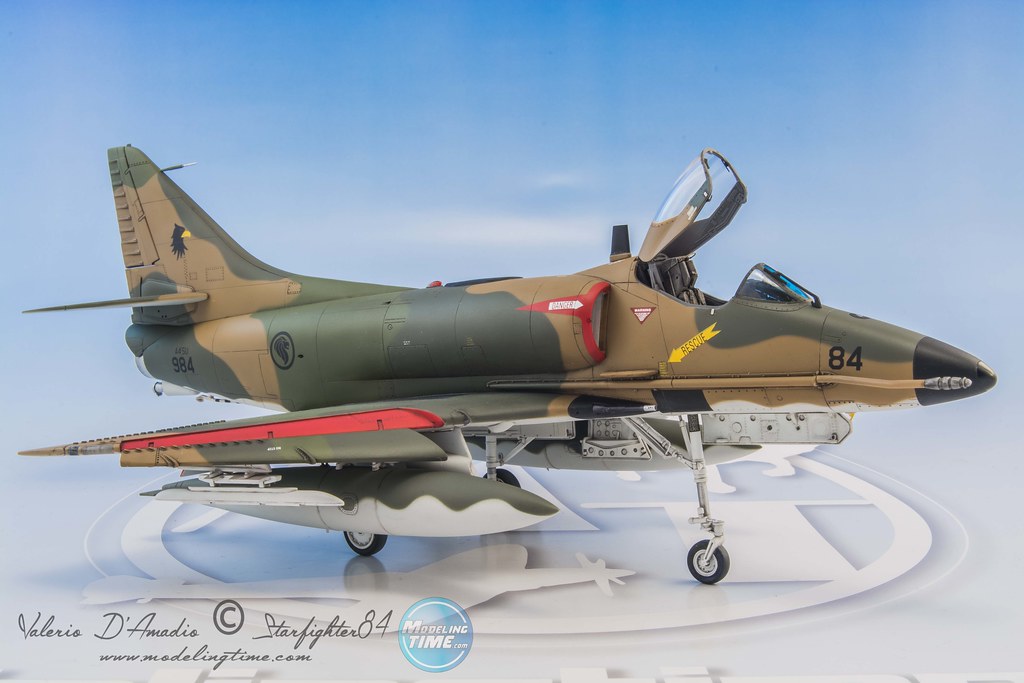
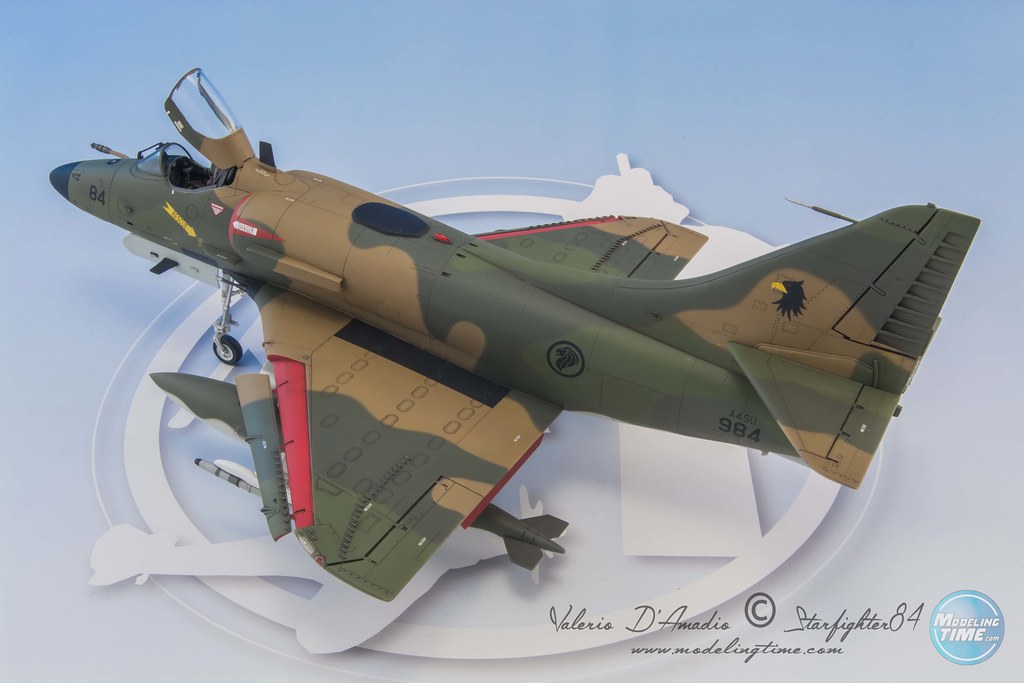
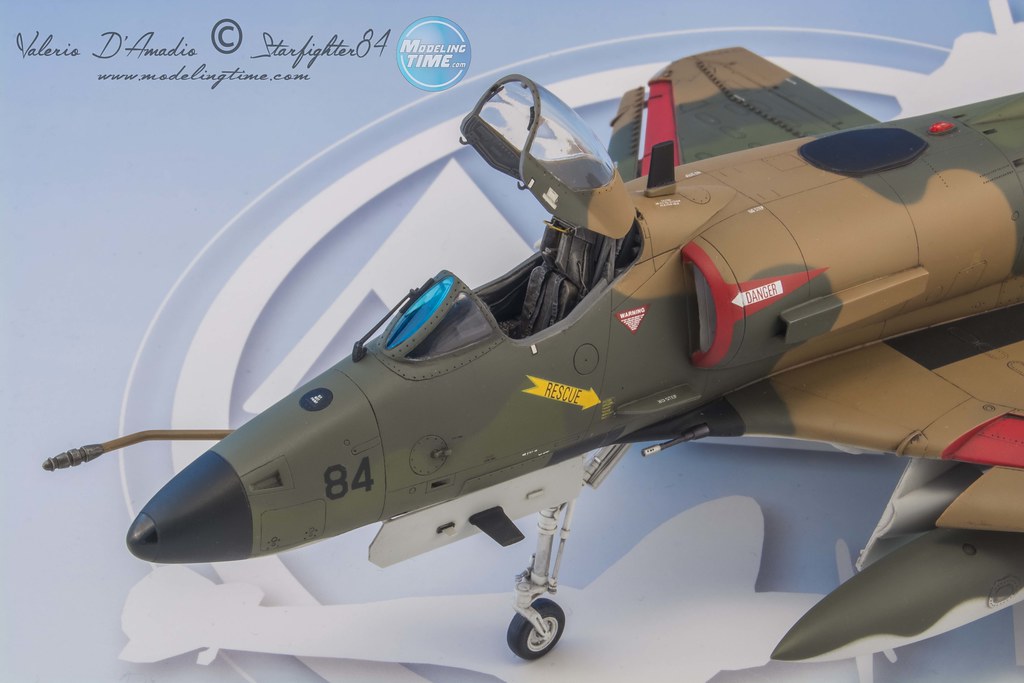
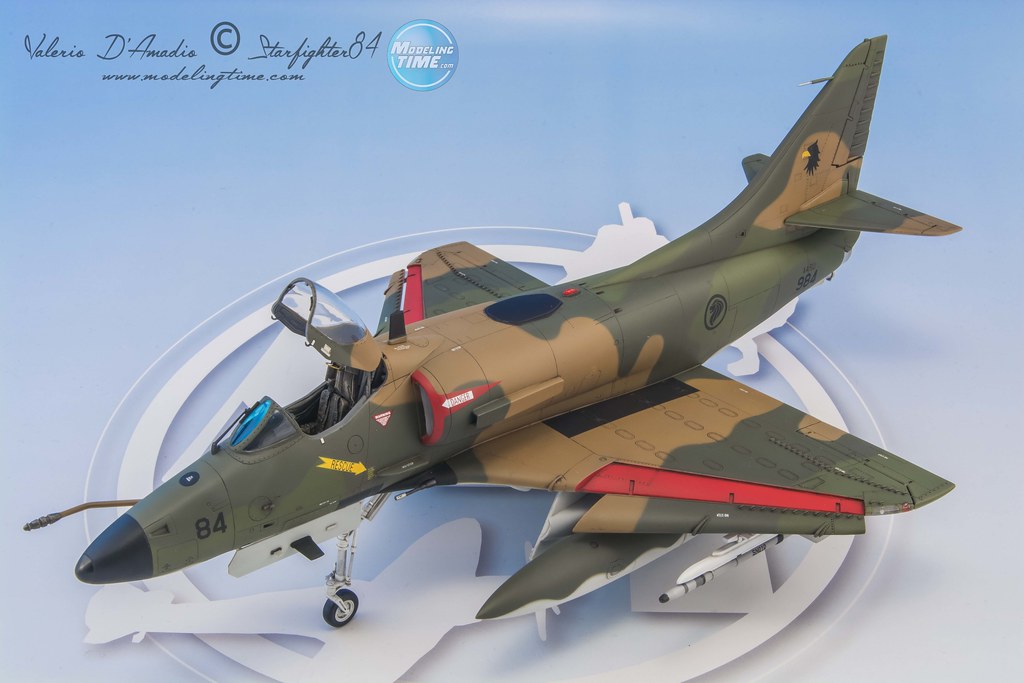
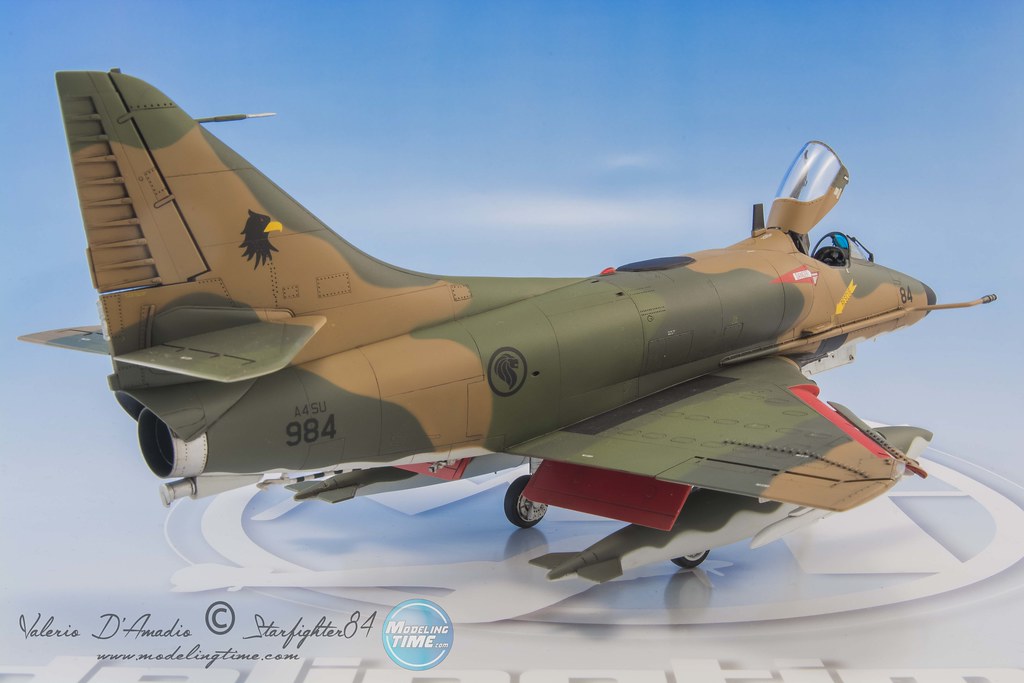
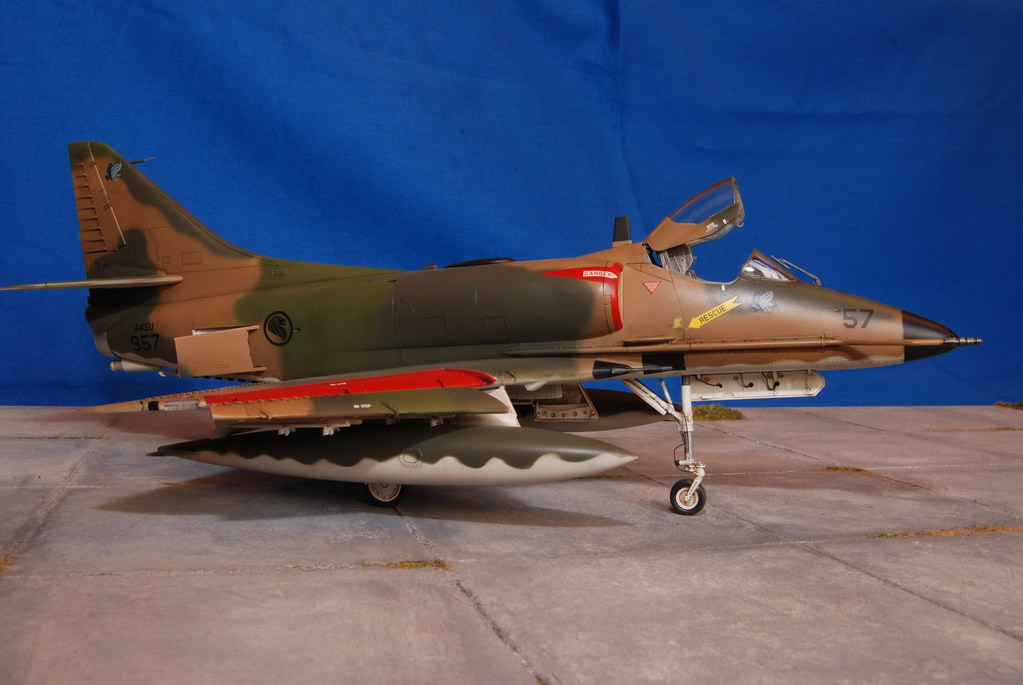
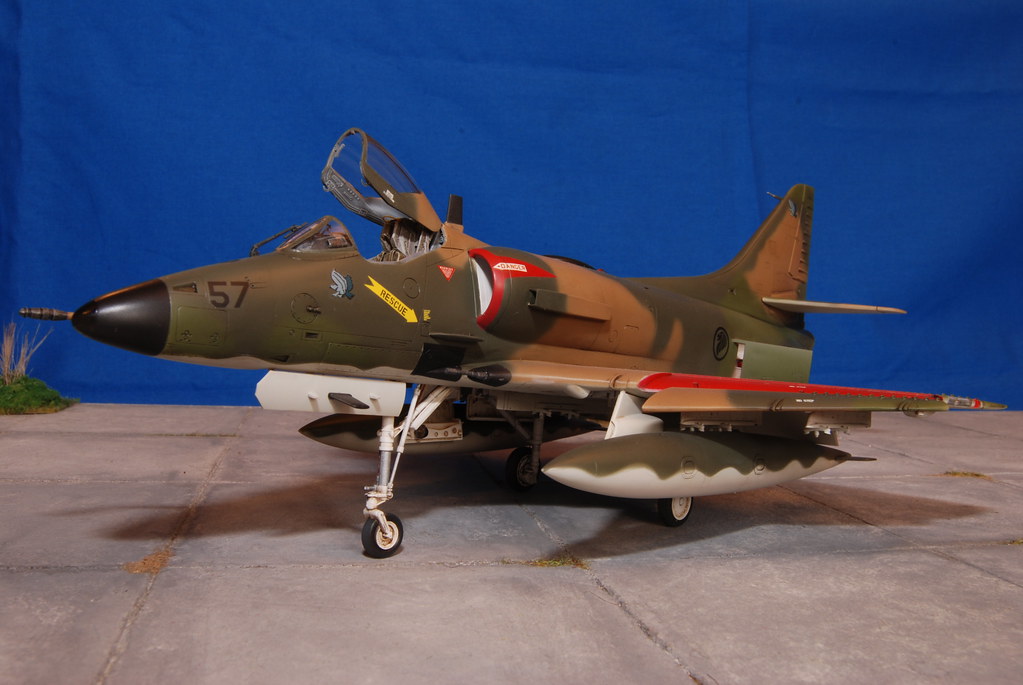
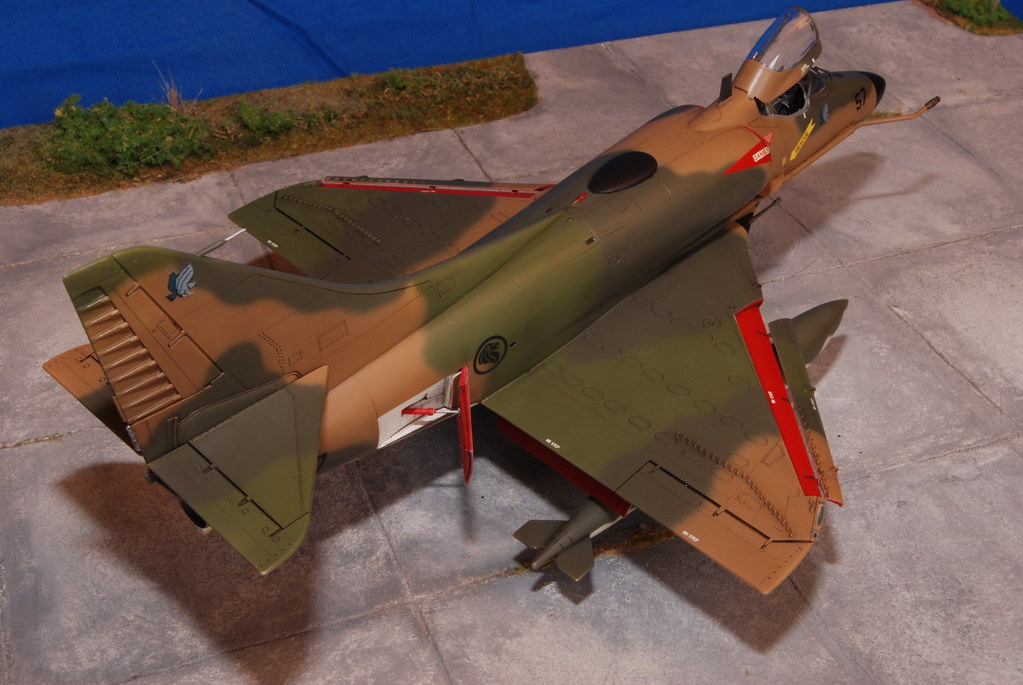
Good morning to all!
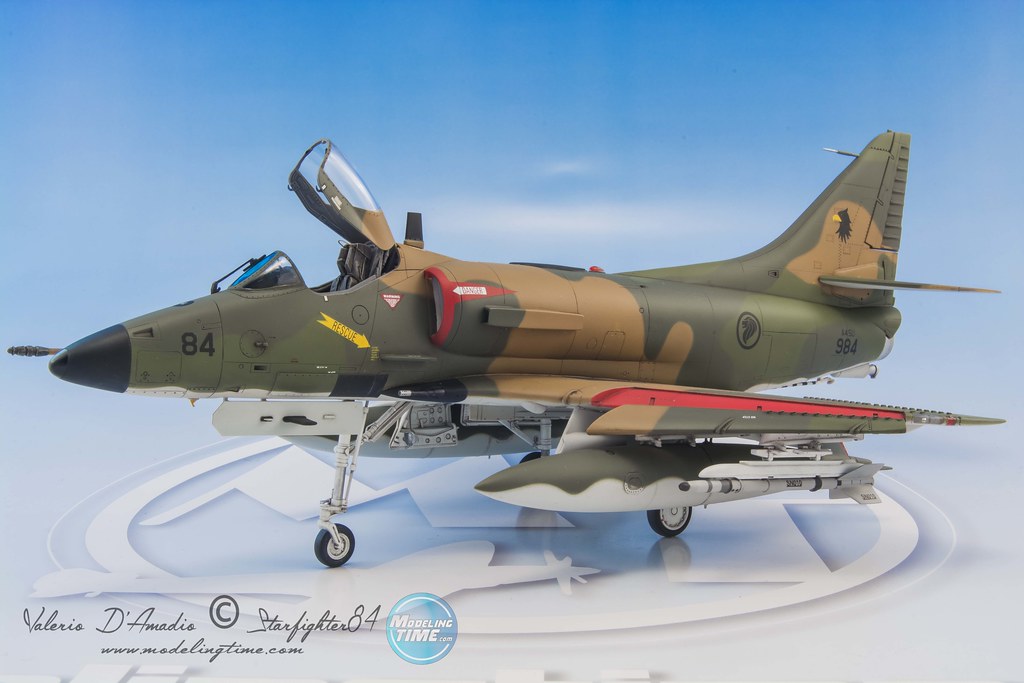
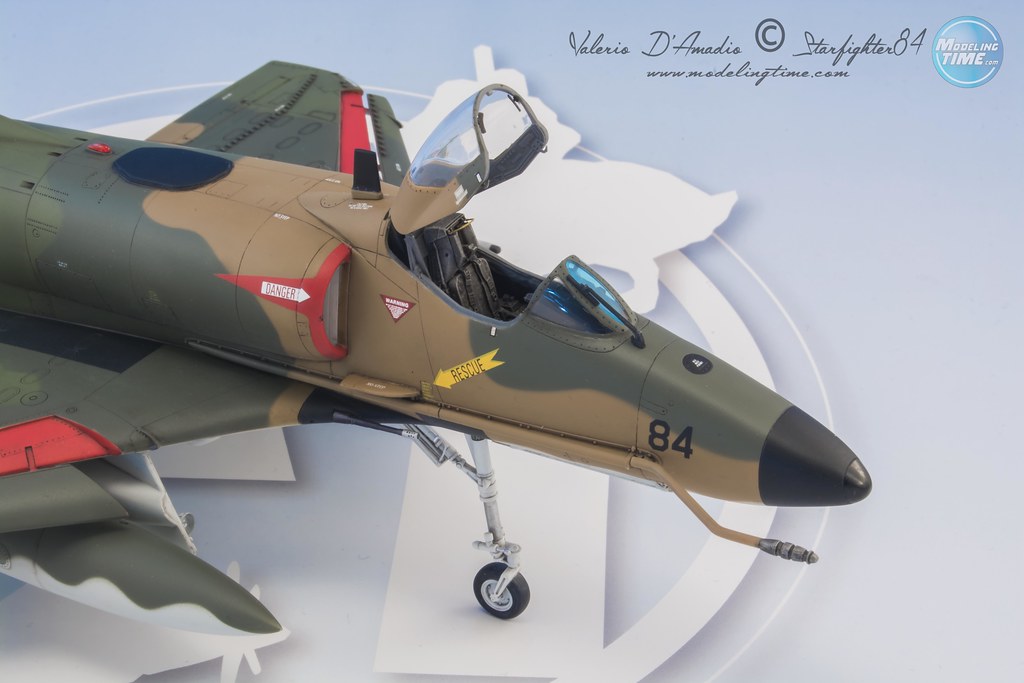
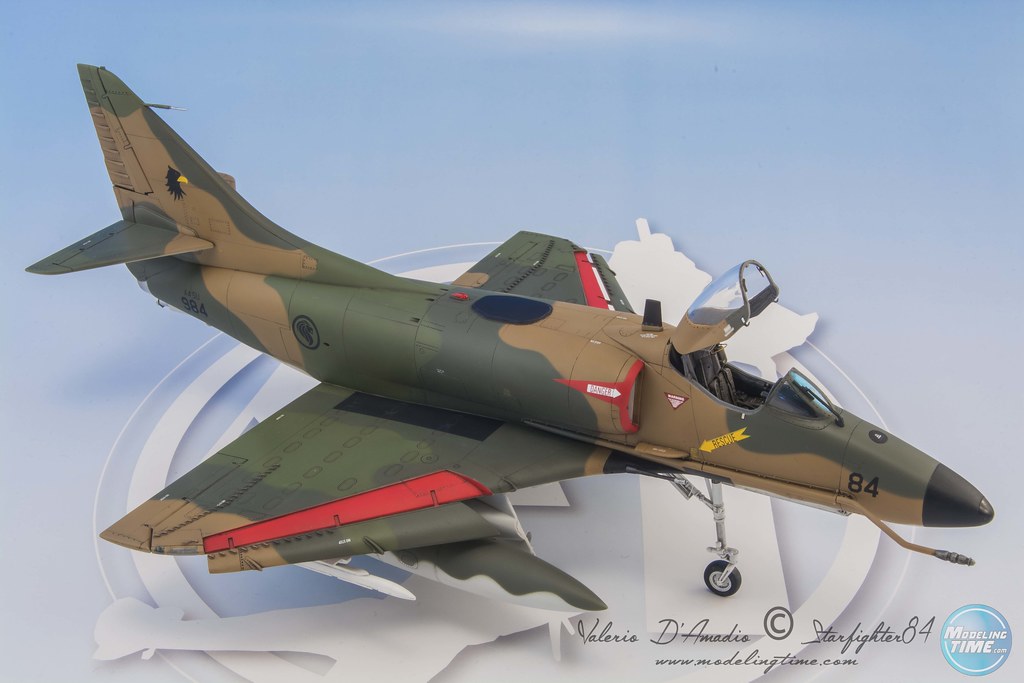
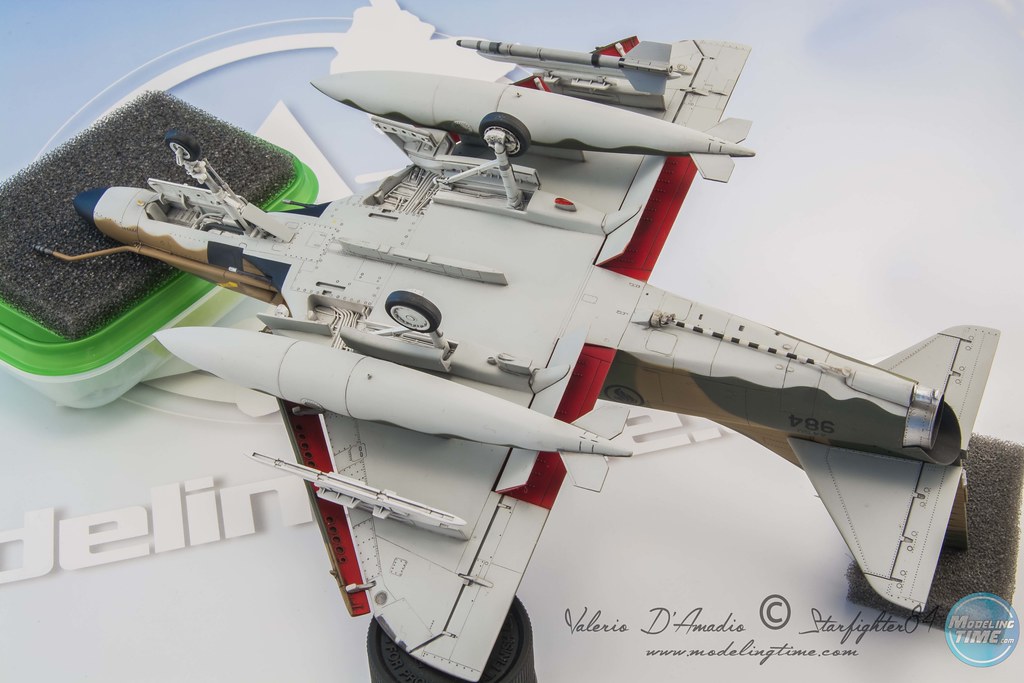
I'm glad to present my last work... a restoration of an old Hasegawa A-4 that I built ten years ago. I decided to put it back to workbench due to the "crack" of the fuselage:
21616109_10210113589216277_2086911637920727775_n by valerio, su Flickr
While I was at it, I scratchbuilt a new UHF dorsal hump (the one in the Hasegawa kit is wrong in dimensions and shape) using the cutting plotter:
A-4SU Restoration_11 by valerio, su Flickr
A-4SU Restoration_10 by valerio, su Flickr
There was other details to fix, like a small naca intake on the main right engine intake, but the model was almost assembled and was very difficul to add this new parts.
This is the final result! the decals are from Miliverse - many thanks to Mark (the owner) for his advice and pics!
SU Finito_6 by valerio, su Flickr
SU Finito_9 by valerio, su Flickr
SU Finito_14 by valerio, su Flickr
SU Finito_11 by valerio, su Flickr
SU Finito_10 by valerio, su Flickr
SU Finito_9 by valerio, su Flickr
SU Finito_8 by valerio, su Flickr
SU Finito_7 by valerio, su Flickr
SU Finito_5 by valerio, su Flickr
SU Finito_4 by valerio, su Flickr
SU Finito_3 by valerio, su Flickr
SU Finito_2 by valerio, su Flickr
SU Finito_1 by valerio, su Flickr
SU Finito_15 by valerio, su Flickr
SU Finito_16 by valerio, su Flickr
... and here... a comparison with the 2008 version:
DSC_3424 by valerio, su Flickr
DSC_3429 by valerio, su Flickr
DSC_3420 by valerio, su Flickr
Thanks for your attention!
Cheers from Rome, Italy.
-
35
-
-
On 10/8/2017 at 7:35 AM, Lifeline said:
Beautiful Mirage.... Congratulations.
How much did you cut on the landing gear fork? I bookmarked a tutorial about how to modified Eduard landing gear, but somehow lost it
Cheers,
Mario
Quoting Toniosky, more or less 2 mm to high. Pay attention to the main landing gear, you also have to "trim" it to obtain the correct balance.
-
1
-


Anything, Anywhere, Anytime, Professionally - Air America. Pilatus PC-6C/H2 Roden 1/48
in Ready for Inspection - Aircraft
Posted
This is one of the best appreciation I ever received. You catched my scale model philosofy, thank you so much!