


D1fuN0
-
Posts
0 -
Joined
-
Last visited
-
Days Won
1
Content Type
Events
Profiles
Forums
Media Demo
Posts posted by D1fuN0
-
-
Good Afternoon Chaps

Onward's and upwards
Couple of things I remember from the last one of these I built, was that the interior frame was too tall and the round object on the rear deck was too far forward
So rather than go thru all that crap again, I've cut down the top of the supports and that should do for that, plus I sliced off the round fitting off the rear deck
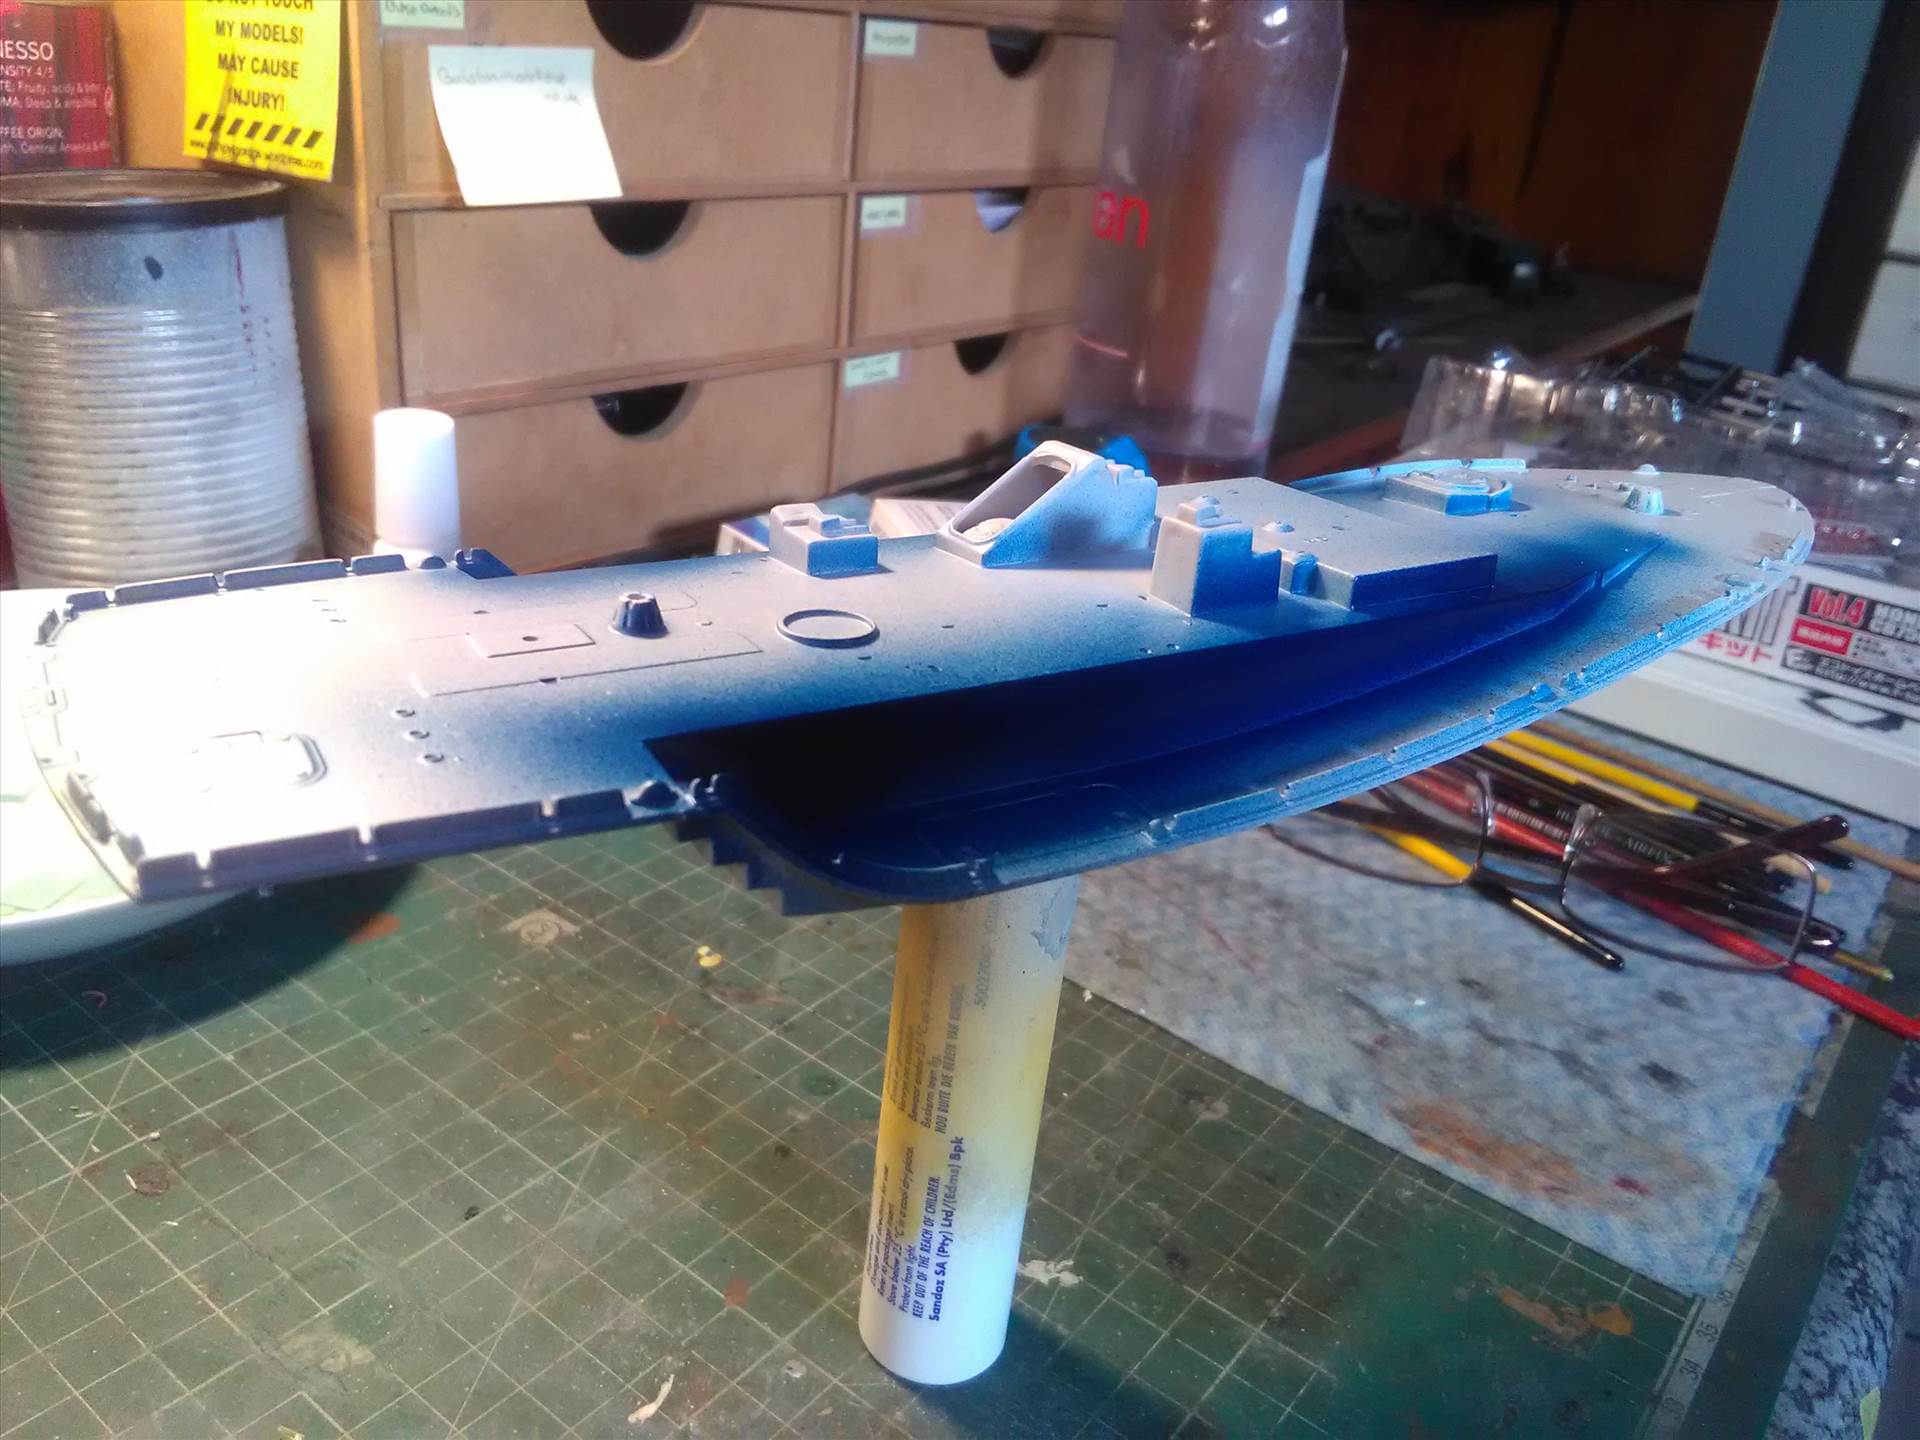
Deck taped off and the white bits sprayed Flat White. I really hate hand painting white, so it was worth the effort of an hours masking for 5 minutes of spraying
. It was at this point that I realised that I made a bit of a doosh move on the deck. I sprayed the side sections blue and then all the associated masking when in fact it doesn't need painting as the cabin sides extend that far down
Most of the interior parts have now been base coated and ready for paint.
Just an observation. I don't build many Airfix kits, 32nd cars and 48th armour being basically it, but I'm not a big fan of how Airfix do the runners. Its like a treasure hunt every time you need to look for a piece. I like the idea of numbered or lettered runners, with parts 1-xxx on them, and marked as such in the instructions. It just makes things a little easier. Just my opinion.
Right then, waiting for stuff to dry.... (bouncy bouncy bouncy bouncy)
Mad Steve
-
 2
2
-
-
Morning Chaps
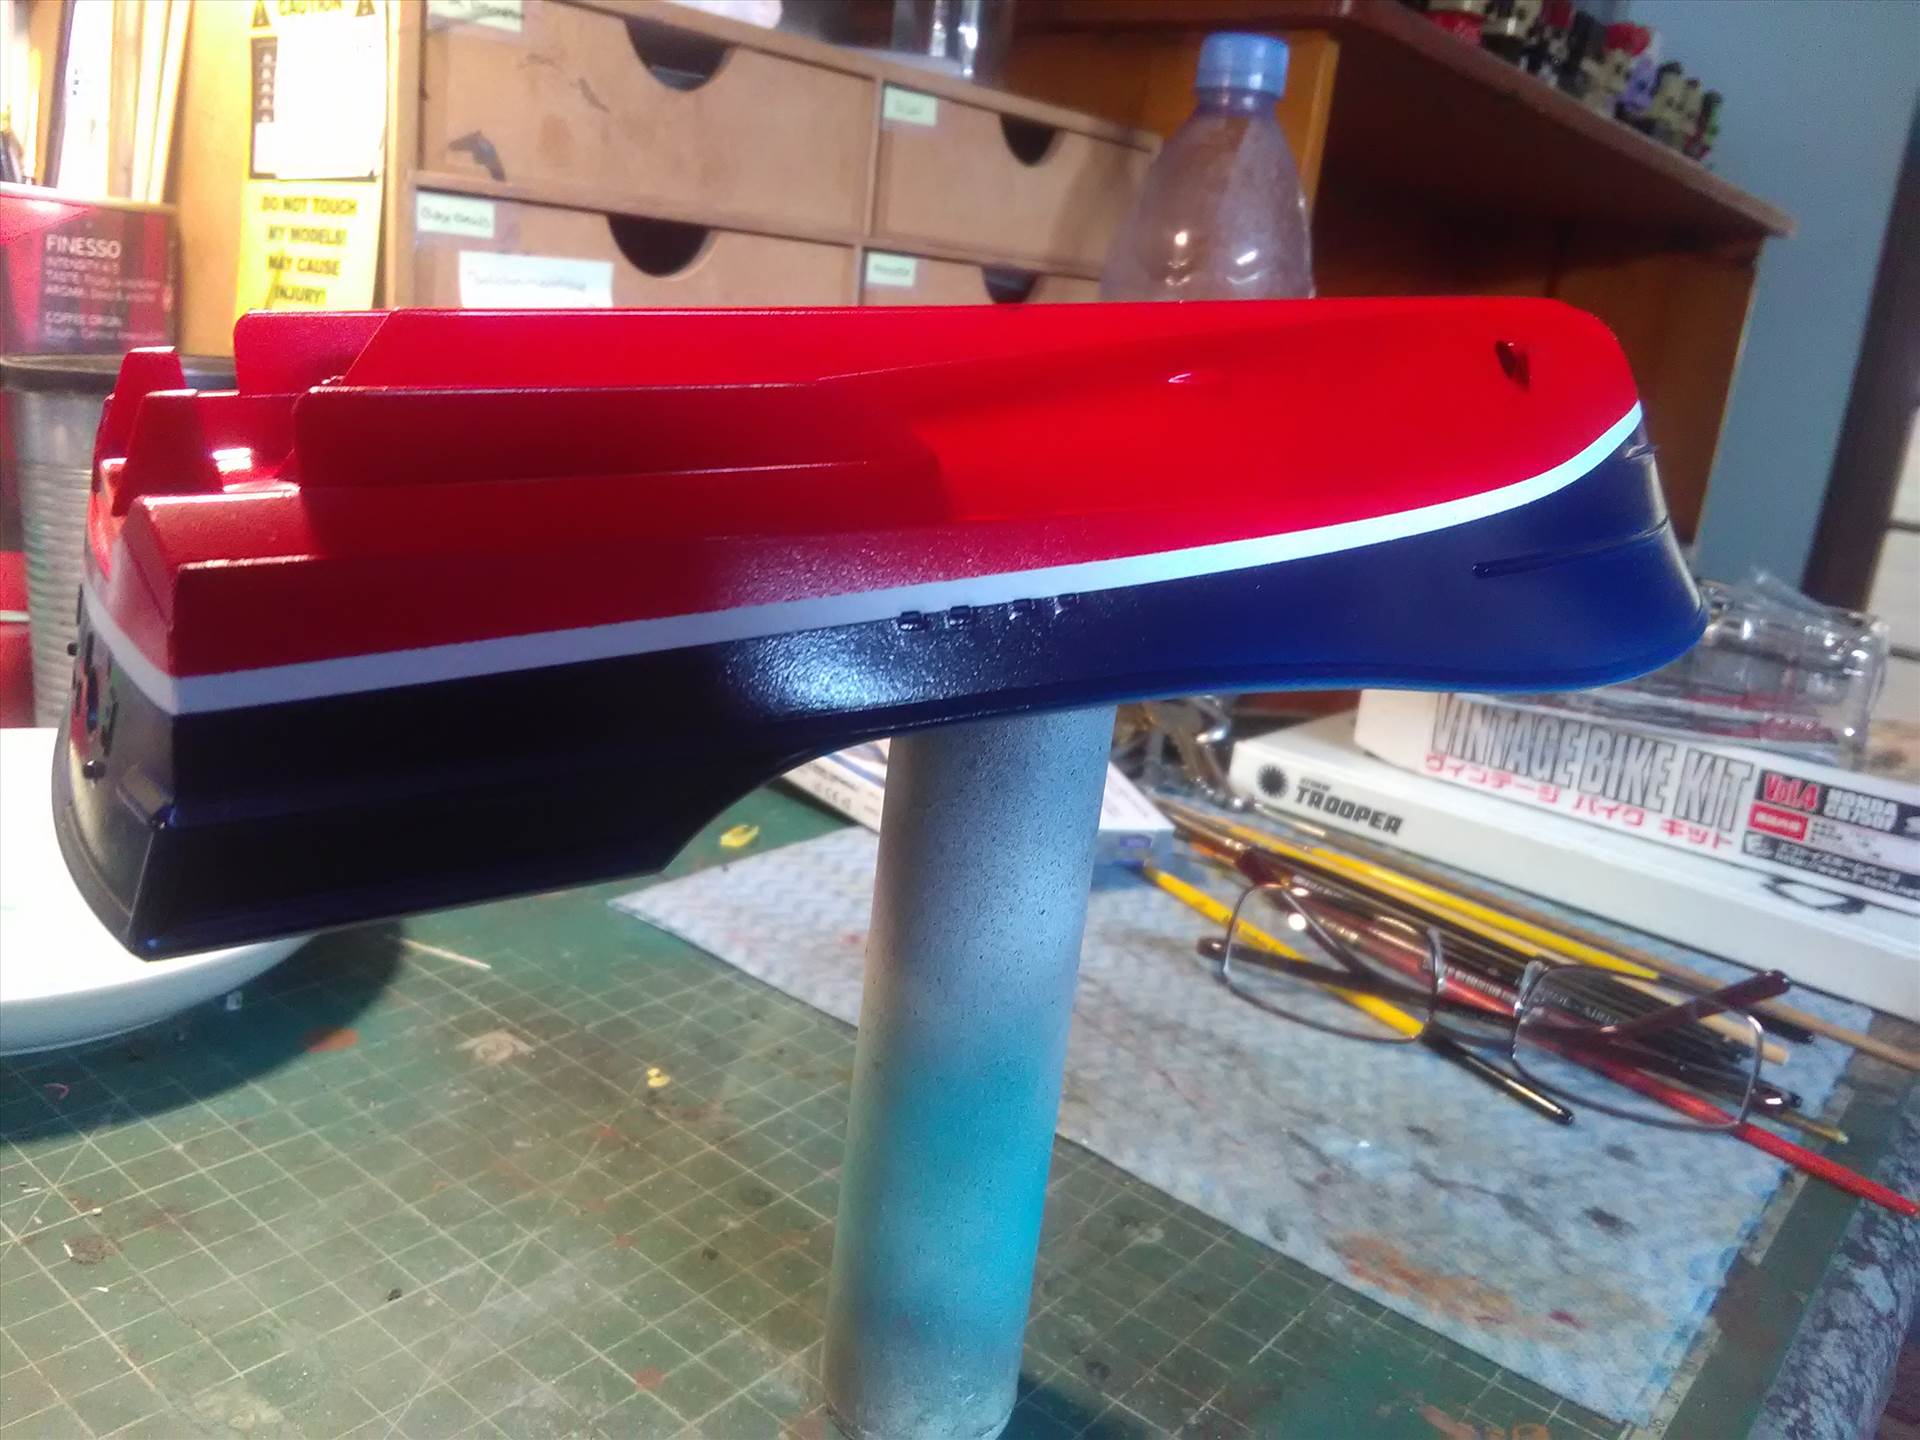
Right then, I've sprayed the Red (X7), the Blue (X3), That's all come out nicely and thankfully I didn't have any paint creeping over onto the white waterline. I think the line is a tad wide maybe a mm or two?
That line is very frustrating because it appears to bend because of the shape of the hull
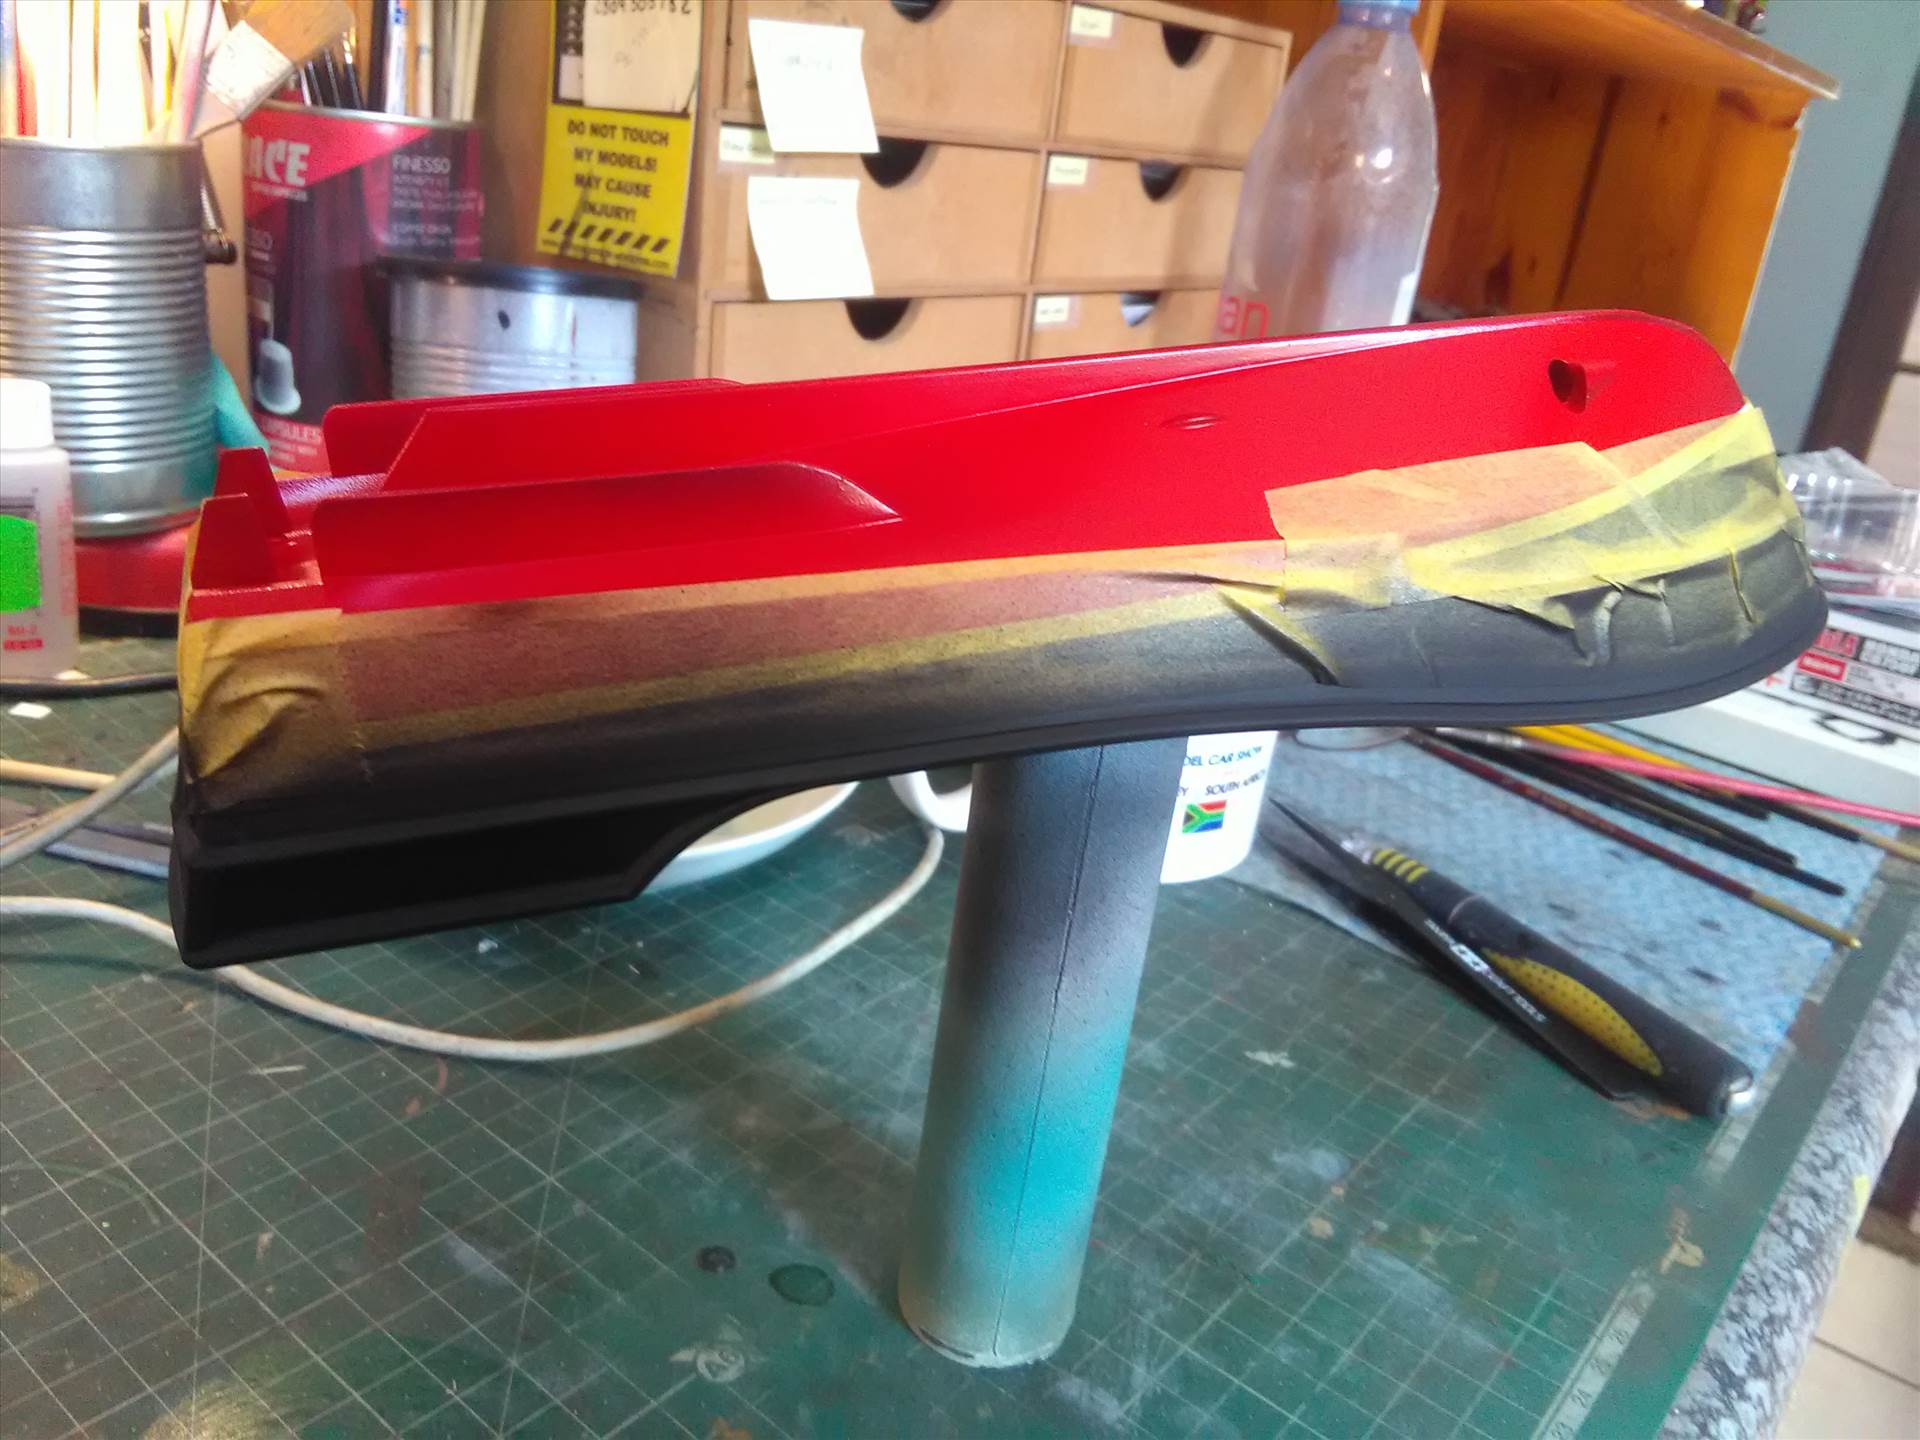
(well that's my excuse) A coat of Clear was sprayed over it and when dry, I masked off the top of the hull to spray the black bits
At the same time, the deck was first sprayed Blue (X3)
And then the same process was followed with Clear, after which it was taped off and the deck was sprayed with Dark Sea Grey (XF54), its about the closest I could get to Humbrol 27.
While all that was drying, I painted the bits for the rear of the boat (I'm assuming they are some kind of trim vanes?)
That's it for now, time to move onto the interior (yay!) all the bits have been cleaned up and ready for spraying
Cheers
-
5
-
-
Afternoon Chaps
Some new ones to squuueeeeeeeeeeze into the cupboard
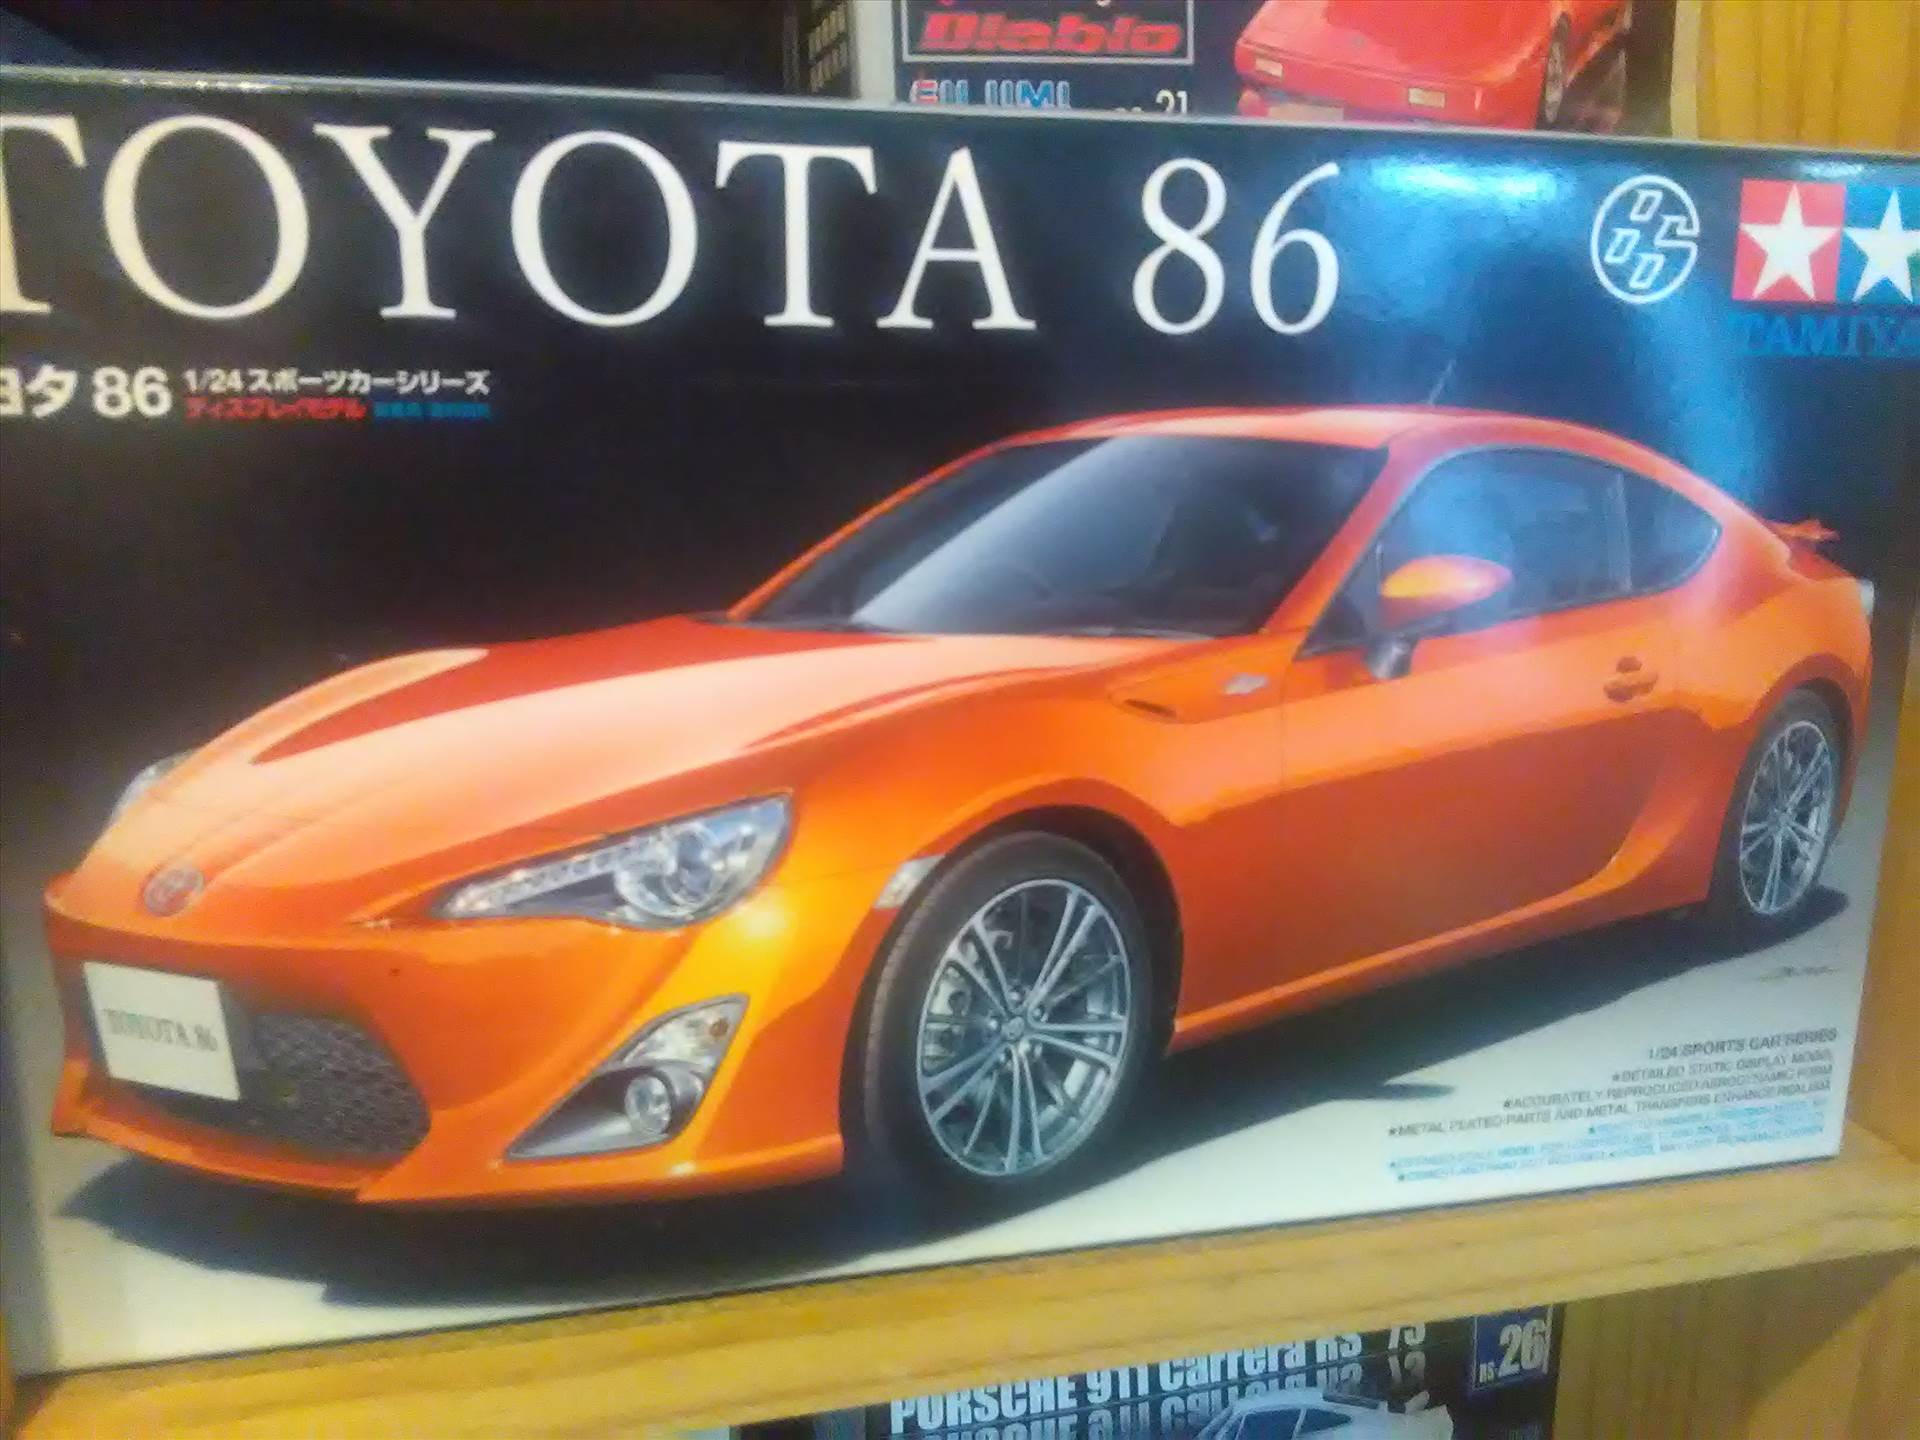
Toyota 86. Like the car, just haven't gotten to buying the kit, found one at a nice price
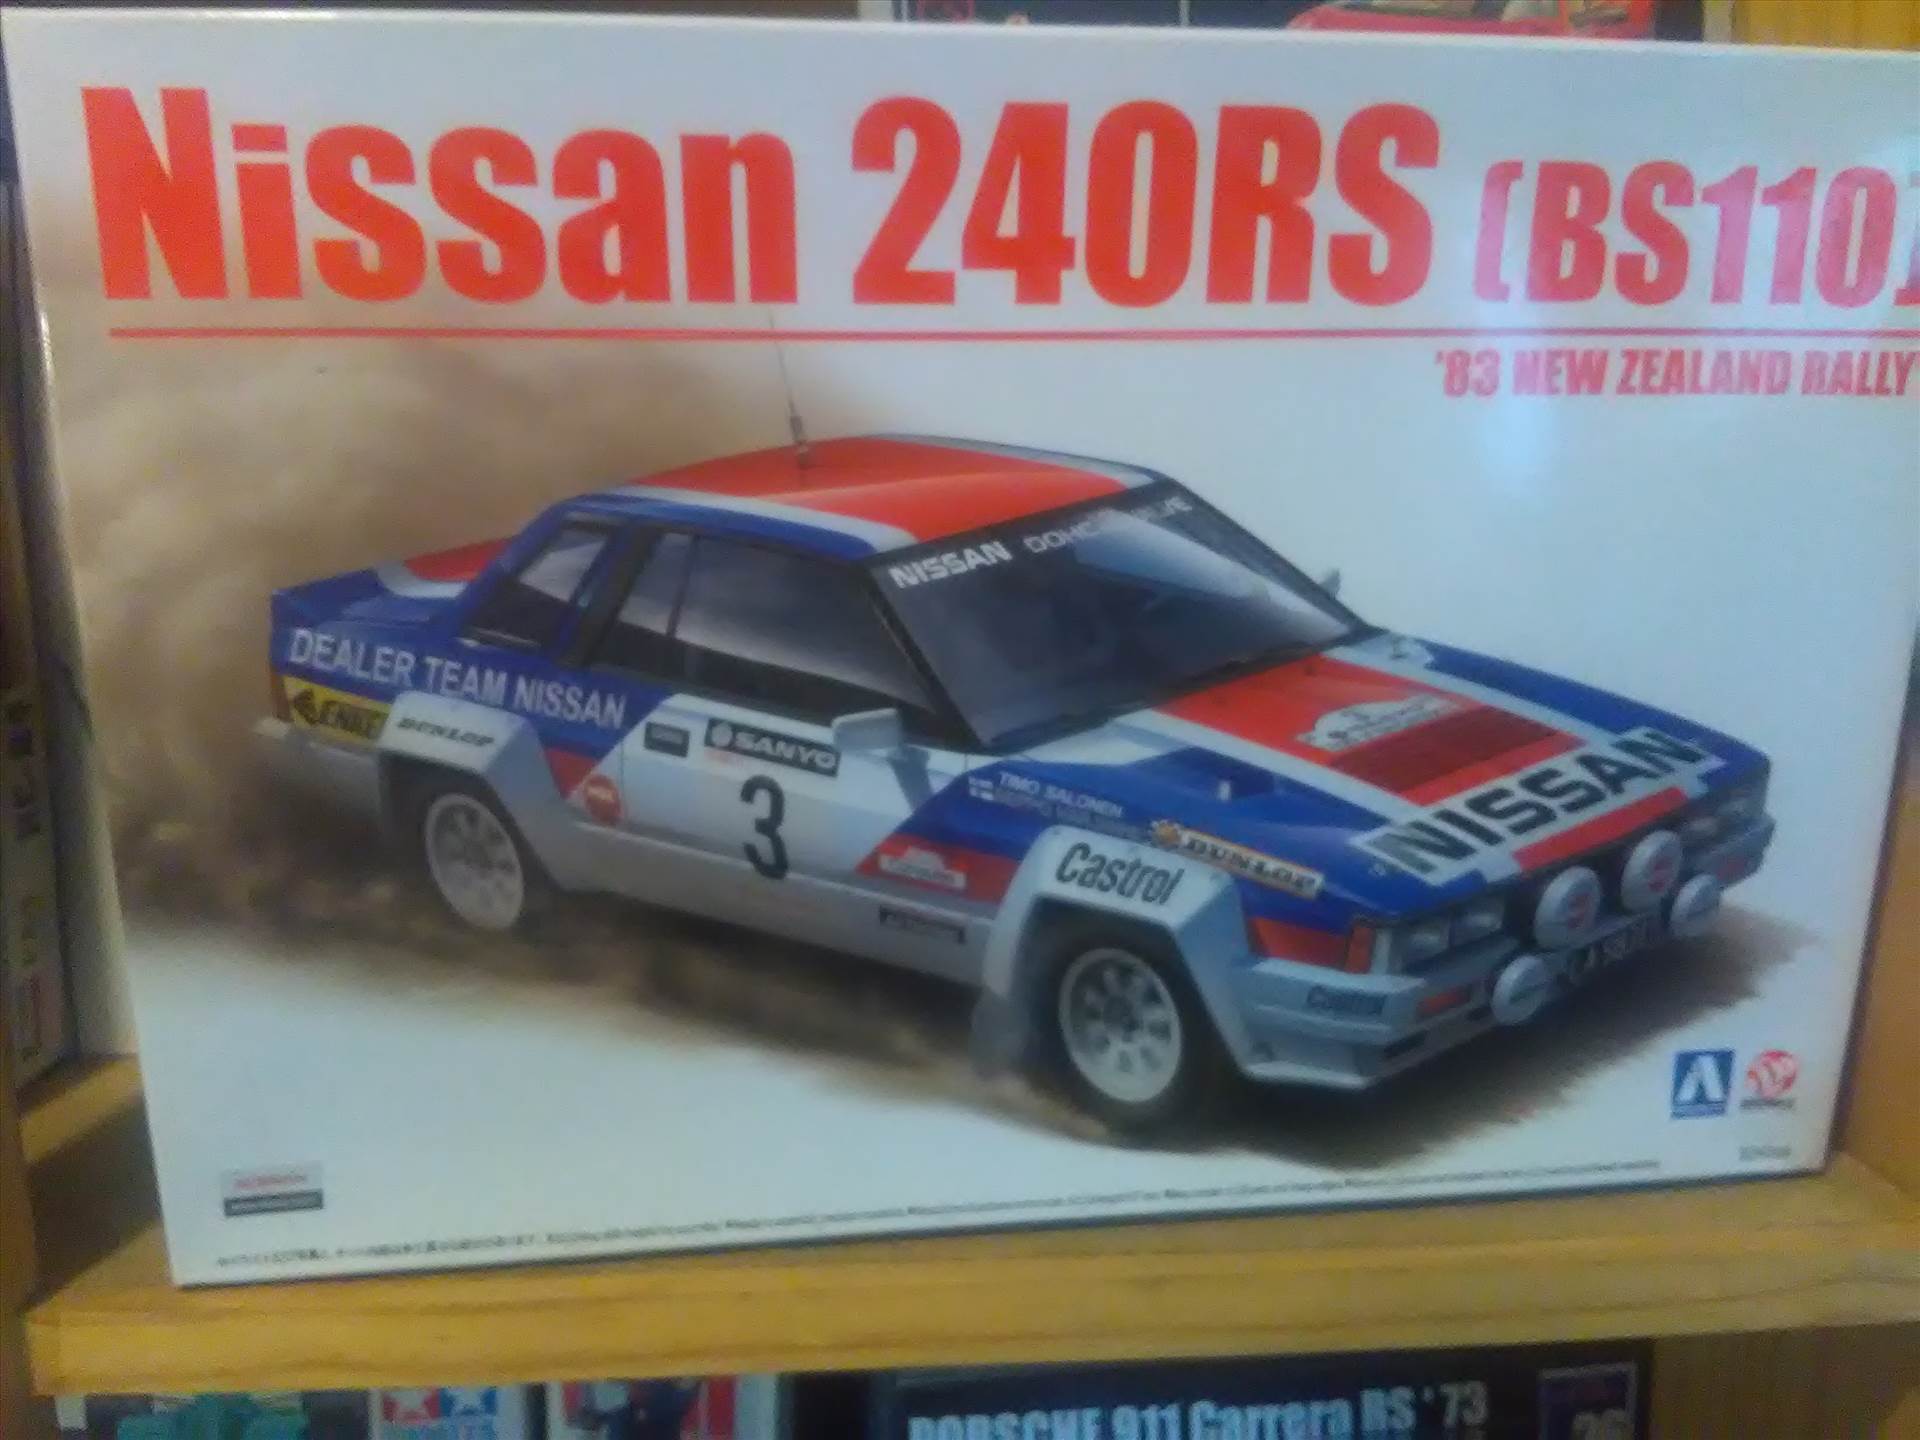
Beemax Toyota 240RS BS110 + Detail up Set
I recently got the Volvo 240 Turbo from Beemax and thought it might be lonely boarding in the cupboard all by itself
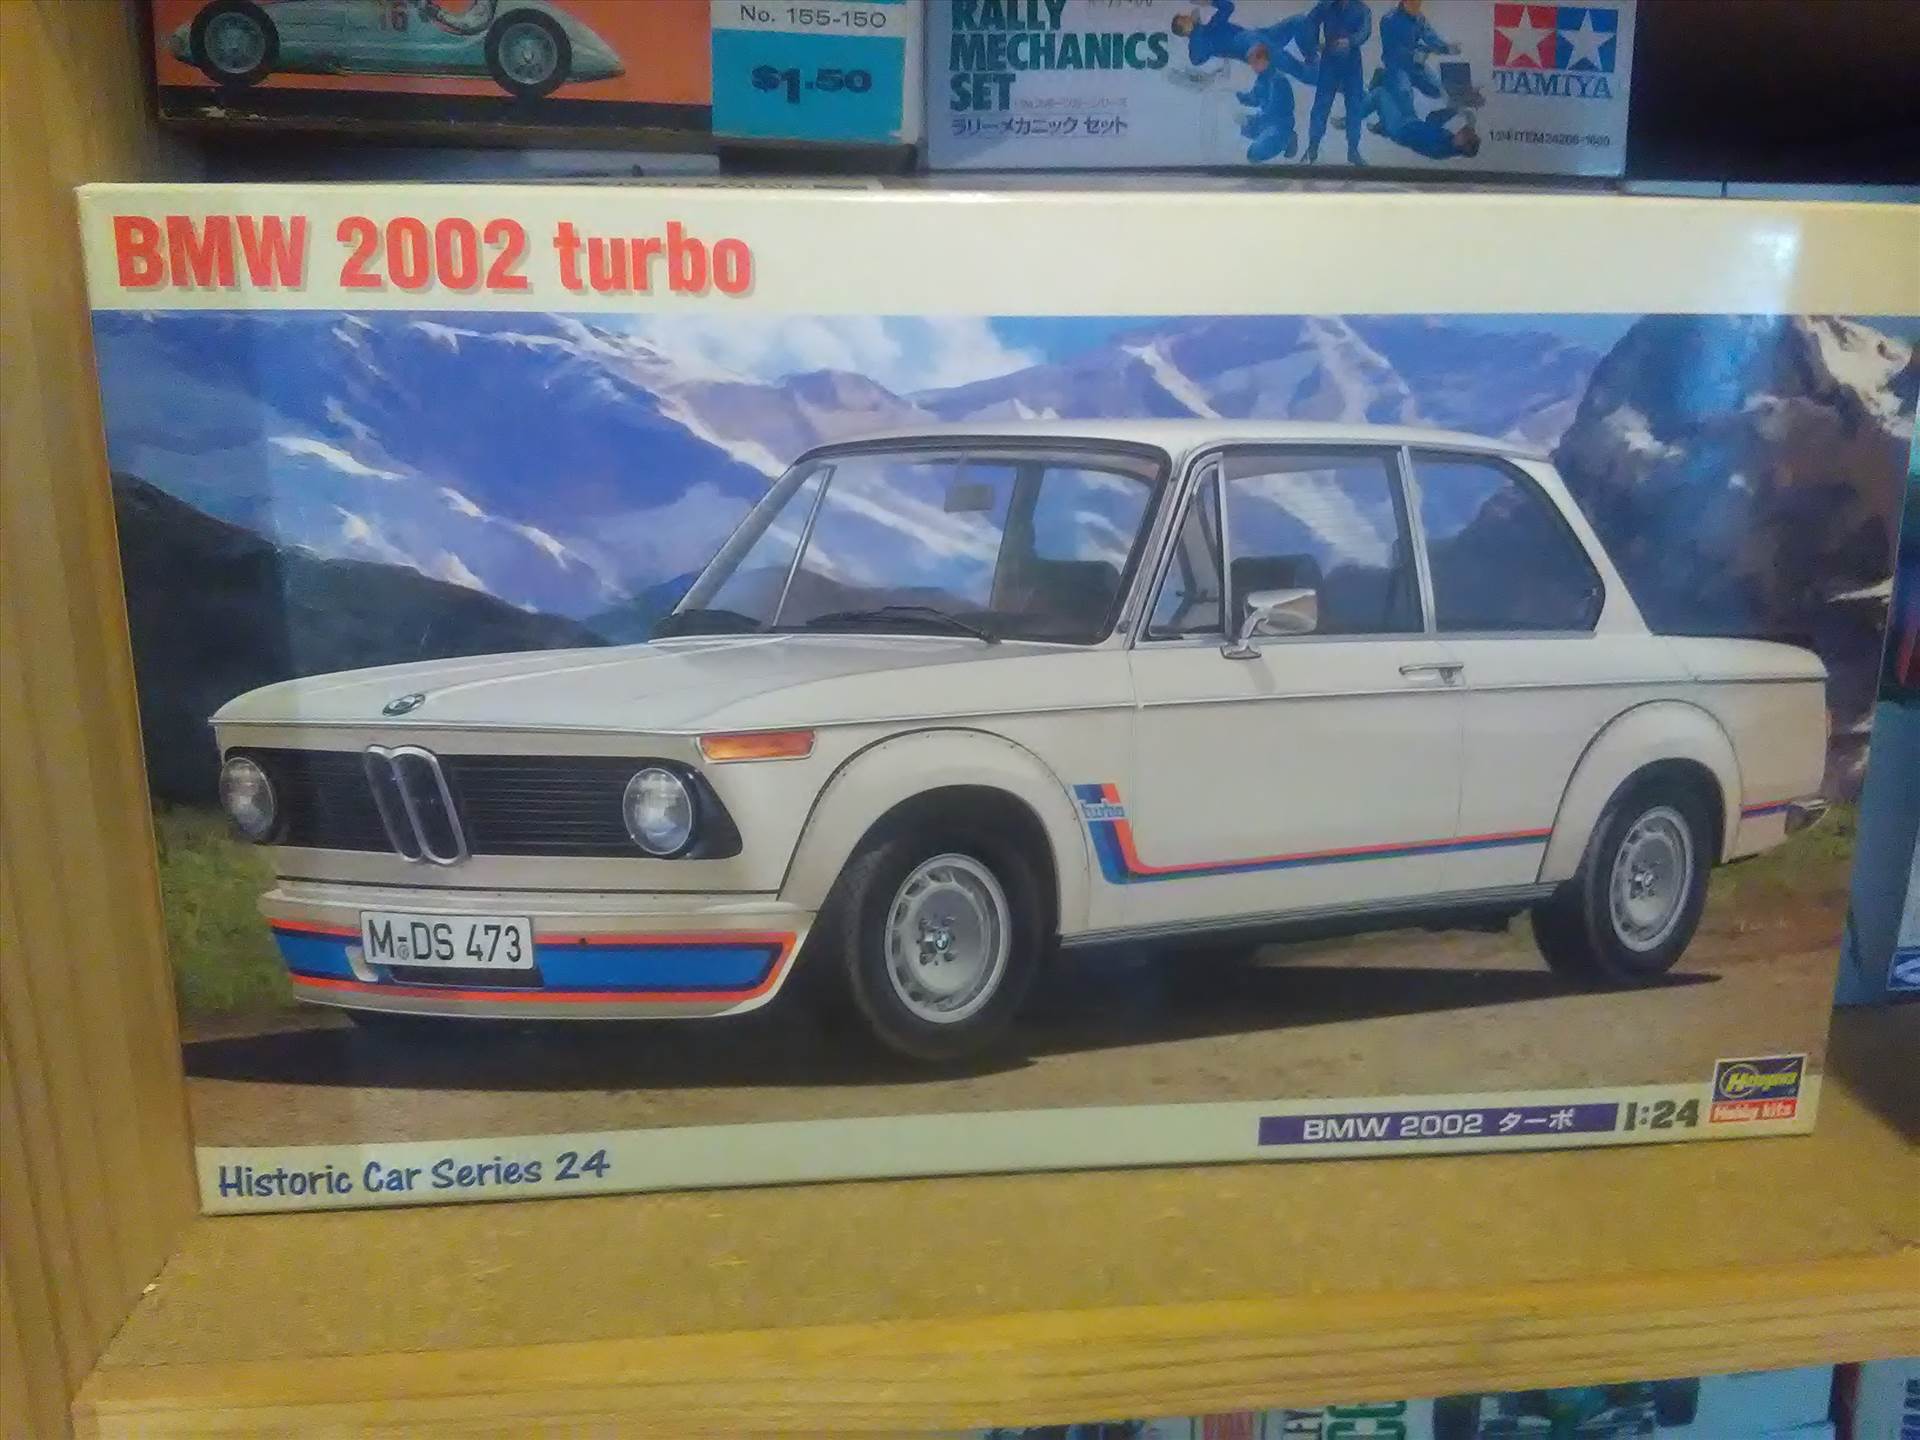
Next we have the BMW 2002 Turbo from Hasegawa....
You just cant not buy a 2002 Turbo, I mean, it'd just be rude not too
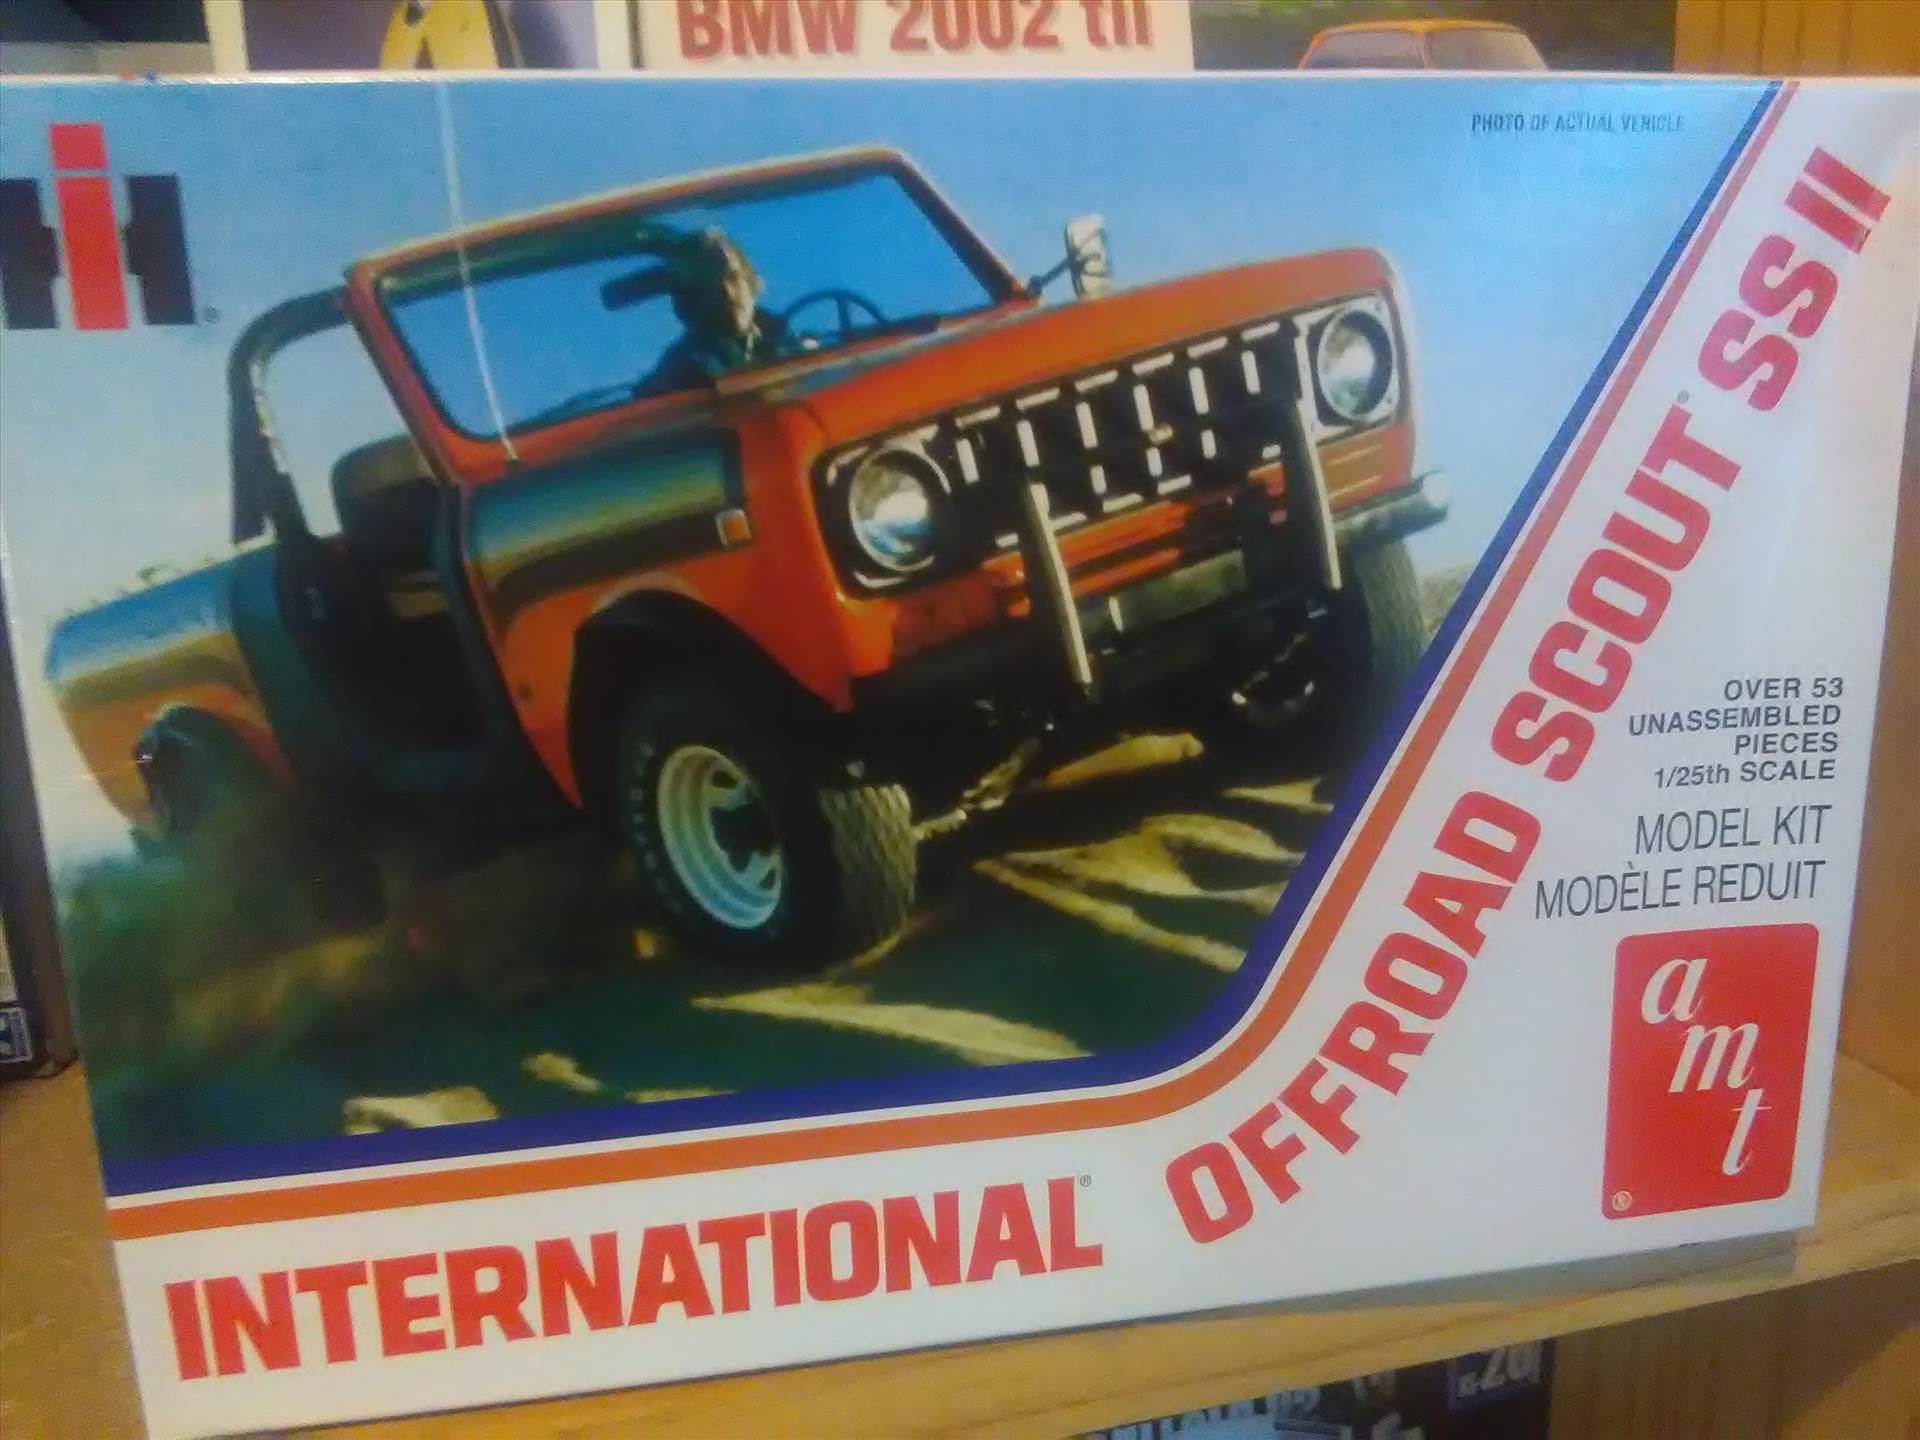
And finally, quite a big moment for me really...
I have been after one of these kits for nigh on 15 years. Its been floating around the top of the wants list for an age, and Round 2 has just released them.
I know its not much of a kit, but it represents a win by knocking one of the impossible list
That's it, now off to do some creative packing in the cupboard...
Mad Steve
-
3
-
-
Afternoon Chaps
Well I can honestly say that I have never ventured into these waters before (see what I did there
)
Yes, I know, my complete ignorance of all things nautical probably wont make me a good ship Modeler, but there is method behind my floaty thing madness
(Its not actually the first ship I've built. As a kid I built the Airfix HMS Fearless, Matchbox HMS Tiger, and one of the Novo Ships but cant remember which one, but basically they were all Saturday afternoon stick togethers and weren't painted.)
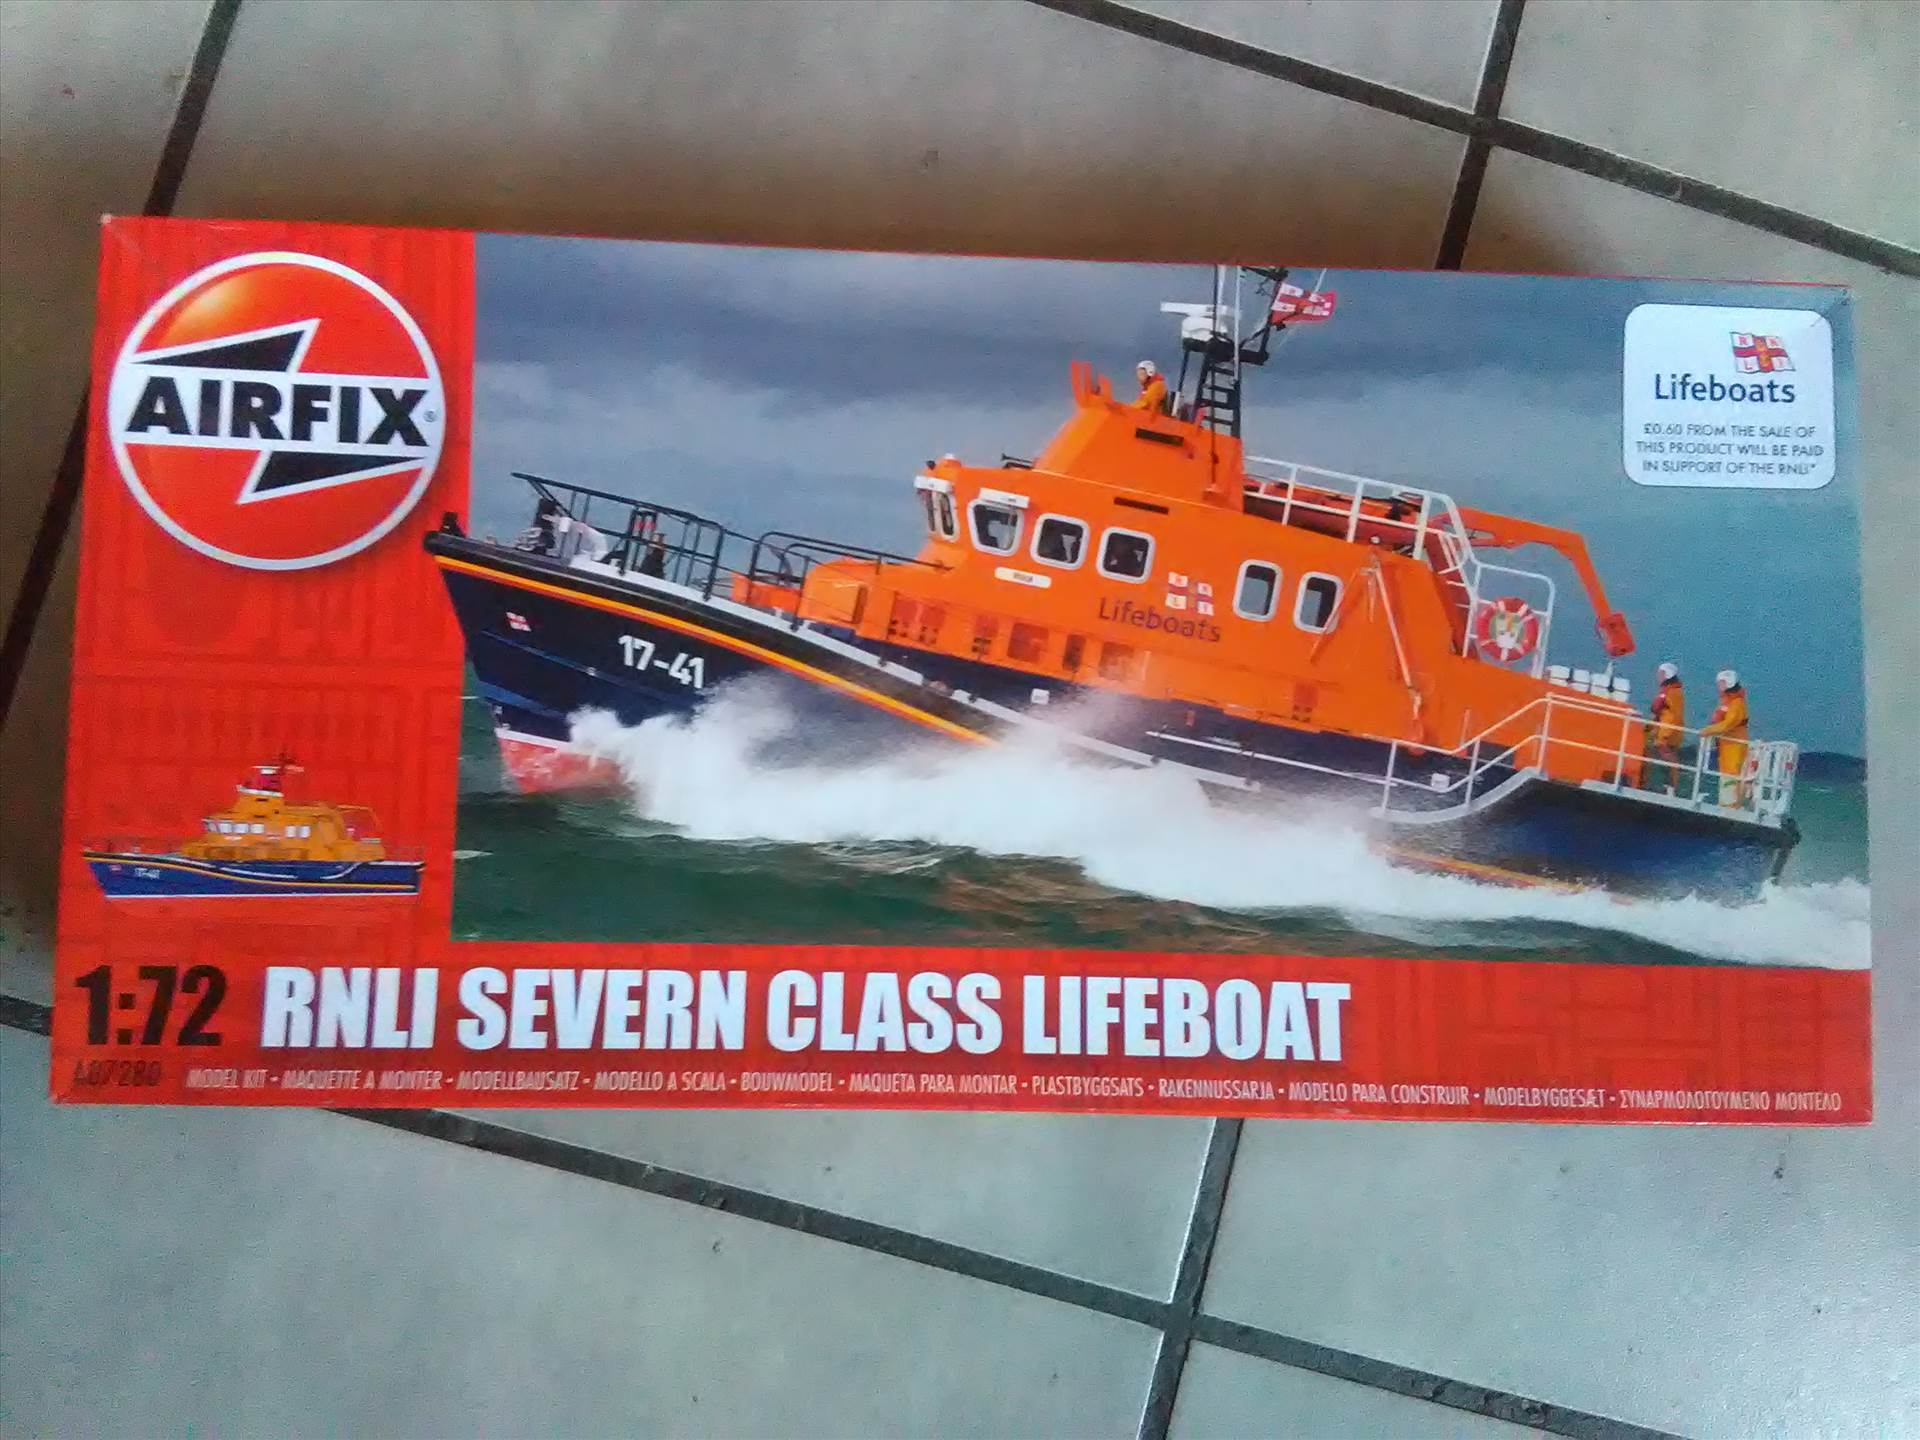
When the Severn Class Lifeboat was released ,I literally was the first person in the shop to buy one (buying one, turns out, was a mistake)
My Late Grandfather was big into building large scale RC Lifeboats that you may have seen at a couple of shows years ago, and I thought, Id love to build one in memory of him. This was the time before I had an airbrush and, well honesty, I made a complete pigs ear of it, not finishing it and eventually throwing it away in a very unhappy state. No problem I though, I'll just get another one and try again (Riiiiight). Well its been a good couple of years since that day, and I actually got one yesterday from a good friend
I fully intend not to make a pigs ear of this one.
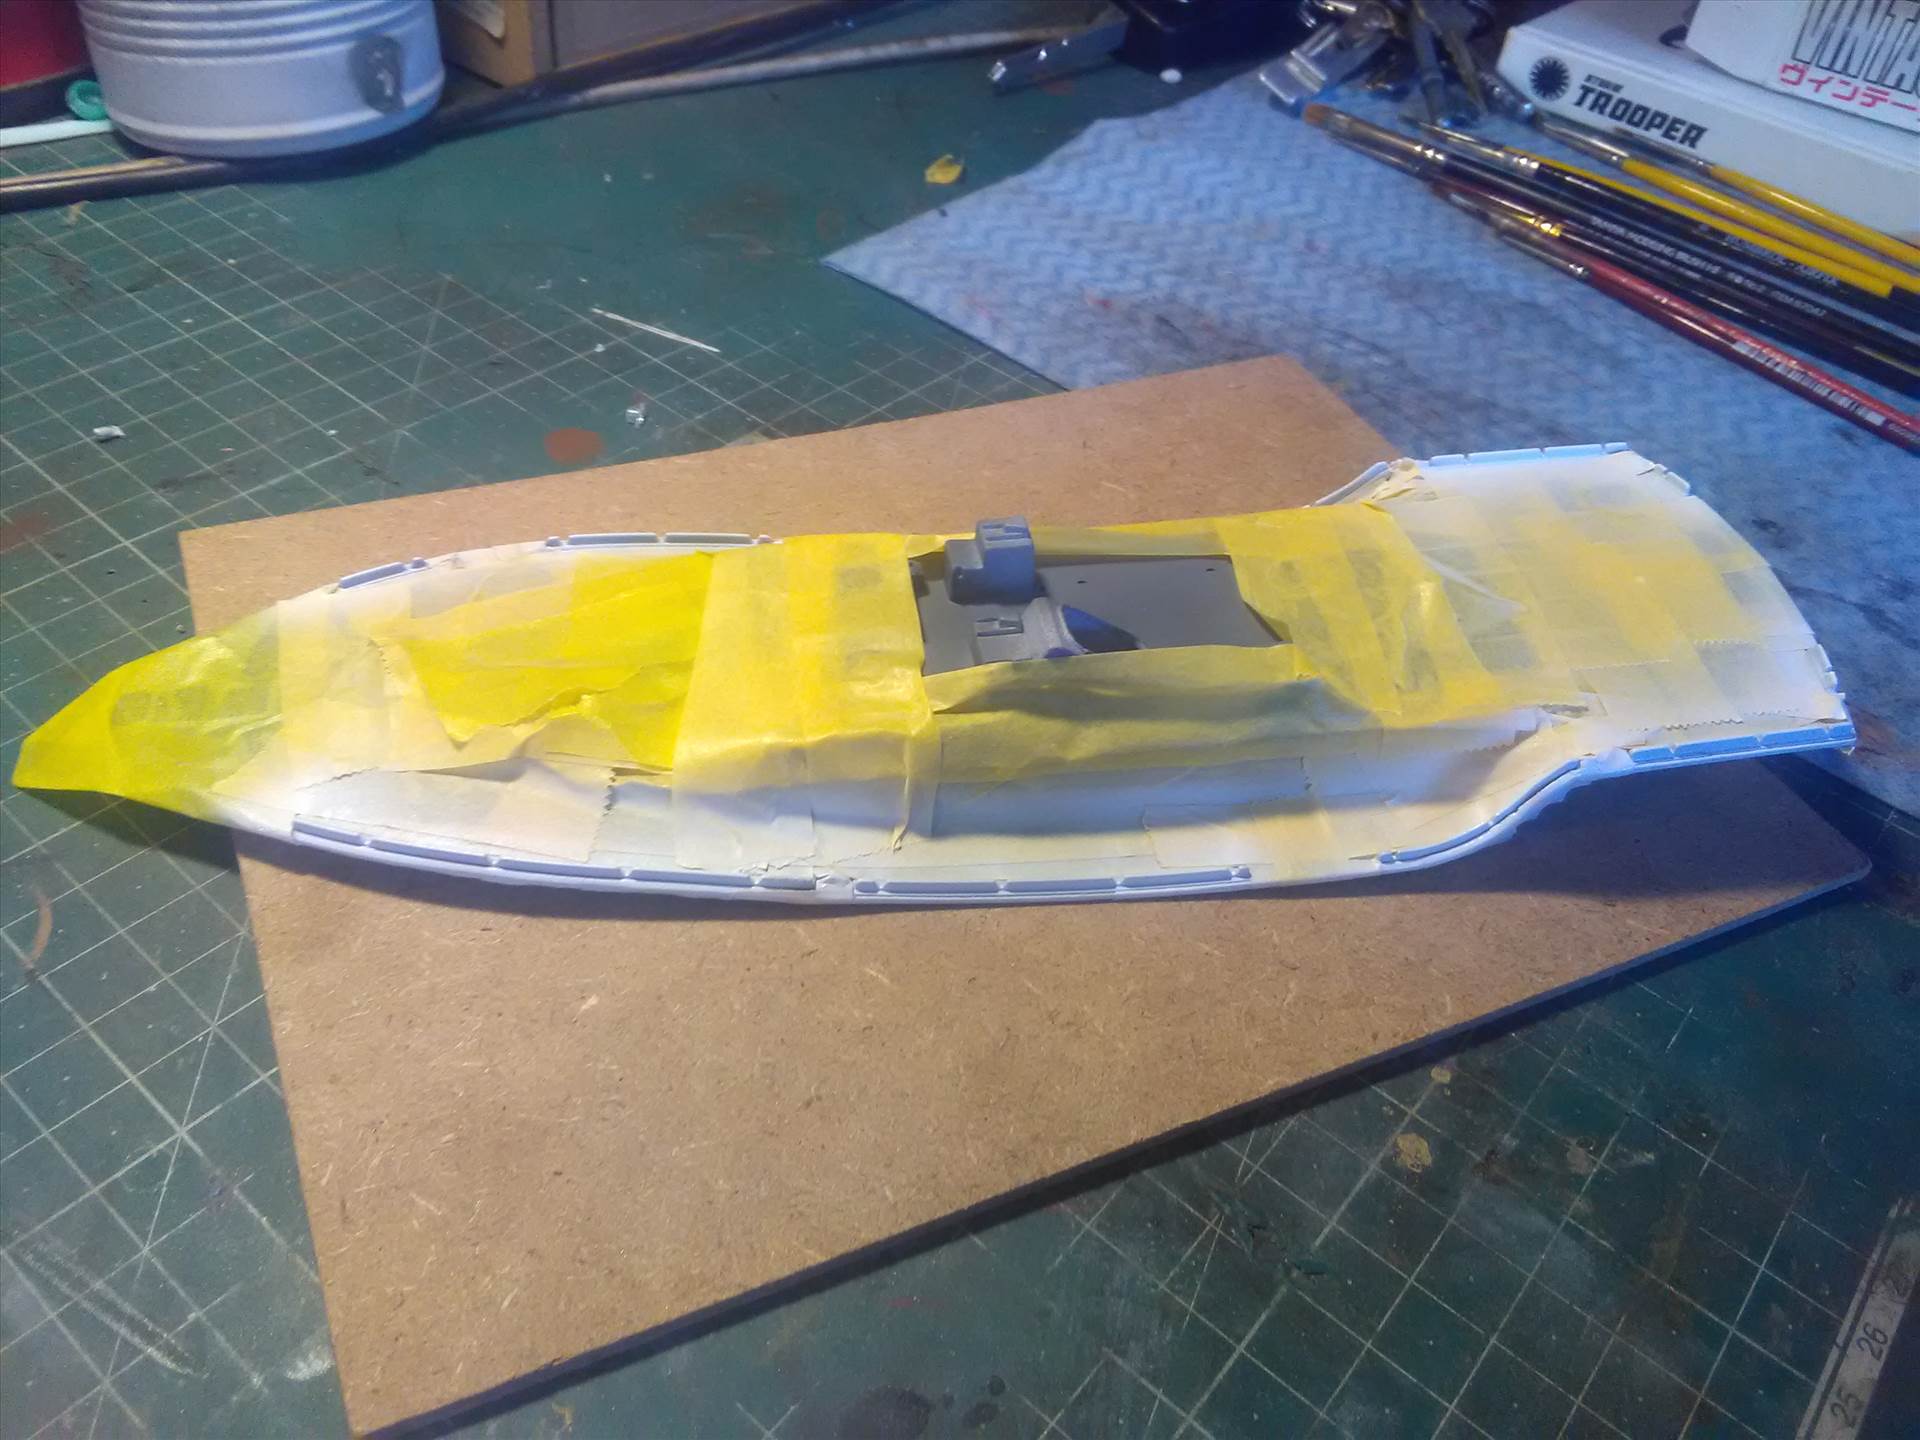
Since the wife has been away at a Spa all today with No1 daughter, I've had a good few hours to play with it.
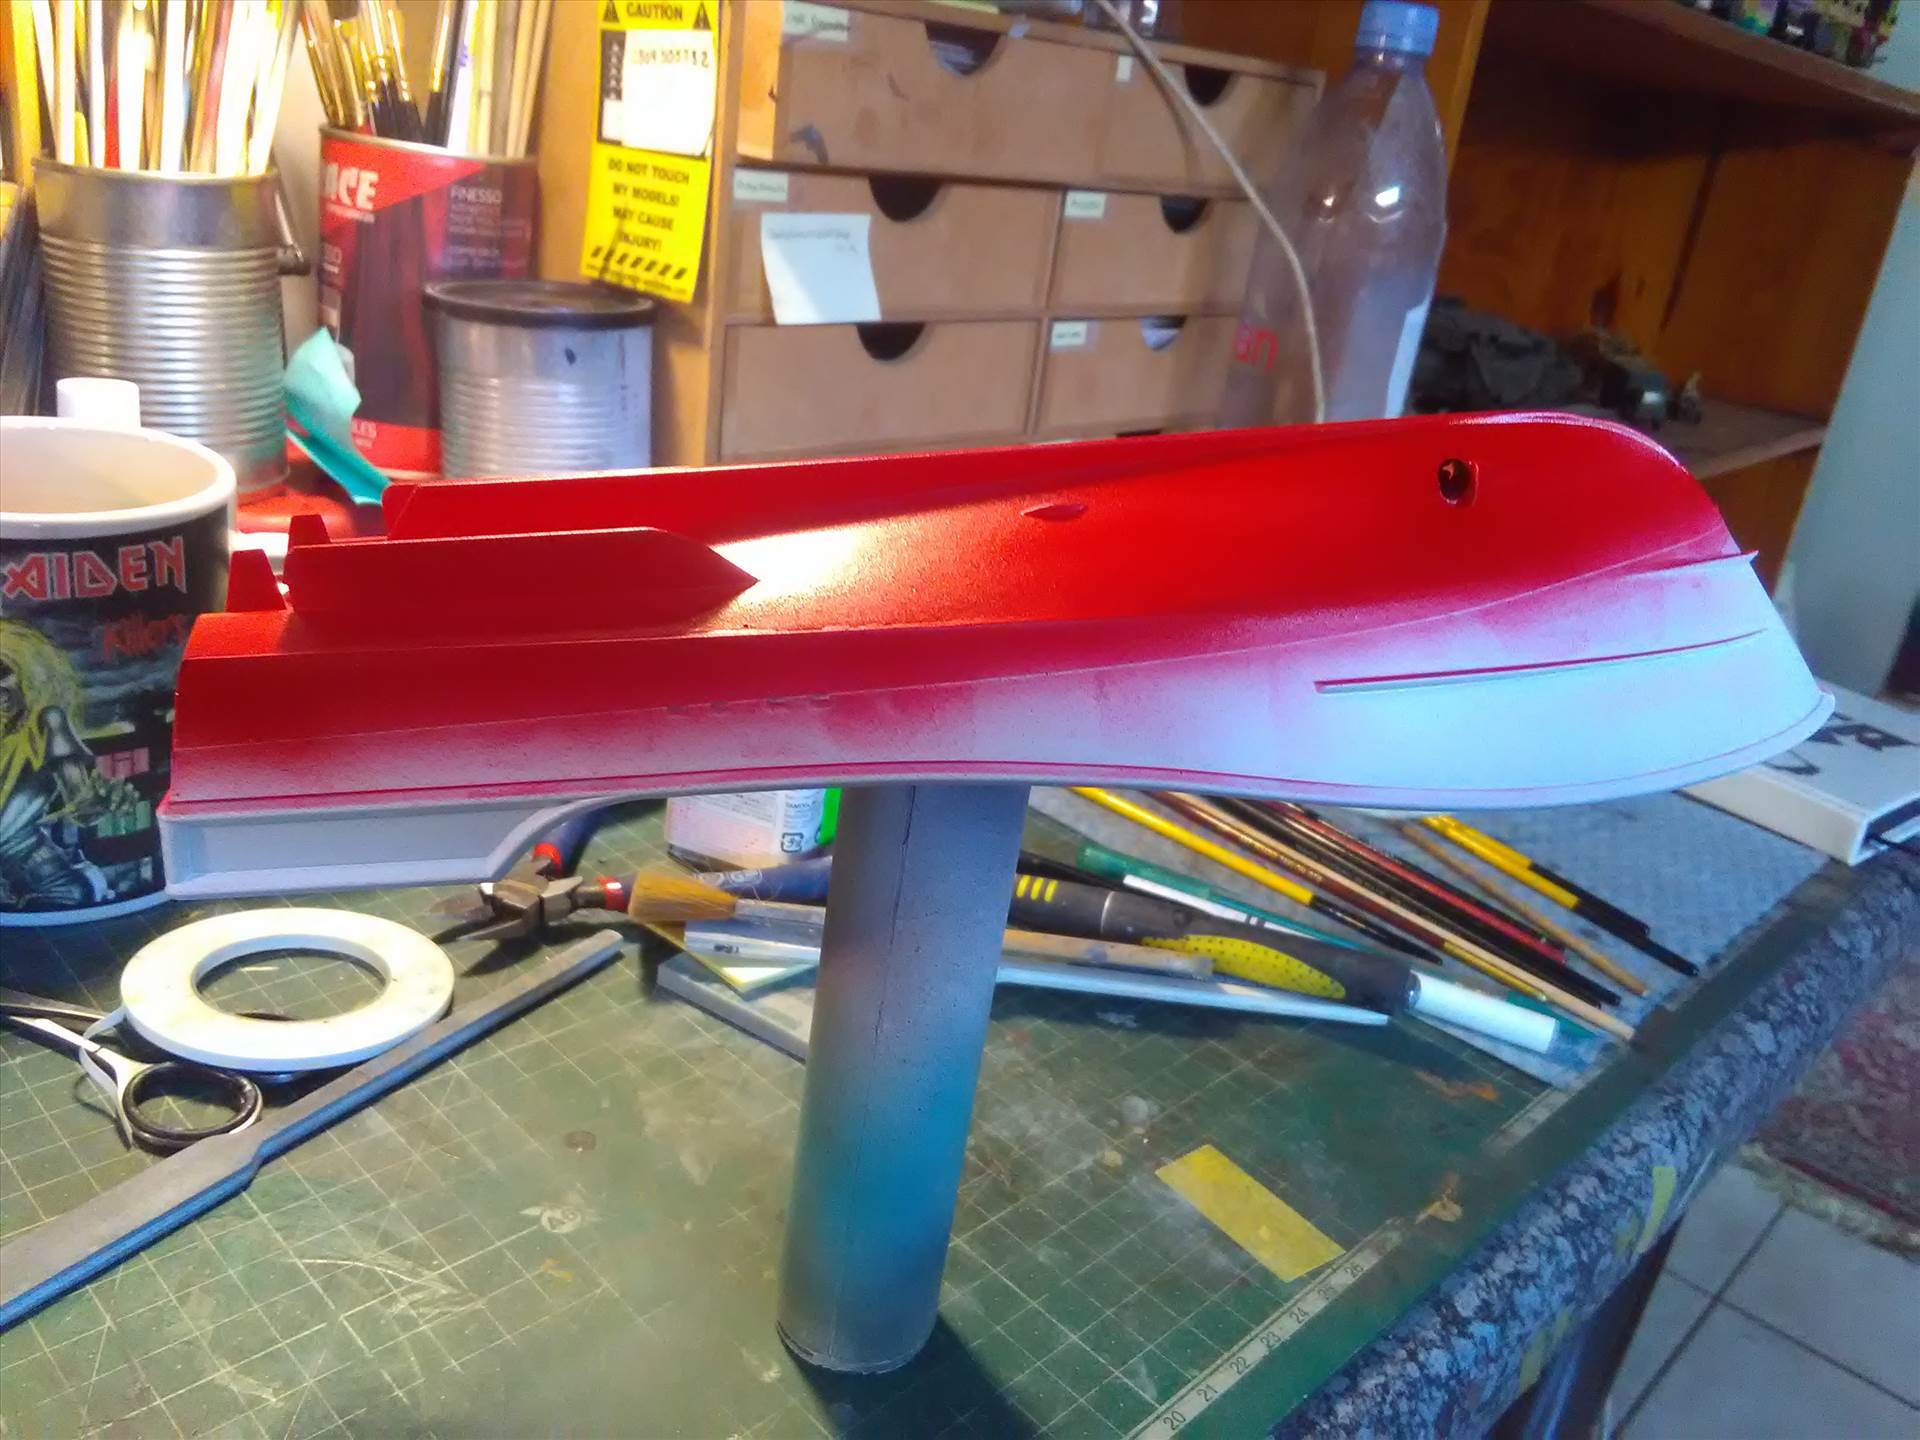
Yesterday afternoon I assembled the hull and was mildly not amused with the joint between the lower and upper hulls. So out came the Tamiya Putty and that was filled and left to dry over night. First thing this morning I sanded that off and got some primer on and this afternoon I got some paint on.
Used some Tamiya bendy tape to create the white line and sprayed the bottom of the hull X-7 Gloss Red. Ill be using Tamiya acrylics throughout as I gave up on Humbrol paints years ago.
One thing I've noticed on a lot of these models is that they are finished very SHINY!. Whilst there is nothing wrong with that, I prefer to do this in a semi gloss finish, with maybe a bit of mild weathering. I shall be displaying this full hull as I seriously suck at making sea
Righto then, there will be more soon and any comments and helps will be greatly appreciated
-
11
-
-
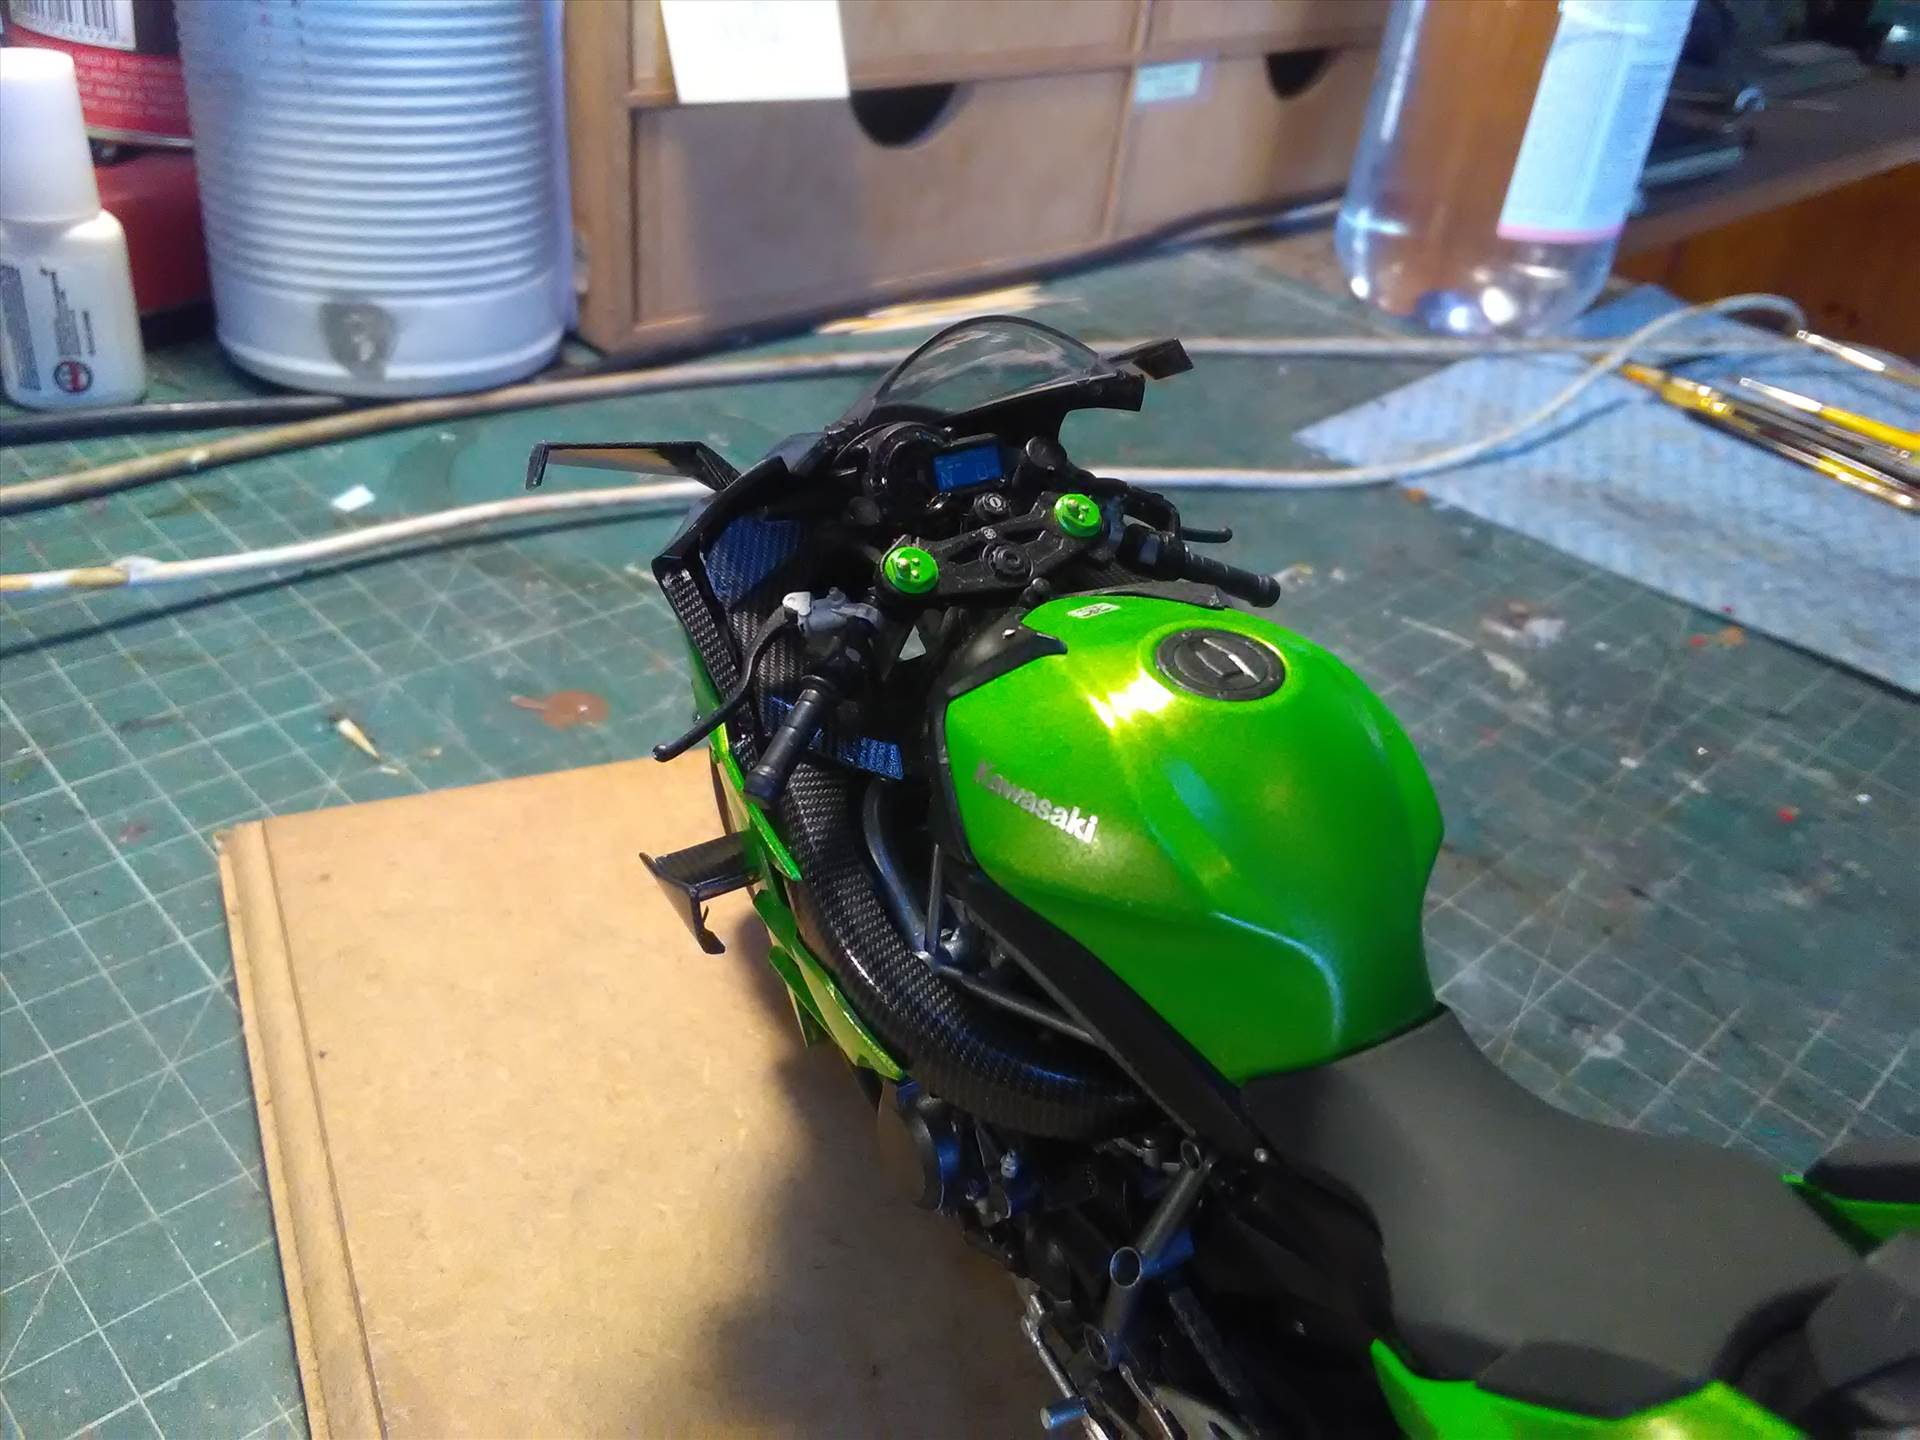
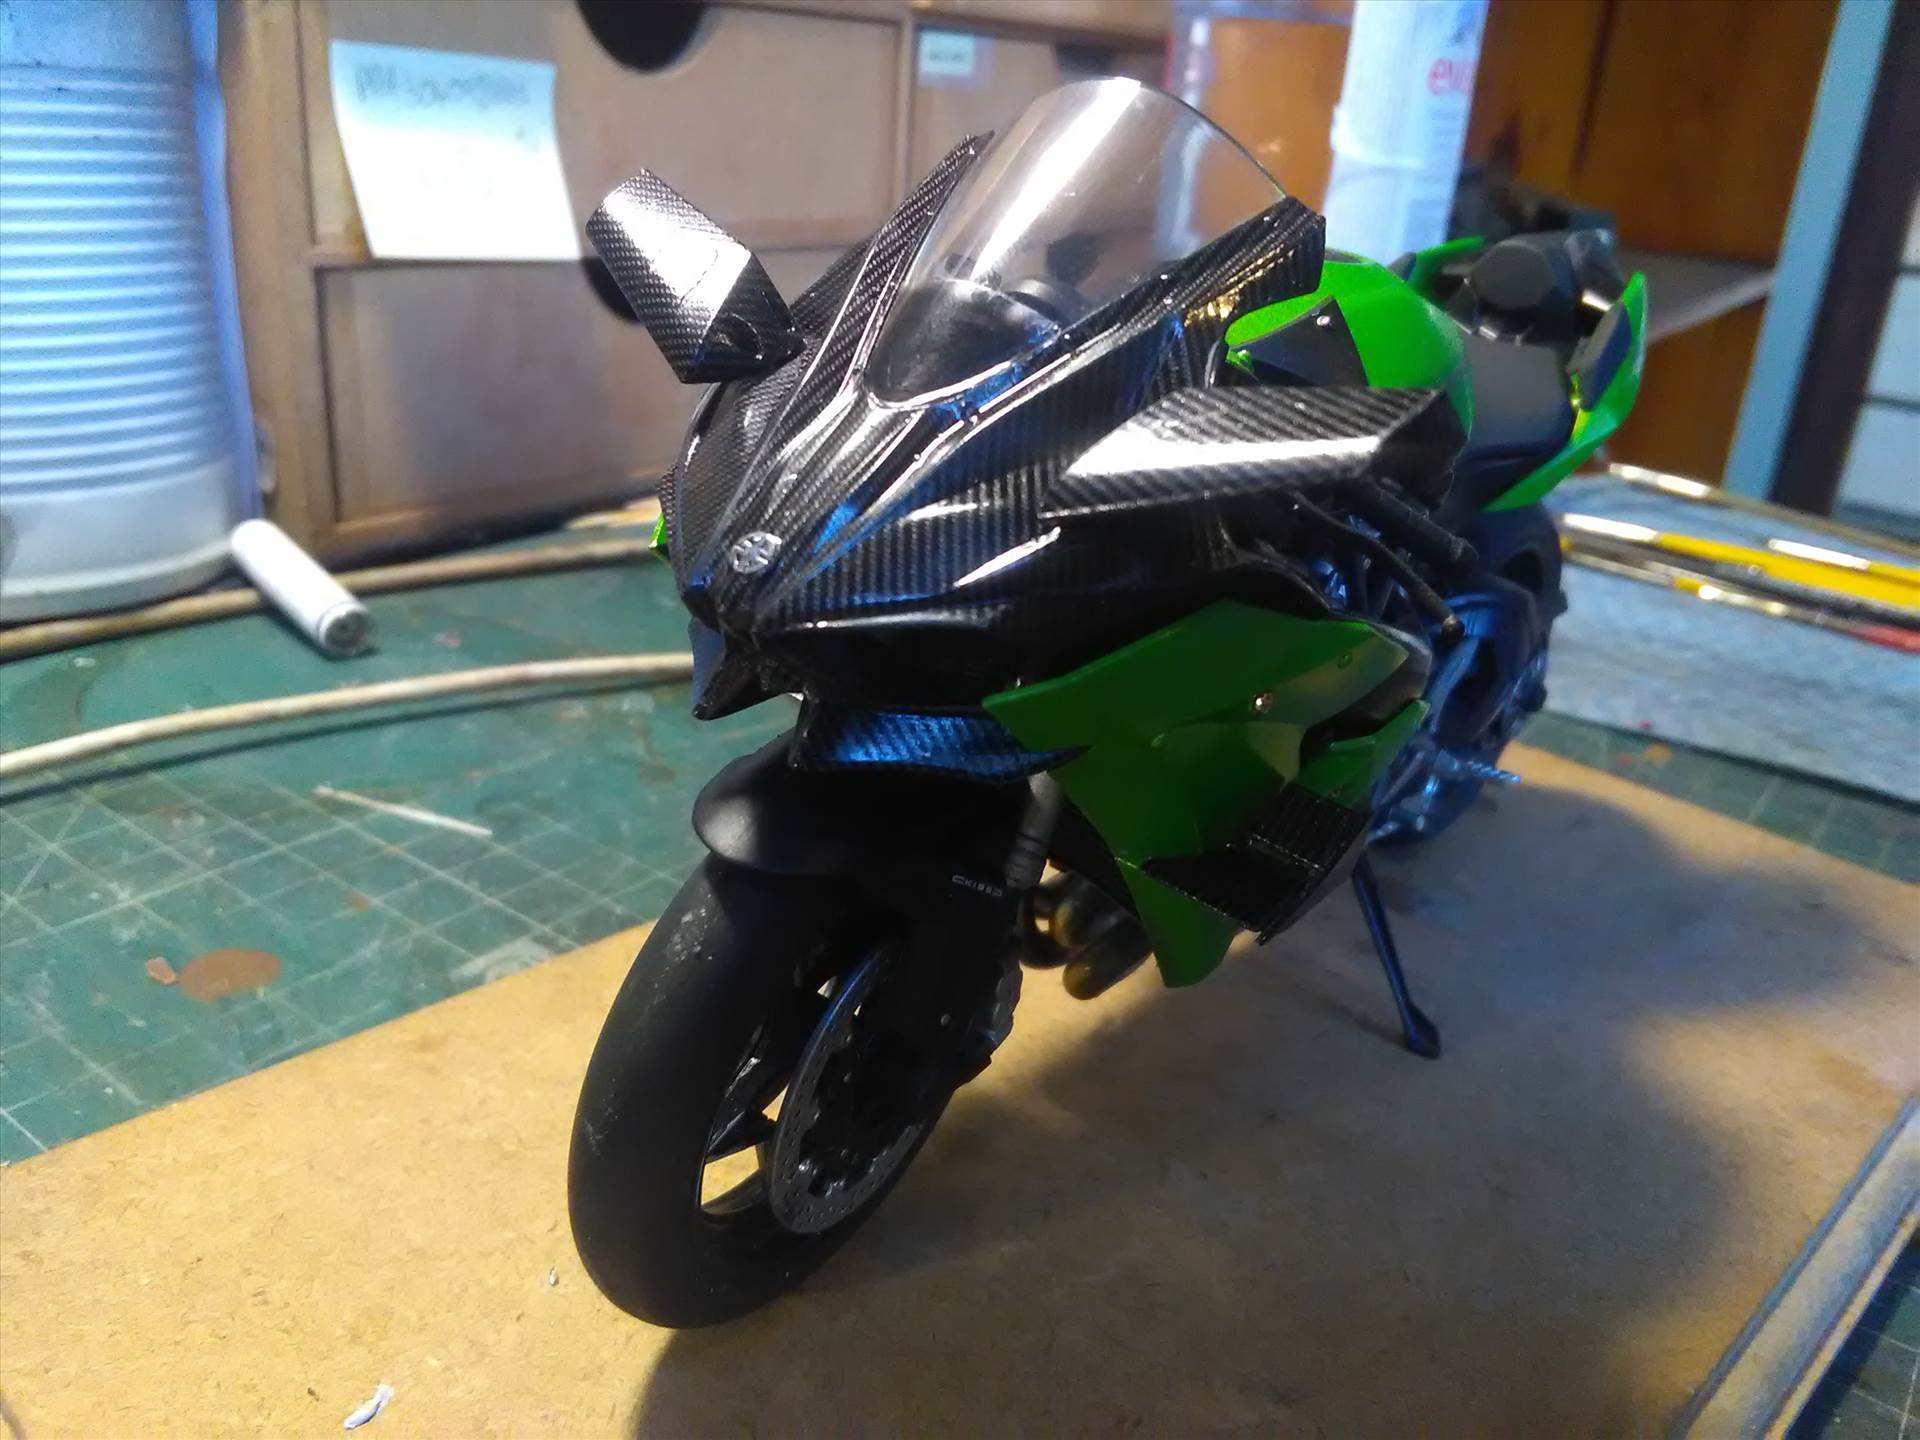
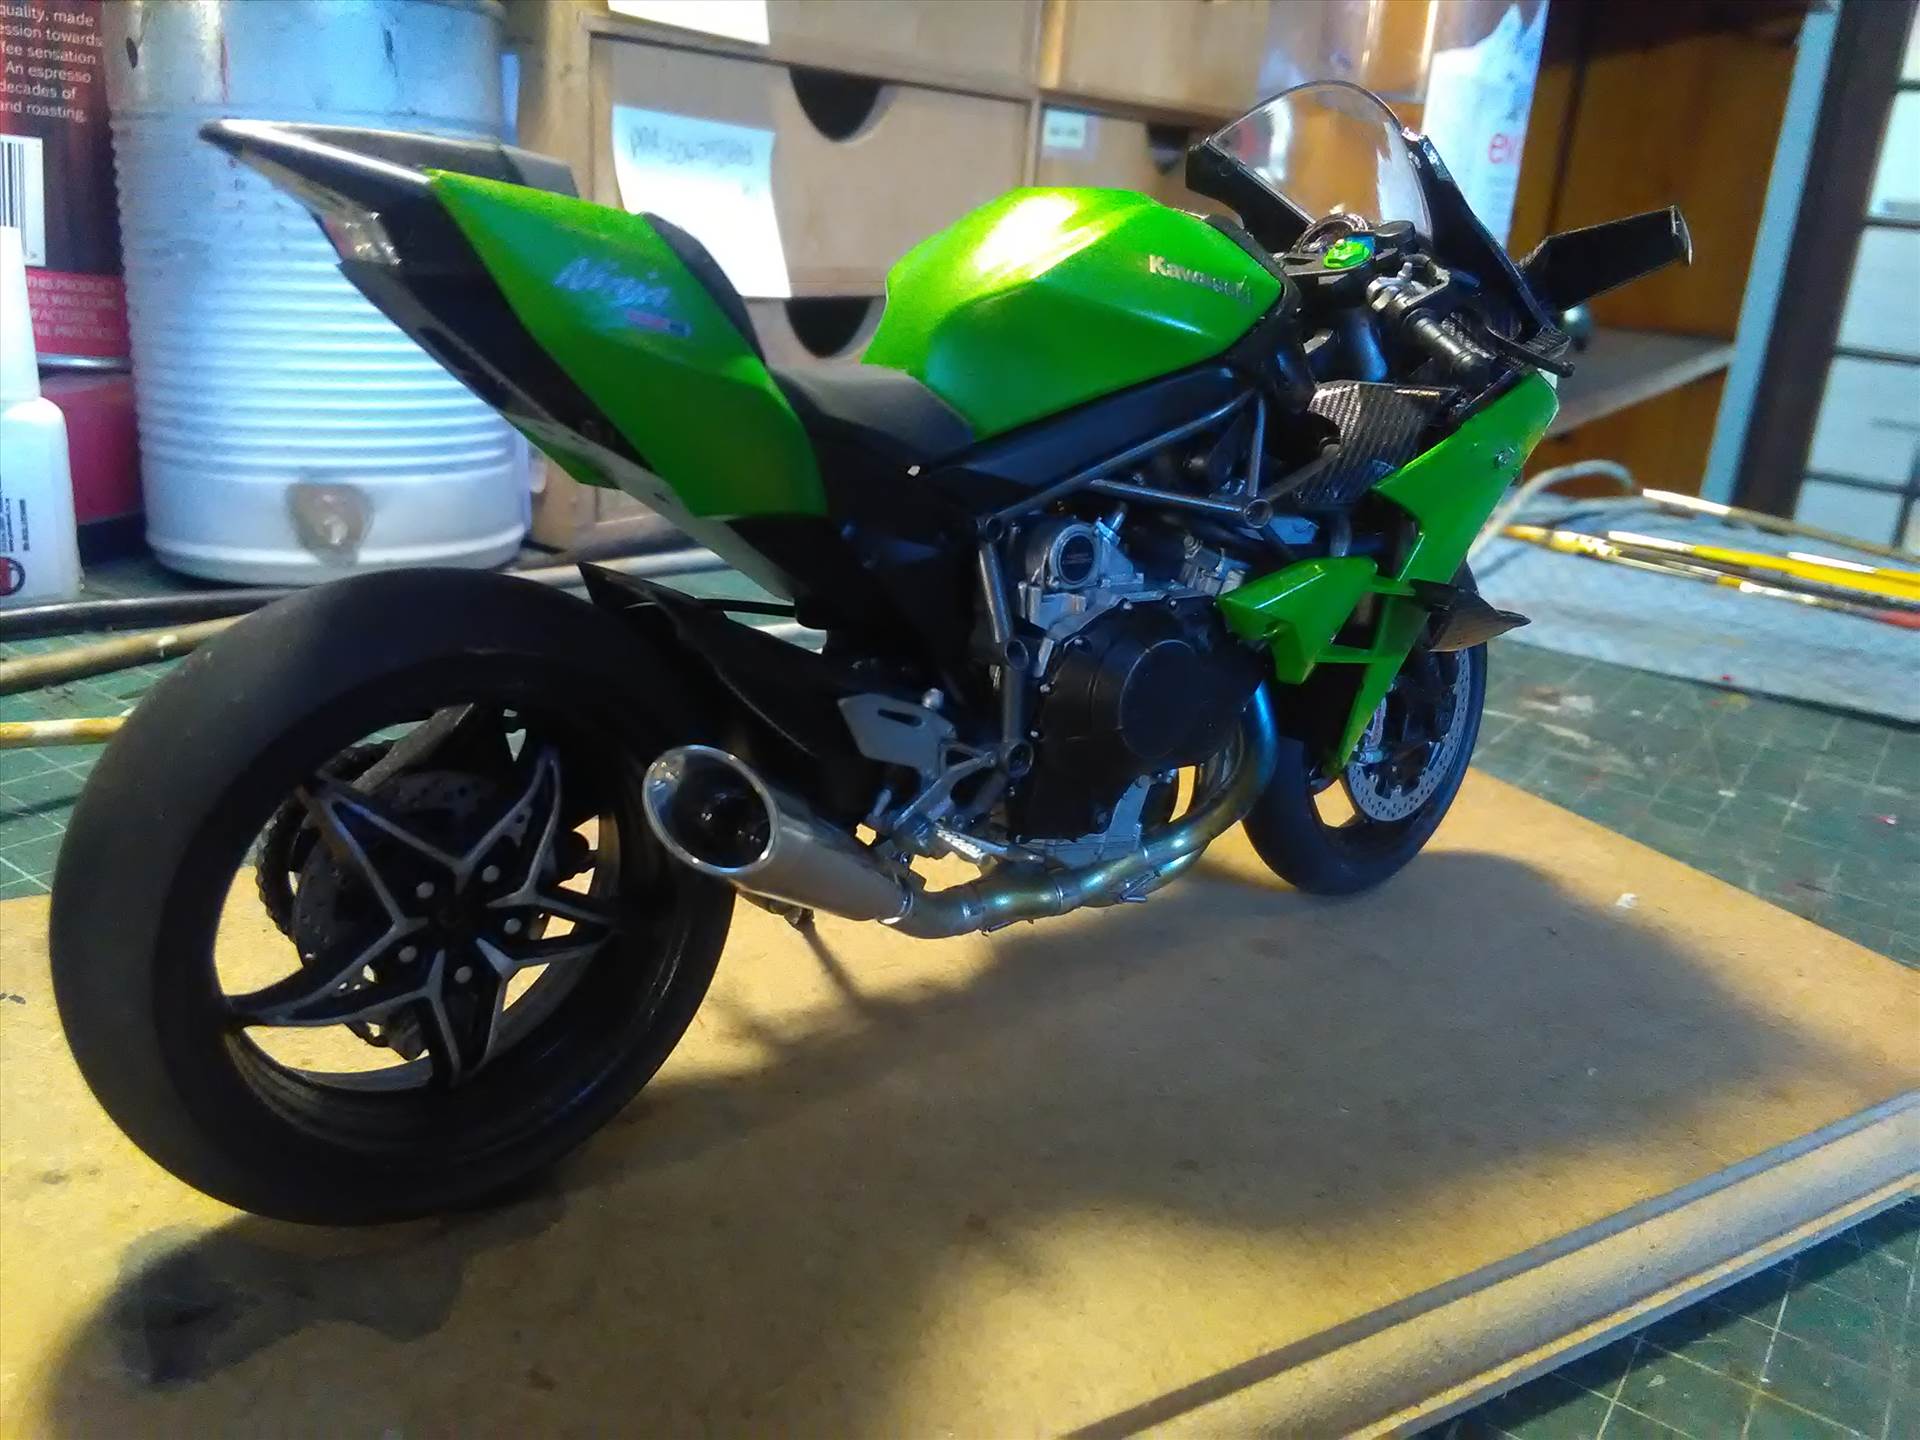
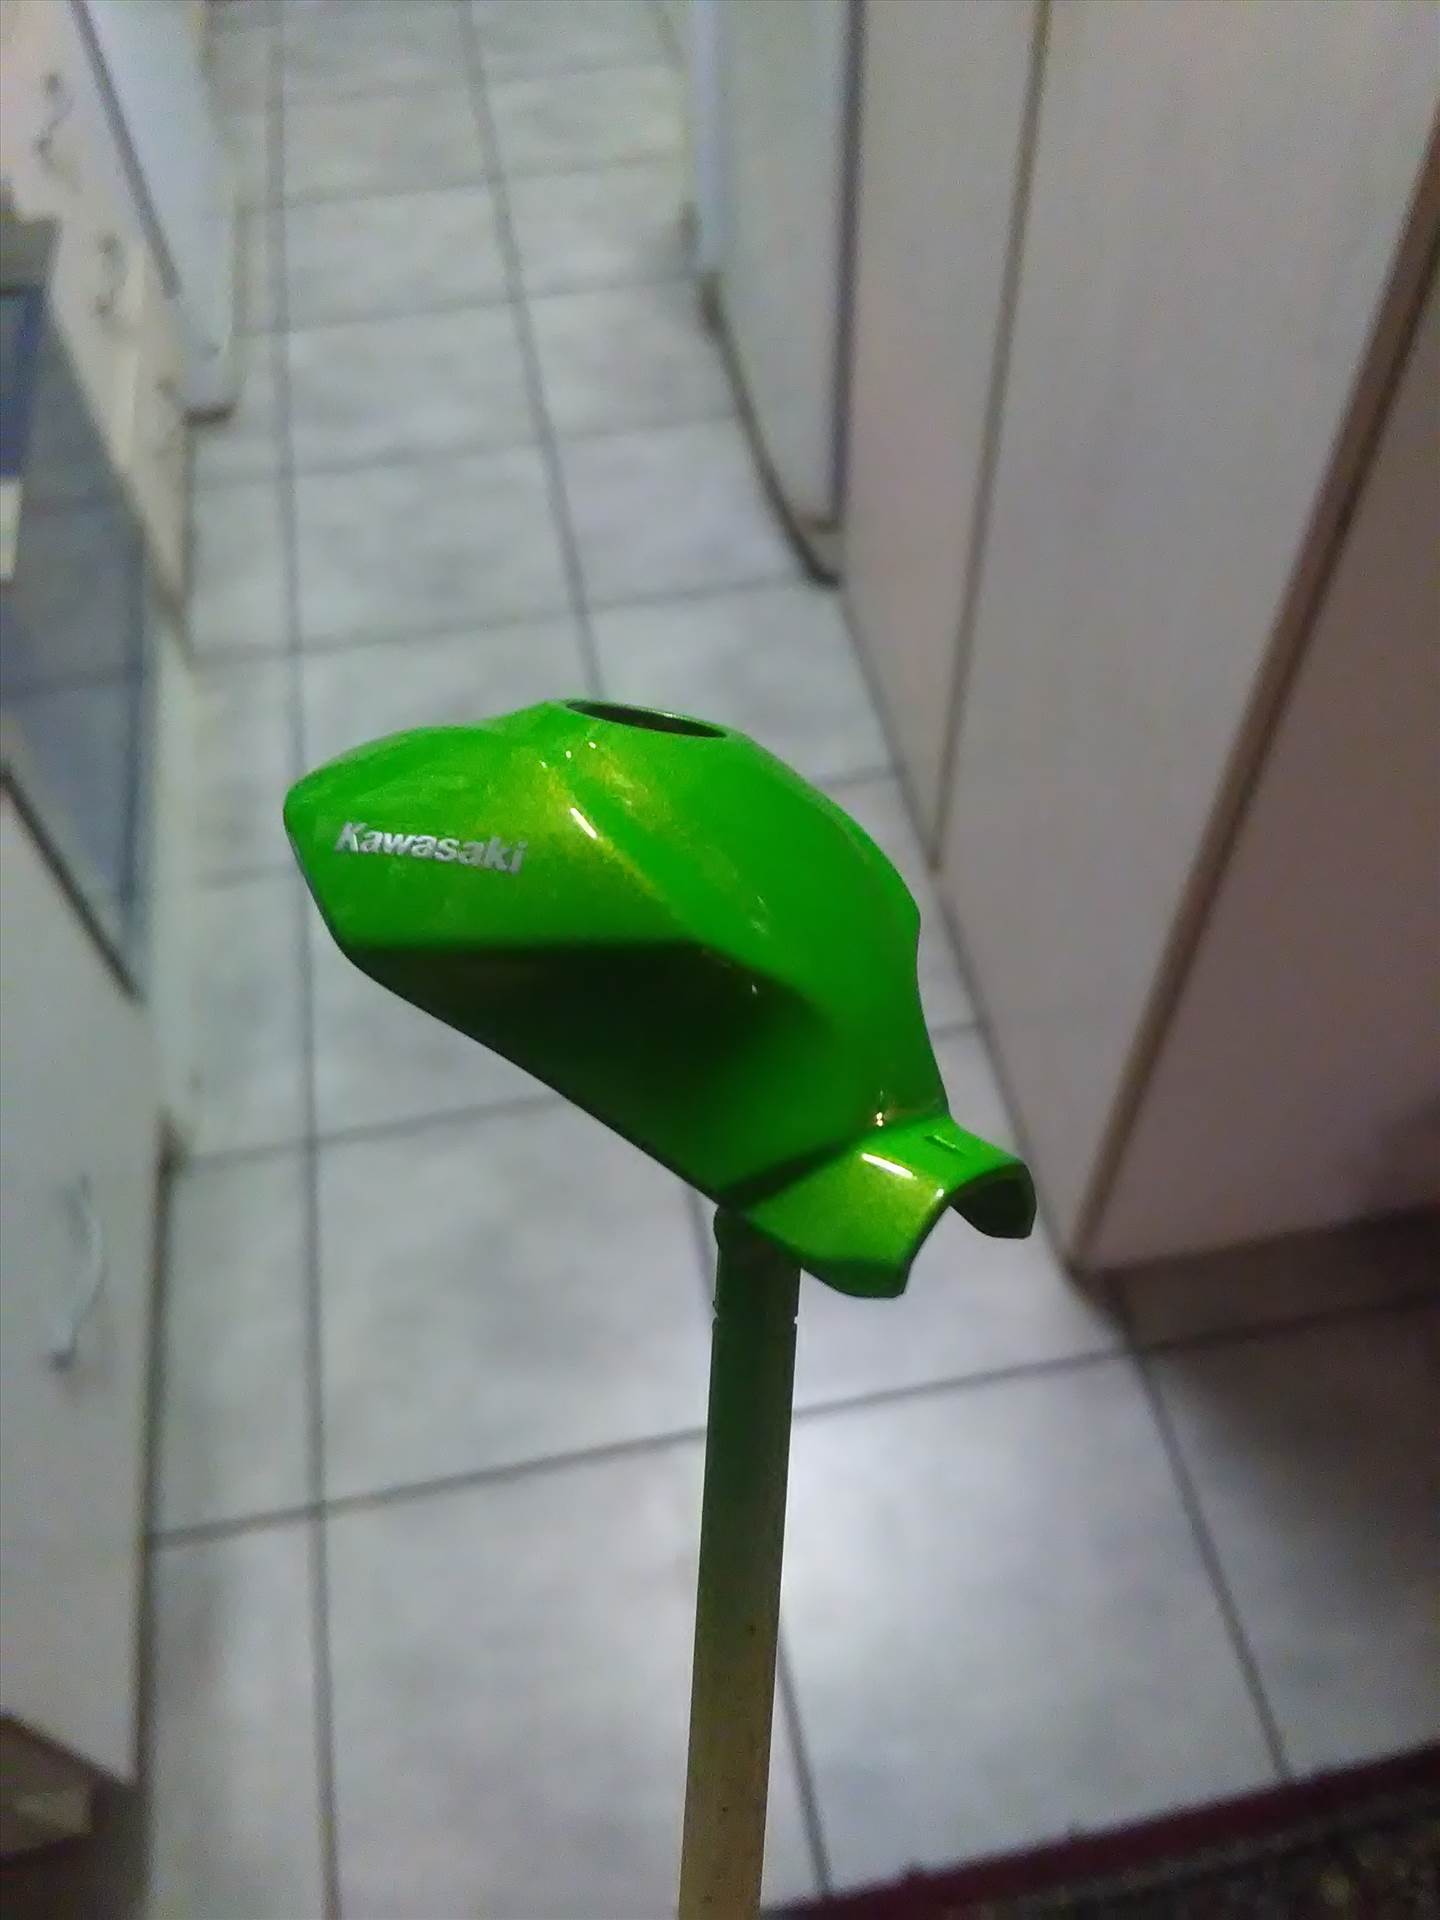
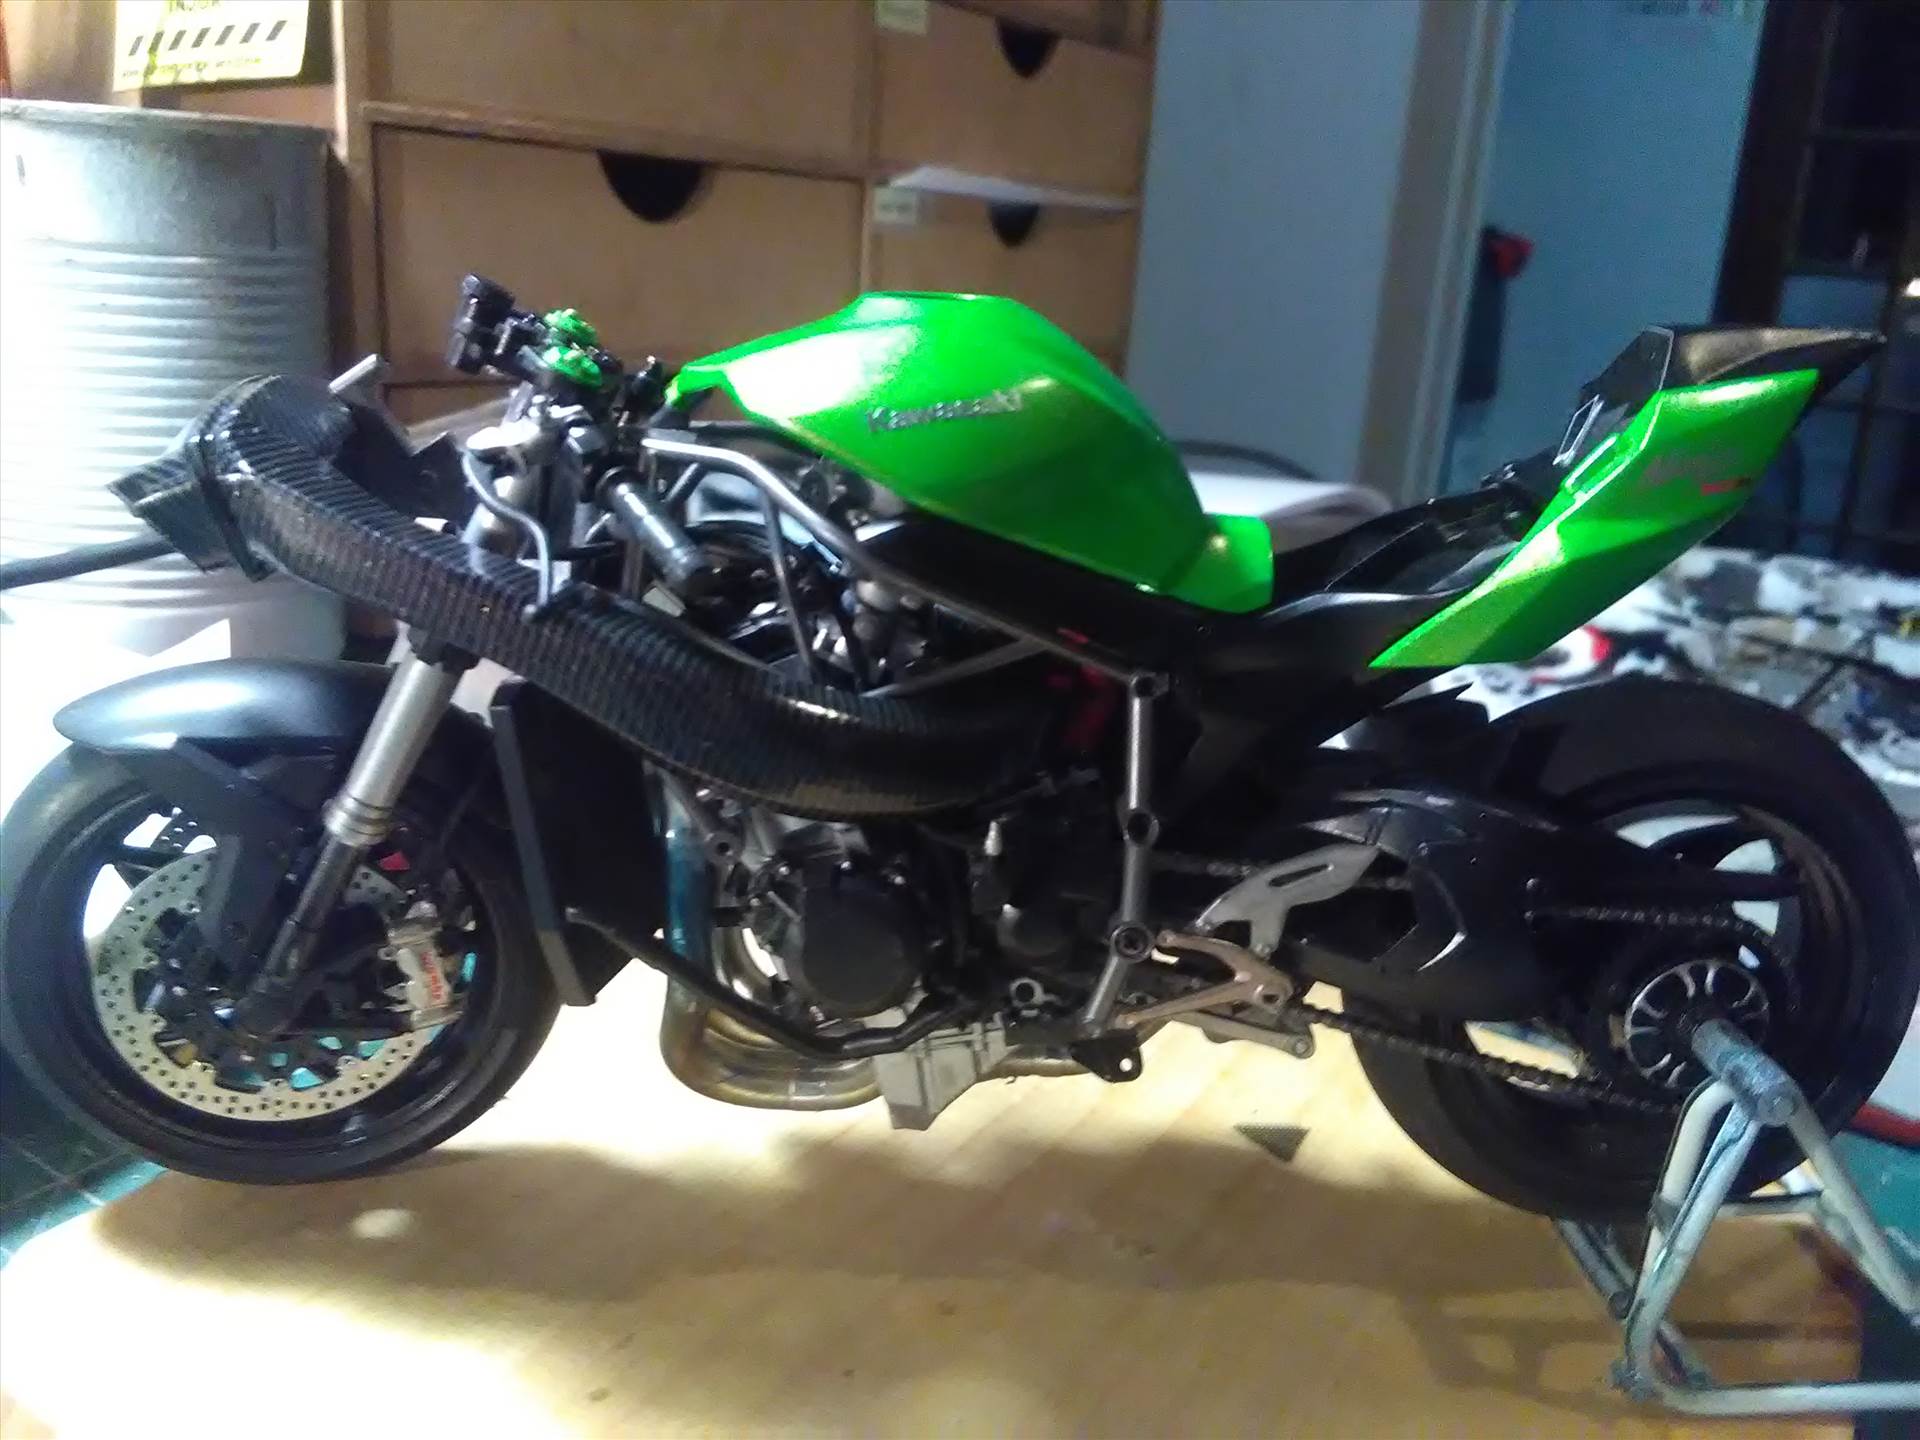
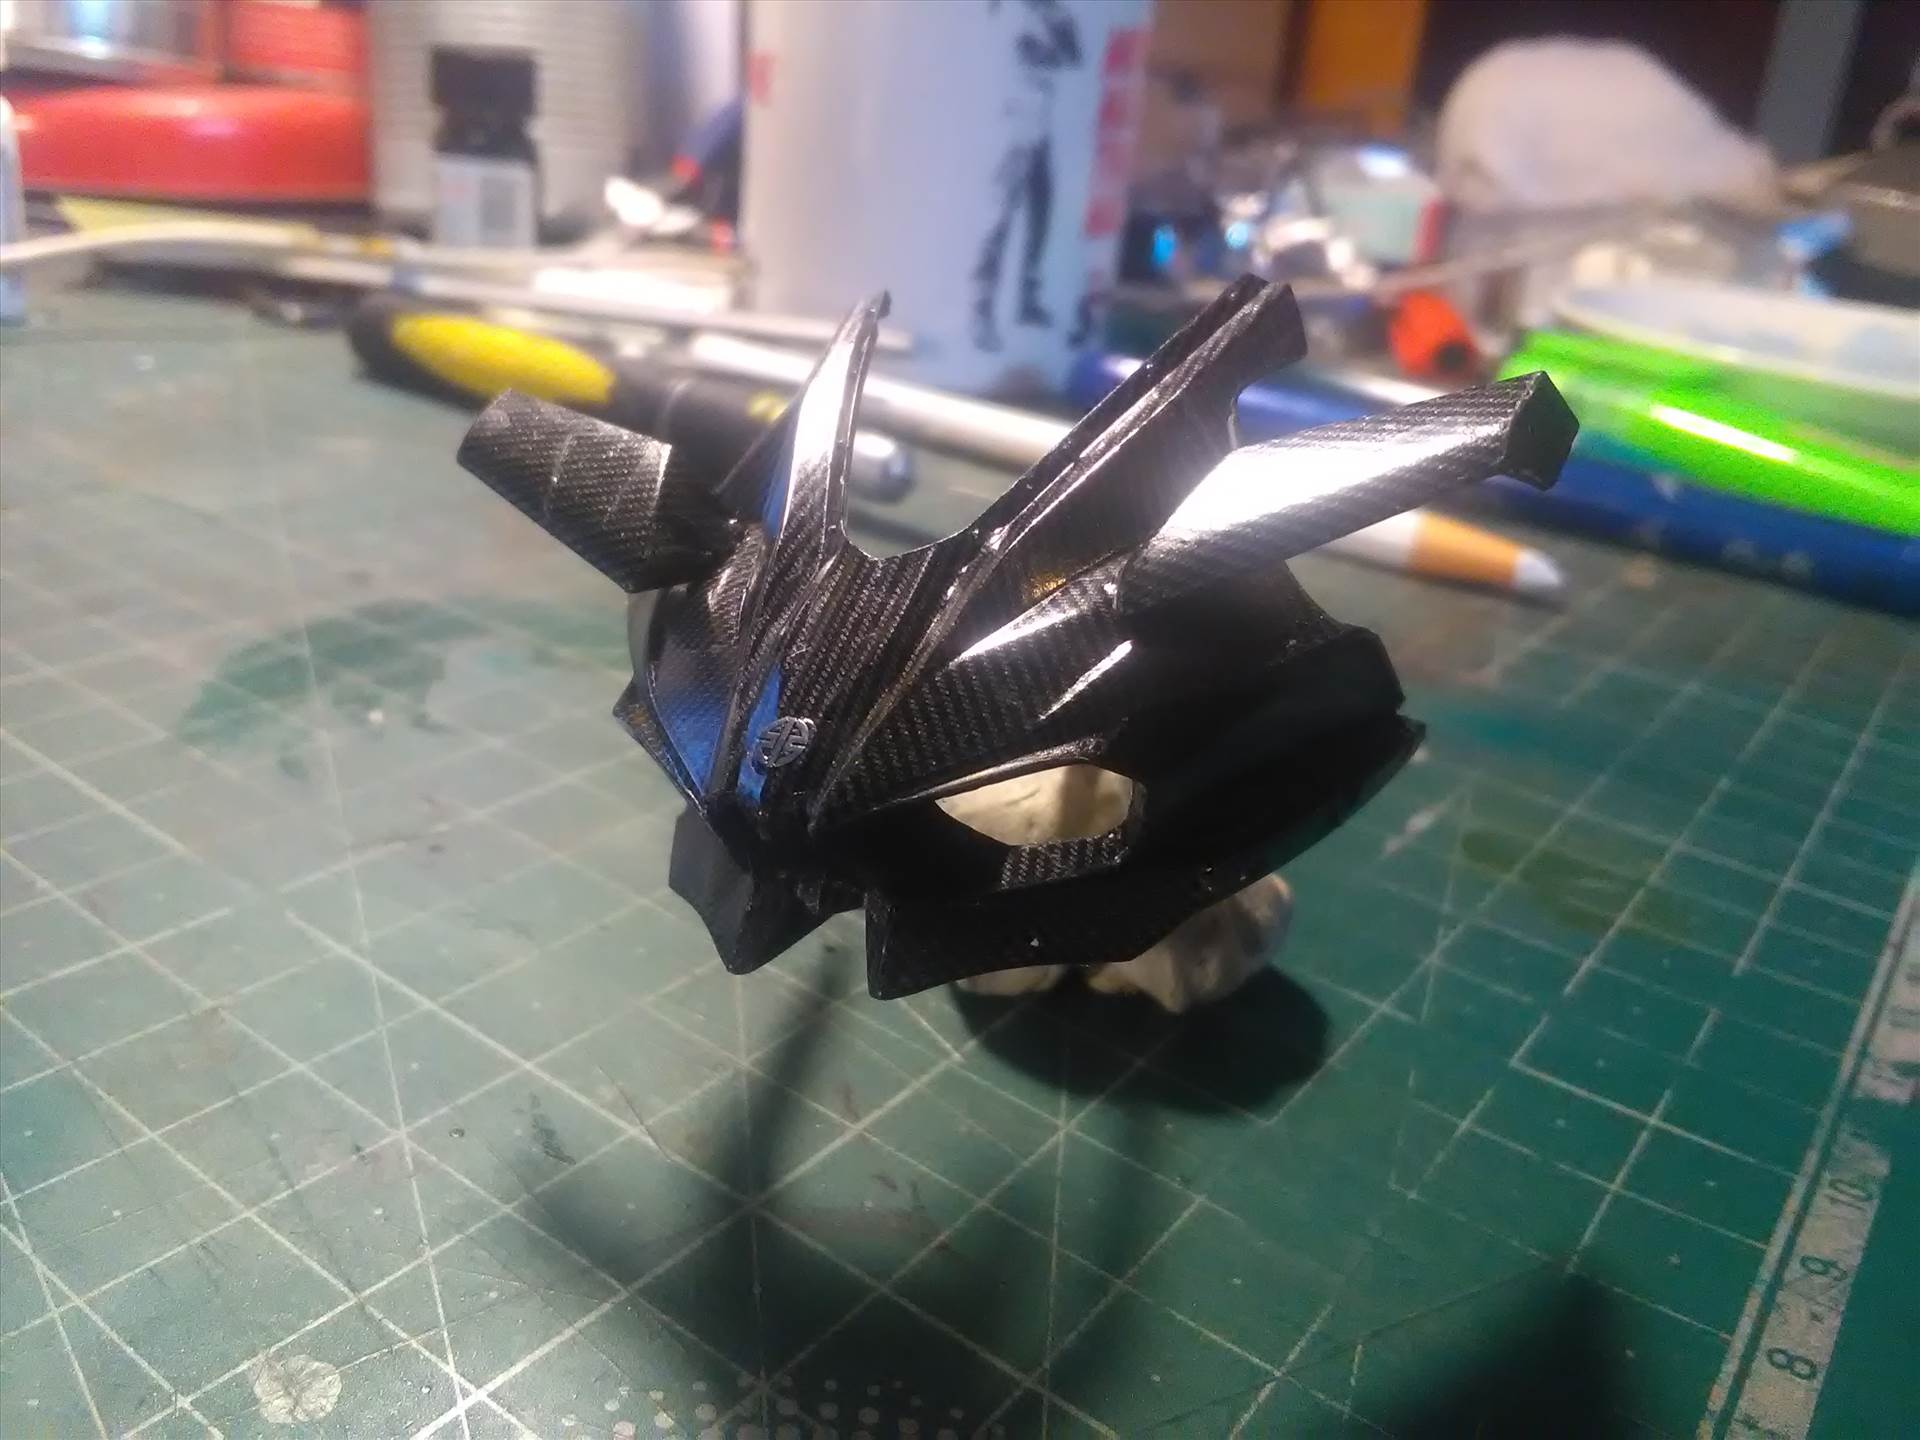
Afternoon Chaperinos
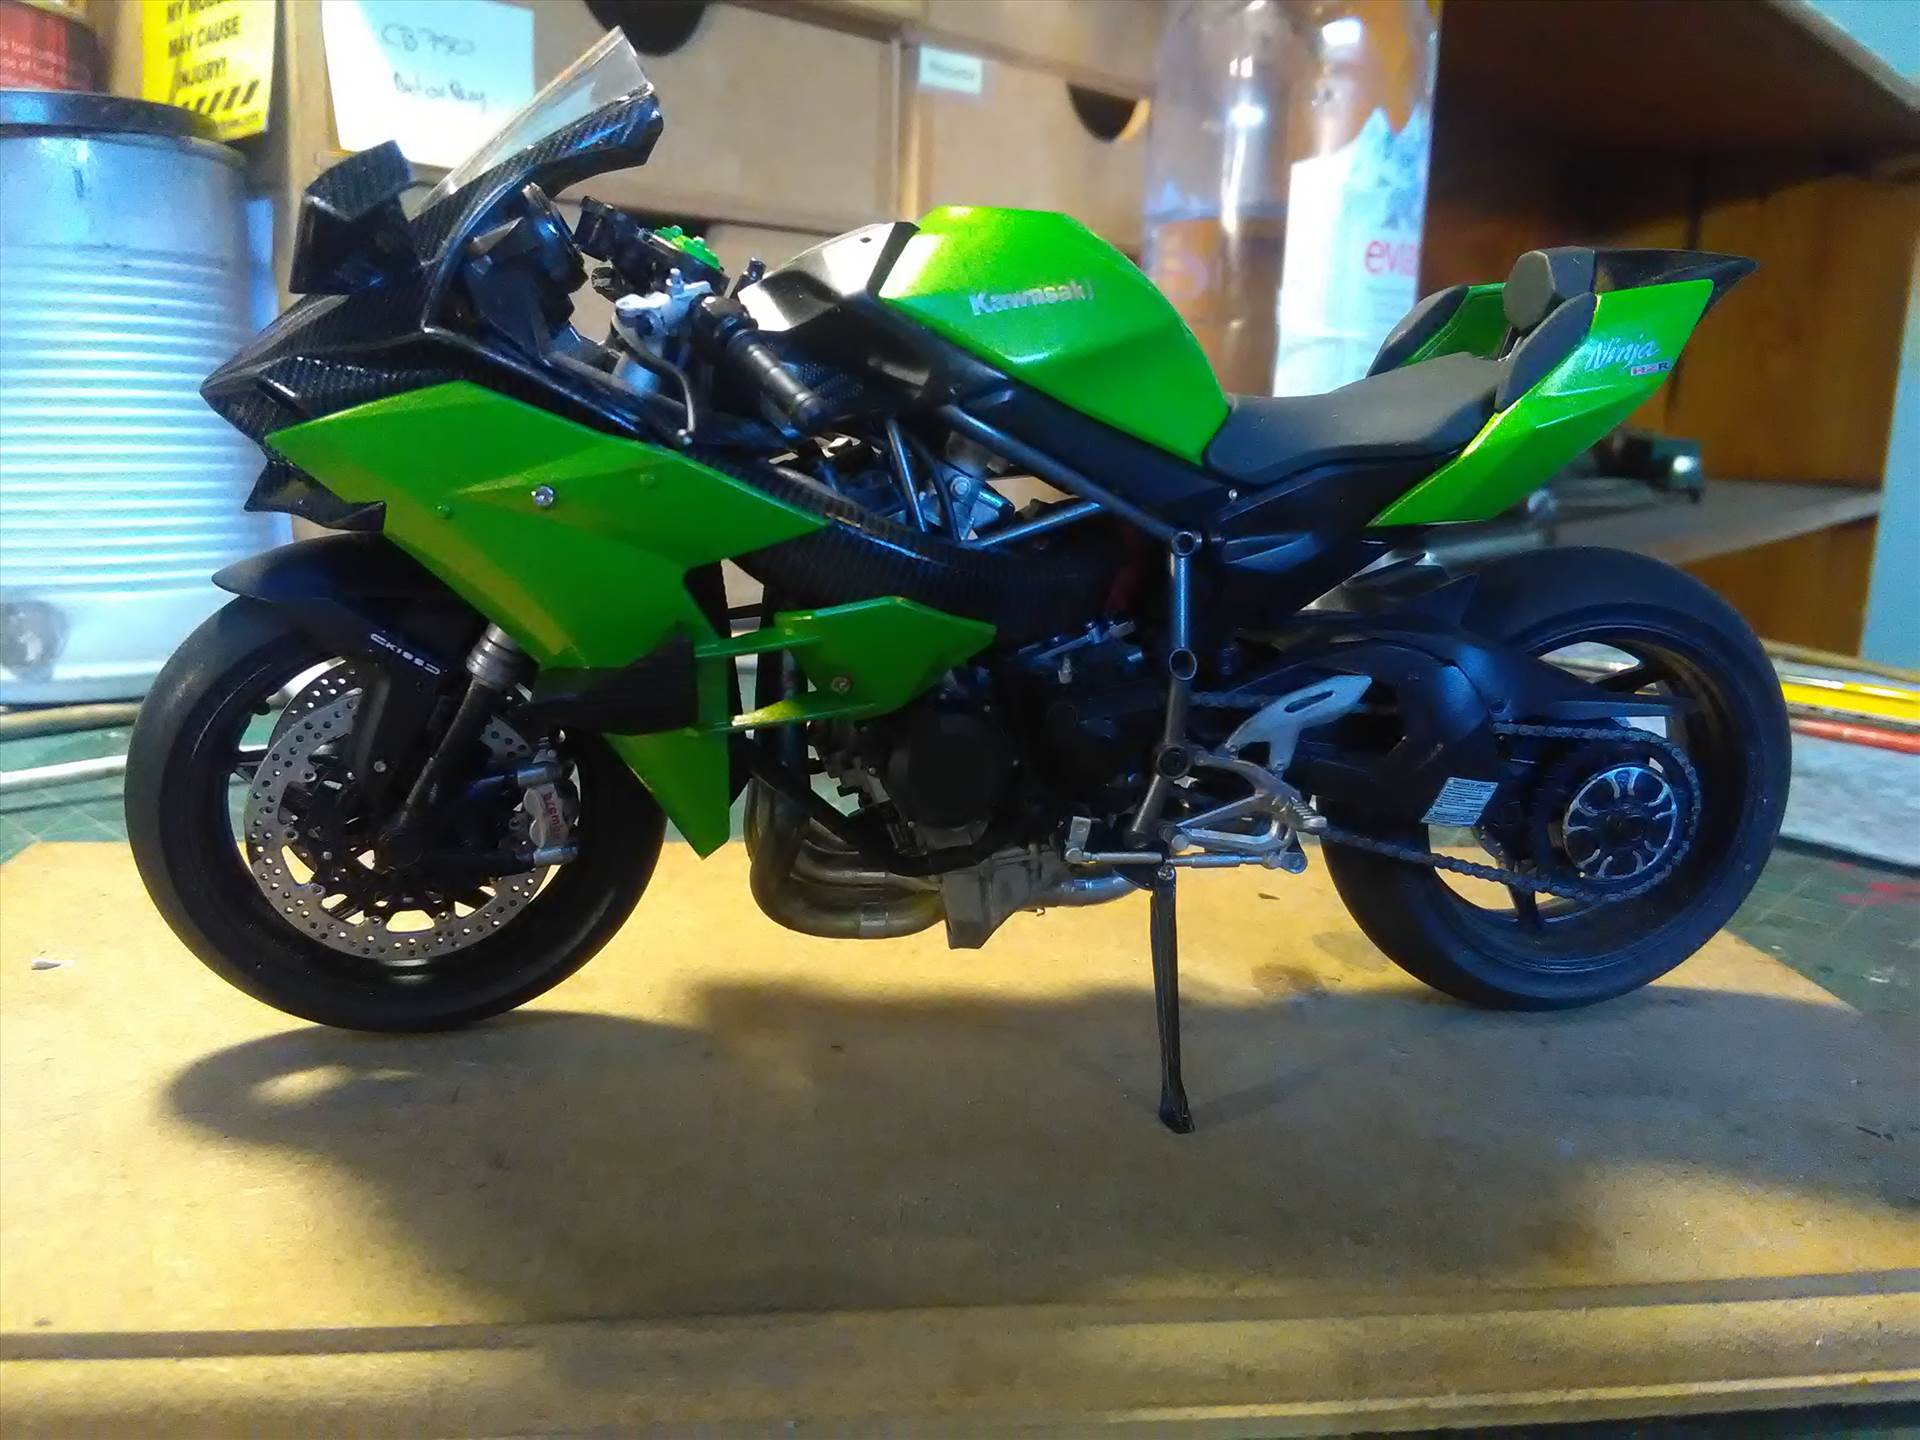
Well I'm calling the H2R done.
I think this is the longest I have ever worked on a Bike, just over a year.
I think the reason for that is basically my fretting too much over the Carbon Fibre decals... (too much fretting and not enough doing!)
Anyway, The kit is amazing, probably Tamiya's best bike kit, close call between the Panigale and the new Yamaha.
Final colour decided upon was TS 52 Candy Lime Green. I'm not totally sold on the original black chrome colour and I'd probably have stuffed it up anyway, but I'm glad that I did it in the Lime Green. Looking at pictures of the real bike, just about the whole thing is black and I think adding a bit of colour actually brings out the evil lines of the bike.
Righto, here's the pictures...
There aren't really any bad points about the kit, except maybe that the wings are extremely fragile, so probably best to use superglue on those bits.
Absolutely no reason why you couldn't finish this without the CF decals, but they do add a certain something.
I'm already plotting to build another one, but this time with the HobbyDesign detail set and a completely off the wall finish...
I have absolutely loved building this bike and I hope you enjoy the pictures
Cheers
Mad Steve
-
10
-
-
3 hours ago, spoly said:
you could turn this into a Decepticon. nice work.
I think I read somewhere Spoly that that was one of their influences
-
Afternoon Chaps
First time I saw a H2R i thought, that is the evilest looking bike I have ever seen...
As soon as Tamiya announced they were releasing one, It was over the moon and I had to have one... (ok, its now three, but who's counting
)
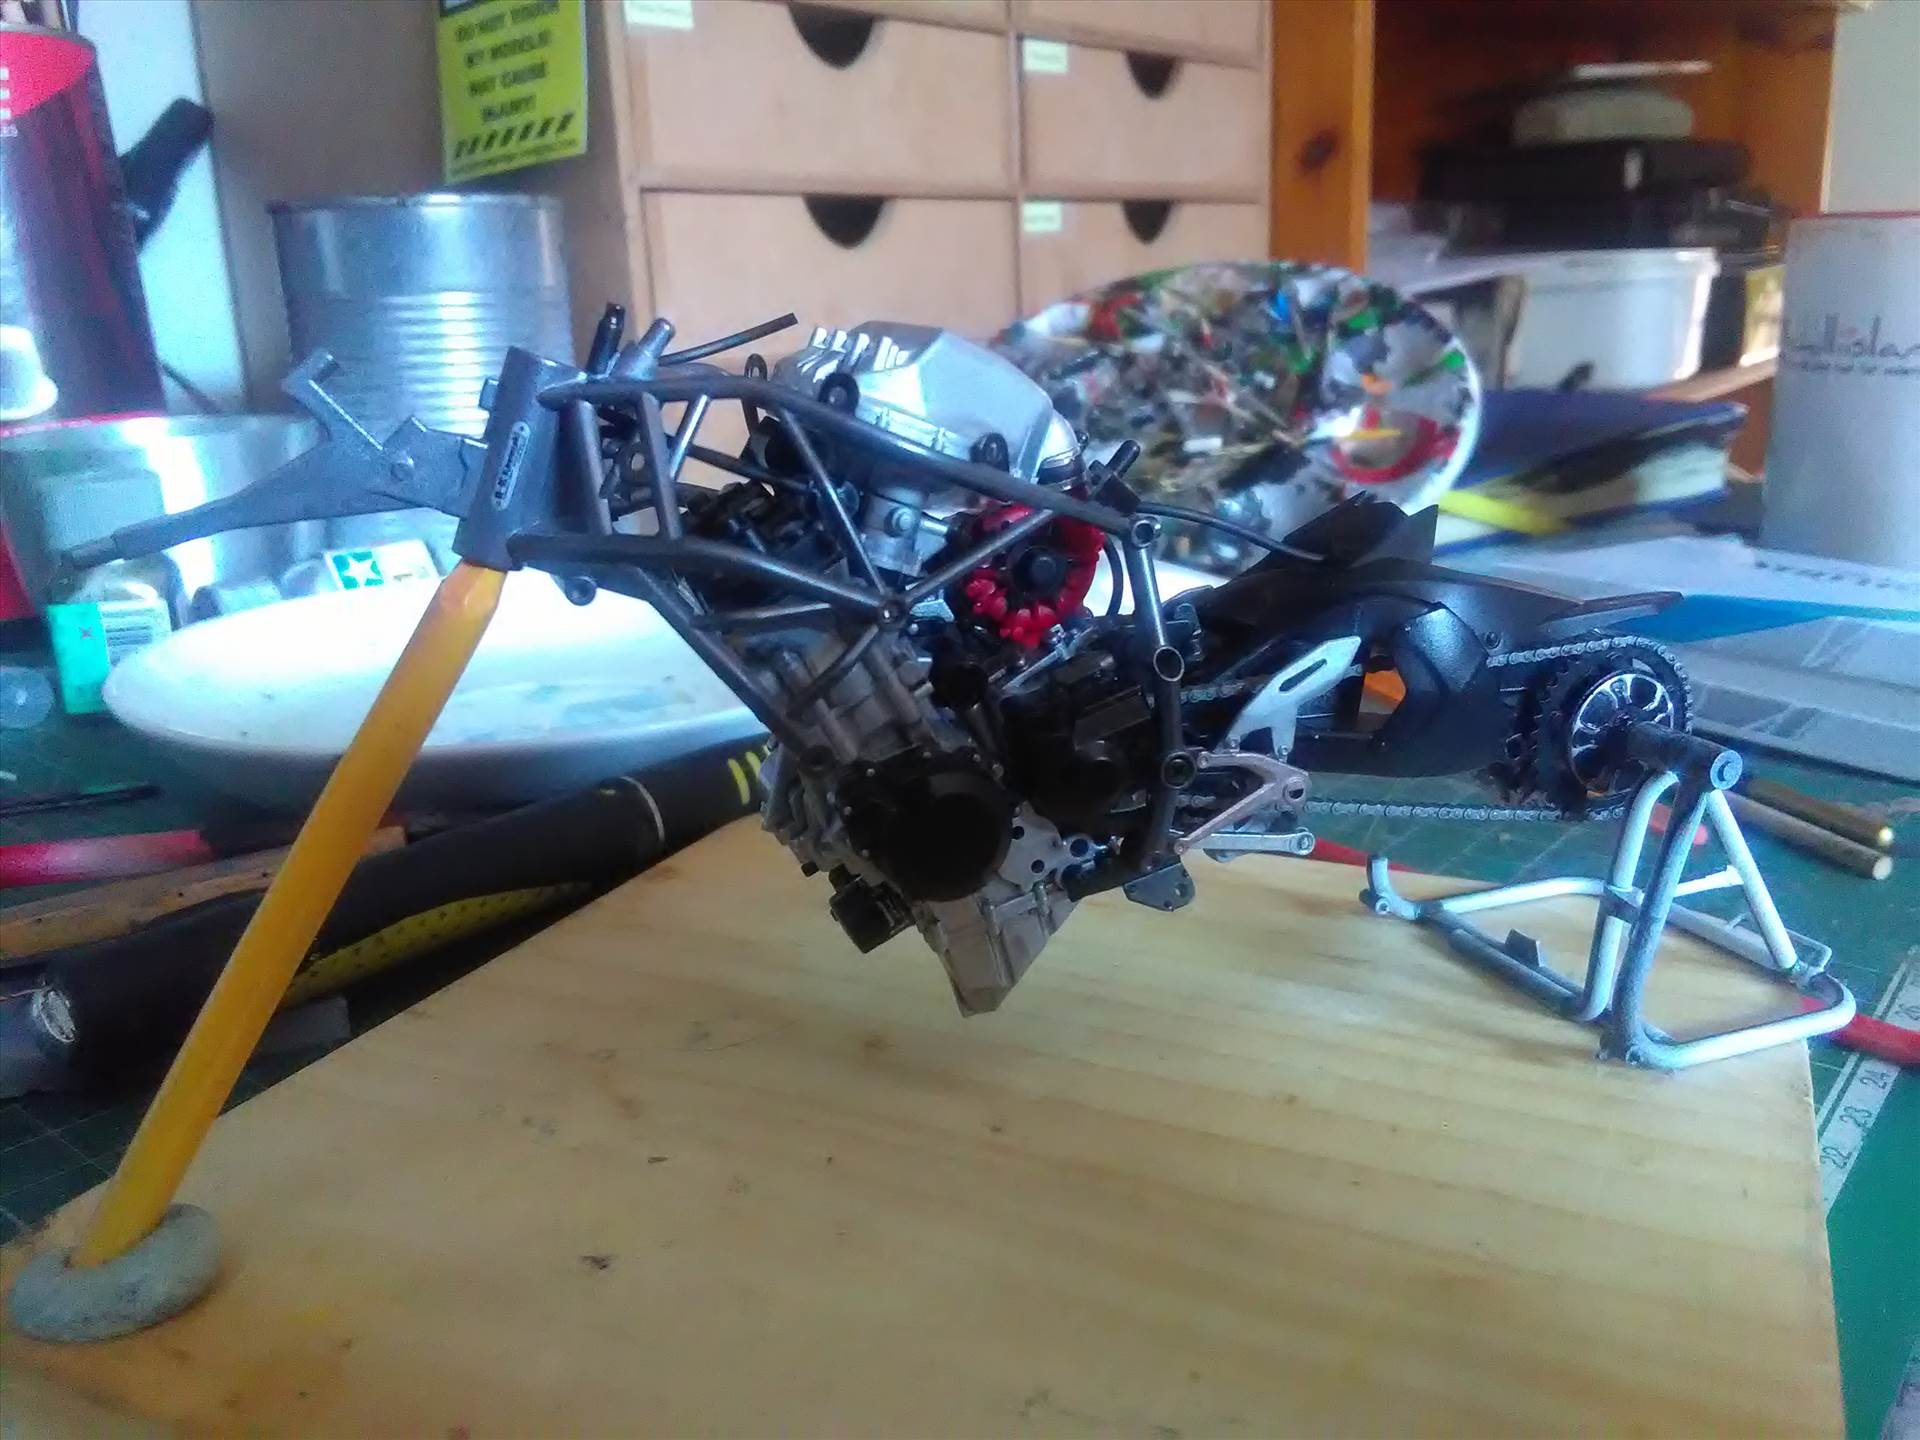
I've actually been building this over the last couple of months, so this is sort of a catch up post
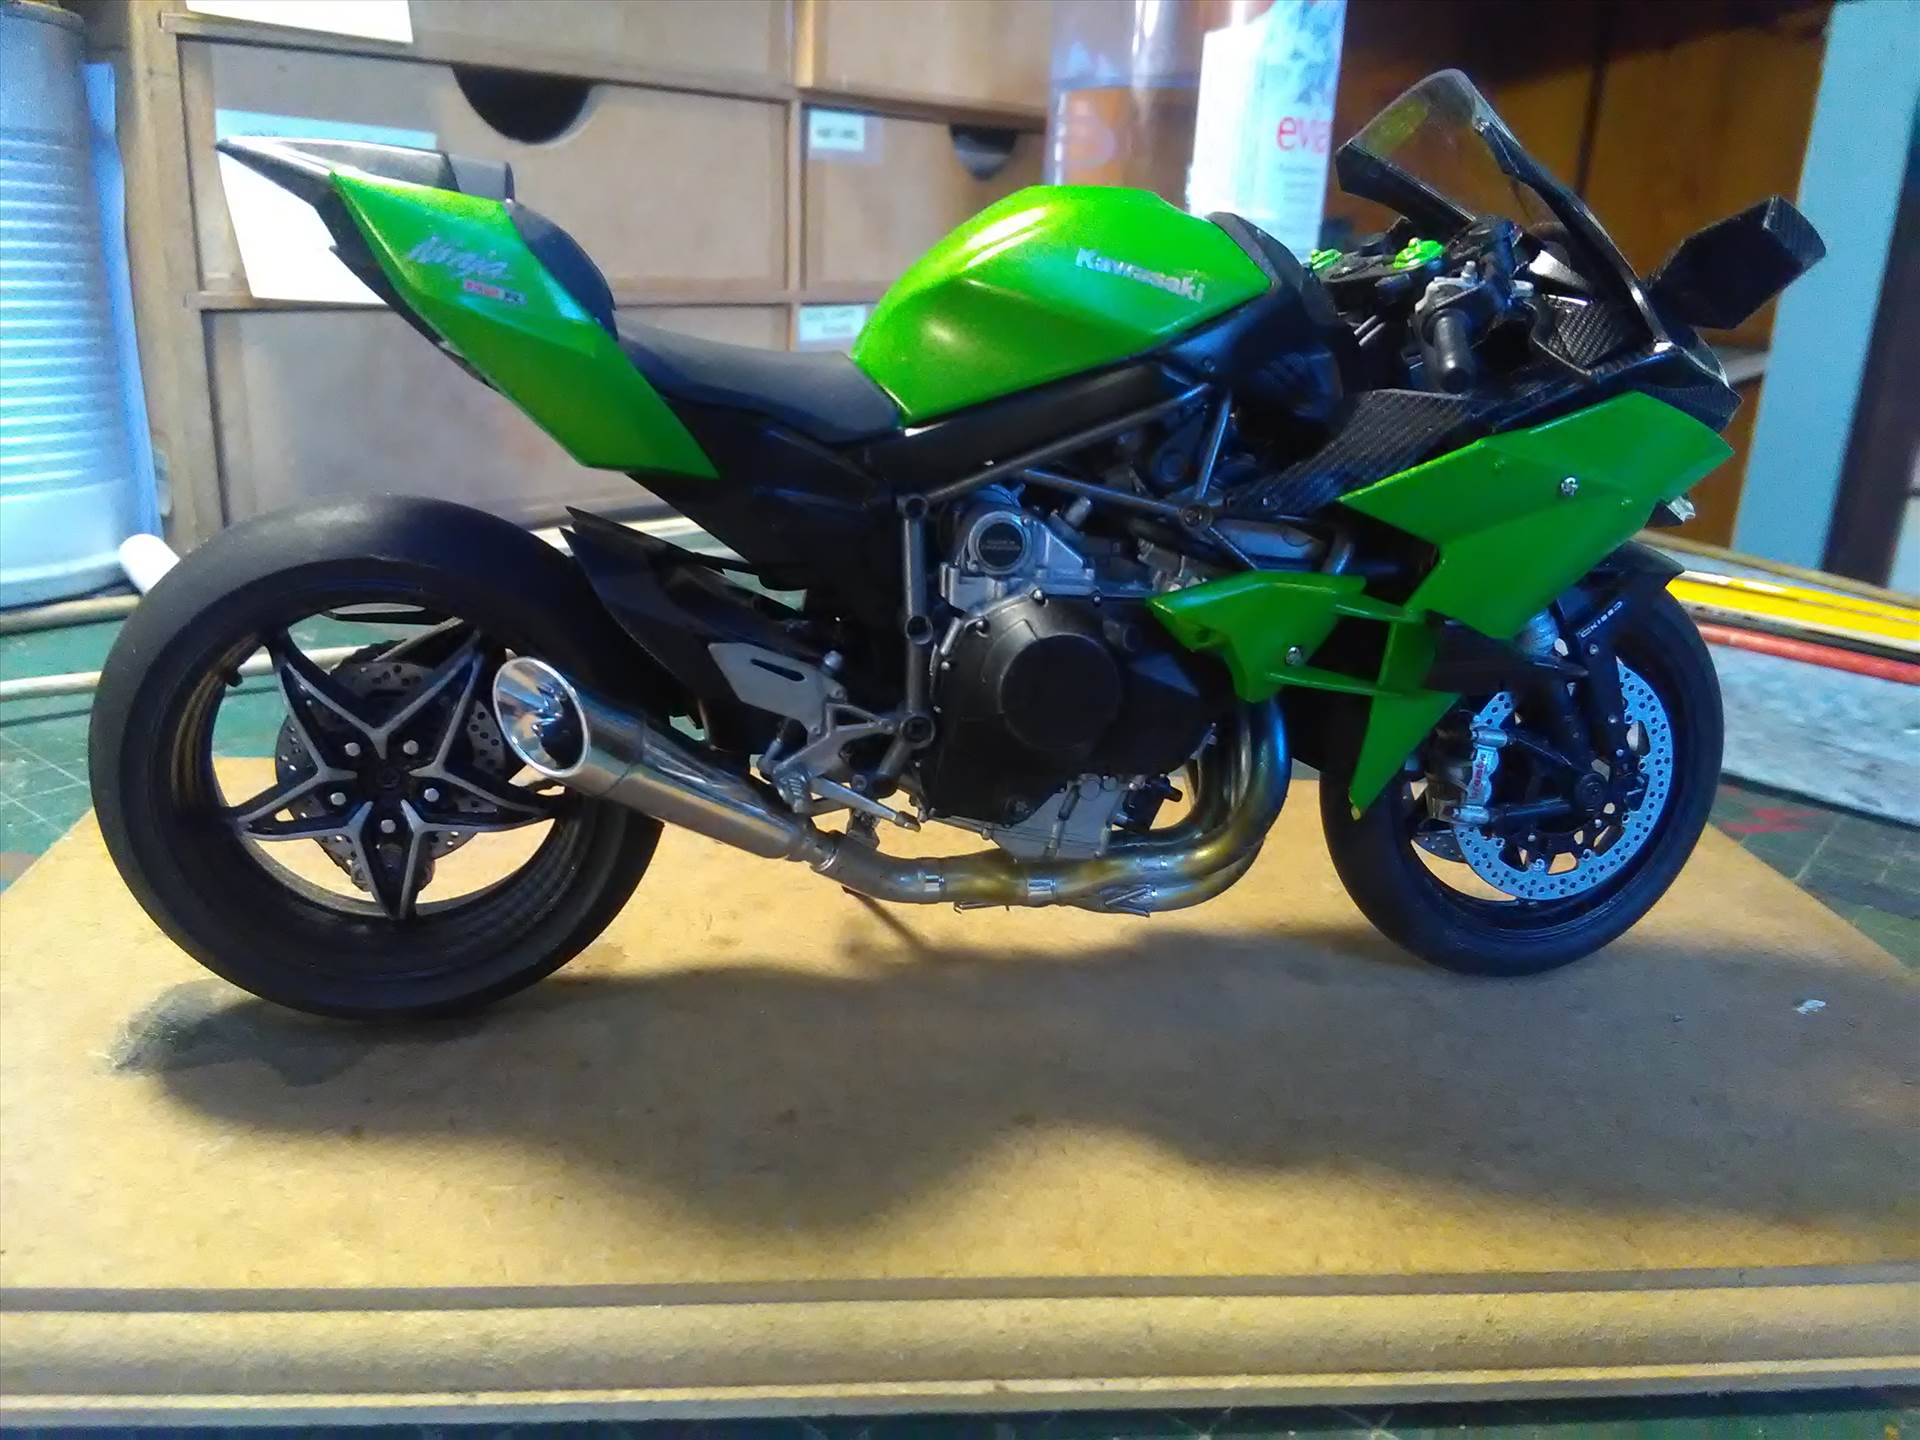
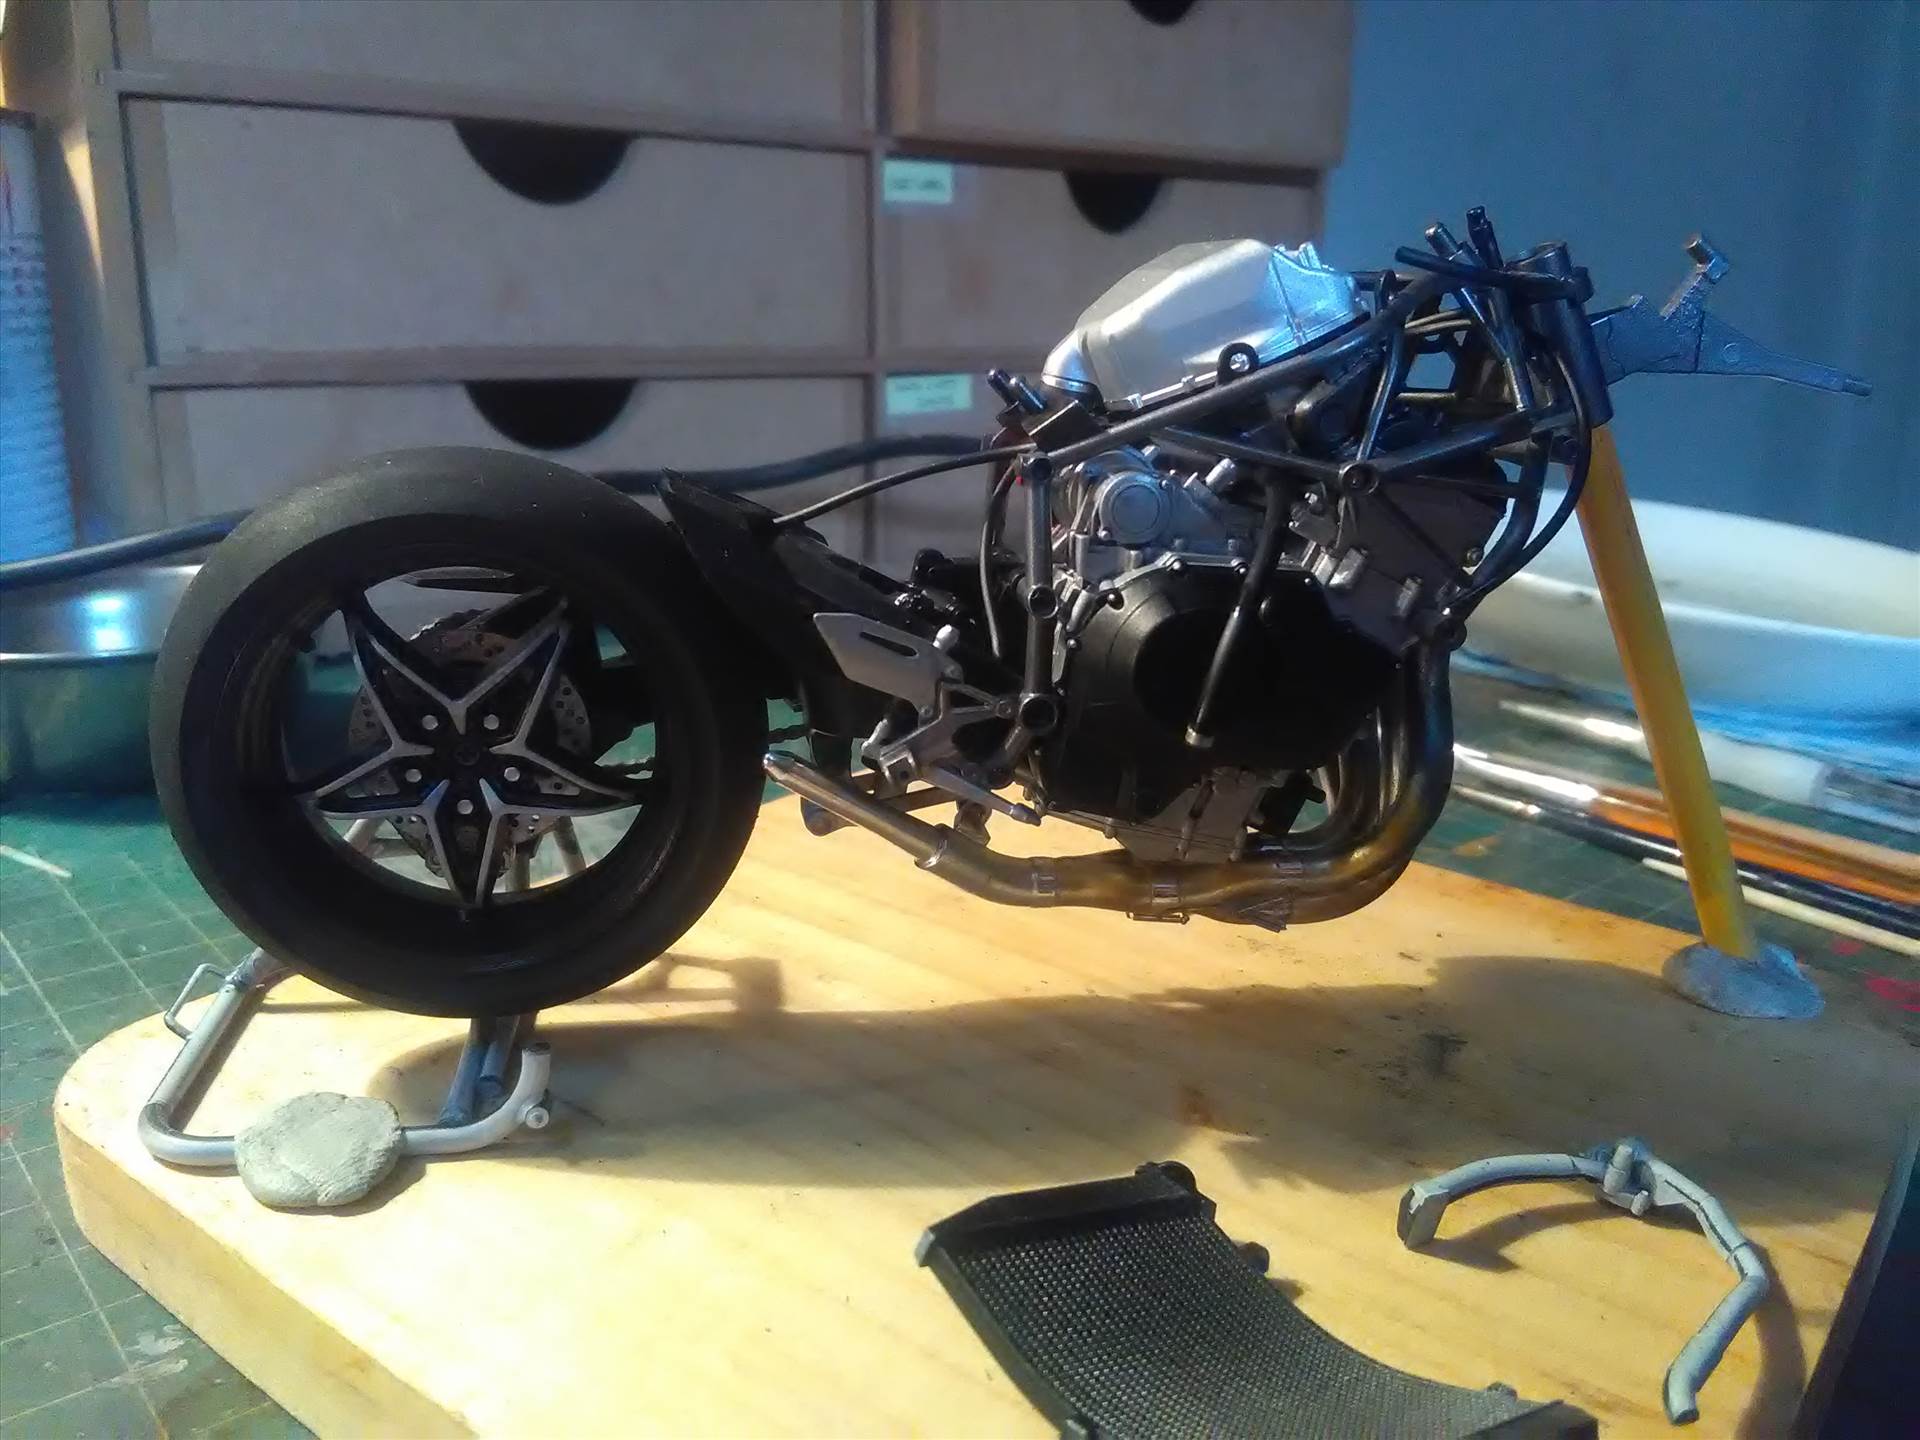
This is a monster of a kit! It is extremely well detailed, goes together like a dream.
The original comes in a polished chrome black finish, which to be honest I don't like and more than likely, a finish like that I would stuff up and it would go back in the box.
Okay then, first off while you are sitting having a coffee, drill out the disc brakes.
(you will notice all the parts are primed on the runners, just the way I do it)
Once that was out of the way time to start building.
Frame and engine together
I know it doesn't look like it from my photos, but I have used 5 types of black on the engine & frame for a bit of variety, Gloss, Matt, Semi Gloss, Rubber and Nato Black.
Frame has been done in Tamiya TS 94 Metallic Grey, covered with Semi Gloss Clear.
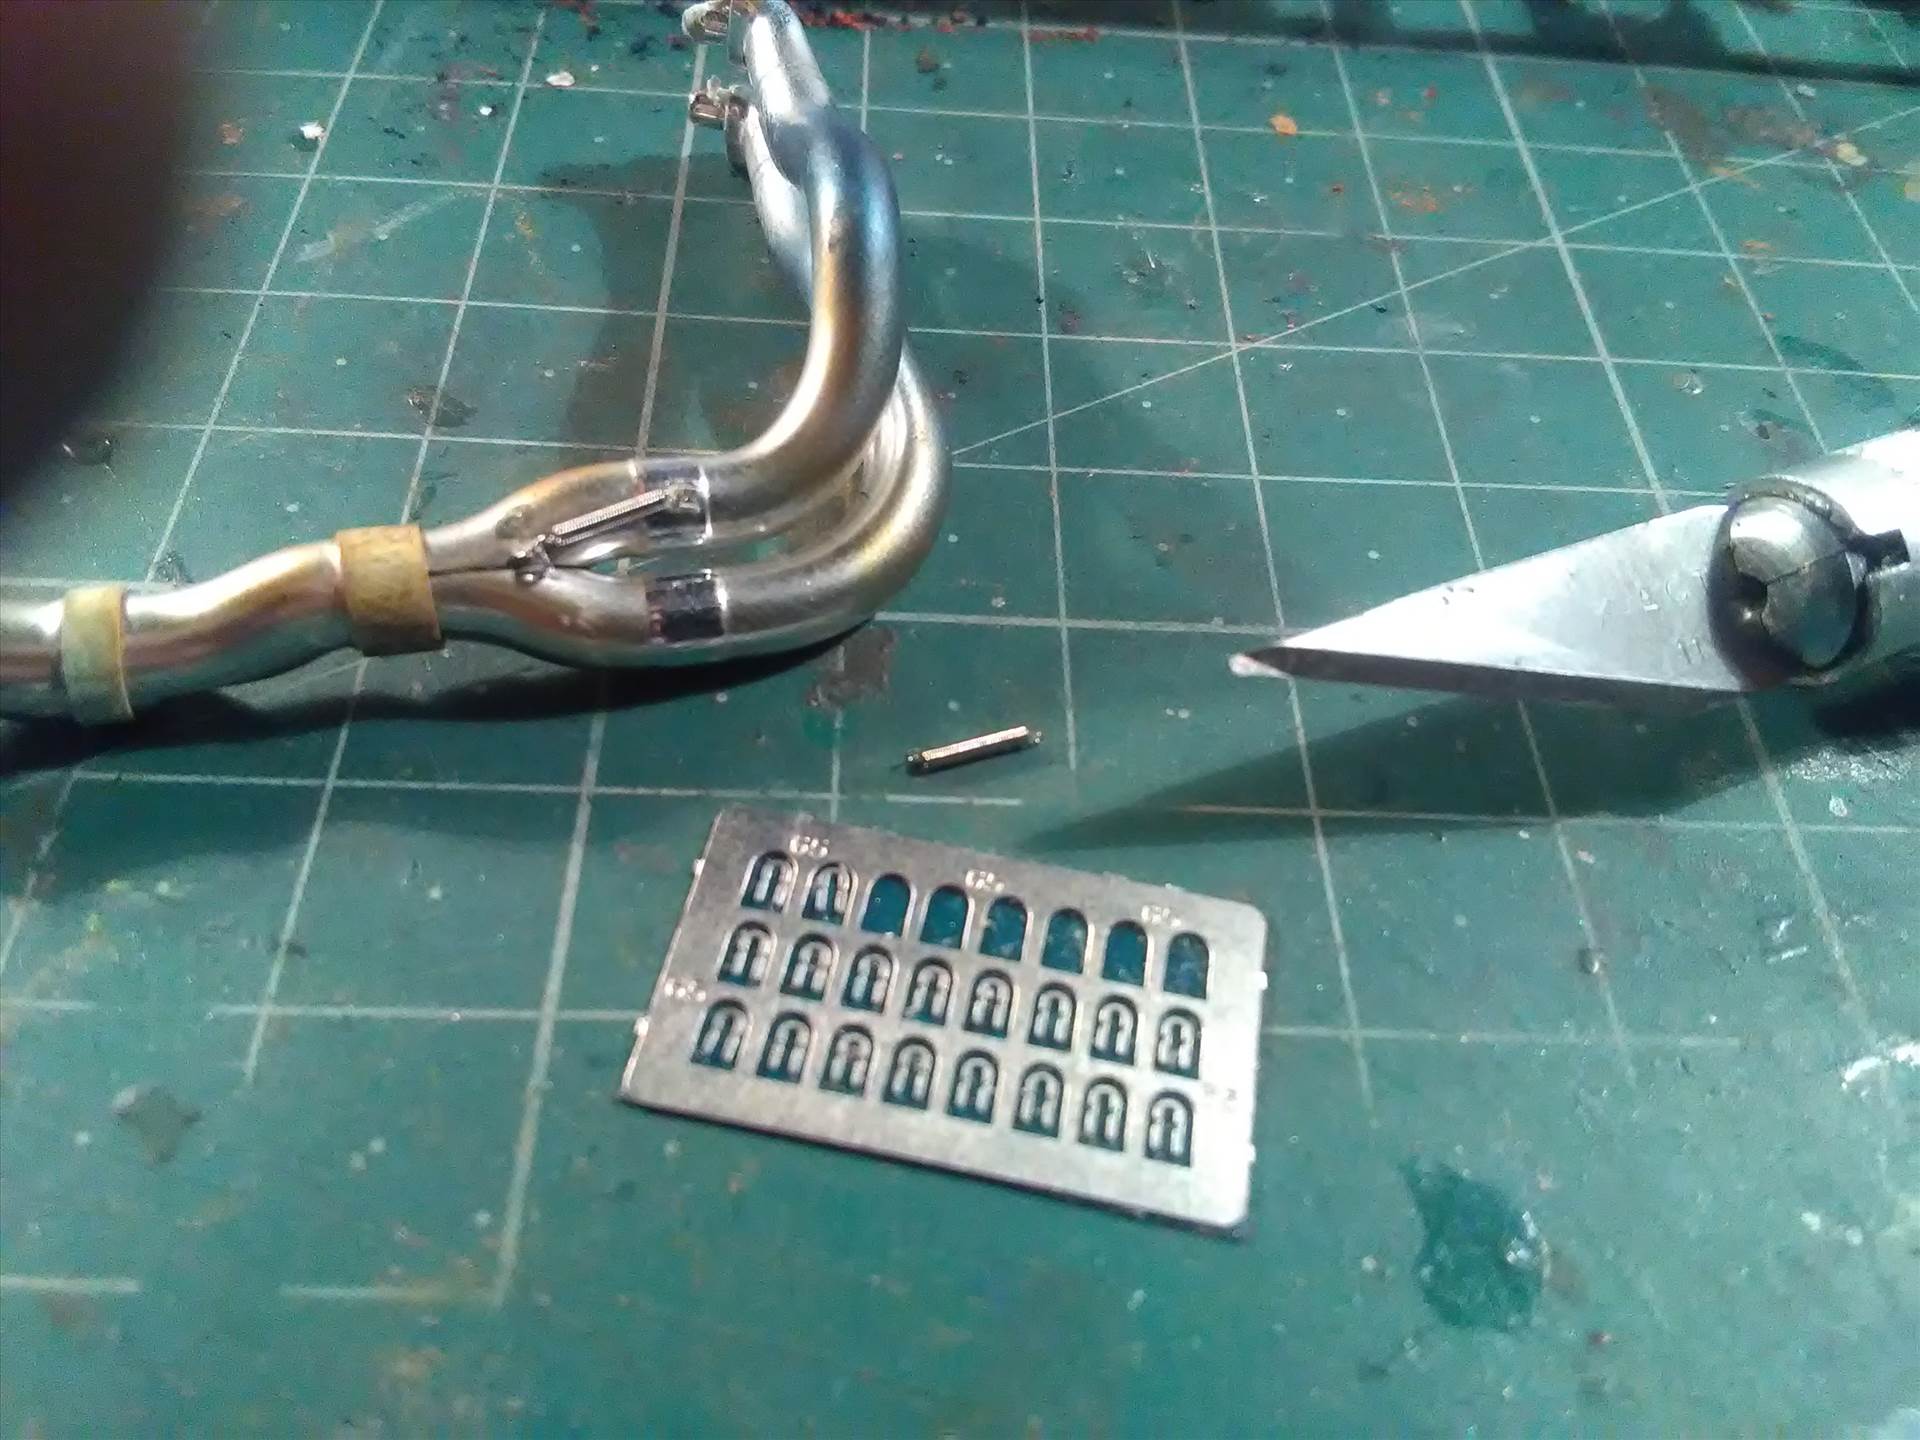
Next up, rear wheel on and exhaust getting test fitted
I also added a couple of tensioners to the exhaust for giggles
And that is basically where things came to a heaching scralt in the works because I was waiting for this to arrive...
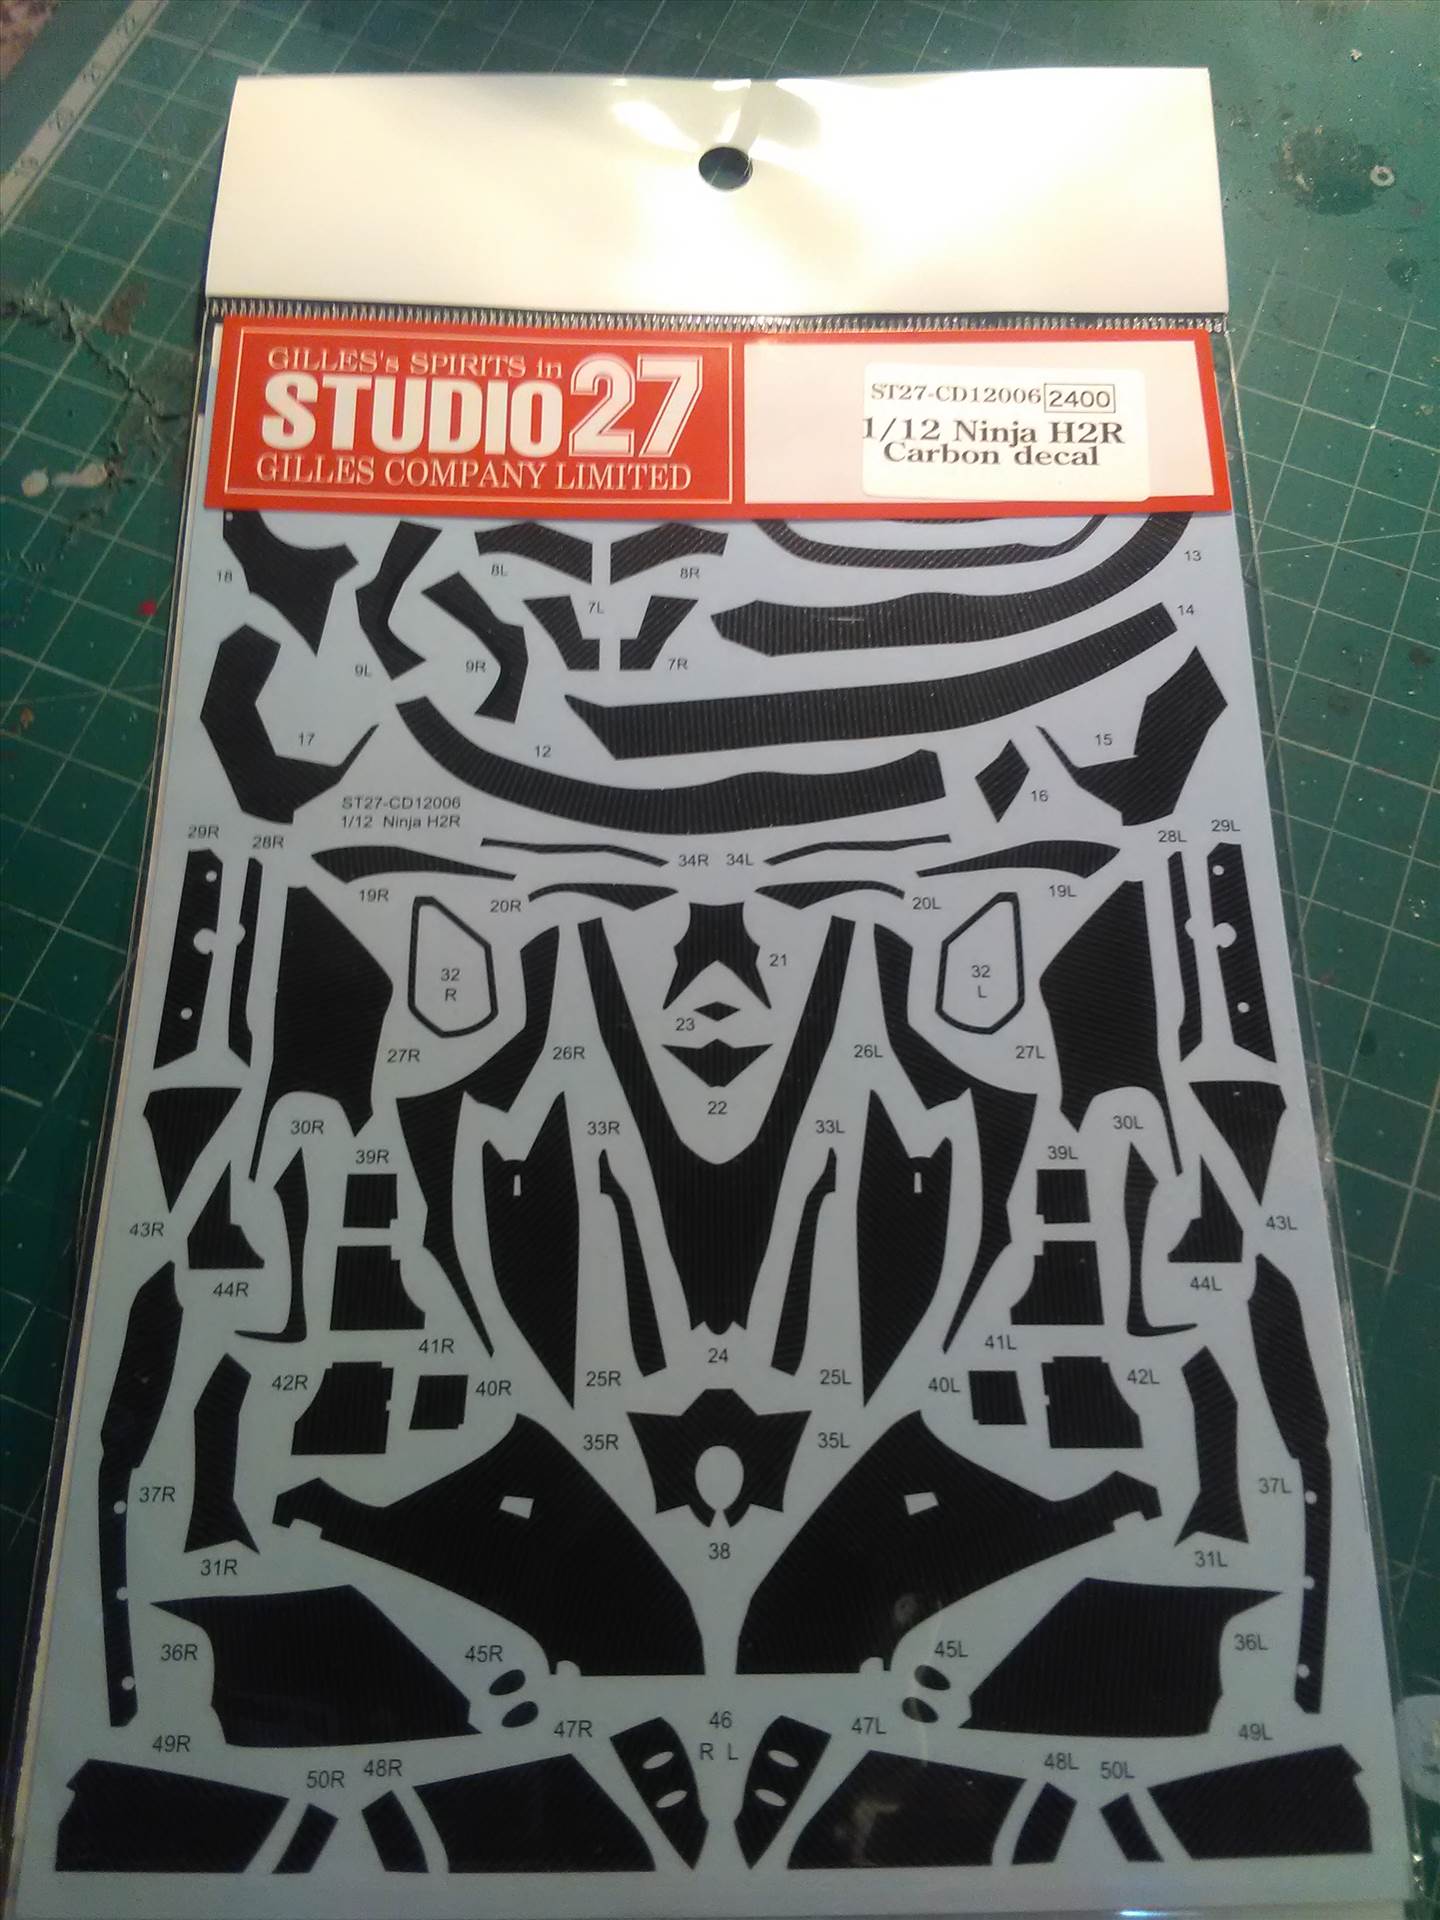
So things were quiet for about two months until the decals arrived....
Now, decals are not my strong point, and I didn't really quite realise what I was getting into here... The whole cowling, air intake and intake pipe to the super charger are CF decals, with 48 decals going on the cowling alone...
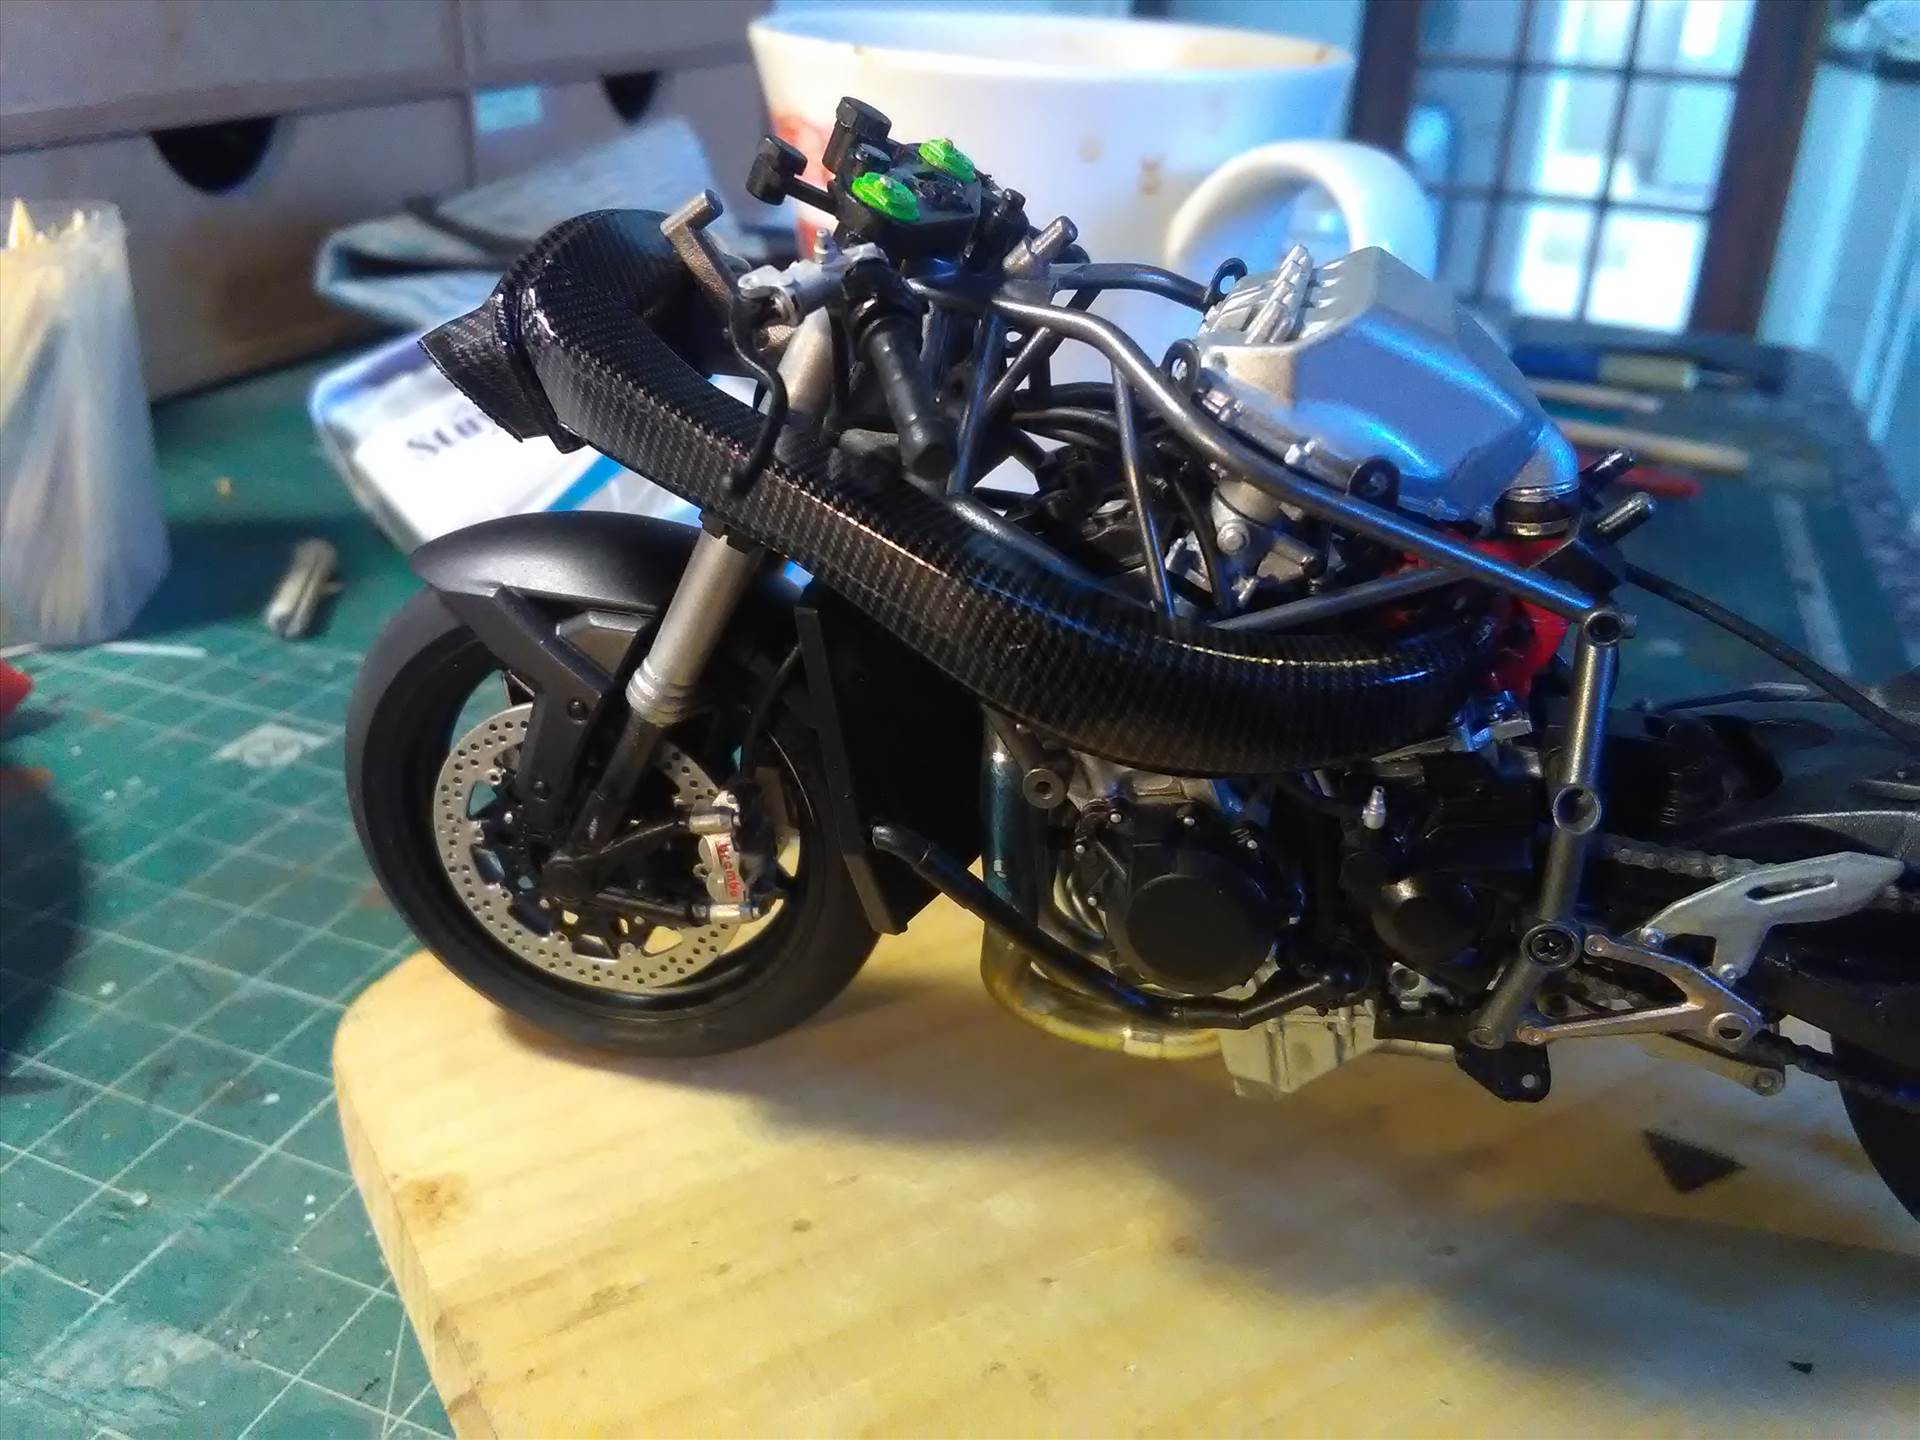
Once that was done I took a bit of a breather. I wasn't 100% sure on the colour I wanted to do, because i didn't think it would suit the bike, but in reality it could really be only one colour...
And all together...
The day finally arrived where I had to put my big boy pants on, and start on the cowling. I took it slow and steady, no rush at all and it eventually took 3 weeks of decalling...
I made a boob on the right wing, but managed to fix it and everything has been coated in 2 coats of Tamiya Clear.
And this is where I am at the moment.
I fitted the cowling just to see what it looks like, and noticed that you don't need to do the CF decals inside the cowling because you cant see them, just the ones underneath the windscreen surround. Be very careful when decaling the wings on the side fairing, they are extremely fragile. The little metal Yamaha badge on the front didn't want to stick either so I just used a dab of clear to stick it down and hope the clear varnish holds it
Still a bit to go, but on we plod
-
8
-
-
The Weather,
in Chat
20 hours ago, Bullbasket said:We British love to moan about the rain in the UK, but even the heaviest downpour is nothing compared to the monsoon rain.
John.
Agreed...
Worked in Zambia for 2 years, average rainfall for the area of the Copperbelt (Solwezi) I was in was 1200+mm!, and it all falls in basically 2 months
Exciting when you wake up in the morning and the water is half way up the side of your Pick Up
-
2
-
-
Hi AR
The short answer, Nope unfortunately not.
-
 1
1
-
-
The Weather,
in Chat
Morning Chaps
Well we are now moving into spring here, we are currently experiencing a heat wave and I have the bloody flu
Winter seems to have wheezed its last a couple of days ago with a sudden dip in temperatures, but we are back up to 30 Deg C again (currently 19) and I'm sitting in the house with puffy eyes and dribbling snot all over the keyboard.
Mrs Mad admonished me last night, declaring I have to be special and get the flu when its not winter (its a talent
) and believes I just do it for sympathy
I shall now go away and have Hobnobs for breakfast (Im sick, its allowed
)
-
 2
2
-
-
Morning Chaps
Welcome and Howzit Andy
Like the other chaps have mentioned, Vallejo will be fine for the frame and engine, you're just going to be using basically Aluminium, Silver and Semi Gloss Black, but I would use a white basecoat though. My usual MO is that I spray all the sprues with Tamiya Fine White basecoat and then clean the parts as I take them off the sprues. I've built a whole heap of Tamiya bikes and it's just the way I prefer doing it.
What I would buy tho is a can of Tamiya TS7 Racing White and TS 13 Clear as well as some decal setting solution. All of the colour on the bike is supplied as decals (IIRC) so you are going to need something to help soften them up to conform to the body shape and then seal the whole lot with the Clear
-
On 9/1/2018 at 7:59 PM, Pete in Lincs said:
Wow! What a show.
Some fabulous vehicles there.
My favourite has to be the black American car with the Ohio plate.
Not quite sure of the make though. Possibly a Chrysler?
Many thanks for posting.
Great pictures Rich, thanks for posting
Pete. that is a 1940 Cadillac La Salle
-
1
-
-
Very nice indeed Galaxy
Like the two tone colour and very nice engine detail.
-
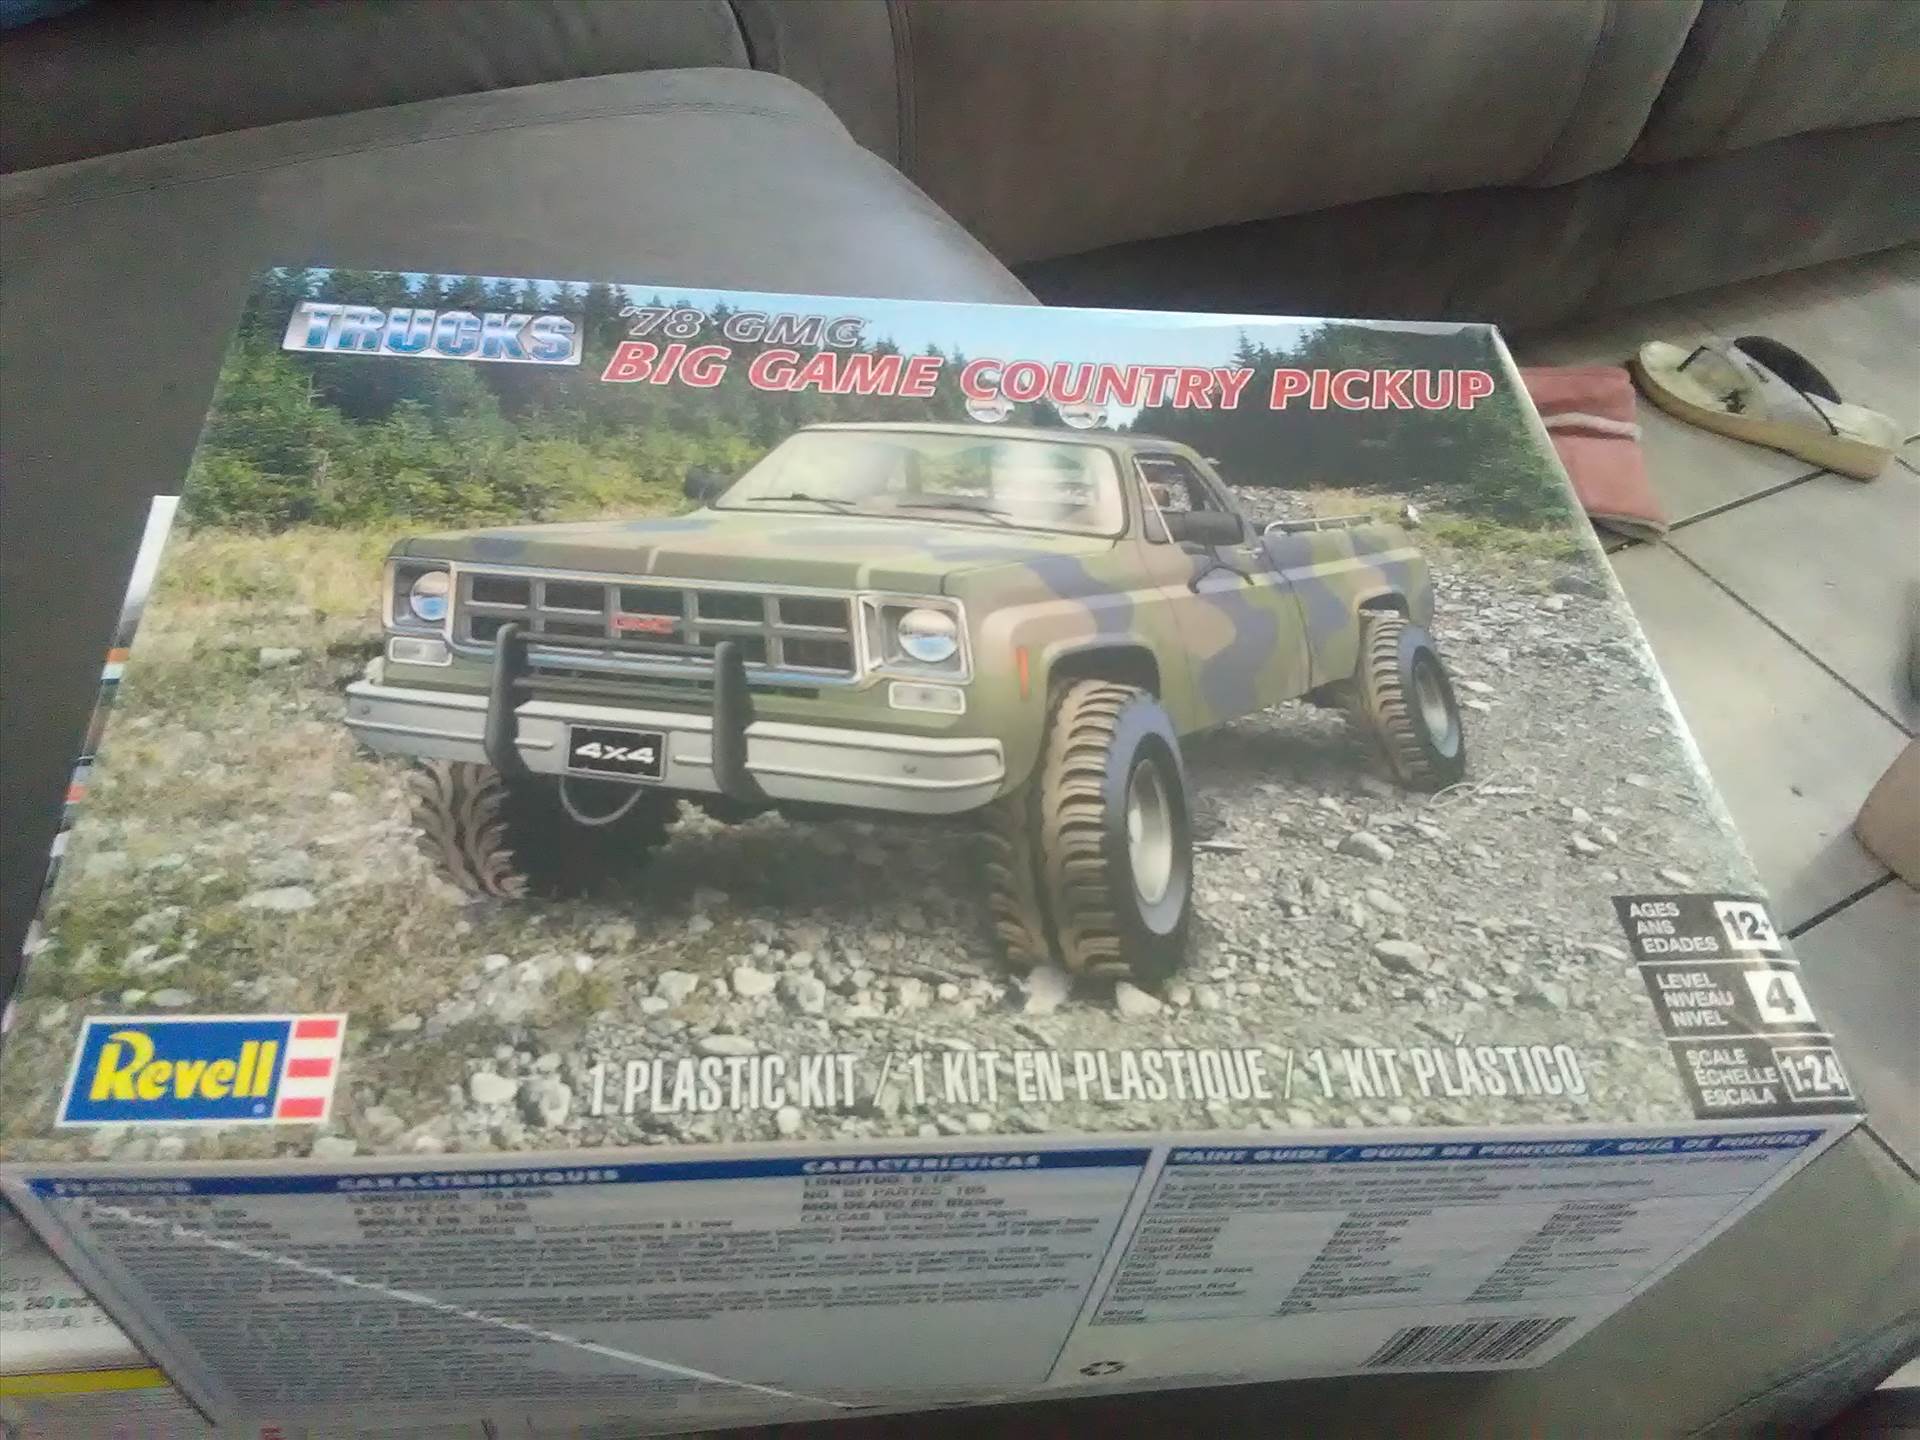
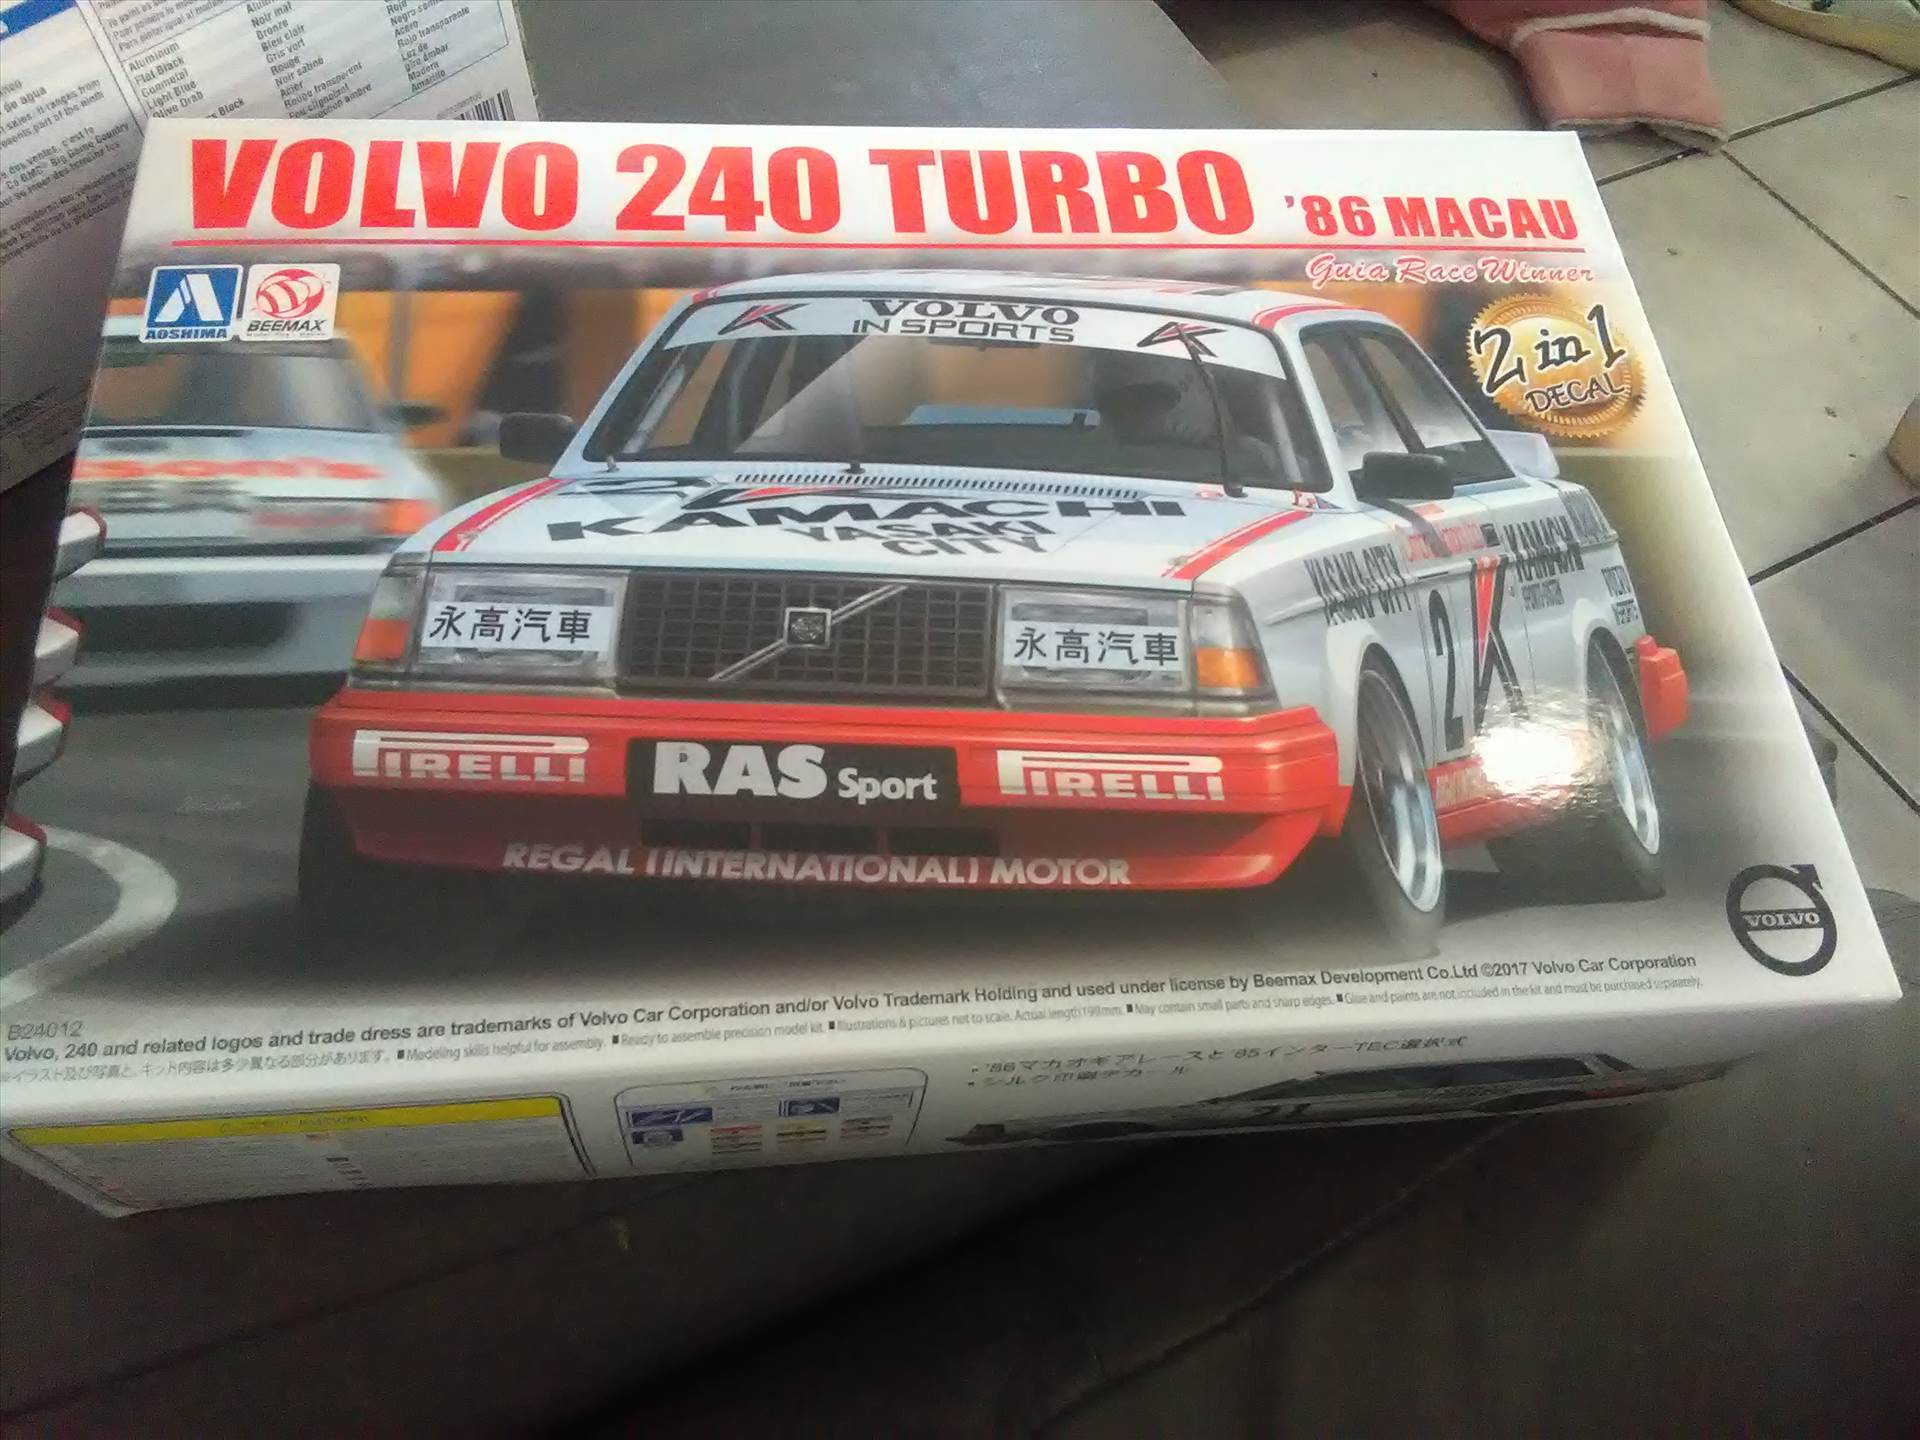
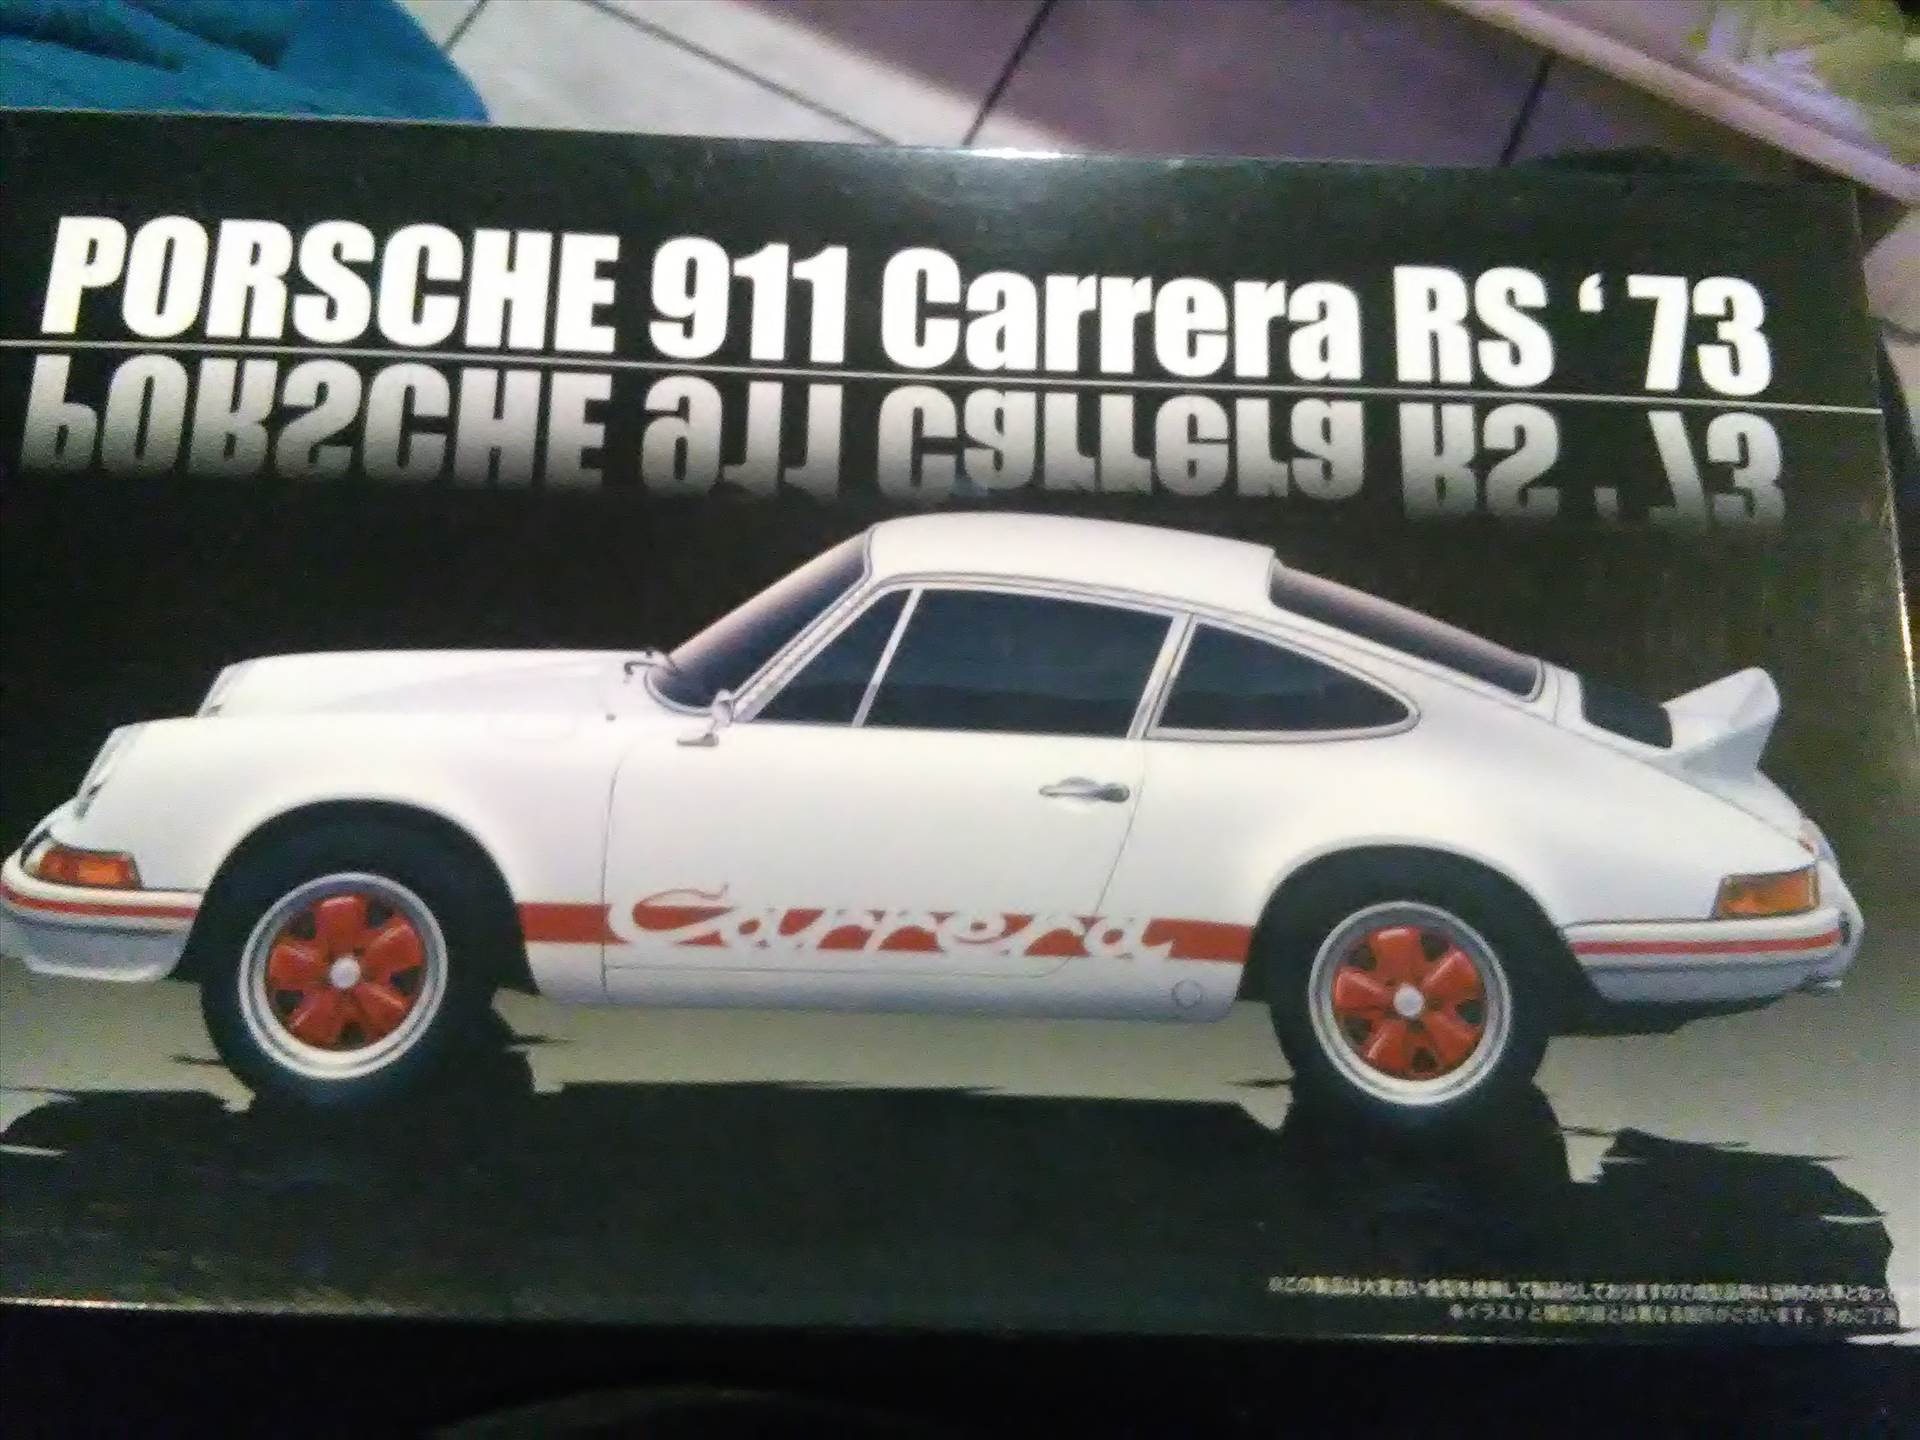
Afternoon Chaps
Couple of new additions
First up this newly released GMC pickup... I kind of like the new pickups etc that are coming out again like the Jeep Honcho and the Suburban.
This one is suitably decked out with big tyres and a gun rack
Something that's a bit on the naff side is that the camo scheme depicted on the box comes in the form of decals.... Clearly, they think car modellers cant paint their own camo
Next up is this Volvo 240 from Beemax. Whats not to like
And lastly this 73 Porsche RS from Fujimi
I've been on the look out for an earlyish 911 for some time, and this one fits the bill, has an engine and quite nicely detailed
-
2
-
-
12 hours ago, Pete in Lincs said:
Nice result, Steve.
Those wheels didn't make it to UK versions.
(Probably a good job too).
Yeah, Is a pity about the wheels, but I believe the Airfix one has the correct wheels so I'm havin a lookie for that
-
1
-
-
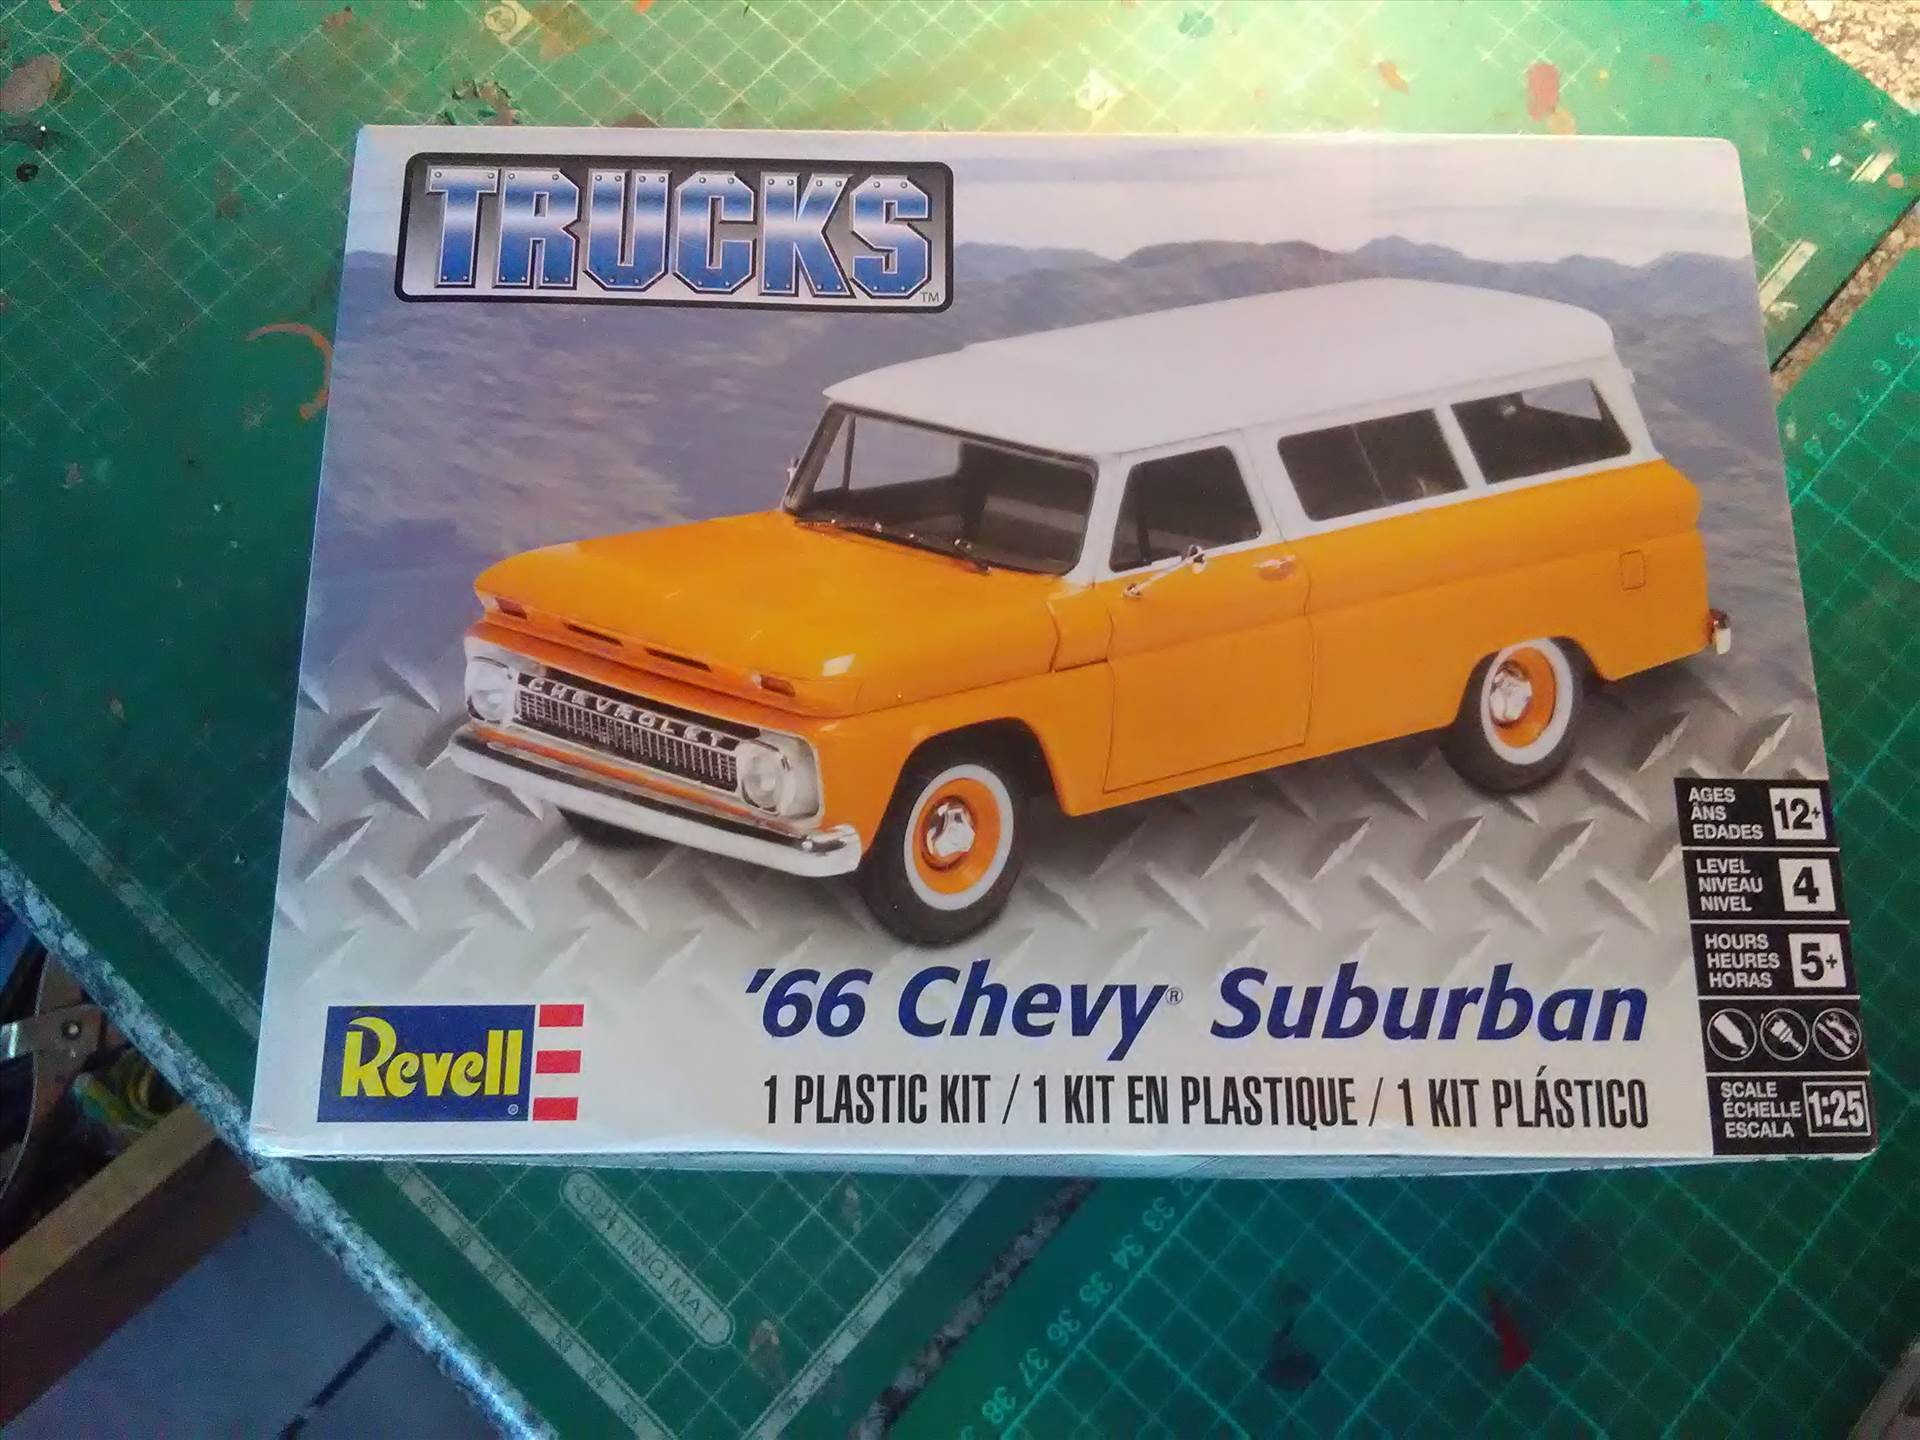
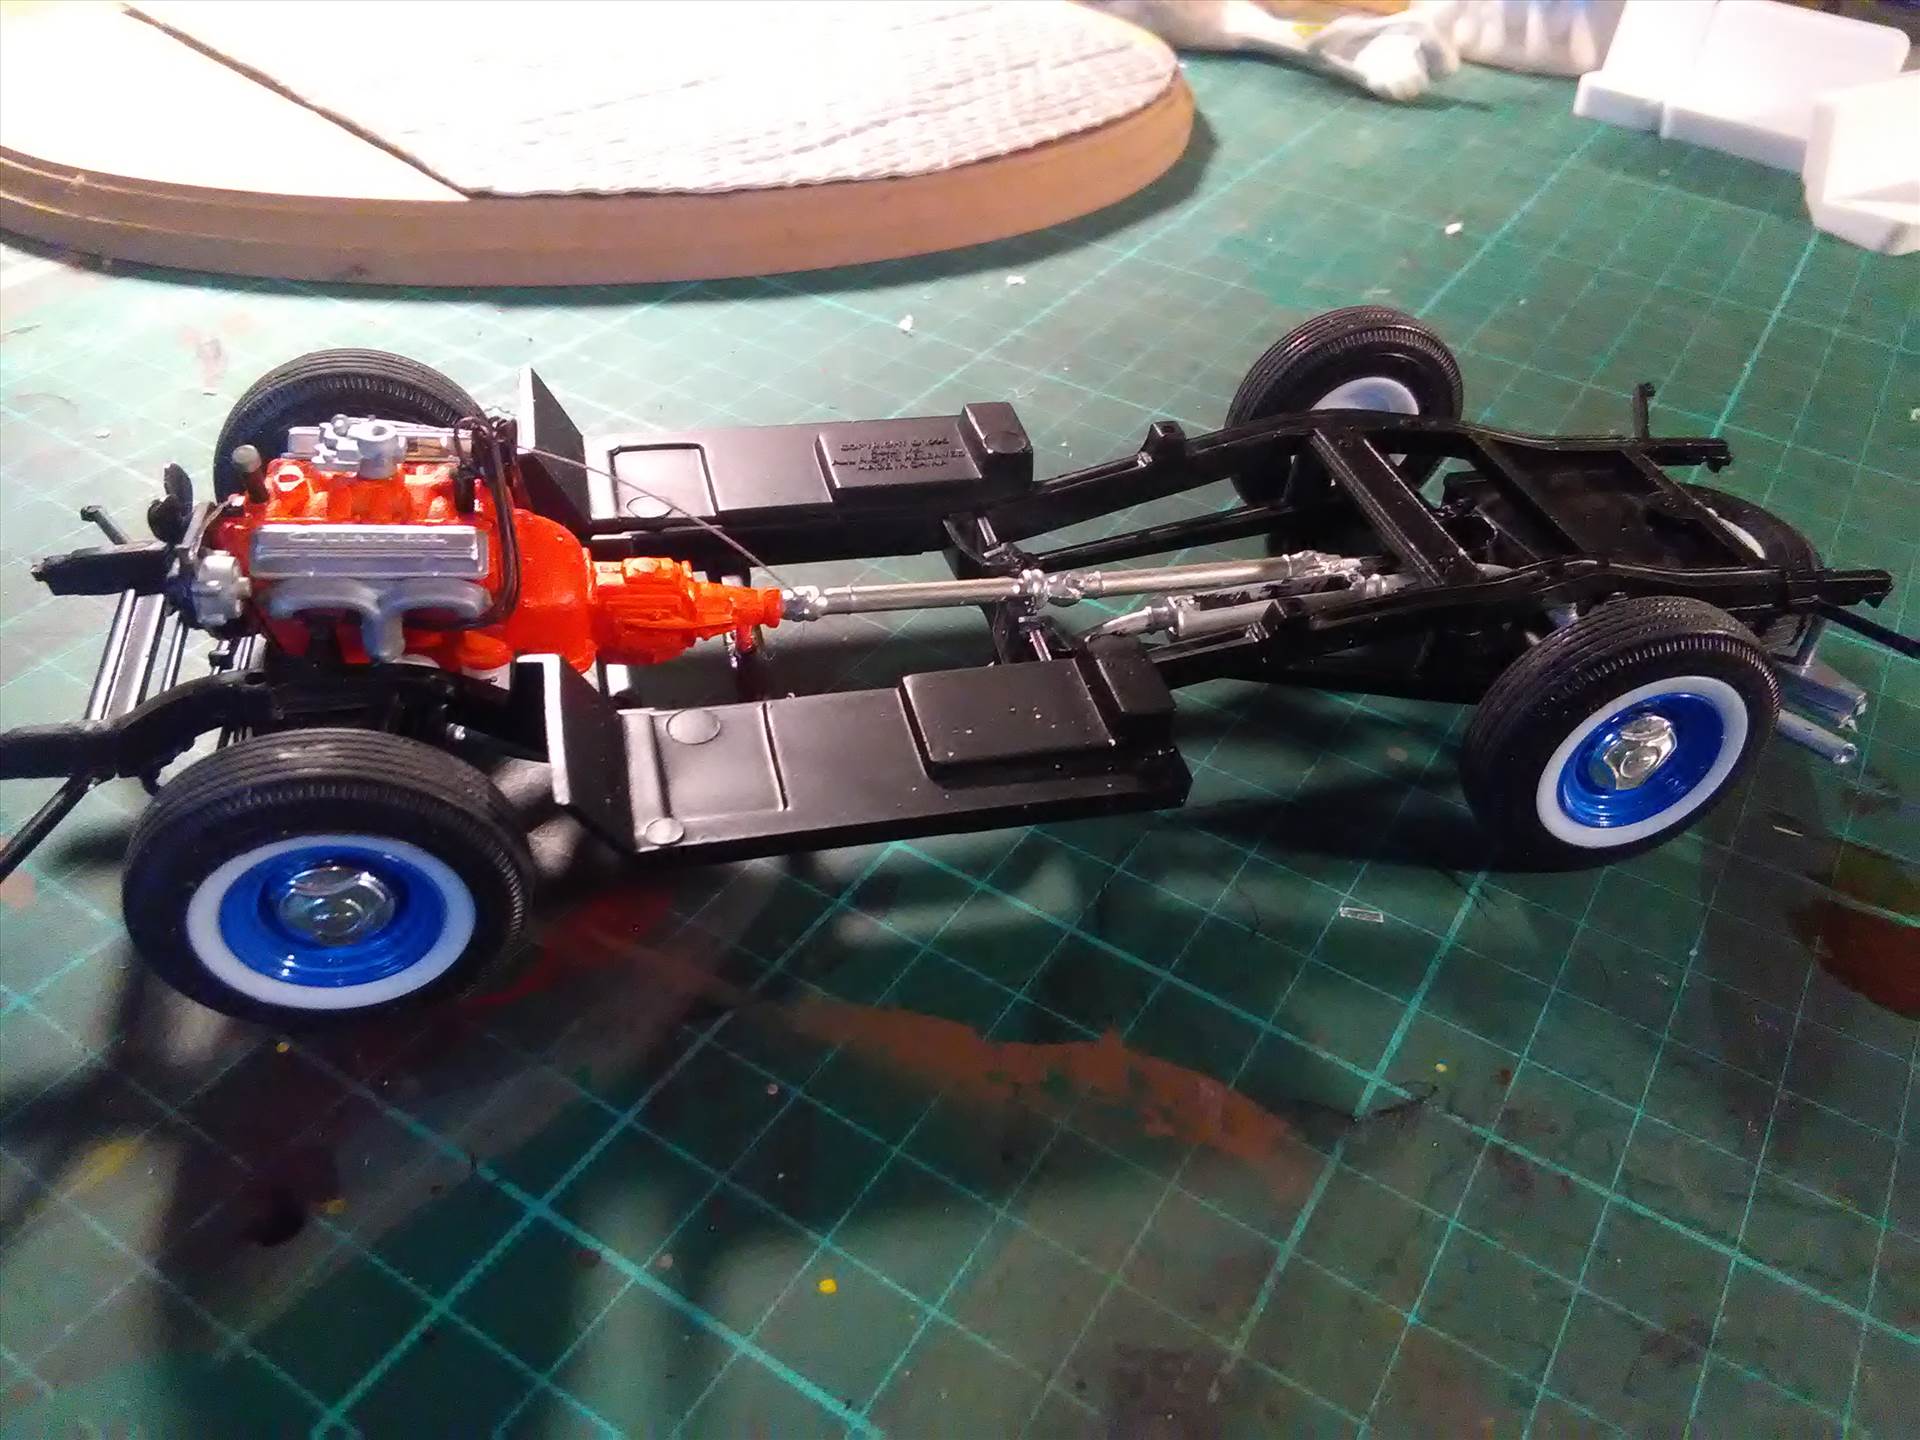
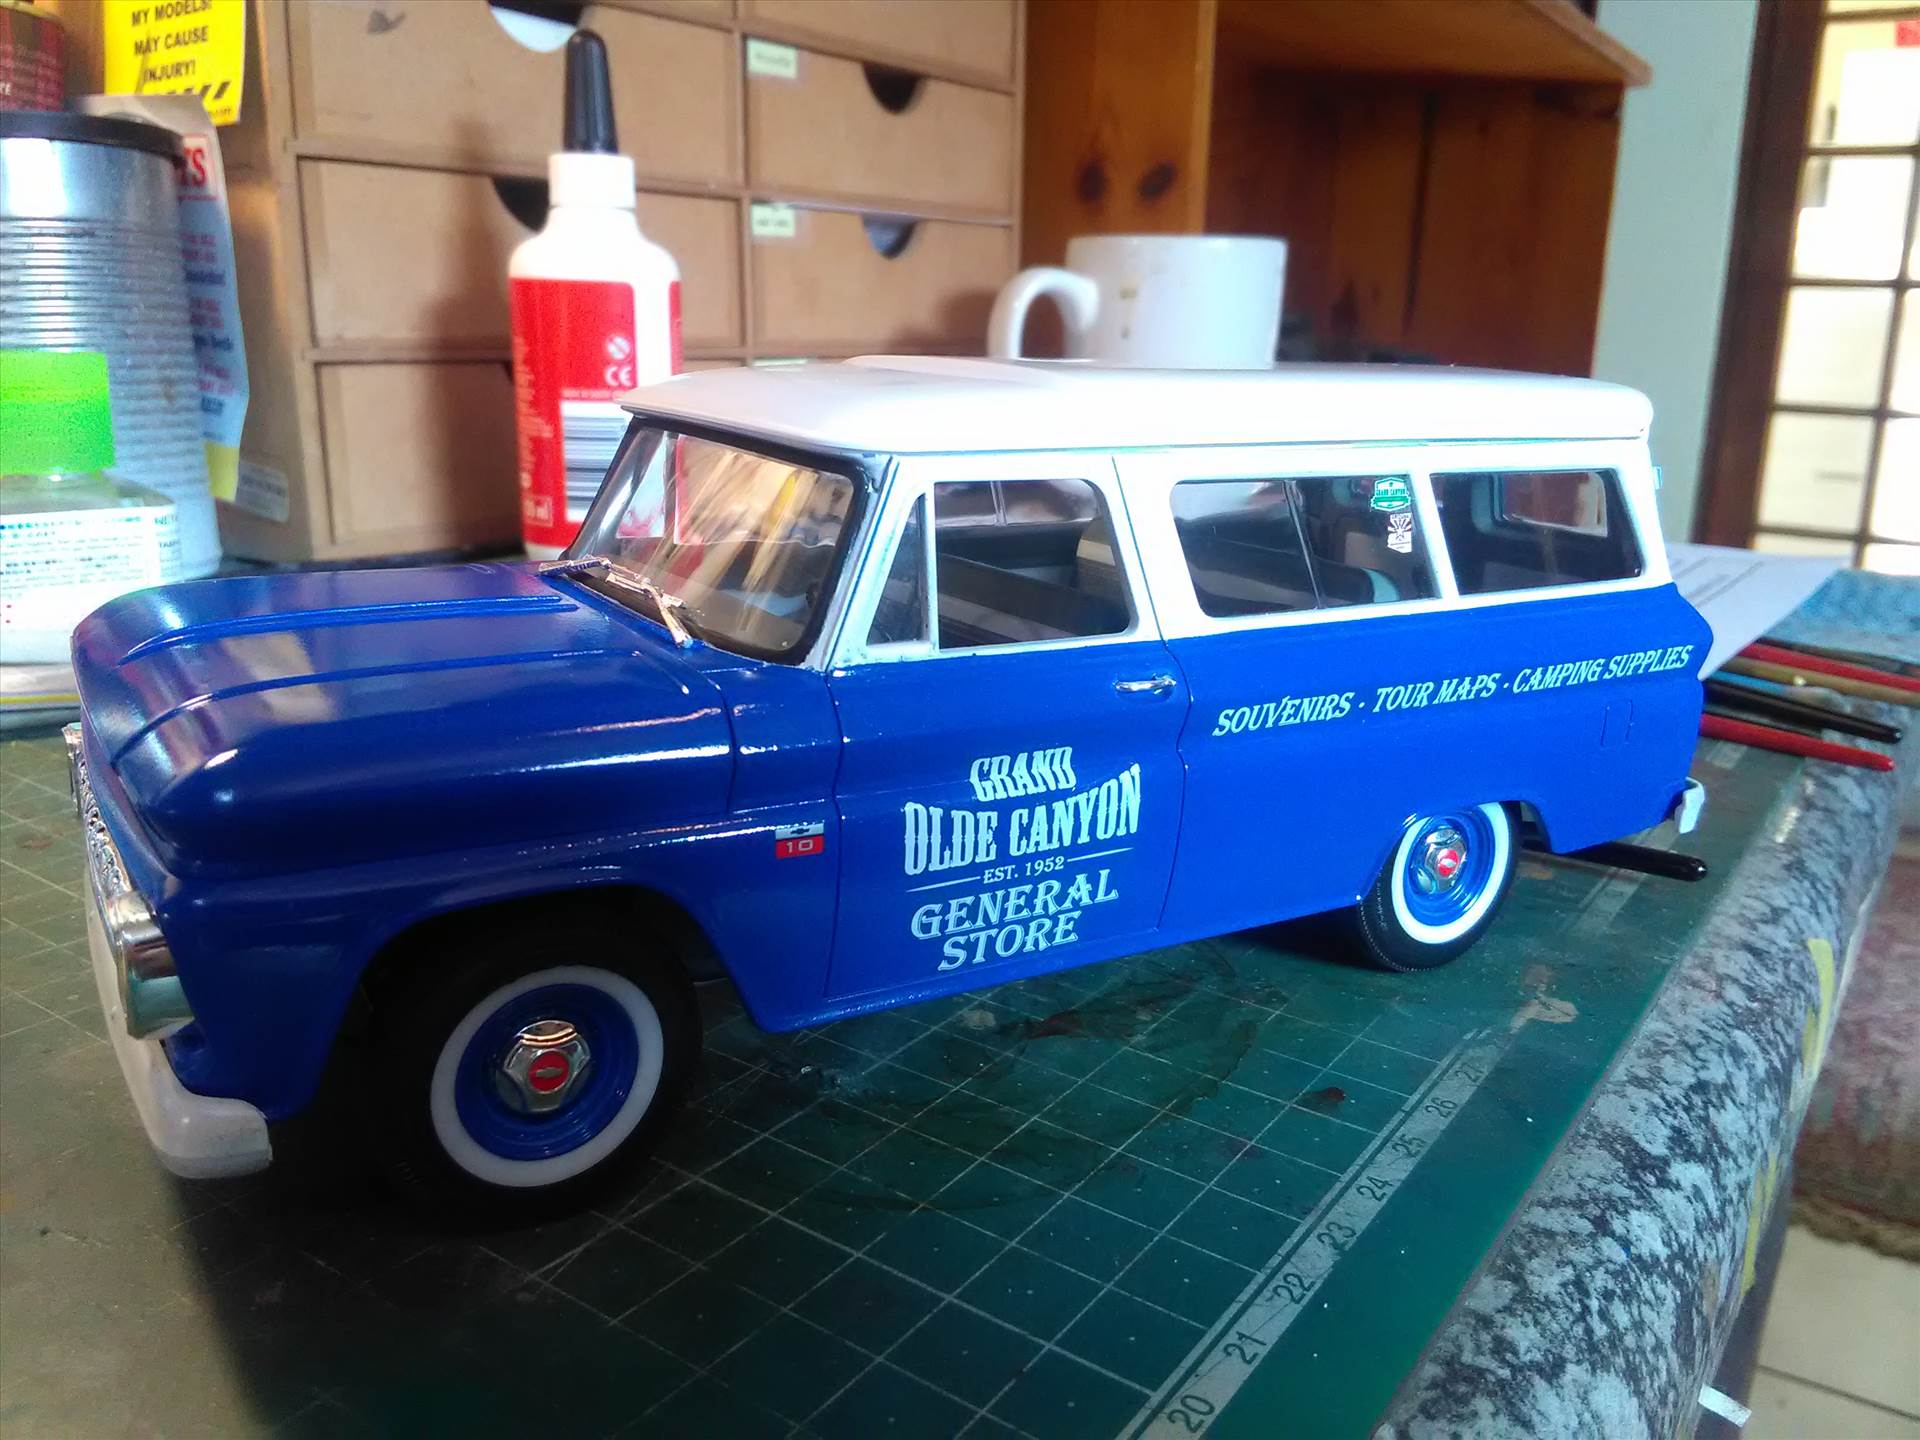
Morning Chaps
The second of my recent builds, The new Revell Chevy Suburban.
This particular model has been on my wants list for decades and it was finally released just recently and I was over the moon
It really is an excellent kit like all of the new Revell kits, but two things actually put me off when I started it. The amount of flash for a new kit was quite surprising as well as the quite think mould lines on the just about every single part, and, the chassis was quite warped and it took quite a bit of persuasion to get it all to sit straight.
The interior is quite nice with decals for the cloth patterns on the seats (they need dulling down with Flat Clear), and for the dashboard.
This one is finished in Tamiya TS 93 Pure Blue and Racing White TS 7, covered in Tamiya Clear. I added the decals cos it looked a bit boring without them.
This really is quite an involved kit and takes a while to clean off all the bits and bobs, but its worth it in the end.
One thing I didn't like is the Plated parts. My general dislike for plated parts anyway wasn't really boosted any by the super shiny chrome in this kit, so I just gave the whole lot a coating of semi gloss clear and it seems to have brought it down to a less LOUD shinyness
2 tips, you can build the entire body off the chassis which helps with painting, and there is a little lip above the windscreen that must be added. Build the body first, than paint it, then do the windscreen surround and add the lip last otherwise its quite a mission.
Really is a lovely kit of a classic vehicle
Thanks for looking
Mad Steve
-
10
-
-
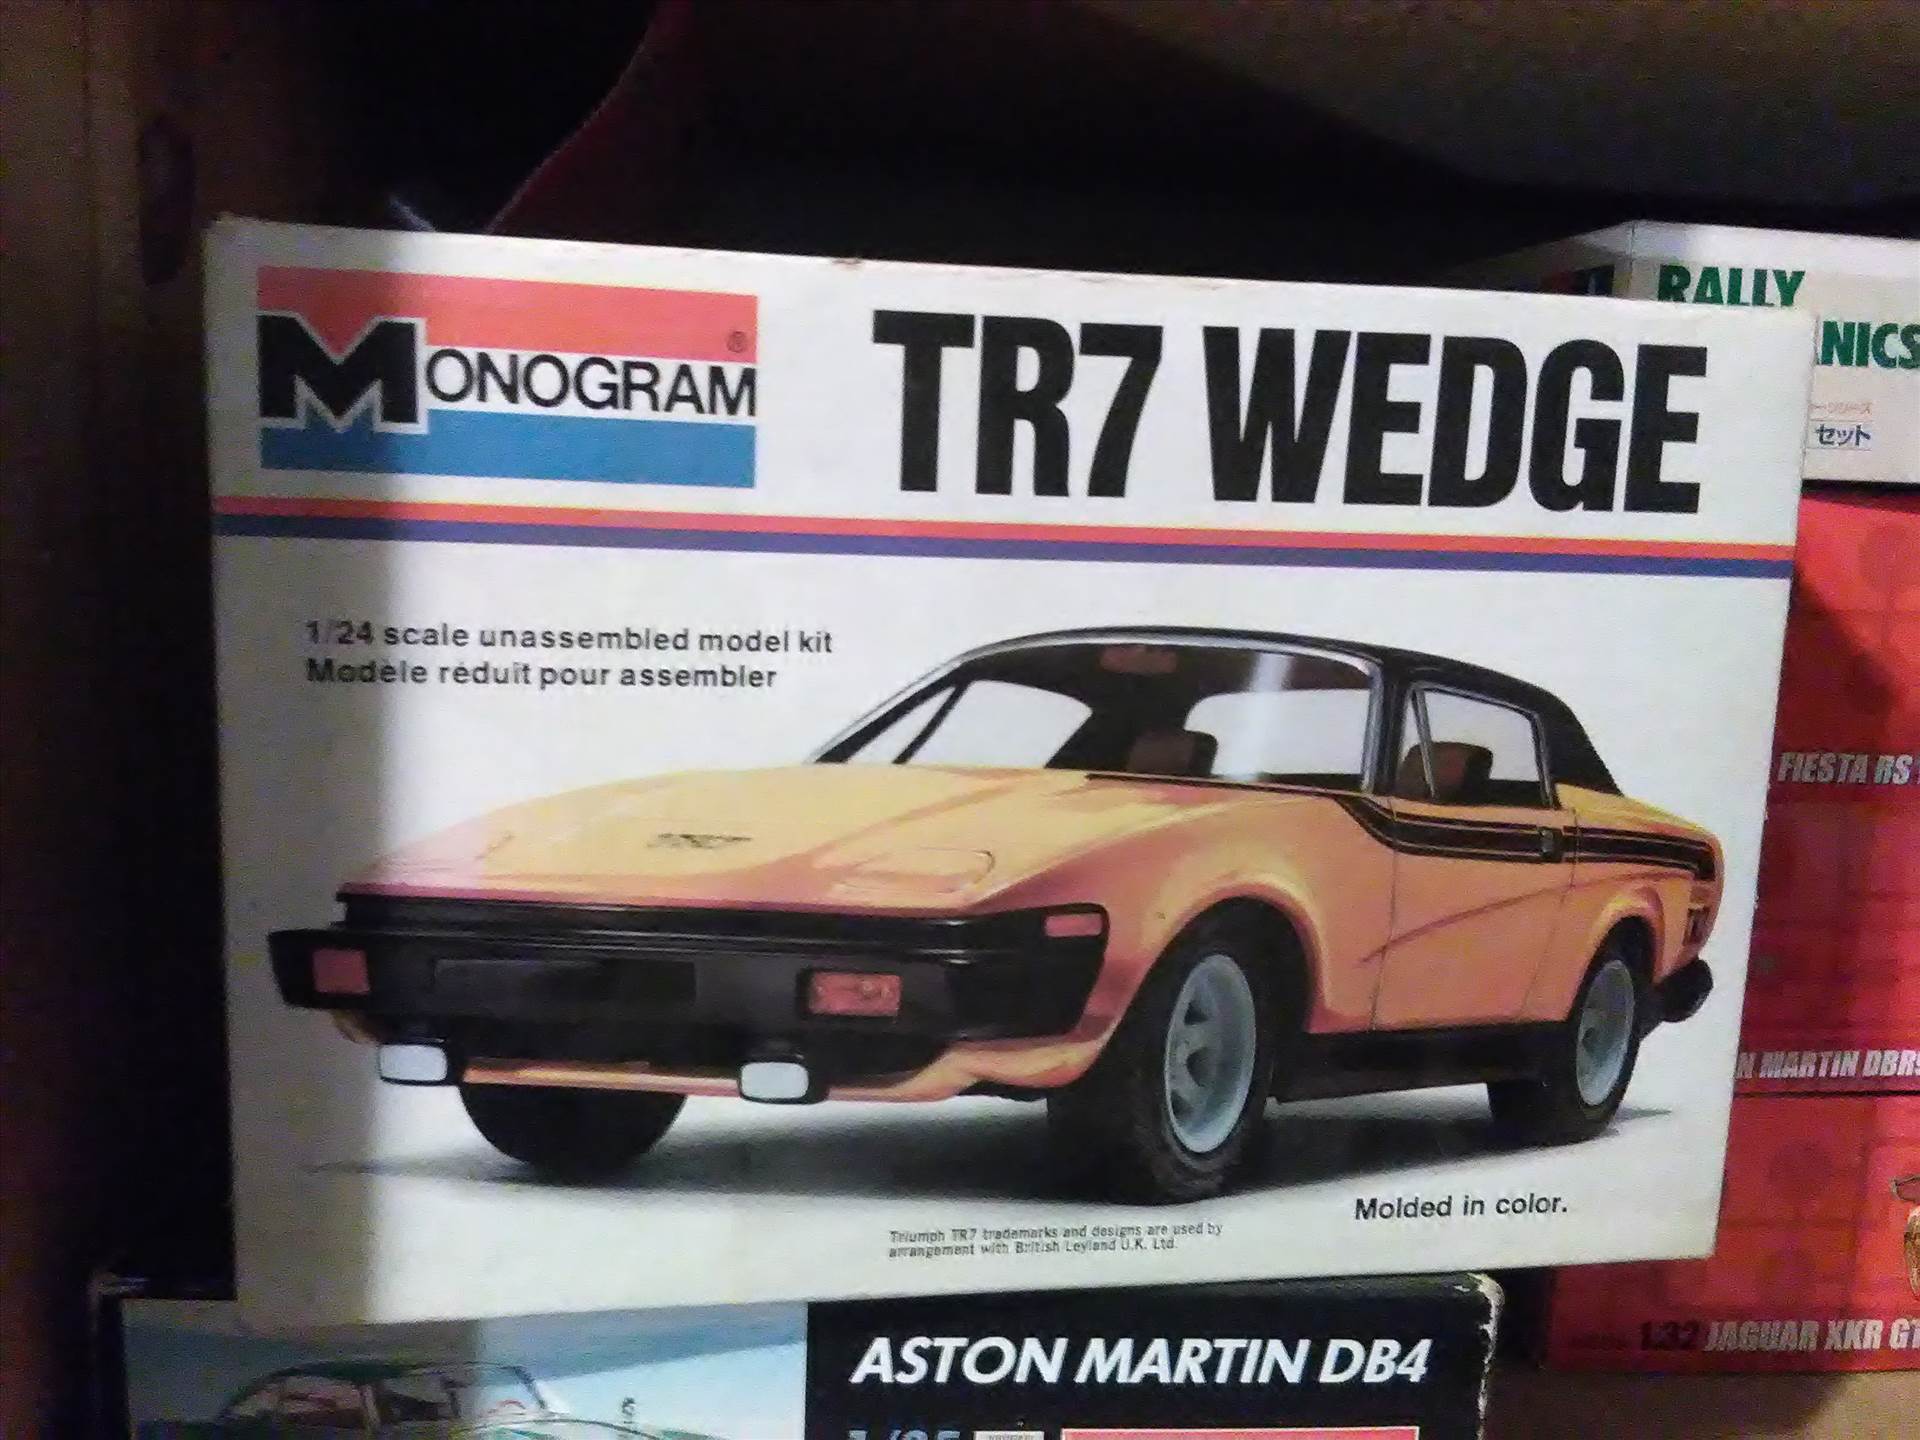
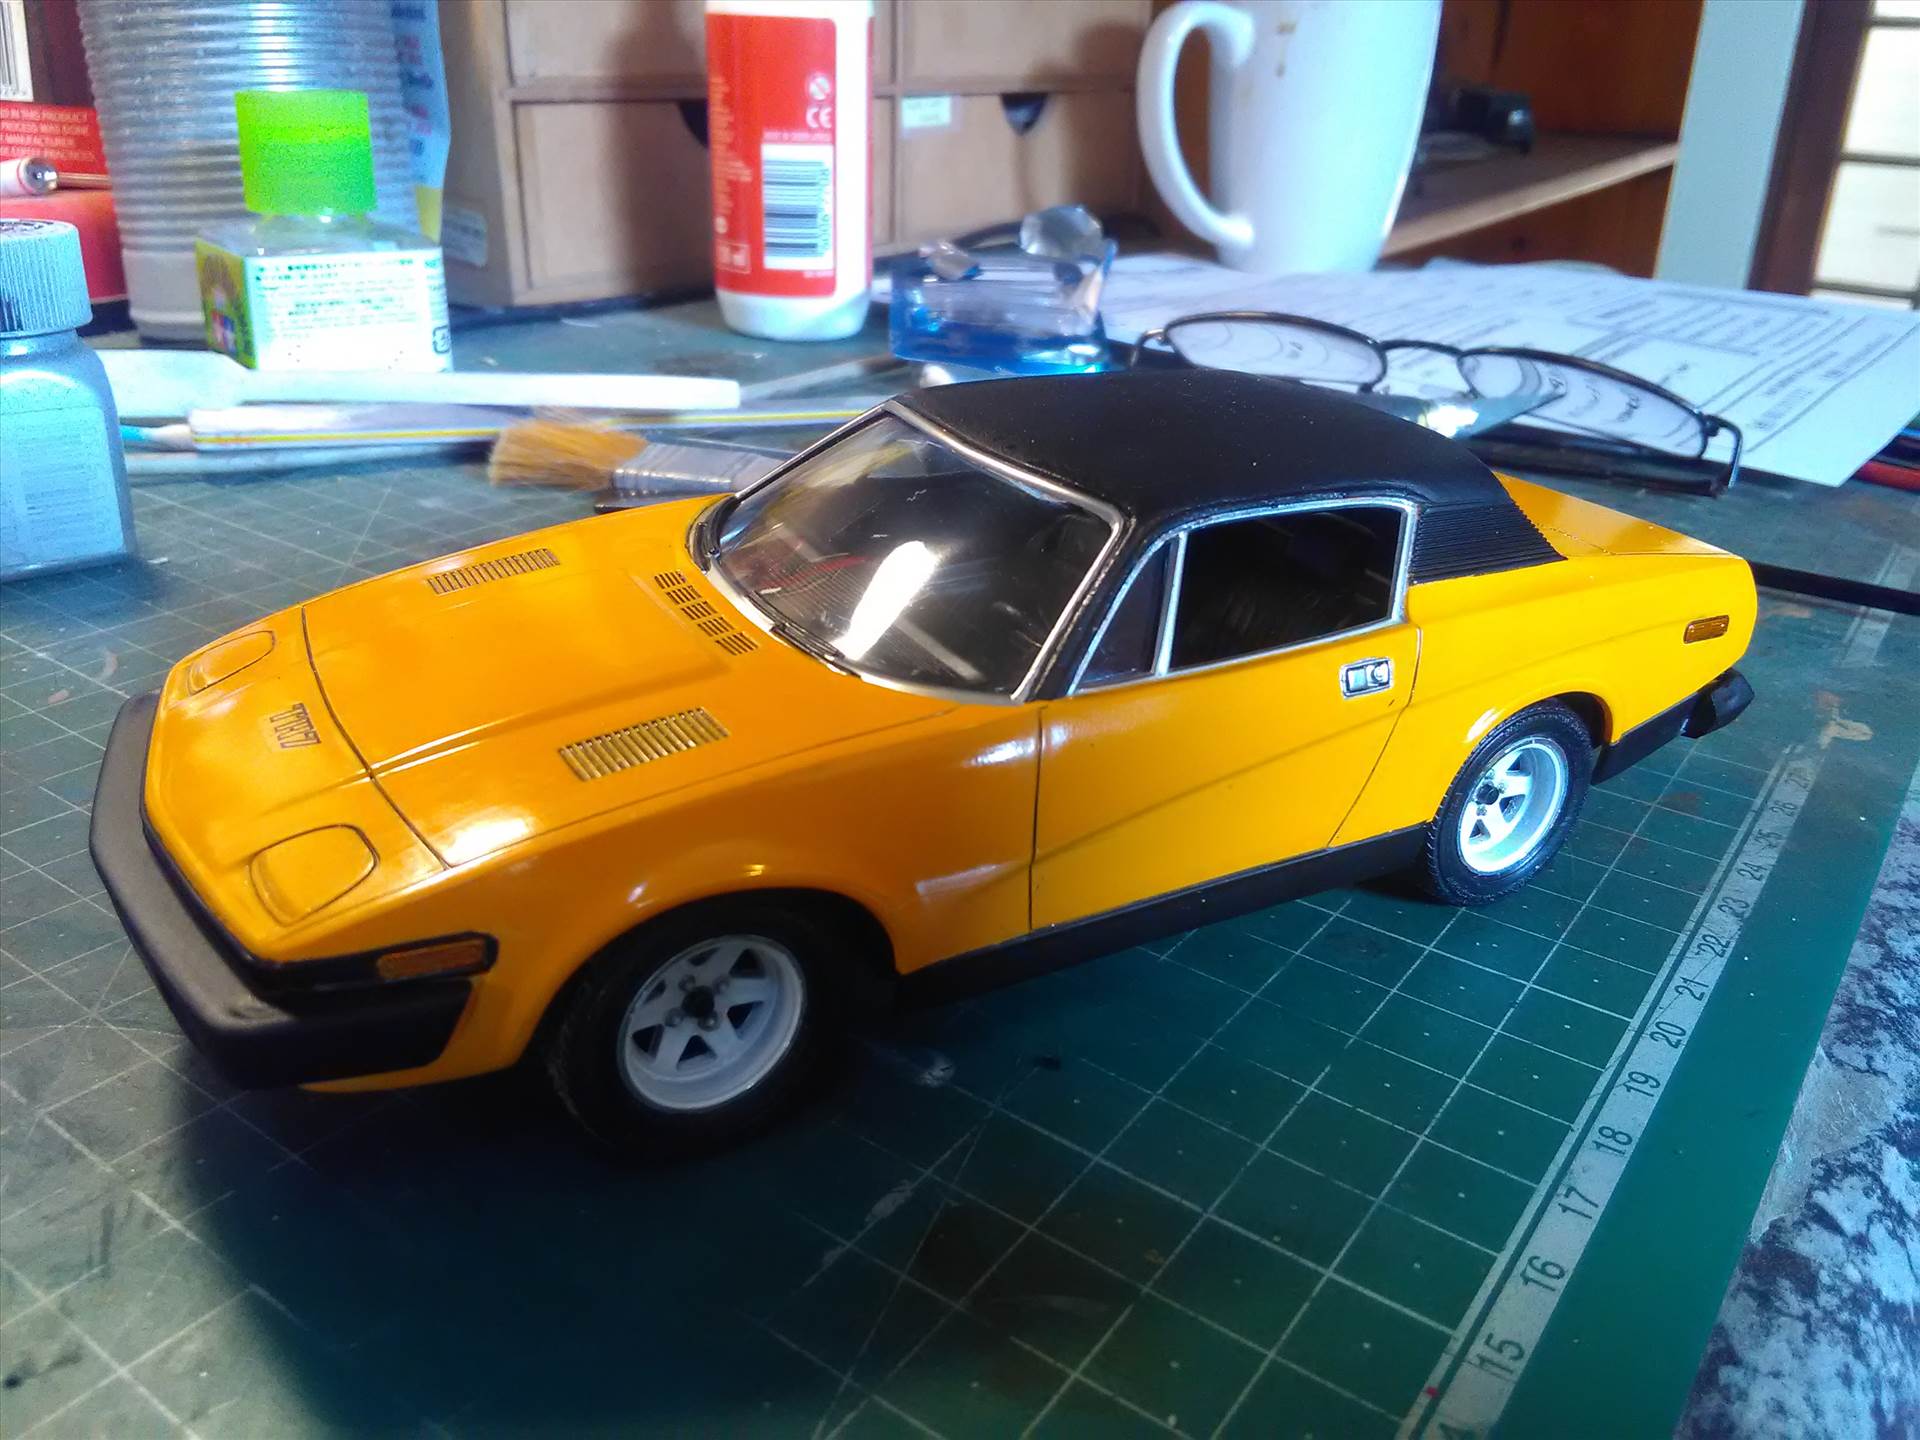
Morning Chaps
Yep, bet ya nearly fell off your chair when you saw that title
Monograms Triumph TR7!!
The kit, according to the box, is from 1977, and the box art really is quite, well....
If you are one of those, I want super duper detail kits and all the add on bits and I want it NOW modeller, I have a feeling you might be a bit disappointed. But for me that loves the classics and am revisiting the kits built in my youth, its a joy to behold.
Not a very difficult kit, its only got about 30 pieces, and its a typical monogram kit of the time.
Interior has a mind numbing 5 pieces, not that you can actually see any of it, but I added some instrument decals and a new gear knob.
Finished in Tamiya Camel Yellow (TS 47) and Semi Gloss Black Vinyl Roof and then the body was sealed in Tamiya Clear.
Just a bit unfortunate that its a left hand drive. The instructions say that it is a 'Victory Edition' that comes with the specific decals seen on the box, but my decals had a complete thromby when they hit water and turned into 37 separate decals. Not surprising as they are 40 odd years old.
Thankfully the ones that did manage to make it were the TR7 decal on the front and the Triumph badge on the back.
A nice simple kit, to get the mojo mojoing again. Absolutely love it.
Think it looks a bit better than the last time I built it in the late 70's
Thanks for looking
MadSteve
-
23
-
-
Morning Chaps
Spad, Nakamura did an Espada in 1/24th moons ago, and is still available on evilbay if you have a shufti around.
SMP24 also do one (did one) but its quite hard to find, resin and expensive
-
1
-
-
On 6/28/2018 at 5:21 PM, keefr22 said:
@MAD STEVE stupid question, when you say "don't be tempted to use water to wash off the paint when you take it out of the Dettol", what do you use if not water?
Hey Keith.
After experimenting with the Dettol quite a bit, I found the easiest and best way for me is to take off the stripped paint with a toothbrush and old rag, just wipe it all off and use a tooth pic to get into all the shutlines etc. Once the entire body is clean of paint residue, then clean it off with some soapy water and let it dry off in the sun.
If you use water to try and get the paint off the body, it turns into a sticky gloop that is twice as hard to get off and stains the plastic.
-
1
-
-
Nice one Pete
I now must apologise....
I have been making fun of your owl since 2014, but now I see that one make cars as well, I feel like a bit of a doosh now....
Sooooo sorry old chap, it was the tablets/devil/glue/cheese made me do it
Yes I LOOOOOOOOOVE your Owl
-
 3
3
-
-
5 hours ago, bentwaters81tfw said:
Afternoon Steve.
What sort of Dettol are you using? the disinfectant, or the cleaning spray?
Ta
Frank
Hey Frank, the brown disinfectant stuff.
-
1
-
-
Morning Chaps
Absolutely safe way that wont cause issues with the plastic or clear parts is Dettol.
One big bottle of Dettol, same amount water, leave for 24-48 hours, clean off with an old paint brush then rinse off with water.
Works with any paint and as I said before, you can use it on clear parts too.
You can use a lesser diluted mix but I believe it works better with water.
One thing keep in mind, don't be tempted to use water to wash off the paint when you take it out of the Dettol, leaves a horrible jelly gunk that's very very hard to get rid of.
-
2
-
-
The Weather,
in Chat
6 hours ago, Gorby said:AUSTRALIA IS FOR SISSIES!!!!!!!
Things to see in
Australia:SOUTH AFRICA...Box jellyfish- Portuguese Man o WarIrukandji jellyfish- Durban Blue BottleBull Shark- Great White SharkEastern brown snake- Black MambaCrocodile- Great Nile CrocodileFunnel web spider- Black WidowBlue-ringed octopus- SnapCommon death adder- BoomslangAustralian paralysis tick - African paralysis tick (three times bigger
)
And then, of course there's...
Lions
Cheetahs
Leopards
Elephants
Rhino's
Hyena's
Wild dogs
Hippos
Water Buffalo's
Honey Badgers
etc etc etc
Things to do in
Australian: South Africa...Laughing at Australian tourists who say, Aww I grew up in the bush mate, and nothing gonna scare(chomp)
-
10
-
-
The Weather,
in Chat
5 hours ago, Beardie said:Man I wish it was snowing! We have had two weeks of baking hot, sunny weather with hardly a cloud in the sky and not a breath of wind, today we had a bit of a downpour with a few rumbles of thunder so now it's hot and sticky instead! I hate heat! This wee glen of mine is way too sheltered I guess. Every time I have had to use the car the temp readout has been over 30 degrees C (35 once!!!) and I have had to let the aircon run for a while before daring to put a hand on the wheel which has been getting so hot it's been like touching a hotplate. Can't wait for the cold to come back so I can get some decent sleep at nights.
We have a natty invention down here for stopping that. Large brick building like a big box with a foldy uppy door on one end that, what for it, your car sleeps in Don't know if they will ever take off though, it seems most cars are like hormonal teenagers and leave their bedrooms in terrible states full to the brim with junk and then they just have to sleep wherever there is space
I know its reaaally funny someone in South Africa telling a chap in the wild and hairys of Scotland how to combat the heat
but failing all else, if you put a large bath towel over the windscreen Beardie the inside wont get hot.
-
1
-
4
-


Airfix announcement at Telford 2018, F6F-5 Hellcat 1/24 scale
in The Rumourmonger
Posted
Morning Chaps
(Dusting off my opinion that's been sitting in the corner since last years Thread)
.... More 32nd scale Cars, More 48th Scale Armour")
Eye thenk ewwwe...
Returning opinion to corner until next year")
Mad Steve