foureyes
-
Posts
238 -
Joined
-
Last visited
Content Type
Events
Profiles
Forums
Media Demo
Everything posted by foureyes
-
Thanks both Kevin
-
Yeah... The engine turned up today. Built the main body of it but not attached any p.e. yet as a lot of dry fitting will mean I will lose loads of bits through general handling. Here are the finished cowls. Here is the engine and the cannon and ammo box. And here is the engine dry fitted into the fuselage. I have had to file away the interupter mechanism off the top. It can't be seen at all when finished so not a problem. My biggest head ache is lining all this up on one axis. Cannon to engine to spinner. All in a straight line. It's a very tight fit and making the engine mounts won't be the easy job I was hoping. The engine mounts have to stand off from the engine to miss the supercharger. And the other side. I can't find any pics of this anywhere on the net. There are a few 152 h's with the jumo but i have not seen a 152 c with the db603 with the cowl open and the engine on display. Either models or actual planes. I would love to see how others have done this to get some ideas. If anyone sees one please post a link. Thanks for looking Kevin
-
I am guessing there is a cannon, by the spinner in the pics . I have one but i will have to scratch the ammo boxes I think. Kevin
-
Ok guys time to pic your brains. The reason I decided to build this with the cowls open and the a.m. db603 was because you can see right into the nose from the wheel wells. I thought if was going to put an engine in it might as well be on show. Trouble is. After a quick dry fit....... There is still a cavernous hole behind the engine mount bulkhead and the cockpit. In the 152h kit there is I believe a cannon and ammo box??? That is what i have seen on another build thread. But i don't think the db603 engined c had this??. What should I be looking to scratch up to fill this space? Any help much appreciated Thanks Kevin
-
Well still no engine!! I guess the kit wants my first born too? Kevin
-
I am sorry but I can't answer that. My list of builds is as follows. Oct 2011 revell hurricane. Oct 11 revell space shuttle. Nov11 airfix focke wolf. Dec11 smer seafury. Jan12 tamiya spitfire. And tamiya tilly. Feb 12 airfix stukka Mar 12 airfix Bf109 Trop. May 12 academy spitfire. And now this one. All others have been oob. First time for me whittling plasticard.. but as for the kit so far so good... Sorry I couldn't help but feel free to ask about the others I have built. Cheers Kevin.
-
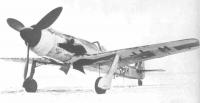
A couple more reference shoots for anyone interested.
-
Thank you. Have ordered another with the correct delivery details this time. Kevin
-
Thanks very much Kevin Last piece of the cowl detail. After I wiped the blood off! Definitely time for bed. Cheers all Kevin
-
I have cut away the cowls from the nose piece. Will give them a bit of a thin and add some detail. Sanded and tidied it up a bit and added some strengthening bars. Not all that are shown on the blueprints, as I have just stabbed my finger with my scalple and am going to bed!! Cheers for looking Kevin
-
Better pic.
-
Macro setting on the camers is very unforgiving!!
-
Done a little work on the cockpit. Still a no show on the Aires db 603. I put the wrong postcode in the order. Guess royal mail gremlins have it now. Will order another in the mean time just been busy building log cabins and only just picked this back up last night. Cheers for looking Kevin
-
Thank you very much kind sir Kevin
-
Thank you mark. Kind words of encouragement. Kevin
-
Thank you Kevin
-
Thank you Kevin Once again . Thank you Kevin.
-
Made a start on the cowl while I was waiting for the Aires engine to turn up. Instead of butchering the c cowl I tried to make them using the cut off h cowl. The c's was a bit longer. so lengthened it to match and added the little piece above the exhaust opening on the right, not sure if this should be there as its not on the drawings kindly supplied by Tim and can't make out on the pics. on the left I need to smooth out the panel lines and fill the large inlet hole. Also have to cut out and replace the strengthening bars in the correct place. Hang in there with me cos this is the first time I have tried anything like this, I have always built oob, with only just tried cockpit detailing with p.e. on my last build. . The little piece above the exhaust looks bigger on mine but its just the angle of the photo. Cheers all Kevin
-
I don't know what you are all on about!!!!! Doesn't everyone wear dodgy chipped silver nail varnish now?? Grazia said its on trend! I can't wait to start on the ta152. Razor saw at the ready. Cheers for the comments again Kevin
-
Thank you so much. Glad to know people take notice. The cannons are just drybrushed citedel bolt gun silver over a black base. Been using a citedel dedicated dry brush and its awesome. Then brass and copper on the ammo. Then a develin mud (citedel too) ink wash over to finish. Thanks again Kevin
-
This is my fourth model with my airbrush and number nine altogether. academy kit oob. Extradecals for the letters and sprayed dday stripes. Thanks for looking. here's the wip. http://www.britmodeller.com/forums/index.p...topic=234919465 Thanks so much for looking Kevin
-
All finished. Critique welcome. I like em dirty, so did it dirty.
-
Thank you very much tim. I didn't know that the cowl was one piece per side. I was planning on splitting each piece like on the 152 h's that I have seen with the cowl up. Saves me a few cuts. Good to see all the extra plumbing too. Am looking forward to starting this now. But going to wait till I have all the bits. Btw seen your ta-154 and its looking very good. Especially the wing walk lines!!!!! Cheers Kevin
-
Decided to get the Aires 4004 engine instead. Saves a lot of hassle.
-
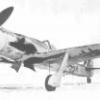
I know the c-0 had a db 603 fitted and as I have to cut the nose off I was going to fit a spare db601 from a Bf 110 I have lying around. Is this the correct engine??? I have a vauge idea how the flaps open but any ref pics from you guys would be cool. Here's a pic of the lump, can someone let me know if this is right please. I know its not 100% but can I change any fittings etc to make it at least look right?.