foureyes
-
Posts
238 -
Joined
-
Last visited
Content Type
Events
Profiles
Forums
Media Demo
Everything posted by foureyes
-
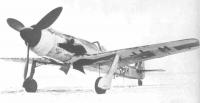
Using rlm 76, thinned right out, I have tried to recreate the various wear marks in the smoke stain. If that makes sense? Used a citedel dry brush. It has stopped it looking like a giant black slab on the side if the craft. Will do the same with the green on the wing root too. Thanks for looking Kevin
-
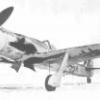
I managed to get a gloss coat on and about 3/4 of the decals on too. While I am not 100% sure these colours are right I decided to go with the kit colour scheme as opposed to the hobbyboss colour scheme I posted earlier. There are four different schemes on wings pallet and i don't think anyone can say exactly with conviction which one is 100% correct (that when everybody tells me they can say with 100% conviction what is correct). But i will do the best with the scheme i have chosen. Thanks for looking Kevin
-
It is a nice kit. Been toying with the idea of a little dio. A puzzled mechanic and Kurt Tank overseeing work? Must admit I love figure painting. Kevin
-
Finally got some paint on the main fuse. And added some serious smoke stains. Keep thinking I have overdone it until you look at the reference pics and I don't think I have. Yet. Decals next and some more weathering. Chipped the cowls with sellotape and am quite happy with them. A coat of flat will work wonders with it. After all that I couldn't resist a quick dry fit with the engine. I like it. How to attach the cowls is my next headache. Thanks for looking everyone. Should speed up a bit now there is light at the end of the tunnel. Kevin.
-
Not a lot to report. Kids off school so no free time. Had to remove the top part of the cowl from the fuse because i was not happy with the join. Reattached with a much cleaner fit. Added some more plumbing to the block inbetween dramas. Not sure what this is but its in the pics. It goes into the nose I think and am guessing its to do with cooling. Thanks for looking Kevin
-
Thank you. I will try. Looking back at the previous posted pics its amazing how the colour changes from each shot! All lined up together all the pieces are the same colour. But each pic they look so different. Anyone have any tips on taking better photos?? Went to the faa museum with the kids today and i really want to build a seafury. Luckily I have the trumpeter 1/48 hanging about somewhere. But i will finish this first. Promise. Cheers all Kevin
-
Ok. Had a week off again and i think I does me wonders. I wasn't happy with the alu I did last week. I started over with alclad. I looked again at the reference pics and have heavily shaded the correct places under the wings this time. It's an odd weathering pattern because the alu is almost black in places but the paintwork not so. I am sort of weathering as i go because there is a lot to do and I will be building in layers as i paint. Lots of shading too. I have shaded and chipped the rlm 76 in places but again this will be added to and built upon as i progress. Gave the cowls a coat too with some oil stains but no smoke stains or chips yet. Here's a few pics. Cheers for looking Kevin
-
Thanks guys.
-
Looking good. Might finish it before I finish mine!!. Cheers kev.
-
Gert lush that is.. I got the same kit and it is a lovely fit etc. Will look forward to this after my current build. Kevin
-
Congratulations to all at britmodeller for the revamp. Gave me a funny five minutes but looks awesome. Quick pic of some paint on the thing. The light is catching random flecks in the paint work in real life looks a lot better. Got to mask off where the aluminium starts and finishes. Hopefully when fully weathered and coated in flat it will look the part. Didn't really want to post this, was going to post loads at the end of the week, but wanted to give the new look site a try out!! Cheers all Kevin
-
Thanks very much. Will get on it again in the week hopefully post some more. Cheers all Kevin
-
Thanks. There seemed to be quite a variation of different shapes. Mine match none but they fit and only the bottoms will be seen. I think the test bed ones and the ones fitted to the various aircrafts were all a bit different and without seeing the actual ones on the c0 I had to use artistic licence a bit. Cheers kev
-
Had a couple of pm's about these wires. It's a 40 thou by 30 thou piece of plastic strip with six holes drilled in it. And three pieces of fine fuse wire looped thought it. Trimmed to length and stuck with ca in place. Cheers Kevin
-
Thanks stu. Five weeks and counting.... Ok. Had a week off from this as I was getting a bit fed up with it but tonight I had a good old bash at it. I have mounted the engine on its mounts and attached it to the bulk head. Finished the aluminium tanks on the side of the engine along with their plumbing and attached. Also added the small wiring harness by the supercharger. Added a few extra bits of pipework on the other side of the engine. Closed up the fuselage. figured out at last what order to assemble this load of bits. Especially the open cowls. I.e. how to attach them and paint and mask it all.Snapped the nose off from the top piece of the cowl parts because there was no other way to mount the engine with that there. Also painted some of the detail inside the wheel wells and stabbed myself AGAIN. This kit truly wants my blood. Anyway here's the pics. Here it is sat inside the fuselage. Here is the wheel well detail not too much to see but there will be a lot more to add. I enjoyed it tonight. I think I will make a point to have a week off when its cheeseing me off. Learnt a lot doing this. Have used bits of extra photo etch from the engine to finish the engine mounts off. Fuse wire for the tiny wires and plastic coated steel for the thicker pipework (looks a bit shiney but will give it a coat of Matt) only got some plumbing around the rocker covers to finish the engine off then I can get painting proper. Thanks for looking Kevin
-
Lovely work. Almost a shame to close it up. Kevin
-
Thank you. Hope its sooner rather than later. Child number four is arriving in 6 weeks and i fear my free evenings will be disappearing. Quick pic of the engine mounts. These I have left thick where they join the frame. They will be thinned when I know exactly where to cut them both length ways and also what height. The important thing was clearing the supercharger and fitting under the cowl. I have a few pieces from the engine photoetch to use as the engine mount bolts. Also need to make the bottom diagonal braces. Cheers for looking. Kevin
-
Thanks Tim. I really enjoyed it too. Was a relief painting something, felt like ages since I picked my brush up and worked on something you would actually see. Cheers Kevin.
-
Thanks. Quite glad just to paint something at last. I will keep my eye out for your wip. This kit is quite simple if you want it to be. Let us know how the hobby boss kit is. Cheers all Kevin
-
A stuff up on the boxes then. Luckily you have to look hard to see them. But at least the mk 108 and ammo box is correct. Glad I didn't attempt the engine mounted guns. That really would have been a waste of time. Three weeks ago I didn't even know this plane existed. Now I understand at least a basic overall plan of it. And as I have said before this is a huge learning curve for me. Even building ammo boxes that don't exist means next time, I will know what I am doing and probably do a better job. Added some paint to the engine. Black with grey dry brush. Black wash more dry brush and a brown ink wash. Nice used look. Also painted the cowl interior. Left a lot of oily wash around the bottom of the cowl. Guessing the inside is as dirty as the outside? Cheers for looking Kevin.
-
Ok a little progress tonight. I have built the lubricant resevoir on the right of the fuselage and two ammo holders. One on each side for the cannons in front of the windscreen. I haven't made these as you can't see all the way in through the wheel wells to where they sit. Also added some wiring for interests sake. I think you will agree the view into the what was once an empty void is now much improved. Also added some p.e. to the engine and made the engine mounts. Had to sand away a lot from the inside of the top of the cowl to get the mount to sit properly. Looks ok. Need to add paint and plumbing etc before I can start building it together. Have to say not having done anything like this before, it is quite hard to get used to not making much progress after hours of fiddling about. Not saying its not enjoyable, I am very happy with the way the engine lines up and sits under the cowl, its just very different from building and painting straight from the box. Anyway here is the engine lined up with the cannon and almost ready for some paint. (i hope?). Thank you all for looking and special thanks for all the amazing references you guys have posted and sent me. Kevin
-
Lovely work Tim. very nice subtle weathering. As all planes should have. Imho. can't wait to she her standing on her legs. Thanks again for your help on my build. Kevin.
-
Added a piece of ally tubing to keep the engine on the correct axis. Finished one engine mount. But now the kids are up.
-
[quote name='hacker' date='Jul 21 2012, 09:04 PM' here is one that l found this among my stuff. still looking Awesome.. that engine mount looks chunky. Just right for my fat fingers! Kevin
-
Thanks so much for all this info. Although this now means I have more work to do. Now I know what's there I can't ignore it!! But i am limited by the space I have to work with and three kids under nine with one on the way!! Thanks all Kevin.