

foureyes
-
Posts
238 -
Joined
-
Last visited
Content Type
Events
Profiles
Forums
Media Demo
Everything posted by foureyes
-
blohm & voss bv141 b-02 airfix 1/72
foureyes replied to foureyes's topic in Work in Progress - Aircraft
Unusually. The first thing I did was close up the fuse. Then joined on one wing, a stubby middle wing and the tail, all before I got near the cockpit. Lost some surface detail but no biggy. A little filling and sanding but only minimal. Here's so far with the cockpit in situ. That's all for tonight. Kev. -
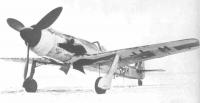
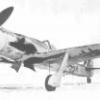
I decided to have a pop at something a little smaller and a bit more fun. The Bf110d3 I al doing is great but am not getting enough time to sink my teeth into it properly. So today I grabbed this one. Seen a few pics and its a strange one. I think in all ten craft were built for evaluation but they weren't taken up for service. Shame because its a lovely looking thing. The canopy looks evil... I am not going to enjoy masking that!!! Lots of rivets and raised detail but its staying. Like I said this is for light relief. . . There is some detail in the cockpit but I think I am going to put the crew in. One lays on his belly and fires from the rear, using a small opening. Cheers for looking. Patience appreciated as I may get no further than opening the box. Kev.
-
tamiya mk 1 spitfire diorama
foureyes replied to foureyes's topic in Ready for Inspection - Aircraft
Thanks very much for your comments Kev -
I will have them both on display I think. But i may be adding some more detail to them and the bulkheads and i will change the wire colours too. I thought I had seen a pic with red wires but it was my memory playing tricks. It was red number stencils on the block. Shows you should always look at a pic. Kev
-
Well I would say she looks awesome. Well done juggling kids and models ain't easy. What's next???? Kev.
-
Got some paint on the engines, mounts and did some more on the fuselage. And this is all together how far I have got. Cheers Kev.
-
Cheers guys. Had five minutes and closed the fuse up. Also started on the engines. They are lovely. Nicely detailed with some sensible plumbing on them. Very Fiddely and the instructions a little vague concerning the cooling pipe which comes from the front. It doesn't show its route properly so you can't see exactly where to put it until its nearly finished. But it needs to be in place earlier. Having built an Aires version of the 603 on my fw152 i think these are awesome. They should look great when painted. This was the 603 Aires version. Cheers Kev.
-
I have a lagg 3 to build. But the instructions are all Russian I think??? Watching this one for some pointers. I wanted to do mine as http://mig3.sovietwarplanes.com/lagg3/ski/ski3.jpg no canopy and with skis. Haven't got the skis but should be ok to scratch. Yours looks a bit of a handful. What colours you going for? Cheers Kev.
-
Ju 87 Stuka G2 - Academy 1:72
foureyes replied to pablomellis's topic in Work in Progress - Aircraft
That looks great. I built the old airfix 1/48 version of this earlier this year and this looks much better in terms of detail! Kevin -
Looking forward to seeing this one on her legs. Well done so far stu. Cheers Kev
-
Found a little time today and finished off the cockpit. Also started the cannons at the front. Rlm 02 from vallejo with silver and some ink and drybrushing. Thanks for looking Kevin
-
Sorry, forgot to say congratulations. Sleep deprivation doing its job. Kev
-
Thanks very much. It's my first go at one of these at any scale or make. My builds are leaning a little luft at the mo. But are about 50/50 overall. I like the shape of spits and hurricanes etc. And have done two spits so far. This is model number eleven so far so very much still learning. Both in techniques and as to what I like. I love weathering so dirty things I enjoy. I have a few German tanks to do at some point and i can go to town on them. Cheers Kev
-
It's been a struggle to fit any time in at the mo dad duties split between all four of them is taking its toll. Still not cracked open the airbrush. Gave it a clean and polish and can't wait to load it up. It took me ages to decide if not to do this kit but the detail is so good I couldn't resist. It fits together very well but don't believe the instructions in their steps. I.e. best dry fit first to check the order. The cannon tray would not fit as shown at all. but once in it fits fine and looks the part. As I said before beware little bits not on the instructions at all. There are at least four pieces in the first two steps that arn't accounted for but should be. Good luck if you decided to start one and do a w.I.p. I would love to see someone else's. Cheers Kev
-
Got a little time so did this. It's the underfloor cannons and operator's seat. The cannons won't be seen at all but they are well detailed and painted with bolt gun and a black wash. They also wouldn't fit in built like in the instructions so i had to pull them to pieces again to fit. Like so. Slowly working my way to the rear of the cockpit. Cheers for looking Kev
-
Stu. Will have to look at some decent period pics of these craft which i haven't done yet. I should imagine they got shot down before they got grime and wot not on them. But you know i like em dirty so may see. Cheers Kev If anyone's got any links to period pics I would be most grateful!
-
Stu This was my first attempt at pre shading and have never bettered it. That was in May I think. Two models ago? I used tamiya paint and it was lovely to use. Also the preshading on my spit I liked, but not as pronounced. On the 152 I did a bit of everything. Except throw dirt at it! Kev
-
Looking great stu. I love the shading. Have you done your usual job of post lightening the panel centres? Or have you pre shaded this time? Either way looking good. Sorry i haven't kept up with this build but been a tad busy!!!! Cheers Kev
-
Cheers stu. I've probably said it before but I enjoy painting more than anything. Building is ok but i would rather spend my time with my brush. I guess that's why I have never used painted p.e. for I.p.s or anything. I know they look better but i just really enjoy the satisfaction of painting them. I haven't used my airbrush at all on this build as i was waiting for the aztek to turn up. Thanks for the heads up on the cleaning. I was close to soaking it in thinners last night but didn't. On this one the body and adjusting roller are all metal which i thought the thinners wouldn't touch but i guess the interior isn't. I bought this one because a spray cleaner destroyed all the rubber seals in my old airbrush, it looked fine but the air valve jammed on and paint leaked out the seals around the nozzle. I can't wait to get some paint through this new one. I have watched a few brett green videos and he uses the resin version of this. Seams a lot less hassle than my other exterior mix ones. Will yet you know how I get on. BTW little one all fine and home yesterday so i will start to feel the effects of sleep deprivation soon. Cheers Kev.
-
It does feel like painting a breeze block at the moment. Still loads more grey to go. All be it a different shade of grey. Cheers Kev
-
E bay has the sticky stuff. Get it delivered...it is quite cheap on there I think. Kev
-
I have tried to use tooth pick method but the brush painting stands out if you have airbrushed the rest. Does work though but hard to get a straight line. Cheers Kev
-
Have you tried the sticky foil?? Comes on a roll. I am assuming you are using the white glue Matt side like you did last time? I use the sticky foil from wickes to mask my canopys. Only a suggestion. Cheers Kev.
-
My new toy. Anyone use one of these? Got it off evilbay. Any tips on use would be useful. It's an aztek a7778. I think. Cheers all Kevin.
-
Got a little bit of time tonight. So had a play with the side walls. Rlm 66 with some black ink wash picked out the wires in yellow and blue. Some drybrushing and a little rust dirt and scrapes etc. Sort of building from the front to the rear. Hope you like. Cheers all Kevin