


AndyE1976
-
Posts
79 -
Joined
-
Last visited
Content Type
Events
Profiles
Forums
Media Demo
Everything posted by AndyE1976
-
Didn't make the deadline for this group build, but still going on this one. Revell kindly moulded the date inside the fuselage, thankfully out of the way, but it was interesting to see that this was first released in 2011 - I remember building it back then using some left over Airfix starter paints, humbrol glue and the most basic of tools while staying at my parents house on a work trip. This time the fit didn't seem as good as I recalled and the wing to fuselage required a lot of filler. Got it all together and 'primed' with some XF-19 as a basis for the white and yellow to go on.
-
Finally finished the cockpit PE and got some paint on! Tamiya XF-63 for the interior and then an oil wash The rest of the aircraft is simple to put together and the fit is excellent. I think it's going to need some riveting though as it's just a bit plain.
-
Been working through the non-coloured PE ready for a coat of paint on the cockpit. Nearly there, but lots of tiny pieces. Eduard would have you attach ammo belts and guns at this stage, but they'll wait for later.
-
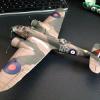
Bit late to join in this one, but hopefully I can get this completed in time! Will be done in the Catania scheme
-
Some pics of the dismantled 2-seater at Hendon as of Dec 22:
- 8 replies
-
- 10
-

-

-
Accuracy of AMMO by Mig Jiménez RAF WWII Colours
AndyE1976 replied to Nobby Clarke's topic in Aircraft WWII
I used their RAF desert camo set after trying decanting Tamiya spray cans and found them to be easy to spray straight from the bottle and accurate enough that my finished Spit looks right to my eyes. -
Trumpeter 1/32 AV-8B Harrier II Night Attack
AndyE1976 replied to logical's topic in Work in Progress - Aircraft
Nice! Very tempted by these large scale Harriers. -
Little more work on the cockpit getting it ready for painting: Also got the PE seat together, it's a little wider than the kit seat, but I think the detail is worth it.
-
While I was waiting for the post to arrive with the Eduard bits I printed off the manual to see which of the kit bits could be worked on without testing my Operation skills to put the PE parts in. Surprisingly few it turns out! Still the cockpit framing started to come together and expedited shipping meant the PE parts were here by the weekend. It wasn't long before Mr Dissolved Putty was out and filling in sink marks: This stuff has taken me a bit of time to get used to - it sinks a lot after application and seems to respond best to wet sanding. With the PE parts here I had to get on with the seat: It was at this point that I found out all my superglue had dried hard! Off to the store before more progress can be made!
- 2 replies
-
- 1
-
-
- sea hurricane
- airfix
- (and 1 more)
-
I'd like to submit my entry for the Hurricane group build... Starting with the Airfix Hurricane Mk1 (New Tool), adding Eduard PE details and some Model Alliance RN decals I'm aiming to build one of the Sea Hurricane Mk1's on the decal sheet - probably P3114 in the typical coastal command colours. This is where it all starts, the necessary box of bits: The decals are still on their way from Hannants, but here is the Eduard stuff: It looks like the kit includes all the parts to build a Mk 1 or Mk1A Sea Hurricane, i.e. without the arrestor hook for CAM duties and with the arrestor hook for MAC duties. It also has the tropical filter, so that should cover all but the mk 2 schemes on the Model Alliance sheet.
-
FW 190 Single Type GB Chat
AndyE1976 replied to AnonymousDFB1's topic in Fw.190 Single Type Group Build
I'd like in on this too. I have a Tamiya 1/48 A8 with Eduard stuff that I plan to build with the Alfred Bindseil markings. -
Thanks for the comments! Back to my 1/24 Typhoon now
-
Battle of Britain GB Gallery and Poll
AndyE1976 replied to AnonymousDFB1's topic in Battle of Britain Group Build III
Boulton-Paul Defiant P-SB, Airfix 1/72 from the Dogfight Double set.- 99 replies
-
- 25
-
-
I'm going to call this done. Even with the damage to the paint it doesn't look too bad IMHO.
-
Painting and decals were going pretty well until I came to weather it. Either I didn't get a good enough coat of gloss on the bottom or the new bottle of Microscale Gloss has a slightly different formula, but the MiG Productions thinner started to remove the paint! At this point in the build it's going to be tough to repair, it might have to stay as 'battle damage' It mainly affects the undersides, although there are a couple of areas on the leading edge.
-
Apologies for the lack of updates, it's been a busy few weeks. I've moved on to painting, starting with the black of the turret interior and prop. The prop needs to have a white nose and the rest black, which posed some masking problems. The solution - a pencil and some Tamiya tape to create an even circle that the propellor can sit in while painted black. Worked pretty well. Then on with the camo, pretty simple job and the tape didn't take any paint off this time. Couple more pieces before I can give it a gloss coat and some decals. Nearly done
-
This one seems to be flying together and I have to keep remembering to take pictures and post here! The plane is together now, the turret, undercarriage and propeller are built ready for painting and the prop has had a coat of white Tamiya XF-2. Masking was surprisingly difficult, especially on the turret, I think I've got it covered ok, but I guess I'll find out when it's painted. Next up is to splash some paint on it, but this weekend is way too busy for that to occur much before Monday unless I can sneak a few minutes during the day!
-
Now on with the Defiant! I started cutting bits off the sprues and before I knew it the interior was together and painted, I think this one is going to be a lot easier than the Dornier. So here is the interior. A good level of detail given that very little will be seen. And the wings: This morning I started bright and early thanks to calls with our off-shore development centre, so the fuselage is now together: I have a feeling that at some point today the wings will be attached along with the rest of the flying surfaces. Maybe ready for painting this evening at this rate, although some of the joins look like they could do with a bit of Mr Surfacer.
-
Cheers, got there in the end!
-
Battle of Britain GB Gallery and Poll
AndyE1976 replied to AnonymousDFB1's topic in Battle of Britain Group Build III
Airfix Do-17z 5K+AR. Build thread: http://www.britmodeller.com/forums/index.php?/topic/234987457-airfix-do-17z-defiant/?p=2081396- 99 replies
-
- 34
-
-
Thanks, this one has taken a bit more effort than I anticipated. From the twisted fuselage to the paint issues and the fit of those T-pieces on the nacelles it was starting to feel like hard work! I'm calling this done though, here's the final result:
-
After much masking and some re-painting when the tape removed paint it wasn't supposed to, the camo is done and the flaps and doors can start to go on. The Model Masters RLM65 didn't want to stay on and there were quite a few areas that needed a touch-up, even after 24hrs of drying. The Tamiya paint held up better, but wasn't perfect. Once all of these have dried properly then the engines can go on and then I'm on to varnishes, decals and washes. This part just seems to take so long, but the end justifies the time.
-
Got the masking done, but paint will have to wait until Monday as life intervenes
-
Look what showed up on the carpet this morning! No idea how I missed it for 5 days since it was right behind the chair I sit in all day for work!
-
It's slowly starting to take shape. There are plenty of seams to deal with, partly due to the twisted fuselage and partly my hamfisted assembly. Unfortunately I had to put stuff away on Thursday and when I got it back out again the middle brace across the bomb bay had disappeared. I may still have the bay open since you'd only notice it if you knew it was supposed to be there. Just a few more engine parts to clean up and the canopy to mask before painting starts again.